PHP bot source code for WhatsApp:
https://github.com/Whapi-Cloud/php-whatsapp-chatbot
We have prepared and posted a project that takes into account the basic functionality that a WhatsApp Bot needs: sending and receiving messages, sending images/files/documents/videos/goods, as well as creating a group and sending a message to a WhatsApp group.
Very often our customers ask for help just in developing these features and that’s why we decided to prepare the source code right away for an easy start.
The demo bot will react and respond to commands sent to it as regular WhatsApp messages to your number.
The project will allow you to adapt our code to your tasks and needs or take it as a basis for creating any other WhatsApp integration.
In the bot source code you will find the following functionality:
- Reply to an unfamiliar command, it can be an instruction or your welcome message;
- Send a normal message;
- Send an image;
- Send a file;
- Send a video;
- Send a contact (vCard);
- Send a product;
- Creating a new group, sending an invitation and sending a message to the group;
- Receive incoming messages;
You do NOT need to have your phone on or online for the bot to work.
You can learn about the features of our service and the powerful functionality of our WhatsApp API here:
Powerful features of our WhatsApp API

We have shown you that it is quite easy to develop a simple PHP bot using our Cloud API.
Now you need to download the project and replace the API-Token in the settings, which you can get by registering on our website: https://panel.whapi.cloud/register
And if you need help, just write to us in the support chat on any page of the site.
Getting Started: How to connect to Whapi.Cloud
The first step is to register on the Whapi.Cloud website and create an account. This is free and does not require you to enter credit card information. After registering, you will immediately get access to a test channel with a small limitation. Wait for it to launch (usually takes about a minute). To automate Whatsapp, you will need to connect your phone. It is from the connected phone that messages will be sent. The big advantage of the service is that it takes only a couple of minutes to launch and start working.
To connect your phone, use the QR code available when you go to the trial channel in your personal cabinet. Then open WhatsApp on your mobile device, go to Settings -> Connected devices -> Connect device -> Scan QR code.
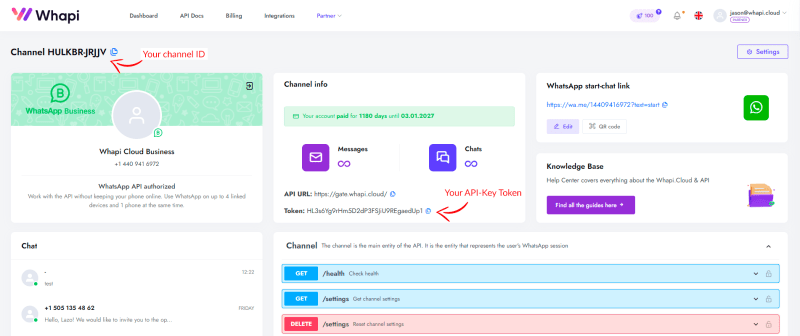
On the second and third steps, the service will offer you to customize the channel: write its name for convenience, set webhooks, change the settings. All these steps can be skipped, we will come back to webhooks a little later. After launching in the central block under the information about limits you will find your API KEY, i.e. Token. This token will be used to authenticate your API requests. It is usually added to request headers as a Bearer Token or simply as a request parameter, depending on the API method you are using.
Paste the token into /public/config.php in the “token” line
How to work with webhooks to receive incoming WhatsApp messages
In the channel settings, enable the events that are important for you to learn about (this can apply to messages, calls, dialogs, etc.).
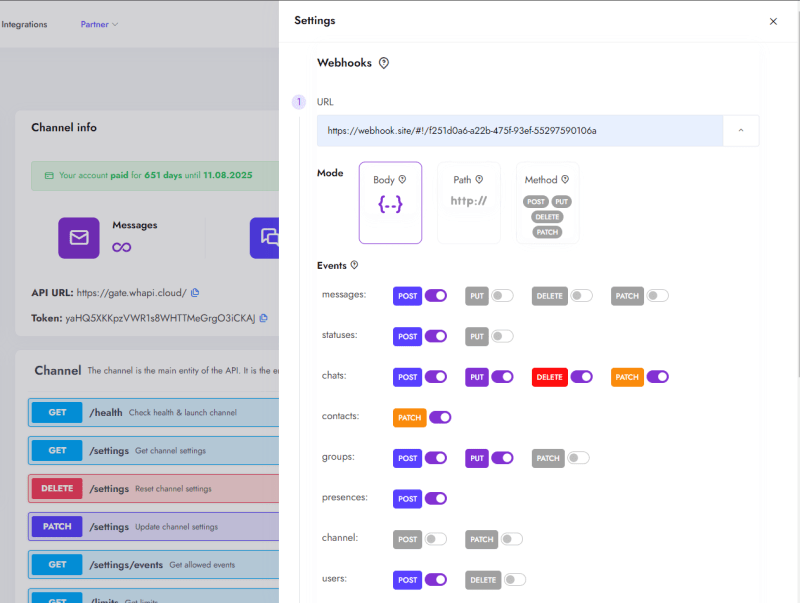
Then set up a link to the webhook. This URL should point to a file on your server that will handle incoming requests. For example webhook.php, which will expect incoming HTTP requests from the service.
When an event occurs, the service will send an HTTP request (usually POST) to this URL containing information about the event.
In the file itself, you read the incoming data (in JSON format) that contains the event information and programmatically respond to it.
This is an example of a webhook for an incoming text message:
{
  "messages": [
    {
      "id": "PrASmgj_7SvxVLU-gDwSiXIF.g", // id message
      "from_me": false, // this is an incoming message, otherwise true
      "type": "text", // type message
      "chat_id": "123456789@s.whatsapp.net",
      "timestamp": 1697532322,
      "source": "web", // "source": "mobile"
      "text": {
        "body": "Hello!"
      },
      "from_name": "John Doe"
    }
  ],
  "event": {
    "type": "messages",
    "event": "post"
  },
  "channel_id": "Your Channel ID"
}
It’s really simple! You can customize any number of hooks for different events.
We have written a detailed article about working with hooks, you can read it here
Have a great testing! If you have any questions, feel free to write :)

Top comments (2)
Thanks for sharing! This PHP WhatsApp bot repo looks like a great starting point for beginners—having message handling, media sending, and group management all built-in makes it easy to adapt for custom workflows.