Azure Cache for Redis provides us with a powerful in-memory data store that can be used for distributed data, session stores or even message brokering.

Azure provides us with it’s own implementation of Redis called Azure Cache for Redis. This is an in-memory data store that helps us improve the performance and scalability of our applications. We’re able to process a large amount of application requests by keeping the most frequently accessed data in our server memory so that it can be written to and read from quickly.
Azure Cache for Redis is a managed service and it provides secure Redis server instances with full Redis API compatibility. With Azure Redis Cache, we can use it for the following scenarios:
Caching our data
We wouldn’t want to load our database data directly into our cache. Instead, we could use the cache-aside pattern to load data into the cache when we need to. When our application makes changes to our data, it will also update the cache. We can also have an expiration time on our data to trigger a data update into the cache.
Caching our content
Say if we have a web application that uses a bunch of static content that don’t change often, we can use a in-memory cache to quickly access our static content which will be a lot quicker than retrieving that content from a datastore. This is great, because it will help our web application to be more responsive by reducing load times.
Storing our session
We can store user history data in our web application that are associated with user cookies. If we try and store too much data in a cookie, this can have an impact on the performance of our web application as the cookie grows. Instead of using this cookie to query data in our database, we can use Redis to associate the information with our user.
Messaging and Job queuing
We can also use Azure Cache for Redis as a distributed queue to process tasks in our application.
Distributed transactions
Finally, Azure Cache for Redis can be used to execute a batch of operations as a single transaction. This is great when we need to execute a series of commands as a single atomic operation.
Let’s go through setting up our own Redis cache and build a simple .NET Core application to work with the cache. If you want to follow along with this tutorial, you’ll need the following:
- An Azure Subscription
- Visual Studio 2019 (The community version is free!)
- AZ CLI
If you’re missing anything, click on the links to get setup. Once you’ve got everything, let’s login into our Azure subscription using the following AZ CLI command:
az login
Once you’ve logged in, let’s create a resource group that we’ll provision to our Redis Cache to. Once we’ve completed this tutorial, we can easily destroy our Redis cache by just destroying the resource group.
To create the resource group, run the following command (Pick a new name and a Azure location close to you. I’ve just included some values here to show you an example).
az group create --name "velidaRedis-rg" --location australiaeast
Once we’ve got a resource group set up, let’s create our cache. Run the following AZ CLI command to create our cache in our new resource group.
az redis create --location australiaeast --name velidaredis
--resource-group
velidaRedis-rg --sku Basic --vm-size c0
In this command, I’m creating my Redis cache instance in the Australia East region, using the Basic pricing tier and using a c0 for the size of our Redis Cache.
Azure Cache for Redis has the following pricing tiers:
Basic
- This is the tier with the fewest features and less throughput and higher latency.
- You should use this tier only for development or testing purposes.
- No SLA.
Standard
- This tier offers a two-node primary-secondary replicated Redis cache that is managed by Microsoft.
- This has a SLA of 99.9%.
Premium
- This is a enterprise grade Redis cluster managed by Microsoft.
- This tier offers the complete group of features with the highest throughput and lower latencies.
- Deployed on more powerful hardware.
- This has a SLA of 99.9%
If you want to review the options available to you when using the AZ CLI to create your Redis cache, check out the following documentation.
Back to our example, head into the Azure Portal and we should see our Redis cache set up and ready to go:

To connect to our new Redis instance, we’ll need to grab the primary connection string. This is straightforward.
- Go into your Azure Cache for Redis portal and click Access Keys in the navigation menu.
- Click on the copy to clipboard button for the Primary Connection string to copy the value we need to connect to our client. This is made up of both the host name of the cache, along with the primary key for the cache. Save this value for later as we will need it for our configuration file.

Now that we have our Azure Cache for Redis set up and have our connection string ready, we can start coding our .NET Core console application.
For this tutorial, I’m just going to be creating a basic .NET Console application. To create one, open up Visual Studio 2019 and create a new Console App (.NET Core) project.

Once your Console App is ready, you’ll need to install the following NuGet packages:
Microsoft.Extensions.Configuration
Microsoft.Extensions.Configuration.FileExtensions
Microsoft.Extensions.Configuration.Json
Microsoft.Extensions.DependencyInjection
Newtonsoft.Json
StackExchange.Redis
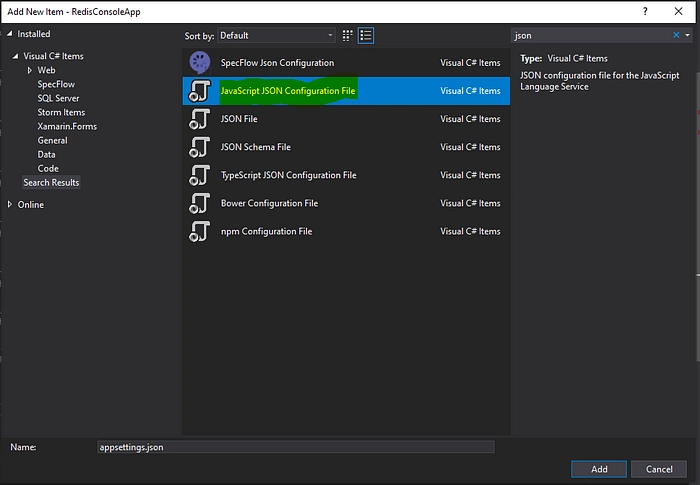
We’ll use a local appsettings.json file to store our connection string to our Redis Cache. To add our App Settings file, right click your solution file and select Add New Item. Enter json in the search bar and pick the JavaScript JSON Configuration file option and name the file appsettings.json
Replace the contents of your file with the following content (replace the value with the connection string that you retrieved from the portal earlier):
{
  "CacheConnection":  "<valuefromportal>"
}
We now have everything setup to write our application. Open the Program.cs file and write the following code:
Let’s go through the code:
In our CreateConfig() method, all we are telling our app to do is to load our appsettings.json file and build our Configuration using the values in that app settings file.
Once we have loaded our connection string into our application, we’ll need to connect to our Redis instance. This is done by using a ConnectionMutiplexer class.
private static Lazy<ConnectionMultiplexer> lazyConnection = new Lazy<ConnectionMultiplexer>(() =>
{
    string cacheConnection = _config["CacheConnection"];
    return ConnectionMultiplexer.Connect(cacheConnection);
});

public static ConnectionMultiplexer Connection
{
    get
    {
        return lazyConnection.Value;
    }
}
Once we’ve connected to our Redis cache in our code, we can start running commands against our instance. We can start by running a simple PING command against our instance like so:
string cacheCommand = "PING";
Console.WriteLine("Cache command: " + cacheCommand);
Console.WriteLine("Response: " + cache.Execute(cacheCommand).ToString());
The PING command in Redis is used to test if a connection to our instance is still alive. We can also use it to measure the latency between our client and our Redis instance. Since we’ve just provided the PING command with no other arguments, we get a PONG response from our Redis instance.

You can read more about the PING Command in the documentation here.
Let’s try an add a new message to the cache. We can do so by using the StringSet() method, like so:
cacheCommand = "SET Message \"Hello! I can get the cache working from this console app :)\"";
Console.WriteLine("Cache command: " + cacheCommand + " or StringGet()");
Console.WriteLine("Response: " + cache.StringSet("Message", "Hello! I can get the cache working from this console app :)").ToString());
If the command was executed successfully, we should see the following output:
![]()
The StringSet() method just implements the SET command in Redis. This command sets the key to hold a specific string value. If this key already has a value, this command will overwrite the value.
We can now retrieve the message from the cache using the StringGet() method, like so:
cacheCommand = "GET Message";
Console.WriteLine("Cache command: " + cacheCommand + " or StringGet()");
Console.WriteLine("Response: " + cache.StringGet("Message").ToString());
If the command was executed successfully, we should see the following output:

Here, the StringGet() method uses the GET command in Redis to get the value of the key. Our key here is Message, so we are retrieving the value associated with the key, which is our Hello message.
We can also list the amount of clients connected to our Redis instance by executing the CLIENT LIST command. This returns information about the clients that are connected to our Redis instance, including information like the IP address of the client, total duration of the connection in seconds etc.
The CLIENT LIST command should produce the following output:

We can also work with Objects in our Redis Cache. Examine the following code snippet:
ToDoItem toDoItem = new ToDoItem("1", "This is a new incoming item!", DateTime.UtcNow);
Console.WriteLine("Response: " + cache.StringSet("1", JsonConvert.SerializeObject(toDoItem)));

ToDoItem itemFromCache = JsonConvert.DeserializeObject<ToDoItem>(cache.StringGet("1"));
Console.WriteLine("Item Id: " + itemFromCache.Id);
Console.WriteLine("Item Description: " + itemFromCache.Description);
Console.WriteLine("Item Created: " + itemFromCache.ItemCreated);
Here, we are creating a new ToDoItem and using the StringSet() method to add it to the cache. We then use the StringGet() method passing in the Id of the TodoItem to retrieve that item from the cache and then print out the properties of that item.
Once we’ve executed our StringSet() method, we should get the following response if the item was successfully added.

Once the item has been retrieved, we should see the following output of the item that was retrieved from the cache.

In Azure Cache for Redis, we can work with primitive and .NET objects. We have to serialize the object ourselves, which provides us with the flexibility of choosing how we serialize those objects depending on the needs of our application.
Let’s clean up our resources. I’ve deployed my Redis instance into it’s own separate resource group, so all we have to do is delete the resource group using the following AZ CLI command.
az group delete --name velidaRedis-rg
In this blog post, we discussed what Azure Cache for Redis is, how we can create a Redis instance using AZ CLI commands and how we can build a simple .NET Core application to work with our cache.
If you have any questions, let me know either in the comments or reach out to me on Twitter.
If you want to learn more about Azure Cache for Redis, check out the following articles:

Top comments (0)