
In my last Kubernetes article, I talked about Pods, what their purpose is, how we can create them and deploy them using kubectl.
This article will move onto Deployments. In this post, we'll cover:
- What Deployments are in Kubernetes
- How we can create Deployment Objects in Kubernetes
- How can we use kubectl to manage our Deployments?
- Deployment Strategies
Let's dive into Kubernetes Deployments!
What Deployments are in Kubernetes
Deployments tells Kubernetes how to create and update our application instances. They provides a layer of functionality around Pods and allows you to describe a desired state. They are a high-level abstraction that controls how we deploy and maintain a set of Pods.
Under the hood, Deployments create a ReplicaSets which will in turn create the Pods that we request as part of our Deployment. Deployments will also provide us with ways to deploy, update and scale Pods running within a cluster.
ReplicaSets are just another object in Kubernetes that maintain a stable set of Pods running in our Kubernetes cluster at any given time. When we update our Deployments, new ReplicaSets will be created that contain the updated Pods and by default, Kubernetes will roll these updates out to the new version, essentially starting a few pods with the updated version and if they are running correctly, it will terminate the old Pods until only your newer version of your Pods are running.
This Diagram below explains the relationship between Deployments, ReplicaSets and Pods:

How we can create Deployment Objects in Kubernetes
We can define our Kubernetes Deployment Objects using YAML. Let's take a look at an example Deployment YAML file:
apiVersion: apps/v1
kind: Deployment
metadata:
  name: myapp-deployment
  labels:
    tier: frontend
    app: nginx
spec:
  selector:
    matchLabels:
      app: myapp
  replicas: 3
  template:
      metadata:
      name: nginx
      labels:
        app: myapp
      spec:
      containers:
      - name: nginx
        image: nginx
Let's break this file definition down! To create Deployment Objects in Kubernetes using YAML, we need the following fields.
apiVersion - This defines the Kubernetes API version that we want to use in our YAML file. For Deployment Objects, we use the apps/v1 apiVersion.
kind - This defines what kind of Kubernetes Object that we want to create. For Deployments, we use the kind Deployment (simple enough right?)
metadata - This is data that helps us uniquely identify the object that we want to create. Here we can provide a name for our app, as well as apply labels to our Deployment.
spec - This defines the state that we want or our object.
Within our spec definition, we need to specify the desired behavior of our Deployment. So in this file, I'm using the following attributes:
selector - Within our selector, I'm using the matchLabels attribute. In Deployments, we use this as a label selector for the pods. Essentially, the Pods that are managed by the existing ReplicaSet will be the Pods that are affected by our Deployment. So in order for this Deployment object to apply to those Pods, we must use the pod's template labels in our Deployment definition.
template - This describes the pods that will be created. So in our file, we are creating a Pod called myapp using the nginx image for our container.
replicas - This states the number of desired Pods.
How can we use kubectl to manage our Deployments?
We can use kubectl to perform a variety of different operations on our Kubernetes Deployment Objects. Let's start with creating a Deployment. We can do so by using the following command:
kubectl apply -f ourdeployment.yaml
We can also create a deployment like so:
kubectl create -f ourdeployment.yaml
To see if our deployments were created, we can run the following command:
kubectl get deployments
Using our deployment defined above, we would see something like this:
NAME              READY     UP-TO-DATE   AVAILABLE   AGE
myapp-deployment  0/3       0            0           1s
Here's what the following fields mean:
NAME - This column shows the names of the Deployments in our Kubernetes namespace.
READY - This displays how many replicas of our application are ready for our users. In this output, 0 means that there are zero replicas ready and 3 means that we want 3 replicas to be ready.
UP-TO-DATE - This shows how many replicas have been updated to achieve our desired state.
AVAILABLE - This shows are many replicas are available to our users.
AGE - This shows how long the app has been running.
We can track the status of our deployment by running the following command:
kubectl rollout status <name-of-deployment>
We can see the history of a rollout by running this command:
kubectl rollout history <name-of-deployment>
We can also rollback a particular deployment by running this command:
kubectl rollout undo <name-of-deployment>
To scale our Kubernetes Deployments, we can run the following command:
kubectl scale <name-of-deployment> --replicas=10
The --replicas parameter states how many replicas we want to scale to. So in this example, we would scale our deployment from 3 replicas as defined in our YAML file to 10 replicas. We can also scale our deployment down if we so choose.
If we have horizontal Pod autoscaling enabled in our kubernetes cluster, we can define how the minimum and maximum number of Pods that we want to run based on CPU utilization. So for example, we could run this command:
kubectl autoscale deployment --min=3 --max=10 --cpu-percent=70
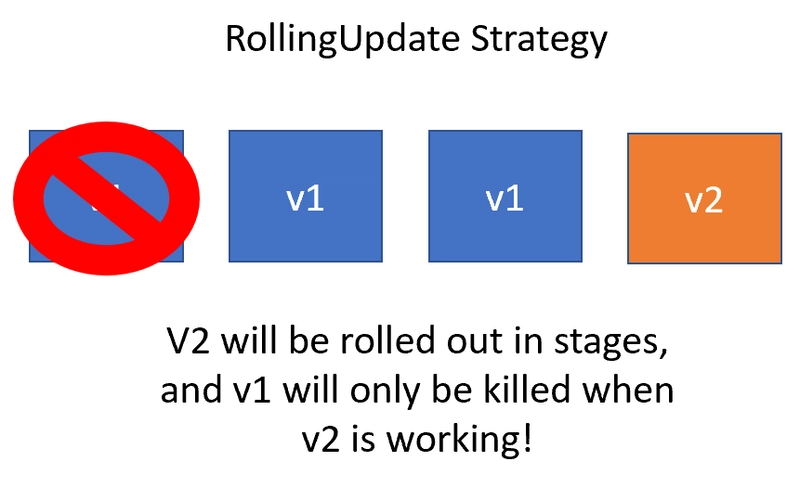
Deployment Strategies
In our Kubernetes Deployments, we can choose the following strategies to replace our old Pods with the new ones that we define as part of our Deployment. This can be one of two types:
Recreate - This will kill all of your existing Pods before creating the new Pods that you have defined in your Deployment. This will cause application downtime!.

RollingUpdate - In this strategy, updates will roll out, meaning that Pods will be rolled out and the old Pods will only be killed off if the new version of your Pods are working. We can define how many Pods will be unavailable and how many Pods will be created as part of the RollingUpdate. This type of Deployment strategy is the default in Kubernetes.
Conclusion
Hopefully this article has helped you understand the basics of Deployments in Kubernetes!
If you want to learn more about Deployments in Kubernetes, I used these resources to get my head around them, so hopefully they help you too!
Happy Coding 💻👩💻👨💻

Top comments (0)