
Git is known as a free and open source version control system. It is used by many developers to speed up and coordinate their work with ease and offers many ways to accomplish this. There are different ways and approaches how people use Git. In this post, I will try to show a simple yet effective way of using Git for your own projects or if you want to make OSS contributions.
Forking the project
The first step is to create a fork (copy) of the project you want to work on. This way you can work on your own copy and don't need to worry about making mistakes on the main repository. Go to the Github page of the project you want to work on and click the Fork button on the top right side.

You have successfully created a fork of the main project. Your fork is now located at:
https://github.com/<your_github_username>/<your_project_name>
Cloning the repository
After forking the project, the next thing to do is to clone your fork (copy) into your local machine. In your terminal type:
git clone <url_of_your_cloned_repo>.git
The URL of your cloned repo looks like this:
https://github.com/<your_github_username>/<your_project_name>
After cloning the project to your local machine, you can access your project folder:
cd <your_project_name>
and check the current branch you are on:
git branch
By default you will be on master branch, which is the main branch of the project. You should never make changes to the master branch and only use it for updating your current project with the latest version from the main repository (more on that later).
Starting your work
Now you want to start working on the project, so what should you do?
The first thing is to create a new branch from your master branch. This way, you are logically separating your new work from the current (master) version of the project and you will avoid having possible merge problems with the master branch later on.
You create a new branch like this:
git checkout -b <name_of_your_working_branch>
This will create a new branch from your current (in this case master) branch. It is basically a copy of your master branch now.
Adding a remote repository
Imagine you start working on your new branch and someone updates the main repository (from where you forked your project). This could lead to problems:
Someone else already finished work you wanted to do or changed files that you were about to change. This will lead to conflicts, you can eventually resolve them but it's easier not to get to this point because making a mistake while resolving a conflict could break the entire application.
Someone else updated a gem version or even a new version of the application that makes your changes obsolete.
These are just 2 problems that could occur if you don't update your repository regularly. The first thing you need to do is to add a remote repository:
git remote add <name_of_remote> <url_of_the_main_repository>.git
The name of the remote can be any name that is not already added as a remote. When you clone your project, your forked repository is added by default as origin, you can check this with:
git remote -v
The result should look something like this:
  origin    https://github.com/<your_github_username>/<your_project_name> (fetch)
  origin    https://github.com/<your_github_username>/<your_project_name> (push)
Usually the name of the main repository that is used is upstream. So after entering the above git remote add command with upstream as the remote name, checking your remotes as before will give you a new result:
  origin    https://github.com/<your_github_username>/<your_project_name> (fetch)
  origin    https://github.com/<your_github_username>/<your_project_name> (push)
  upstream  https://github.com/<the_original_repository>/<your_project_name> (fetch)
  upstream  https://github.com/<the_original_repository>/<your_project_name> (push)
Now you have your forked (origin) and the main (upstream) repositories added, so you can start doing some work.
Saving changes
After you have done some work, you can check all the files that have changed with:
git status
The first step in the process of pushing your changes is to add all the files for commit:
git add -A
or
git add .
The difference between these 2 is that the -A option adds all changes to the staging state (for commit). The dot (.) option adds all but the removed files.
Next, after you have added all the files you can commit them. Commiting means saving your changes to your local repository. You can do it in different ways:
git commit
This will open a text editor where you can add a commit title and description of your changes.
git commit -m "<your_commit_message>"
This way you can add the commit details in the same line, without having to enter them in your text editor.
Merging or rebasing changes
Before you go on and push your newly created commit to your local repository on Github, this is the best moment to sync your repository with the main repository. First you need to change back to your master branch, because as stated earlier, we use it for updating our project to the latest version (commit).
git checkout master
Now you have switched to your master branch and need to update it with the latest version of the main repository. For this, you can use the fetch command:
git fetch upstream master
or the pull command:
git pull upstream master
The difference here is that the fetch command fetches the changes from the upstream repository but does not apply them to your local repository. You need to run the merge or rebase command next (explained in the next section).
The pull command does both, it fetches the changes and applies (merges) the changes to your local repository.
Important to notice is the third parameter (upstream) is the name of the remote repository that you fetch (pull) from. Since we need to sync our local repository with the main repository, we choose upstream. The next step is to switch back to the branch you were working on:
git checkout <name_of_your_working_branch>
What's left is to apply the new changes from your master branch (that we previously synced with the latest version of the main repository) with your current working branch. There are 2 ways of doing this.
Merging
git merge master
The first way is merging your commit with all commits from the main repository, which will create a new merge commit.
As you can see, C4 is the commit you just created, C3 is a new commit in the main repository. By doing the merge command, you create a new merge commit (C5) that consists of commits C3 and C4.
Rebasing
git rebase master
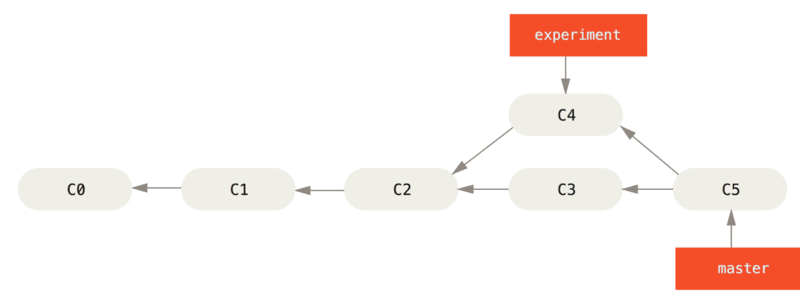
The second way is rebasing your commit with all commits from the main repository, which will not create a new merge commit as with merging but will leave the number of commits the same (all commits from the main repository + your new commit). The next image shows how it looks:

C4 is the commit you just created, C3 is a new commit in the main repository. Your commit is being applied to the new change from the main repository (commit C3).
The question is - which one to use? It is recommended to use rebase if you are working alone on a project because you can make your commit history cleaner. If you are working on a project with other people it may lead to inconsistency if you use rebase, with merge you always preserve the commit history. Ultimately, it comes down to personal preference or how the project maintainer wishes to see the project.
Pushing changes
Now that you have successfully merged or rebased your commit with the changes from the main repository, you can finally push your changes to your repository on Github. Remember that our forked remote repository is named origin, so the command to push your changes is:
git push origin <name_of_your_working_branch>
You have successfully pushed your changes to your forked remote repository on Github.
The last step is to create a new Pull Request to the main remote repository, to apply your work. For that, you need to go to your forked repository on Github:
https://github.com/<your_github_username>/<your_project_name>
There you will get a new message that looks like this:

Clicking the Compare and pull request button opens a new prompt where you have to choose your repository (head repository) and the main repository branch (base repository) and the respective branches (in this case "name_of_your_working_branch" for the head repository and "master" for the base repository). The next image shows an example:

You can edit your Pull Request title and description if you want to. After you are satisfied, you only have to click Create pull request to create the pull request.

After creating the pull request, the maintainer of the project will make a review of your code and decide whether it's ok to merge or if you need to make changes.
Summary
In this post I explained how to start working with Git, the process of preparing your repository, adding changes, pushing them to Github and creating pull requests. You should have a better understanding of how to work with Git and hopefully it will improve your coding experience.

Top comments (3)
Back to the Basics...Must read piece of content for every baby developer.
Thank you for this extremly good article! I have some starters experience in Git, but this here filled all the gaps in my knowledge.
I am glad I could help, thank you.