
Showing extra information to users on the WooCommerce shop page allows them to make decisions early on in the shopping experience, it could be specific to a product or about the delivery times.
Overview
We all know how frustrating it is when you’re shopping online, you add items to your cart and on the last step you see it’ll only arrive in 14 days. So only then do you find out that the product you wanted to buy will arrive much later. Terrible user experience really.
The WooCommerce fields
Custom fields are a great way to store extra data about a product (which is technically a post, just a different type) but let’s take a look at what is already shown about the product on the shop page.
Each product has a title, description, short description, product image, gallery images, categories and tags and of course the all important product price, shipping weights and dimensions and shipping class. We’ll call this the default product information as it’s commonly known.
From this default product info, the only fields shown on the shop page is the product image, title with link and price. Of course this may vary slightly from theme to theme.
Helpful Product information
In our example we’ll create an ACF Text field for the products and then display that field value on the shop landing page.
The information that’s most relevant in our case is delivery times, some products have the same standard delivery time of 5–7 work days and some products have a much longer delivery time of up to 14 work days, so we want to show this to the user on the shop page.
ACF fields for Woo product(s)
If you’d like to follow the steps and show your own ACF fields on your shop page then before you continue, please install the Advanced Custom Fields (ACF) free plugin, as well as the WooCommerceplugin, which also need to be active on your site.
Visit the ‘Custom Fields’ tab in the WordPress backend, then Click on ‘Add New’ to add a new Field Group.
You’re now presented with the ‘Add New Field Group’ screen where you can add fields. Use the ‘Add Field’ button to add a field, select “Text” for Field Type. Enter a Field Label, in my case I’ll add “Delivery time”. Now click on “close field” or simply scroll to Settings and in the ‘Location Rules’, select Post Type is equal to Product. Click on “Save Changes” to save and publish your field group.
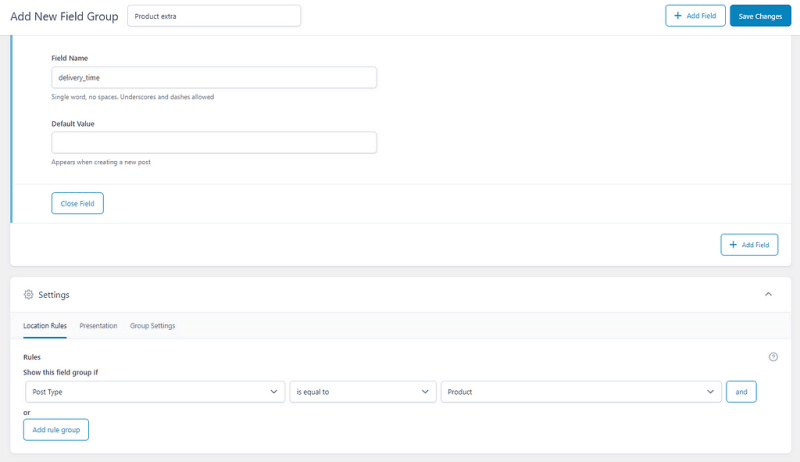
Create an ACF text field to store delivery time information on shop landing page.
That’s it, you’ve created the ACF text field, located it to a product post type, ready to be filled and displayed in some way.
Now visit the product items in the backend and edit each product and fill the text field with text. In my case I’ll insert “Ships in 5–7 work days” for all products and “Ships in 14 work days” for some.
Display ACF field with coding
Unfortunately WooCommerce doesn’t come out with a way to display the field values to users. There are however two ways to solve this and both work well, although it may be a little tricky for new users.
Let’s dig in.
You’ll need to edit the template file that contains the product loop which fortunately comes packaged with the WooCommerce plugin.
Pro tip: It’s often very complex to try and pinpoint which template file or part a product or page is using, so we can recommend the What The File plugin, as it really helps with that.
But not to worry, I’ll show you where and how to do it.
Connect to your server via FTP and go to the wp-content/plugins/woocommerce/templates folder, look for a file called content-product.php and copy it to your local disk for uploading in a minute.
Open the content-product.php file in a text editor and add this snippet below, to line 50.
<?php
$value = get_field('YOUR_FIELD_NAME_HERE');
echo $value;
Replace the above YOUR_FIELD_NAME_HERE with your field name. Save the file and upload it to your theme located at /wp-content/themes/YOUR-THEME/woocommerce/templates/*
As you can see the code method is quite time consuming and often takes even longer when it’s a different field type.
Display ACF field with plugin
If you’re not comfortable with writing PHP and you’d like to spare yourself some headaches in future then often a solution is to find a plugin that will do the heavy lifting for you.
For this we recommend using the ACF Views plugin as it generates the necessary markup and provides a shortcode to display the ACF field values, so please download and install the ACF Views plugin and remember to activate it. (Note: if you’re planning on using a repeater field type, then you’d need to purchase the ACF Views PRO plugin.)
Go to your WordPress backend and click on the ACF Views tab. Click ‘Add New’ to add a new View. Give your View a title and short description, so you can easily find it later.
Now add your fields in the ‘Fields’ section, choose your Group, select the field group that you created earlier, then select the field, in my case it’s “delivery time”, I’ve also entered a field label of “Ships in” as then I would only need to add the trailing info, i.e. 5–7 work days.
Pro tip: switch to Advanced tab in the field row and add a ‘Default Value’, I’ve added “5–7 work days” which applies to all products then you won’t need to add the text for every product, only the exceptions to the standard delivery time, remember to switch on “Show When Empty”.

Assigning ACF fields within a View to display them.
Finally, click “Publish” to save and publish your View. In the right panel take note of your view-id, we’ll use it in a minute.
Connect to your server via FTP and go to the wp-content/plugins/woocommerce/templates folder, look for a file called content-product.php and copy it to your local disk. Now go to your theme folder located at /wp-content/themes/YOUR-THEME/ and create a folder “woocommerce” and inside create another folder “templates” and upload your content-product.php template there.
In your WordPress admin backend, visit Appearance > Theme File Editor and navigate to /YOUR-THEME/woocommerce/templates/content-product.php to view it for editing, or keep using the FTP connection from earlier, whichever you prefer.
Let’s modify the shortcode so it’ll pull the ID of the current page;
Copy this code and replace the view-id with your View ID but keep %s for object-id as it's this that will ensure the current product id is referenced not the page on which all the products are shown.
$shortcode = sprintf('[acf_views view-id="3514" object-id="%s" name="delivery times on products"]', $post->ID);
echo do_shortcode($shortcode );
Paste your shortcode on line 50 of the file content-product.php file. Click “Update file” button to save.
View your shop landing page to see the result.
ACF text field now visible to users.
Note: if you don’t see the Text from your ACF field on the frontend, then go back to edit your View and in the field row switch to ‘advanced’ tab and insert “Default Value”, switch on “Display When Empty” or edit a product and fill the ACF field.
You can style the output by using CSS, to do this you need to edit your View and switch to the “Advanced” tab in ‘View settings’ and paste or write the CSS in the CSS code field. In my case I’ve defined display: flex; to show my field and its label on one line, and added right padding to the field label. The great thing about using the CSS code field is that it'll only load the CSS of the View on which it's displayed. Nice huh!?
Final thoughts
Today you’ve learnt how to display an ACF text field on a WooCommerce shop page, which is specific to each product. There was the code method and the plugin method, of which the plugin method offers a quicker solution without PHP coding.
We hope you’ve found the article useful and that you’re empowered to try other ideas and more complex solutions. Make your shop page better by displaying relevant information about the product to users.

Top comments (0)