
Django is a high-level Python web framework that encourages rapid development and clean, pragmatic design. One of the most exciting things about Django is how fast and relatively easy it is to start creating cool projects with some basic knowledge of python.
Today we are going to be converting a small website using HTML, CSS, and Javascript into a Django project
This article assumes some basic python and Django knowledge and that you already have python and Django installed. Along the line, as we build, we are going to learn the following. How to:
1) create a new Django project
2) create a new Django app
3) use Django templates to render HTML files
4) render static files: images, CSS, and javascript
5) The Model View Template(MVT) pattern of Django
The first thing we are going to do is to create a virtual environment. This ensures that all files and imported modules in our projects are kept safe and free of interaction from our other projects. I am using anaconda which is a free and open-source distribution of the Python so I will be using it to create my virtual environment which will be named "date_app". Also, the name of my current directory is 'date site Django'.
Let's begin...To create a virtual environment, type:
conda create date_app --name django
type 'y' to the prompt and then activate the virtual environment with:
conda activate date_app
you should get this response. Notice the name of our virtual environment in parenthesis indicating that it has been activated.
(date_app) mac@Yahaya-Kehinde-macbook date site django %
Now let's create our first project. A Django project is like a parent directory within which all our apps sit. We are naming our project "date_project"
django-admin startproject date_project
This will create a new folder within our current directory with the name "date_project". Within this is another folder of the same name "date_project" and a "manage.py" file which we are going to be seeing a lot of down the line.

Within the inner date_project folder, you should have the following files
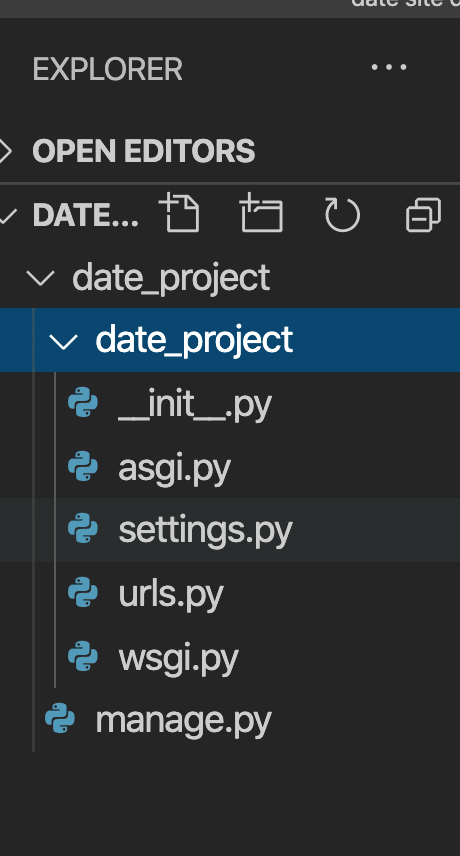
Each file within here has a very specific function as we will later learn as we go along. However, the most important ones to us now are the "settings.py" and the urls.py"
The next thing we are going to do is the change directory into the first "date_project" folder because this is where we are going to creating our first app. Use this command
cd date_project
To confirm that you are in the correct directory, type
ls
This should bring out two files, "date_project" and "manage.py"
Now let's create our first app which we will name "date_app" with the following command:
python manage.py startapp date_app
Your file structure should look this way now:

Your date_app should contain the following files

Congratulations we have now learned how to do two things. We have created our first Django project and our first Django app.
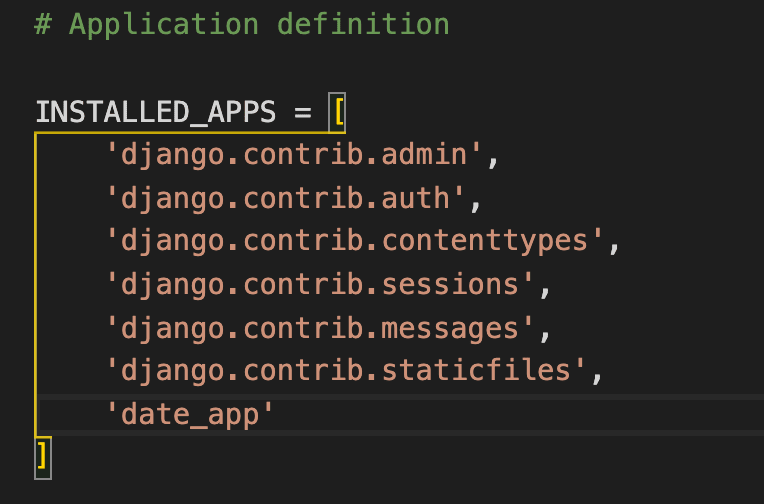
Next, we need to inform Django that we have created a new app. Go to the settings.py file and under INSTALLED APPS, add the name of our new app. See the screenshot below:
Next, we are going to go to create our own "urls.py" file within the date_app. This will be used to map all our views later on. We are creating a new urls.py in order to keep our original urls.py clean and neat. However, we are going to link them.
Go to the date_app folder and create the file:

Now go to the date_project's main "urls.py" file add link it to the newly created urls.py in our date_app.
We add two lines: First, type:
from django.urls import include, path
then within the urlpatterns. we add
path('', date_app.urls)
This is our final file structure
from django.contrib import admin
from django.urls import path
from django.urls import include, path

urlpatterns = [
    path('admin/', admin.site.urls),
    path('', include('date_app.urls')),
]
We are leaving the first argument of our path empty to represent our home page.
Now we will go to our newly created urls.py file in our date_app and add the following
from date_app import views
from django.urls import path

urlpatterns = [
    path('', views.index, name = 'index' )
]
We have now linked them and now we need to create our view. This is where the actual logic of our code occurs. For now let's render a simple hello world to our page.
Go to "views.py" and add the following:
from django.shortcuts import render
from django.http import HttpResponse

# Create your views here.
def index (request):
    return HttpResponse('Hello world')
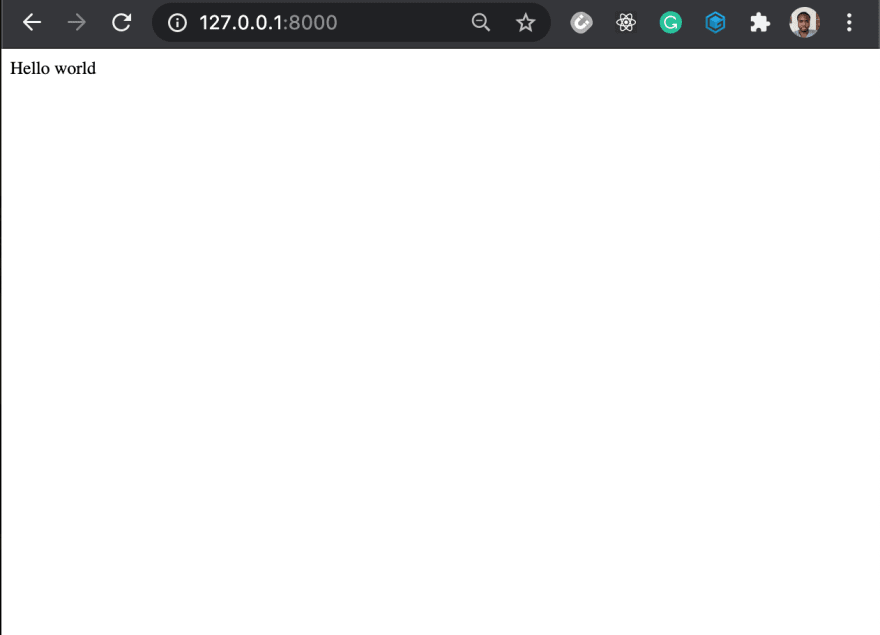
Finally, run the server to see your view displayed
python manage.py runserver
Copy the URL and paste it in your browser.

Congratulations, we have created our first Hello world

Top comments (2)
Thank you for this, Kenny. I've just started looking into Django so this is very helpful!
Hi Chris, you are welcome. I’m also just starting django so I thought to write about my learning process. Thanks for reading ☺️