First things first, stating the not-so-obvious: Adding ReasonML to an existing JavaScript application is extremely easy! In fact, it's not that more difficult than adding Flow. So if you've heard about ReasonML and are curious about trying it out, but not sure how to integrate it into an existing codebase — good news — you can be up-and-running within 10 minutes 😃
This is going to be a miniseries about adding ReasonML to an existing codebase. In this part, we're going to look at the basics, by using an example with a vanilla JavaScript setup with webpack:
- writing code in ReasonML
- calling it from JavaScript
- using ReasonML types as JavaScript records (via genType)
In Part 2 we are going to look at how to add some API-calling-and-decoding functions written in ReasonML to a Vue.js application. And in Part 3 we're going to use the same API caller in a React TypeScript application. So let's get started.
Step 0: Starting point
The starting point is an (almost) empty application created by following the Getting Started section from the webpack guide. The index.js file looks like this:
function component() {
  const element = document.createElement("div");

  element.innerHTML = `Placeholder content`;

  return element;
}

document.body.appendChild(component());
We have 2 scripts in package.json:
"scripts": {
  "build": "webpack",
  "start": "webpack-dev-server --open"
}
Step 1: Adding BuckleScript
BuckleScript is used for compiling ReasonML or OCaml code to JavaScript, while genType is going to simplify interop between Reason and JS:
npm install --save-dev bs-platform gentype
In order to make it work, we simply need to run bsb -make-world, which will transpile our ReasonML code to JavaScript first. After that the generated *.bs.js files are going to get picked up by webpack and treated the same way as "normal" JavaScript code. Let's add the bsb -make-world command to the build and start scripts in package.json:
"scripts": {
  "build": "bsb -make-world && webpack",
  "start": "bsb -make-world && webpack-dev-server --open"
}
The last thing left before we can start writing code is to add bsconfig.json:
{
  "name": "reason-in-javascript",
  "sources": [
    {
      "dir": "src",
      "subdirs": true
    }
  ],
  "package-specs": [
    {
      "module": "es6-global",
      "in-source": true
    }
  ],
  "suffix": ".bs.js",
  "namespace": true,
  "refmt": 3
}
Note: If you're using VS Code with the reason-language-server extension, the IDE watches the folders and transpiles Reason and OCaml files on the fly. Otherwise, we would have to run a watcher-process in a terminal window in the background. In this case we would need to install bs-platform globally: npm install -g bs-platform.
Step 2: Calling a ReasonML function from JavaScript
Now it's time to create a TestFunctions.re file so that we can test our setup:
let reasonSum = (a, b) => a + b;
The easiest way to make sure this is transpiled to JavaScript during development is to run bsb -make-world -w in a terminal in the background. The -w flag makes sure bucklescript watches for changes in the folders specified in the sources section in bsconfig.json. As mentioned earlier, VS Code with the reason-language-server, would handle this automatically and everything would work smoothly even without a background-watcher-terminal. A TestFunctions.bs.js file will immediately get generated next to the .re file:
function reasonSum(a, b) {
  return (a + b) | 0;
}
The generated code is simple enough, so let's import the reasonSum function in index.js and call it:
import { reasonSum } from "./TestFunctions.bs";

function component() {
  const element = document.createElement("div");
  element.innerHTML = `The result is ${reasonSum(1, 2)}`;

  return element;
}

document.body.appendChild(component());
Sure enough — we can now run npm start and see the text: "The result is 3" in the browser. If we change the Reason code to a + b + 1; and save, the text in the browser would get updated to "The result is 4" on the fly. This means that the code written in ReasonML is now succesfully transpiled, picked up, and run in our JavaScript codebase!
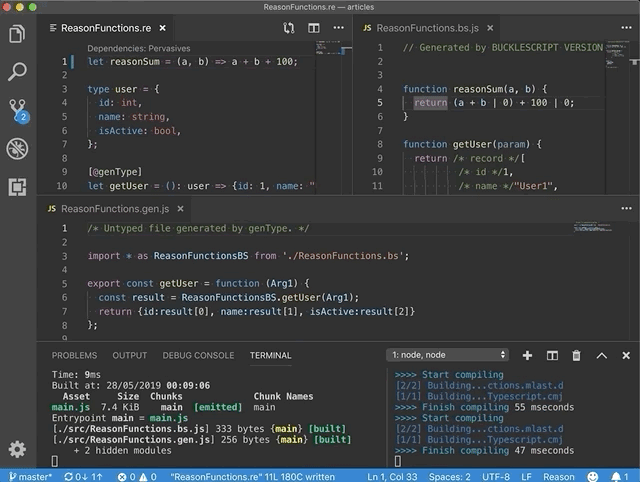
Step 3: Returning a record from ReasonML
How about returning an object from ReasonML? Let's try this with a simple user object:
type user = {
  id: int,
  name: string,
  isActive: bool,
};

let getUser = (): user =>
  {id: 1, name: "Bob", isActive: true};
The generated JavaScript code looks a bit suspicious, since Reason objects get compiled to JavaScript arrays:
function getUser(param) {
  return /* record */[
          /* id */1,
          /* name */"User1",
          /* isActive */true
        ];
}
If we try calling this "as-is" from our index.js, we would not get what we're expecting:
const user = getUser();
console.log("User: ", user);
// console output shows an array, rather than a JSON object:
User: Array(3)
        0: 1
        1: "User1"
        2: true
This is where genType comes in. It can generate types for TypeScript and Flow, as well as "glue-functions" between ReasonML and JavaScript. More about how it works.
Since genType is now supported "out-of-the-box" with BuckleScript 5, all we have to do is to add a gentypeconfig section to bsconfig.json:
"gentypeconfig": {
  "language": "untyped"
}
Now adding a [@genType] annotation to getUser would produce a new ReasonFunctions.gen.js file next to ours:
/* ReasonFunctions.re */

[@genType]
let getUser = (): user =>
  {id: 1, name: "User1", isActive: true};
/* ReasonFunctions.gen.js */

import * as ReasonFunctionsBS from "./ReasonFunctions.bs";

export const getUser = function(Arg1) {
  const result = ReasonFunctionsBS.getUser(Arg1);
  return { id: result[0], name: result[1], isActive: result[2] };
};
Now before calling this from JavaScript, we need to make sure we import getUser from ReasonFunctions.gen, and NOT from ReasonFunctions.bs:
import { getUser } from "./ReasonFunctions.gen";

const user = getUser();
console.log("User: ", user);
const userGreeting = `Hello, ${user.name}!`;
alert(userGreeting);
Now this code produces a pleasant "greeting" message, as well as an expected log in the console:
User: Object
        id: 1
        isActive: true
        name: "User1"
Summary
This is the first article in this miniseries, which demonstrates (on a relatively low-level) the basics of what happens to code written in ReasonML and how it ends up in a JavaScript codebase. The source code is available on GitHub.
The followup articles will show more practical examples of how to use this approach for including Reason code in an existing Vue.js application, as well as a React TypeScript application, without losing type information along the way.

Top comments (0)