I wanted to share what I’ve learned in the hopes of saving keyboards around the world from abuse.
Setting Up PayPal
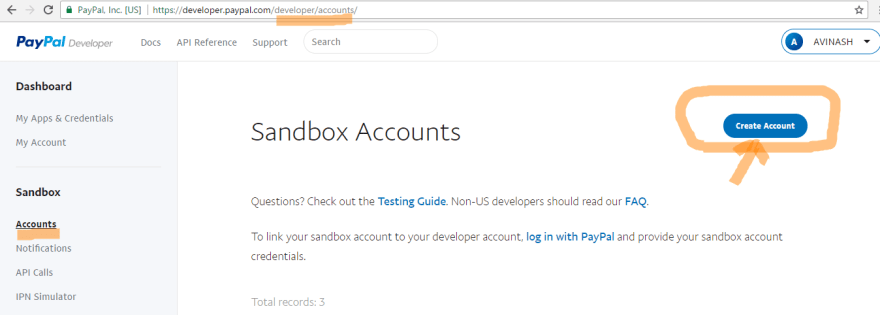
1.The first thing you need to do is set up your PayPal business account and get a sandbox setup, which is a little more confusing than it should be. After you make an account,
2.you need to create a sandbox buyer and seller account to make test transactions.
You also need to make a sandbox app, which will give you an API key and secret, which you should store wherever you like to store your dev configs (.env for Laravel usually)
Making Payments Work
PayPal like almost all payments providers does the great service of handling all the scary personal information of customers for you, and in exchange you have to do alot of back-and-forth with their API to get the info you need. To complete a basic payment it usually goes like this:
1.A fantastic customer clicks a button to buy something on your website
2.PayPal’s client-side JS library then sends a request to some endpoint on your server you have defined which will tell PayPal what they are buying.
3.Your server lets PayPal know a request to buy your great product has occurred, and you ask PayPal for a payment object generated based on what they are buying.
4.You send that payment id back to the user, who then sends it to PayPal’s server which to give the user the chance to affirm what they are buying or realize you lied about the price and then run away.
5.If they agree to the payment, the client-side PayPal will ask PayPal’s server for a payer object.
6.The payer and payment are then sent to your server, where you execute the payment, and do anything else you want to do (like make a record in your database to record it).
Getting a PayPal Button lets work on front-end Vue js
The first thing you need is the ability for a user to actually buy things, and that starts with a PayPal button. I’d very strongly suggest just going with PayPal’s Express Checkout to start. You can read how to get the button to render on a page here and it’s very straightforward.
Along with the checkout.js script, PayPal suggests you to insert the following code:
go to index.html and insert
<script src="https://www.paypalobjects.com/api/checkout.js"></script>
Then go to your component.vue where you need to display the paypal checkout button
Along with the checkout.js script, PayPal suggests you to insert the following code in mounted():
 paypal.Button.render({
     env: 'sandbox', // Optional: specify 'sandbox'
     environment
     client: {
        sandbox:    'xxxx',
        production: 'xxxx'
       },
     locale: 'en_US',
     style: {
         size: 'large',
         color: 'gold',
         shape: 'pill',
         label: 'checkout',
         tagline: 'true'
        },
     commit: true, // Optional: show a 'Pay Now' button in
     the checkout flow


 payment: function(resolve, reject) {
        // Set up the payment here, when the buyer clicks
           on the button

          let returnUrl = "_YOUR_RETURN_URL";
          let amount = 20

          /Here call your own API server
 return new Promise((resolve, reject) => {
     axios.post('/checkout-paypal', {
            return_url: returnUrl,
            amount:amount
        }, {
                headers: { 'Authorization': 'Bearer ' +
   state.token }
            })
            .then(res => {
                resolve(res.data.id)
            })
            .catch(error => {
                reject(error)
            })
    })

        },


  onAuthorize: function(data) {
   // Execute the payment here, when the buyer approves
   the transaction

    return new Promise((resolve, reject) => {
        axios.post('/execute-paypal',  {
            payer_id: data.payerID,
            payment_id: data.paymentID,
        }, {
                headers: { 'Authorization': 'Bearer ' +
    state.token }
            })
            .then(res => {
                resolve(res)
            })
            .catch(error => {
                reject(error)
            })
    })

 }, '#paypal-button');
Now Lets Go To Laravel
Now we require to install paypal package for paypal integration, that way we can use it's method. So Open your terminal and run bellow command.
composer require paypal/rest-api-sdk-php
lets Set client_id And secret Keys.
in your .env file for security.
 PAYPAL_CLIENT_ID=
 PAYPAL_SECRET=
 PAYPAL_MODE=sandbox
Next, I will create a new file paypal.php, at \config directory.
Place the following content in the file
 <?php
 return [
   'client_id' => env('PAYPAL_CLIENT_ID',''),
   'secret' => env('PAYPAL_SECRET',''),
   'settings' => array(
      'mode' => env('PAYPAL_MODE','sandbox'),
      'http.ConnectionTimeOut' => 30,
      'log.LogEnabled' => true,
      'log.FileName' => storage_path() .
      '/logs/paypal.log',
      'log.LogLevel' => 'ERROR'
     ),
    ];
Making a PayPal Controller
The most important part of any payment processing system is security. You want to be protected from pesky customers who want to get your stuff for free, and customers want to make sure their information is safe, and that they are really getting charged the amount you say you will. Your controller helps insulate you from those customers up to no good, because it gives you the chance to set up the properties of a payment behind closed doors.
If you are using the laravel-paypal package, their documentation comes with some solid boilerplate, and I’ll assume you are using Laravel here, but most of this stuff is directly using the PayPal SDK and should transfer languages pretty will. Here is what a skeleton of the contoller should look like:
   <?php

   namespace App\Http\Controllers;
   use Illuminate\Http\Request;
   /** Paypal Details classes **/
   use PayPal\Rest\ApiContext;
   use PayPal\Auth\OAuthTokenCredential;
   use PayPal\Api\Amount;
   use PayPal\Api\Details;
   use PayPal\Api\Item;
   use PayPal\Api\ItemList;
   use PayPal\Api\Payer;
   use PayPal\Api\Payment;
   use PayPal\Api\RedirectUrls;
   use PayPal\Api\PaymentExecution;
   use PayPal\Api\Transaction;

   use PayPal\Exception\PayPalConnectionException;
   use Exception;

   class PaypalController extends Controller
    {
       private $api_context;

   public function __construct()
    {
       $this->api_context = new ApiContext(
        new
        OAuthTokenCredential(config('paypal.client_id'),
        config('paypal.secret'))
    );
    $this->api_context-
        >setConfig(config('paypal.settings'));
    }

    /** This method sets up the paypal payment.
     **/
   public function createPayment(Request $request)
   {
     //Setup Payer
     $payer = new Payer();
     $payer->setPaymentMethod('paypal');
     //Setup Amount
     $amount = new Amount();
     $amount->setCurrency('USD');
     $amount->setTotal($request->amount);
      //Setup Transaction
     $transaction = new Transaction();
     $transaction->setAmount($amount);
     $transaction->setDescription('Your awesome
      Product!');
      //List redirect URLS
     $redirectUrls = new RedirectUrls();
     $redirectUrls->setReturnUrl($request->return_url);
     $redirectUrls->setCancelUrl($request->return_url);
   //And finally set all the prerequisites and create the
     payment
     $payment = new Payment();

     $payment->setIntent('sale');
     $payment->setPayer($payer);
     $payment->setRedirectUrls($redirectUrls);
     $payment->setTransactions(array($transaction));

     $response = $payment->create($this->api_context);
     //Return our payment info to the user
     return $response;

     }
    /**
     ** This method confirms if payment with paypal was
        processed successful and then execute the payment,
     ** we have 'paymentId, PayerID and token' in query
     string.
     **/

    public function executePaypal(Request $request)
    {
       /** Get the payment ID before session clear **/
       $paymentId = $request->get('payment_id');
       $payerId = $request->get('payer_id');


       $payment = Payment::get($paymentId, $this-
       >api_context);
       $paymentExecution = new PaymentExecution();
       $paymentExecution->setPayerId($payerId);

       $executePayment = $payment-
       >execute($paymentExecution, $this->api_context);
       if ($executePayment->getState() == 'approved') {
       if($executePayment->transactions[0]-
       >related_resources[0]->sale->state == 'completed'){

           /*
      * Here is where you would do your own stuff like add
      a record for the payment, trigger a hasPayed event,
      etc.
      */

      // Do something to signify we succeeded

            return response()->json(
                [
                    'status' => "success",

                ],
                200
            );
        }
       }
       return response()->json('failed', 400);


       }

       }
At this point you hopefully have a working payment processor for PayPal,


Top comments (4)
i found better way to do if you are trying to do with the front-end
Install laravel package: github.com/srmklive/laravel-paypal
For example code : medium.com/geekculture/paypal-paym...
Thanks me later
Thanks Tecchtolia i will check it
If you're going to tackle such a delicate topic, please make sure your code examples and instructions are well written and formatted appropriately: ALL of your code examples need extra work.
Thanks i will work on it i wasn't have time enough to dive into details