Have you ever thought of the best way to structure your application and split up your backend and frontend into the separate domains? Then you are in the right place and this tutorial is just for you!
We are in the era of a client-server model architecture of building web applications, where the backend is built as an API and a frontend is built to consume it.
In this tutorial, we will build an application where we will ensure a smooth communication between a backend (API) and a frontend(Vue) on a separate domain. Laravel will be used to expose some API endpoints or URL to which Vue application can connect to and carry out different actions or requests.
This tutorial assumes you have a basic knowledge of object oriented programming in PHP and javaScript. And even-though we will be going through the basics of Laravel and Vue.js, a basic understanding of their concepts is recommended. Now that we have that cleared, lets build something awesome together.
Consuming web services are where JavaScript library like Vue really shines.
Vue is a progressive JavaScript framework for building user interfaces on the web. It can easily be used to build a single page application(SPA), and can also scale up to be used for a large scale enterprise application.
Laravel on another hand, is a powerful MVC PHP web application framework with expressive, elegant syntax, and it is designed for developers who need a simple and elegant toolkit to create full-featured web applications.
There are two different ways of connecting Laravel to a library like Vue.
You could either simply add some widget to your Laravel application, that is, you can still render some views with Laravel but using Vue to power the DOM, this enhances the ability to edit the DOM at runtime
Build both Laravel backend and Vue on separate domains and connect them to each other via HTTP calls.
For the sake of this tutorial, we’ll choose the second option.
Since Vue cannot be used to connect to a server for a dynamic web experience, we will employ and use Laravel as our backend application.
Laravel will not be used here to render multiple views but instead, it will provide the API that will be connected to by Vue via Ajax HTTP Request. This covers all the request required when reaching out to the backend of any application.
What We’ll Build
To better demonstrate this connection between Vue and Laravel, together, we’ll build a simple quote Application. Vue will be used to post a quote to the backend for it to be saved and also fetch the quote, for it to be displayed on the homepage. You can checkout the demo here.
This will be a single page application powered fully by Vue, with the ability to switch between pages, and re-render contents on the pages based on the data fetched from the backend.
Let’s Get Started
As mentioned earlier, our Laravel backend will make available some API endpoint that will eventually be consumed by Vue. To create this, we will start by building all the required API endpoint necessary for interacting with our frontend App.
Set Up Backend
Laravel utilizes Composer to manage its dependencies. So before using Laravel, make sure you have Composer installed on your machine.
You can download and install Laravel via:
- Laravel installer
- Composer create-project.
We’ll start by creating a new Laravel project called 'backend-quote-app'
composer create-project --prefer-dist laravel/laravel backend-quote-app
And if you have Laravel installer already installed on your computer, you can simply proceed to run the command below
laravel new backend-quote-app
Now change directory to the newly created project folder backend-quote-app and start the PHP’s built-in development server to serve the application like this:
## change directory
cd backend-quote-app

## start the server
php artisan serve
By now, you should have your Laravel application set up.
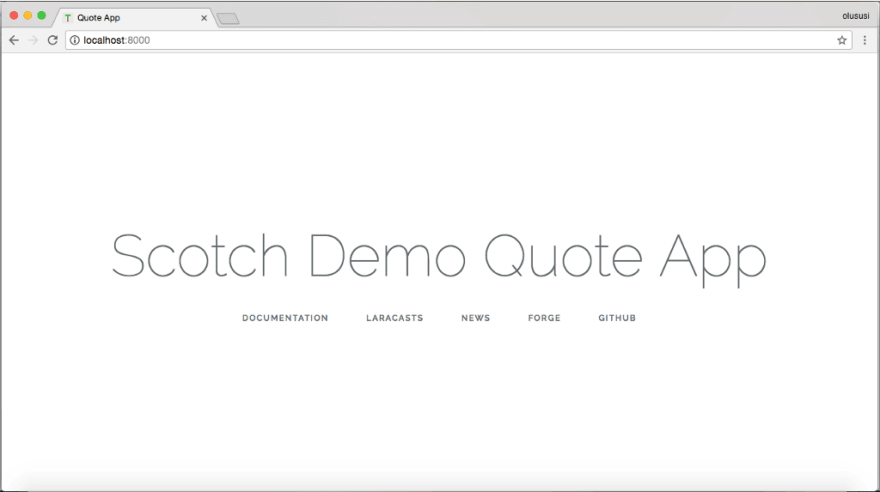
Your homepage should look similar to what we have above if you open your Laravel application on your local server. What I have done differently was to edit the resources/views/welcome.blade.php as shown below.
<!-- resources/views/welcome.blade.php -->
<!doctype html>
<html lang="{{ app()->getLocale() }}">
    <head>
      ...
            <div class="content">
                <div class="title m-b-md">
                   // this was edited
                    Scotch Demo Quote App
                </div>

<div class="links">
                   ...
                </div>
            </div>
        </div>
    </body>
</html>
Set Up Your Route
For a normal Laravel application, it is conventional for us to setup our route by using routes/web.php file, but for the purpose of this tutorial, we will be using routes/api.php. This is a group of route specifically made for API endpoints. The routes in routes/api.php are stateless and are assigned the api middleware group.
For this sample application, we will need the routes below
<?php

Route::post('/quote',[
        'uses' => 'QuoteController@postQuote',
        'as' => 'post-quote'
    ]);

Route::get('/quotes',[
        'uses' => 'QuoteController@getQuotes',
        'as' => 'get-quotes'
    ]);

Route::put('/quote/{id}',[
        'uses' => 'QuoteController@putQuote',
        'as' => 'update-quote'
    ]);

Route::delete('/quote/{id}',[
        'uses' => 'QuoteController@deleteQuote',
        'as' => 'delete-quote'
]);
We are basically using the HTTP verbs POST, GET, PUT, and DELETE to post, fetch, update and delete the quote from our database respectively.
Create a Model and Controller
Create a model in order to access quotes(i.e fetching and storing quotes in the database) by running the command below :
php artisan make:model Quote -m
This will create a model Quote and a migration file to build the application’s database schema.
Now that we have both model and migration file ready. We won’t be adding much content to app\Quote.php, but we will need to edit the contents of the migration file within database\migrations directory to reflect our database schema :
<?php

use Illuminate\Support\Facades\Schema;
use Illuminate\Database\Schema\Blueprint;
use Illuminate\Database\Migrations\Migration;

class CreateQuotesTable extends Migration
{

    public function up()
    {
        Schema::create('quotes', function (Blueprint $table) {
            $table->increments('id');
            $table->text('content');
            $table->timestamps();
        });
    }

    public function down()
    {
        Schema::dropIfExists('quotes');
    }

}
Database Set Up
Open the .env file and add your database details
DB_CONNECTION=mysql

DB_HOST=127.0.0.1

DB_PORT=3306

DB_DATABASE=Your-database-name

DB_USERNAME=Your-database-username

DB_PASSWORD=Your-database-password
Migrating and Creating Table
You can go ahead and run the migration with :
php artisan migrate
If you hit this error when trying to run the migration command,
[PDOException]
  SQLSTATE[42000]: Syntax error or access violation: 1071 Specified key was too long; max key length is 767 bytes
this is because you are running an older version of MySQL. You can read more about it here. But a quick fix is to drop the database and re-create it. Then you will have to edit your AppServiceProvider file and set a default string length inside the boot method:
use Illuminate\Support\Facades\Schema;

public function boot()
{
    Schema::defaultStringLength(191);
}
You can now re-run the migration command and all should be fine by now.
Create Controller
The next step is to create Controller and quickly set up the required logic for our application
php artisan make:controller QuoteController
The command above will create a new file called QuoteController.php stored in the app/Http/Controllers. Here, we want to be able to handle requests to postQuote, getQuotes, putQuote and deleteQuote. We will need to create a couple of functions for all these requests :
<?php

namespace App\Http\Controllers;

use App\Quote;
use Illuminate\Http\Request;

class QuoteController extends Controller
{

    public function postQuote(Request $request)
    {
       ...
    }

public function getQuotes()
    {
       ...
    }

public function putQuote(Request $request, $id)
    {
        ...
    }

public function deleteQuote($id)
    {
        ...
    }
}
Now that the functions have been created, we need to start implementing their functionalities.
public function postQuote(Request $request)
{
$quote = new Quote();
$quote->content = $request->input('content');
$quote->save();
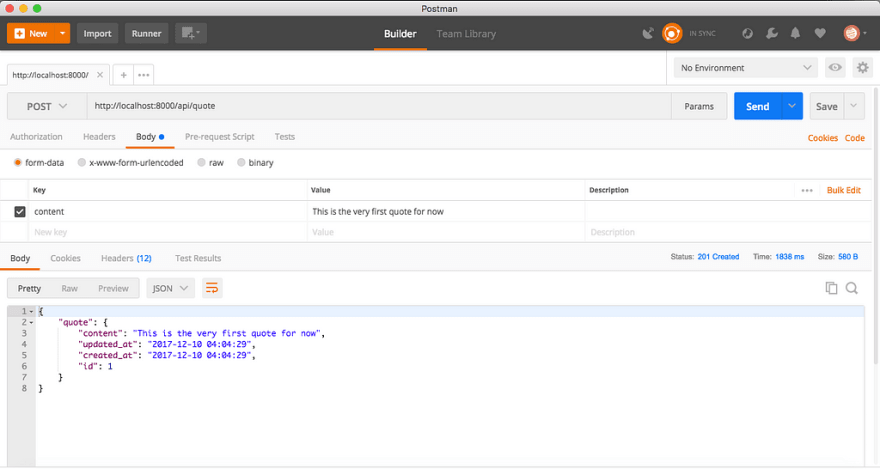
return response()->json(['quote' => $quote], 201);
}
First of all, in order to create a new quote and persist into the database, we instantiate the Quote model, use Laravel’s input()method to retrieve the value passed in from the input field content and then save it. A response was also returned with the newly created quote and a status code of 201.
public function getQuotes()
    {
        $quotes = Quote::all();
        $response = [
            'quotes' => $quotes
        ];
        return response()->json($response, 200);
    }
The created quotes need to be fetched and returned for it to be displayed to users, this method above handles that. It retrieves all the quotes from the database and return it in json format.
public function putQuote(Request $request, $id)
    {
        $quote = Quote::find($id);

// check if quote is not found
        if(!$quote)
        {
            return response()->json(['message' => 'Quote not found'], 404);
        }

$quote->content = $request->input('content');

$quote->save();
        return response()->json(['quote' => $quote], 200);
    }
We added another functionality to update any created quote within our application. This method takes in an extra argument, which is the id of the quote we wish to update. It retrieves the quote, update it and then persist into the database.
public function deleteQuote($id)
    {
        $quote = Quote::find($id);
        $quote->delete();
        return response()->json(['message' => 'Quote deleted'], 200);
    }
To finally complete the CRUD(Create, Read, Update and Delete) operation, the deleteQuote($id) uses the find() method to fetch the quote and then delete.
A close look at all the functions in this controller, you will noticed the use of a json()method all through. It is a Laravel helper method that takes in two arguments, the first one is an associative array which will be transferred to json format by Laravel and the second is a status code. This method comes handy and useful when developing especially a micro service-based application.
All setup? Great!!.
You can quickly test the API endpoints by using a tool called Postman.
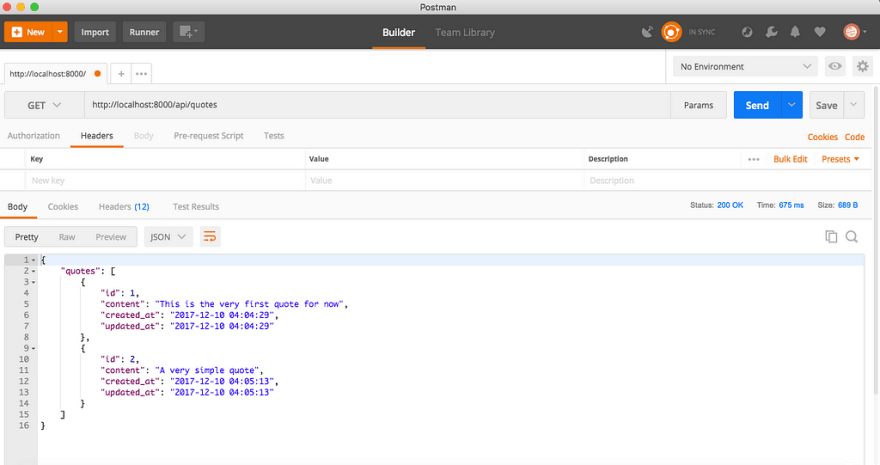

If you have followed along up until now, you should celebrate

Congratulations! you have successfully set up the backend for our Quote application.
Conclusion
So far, we have been able to set up the backend required for the quote Application. In the next part, we will build the frontend with Vue, this will consume the API created. In order to ensure a smooth communication between the frontend and backend, we will also enable CORS (Cross-origin resource sharing). See you then.
PART 2 : Here

Top comments (0)