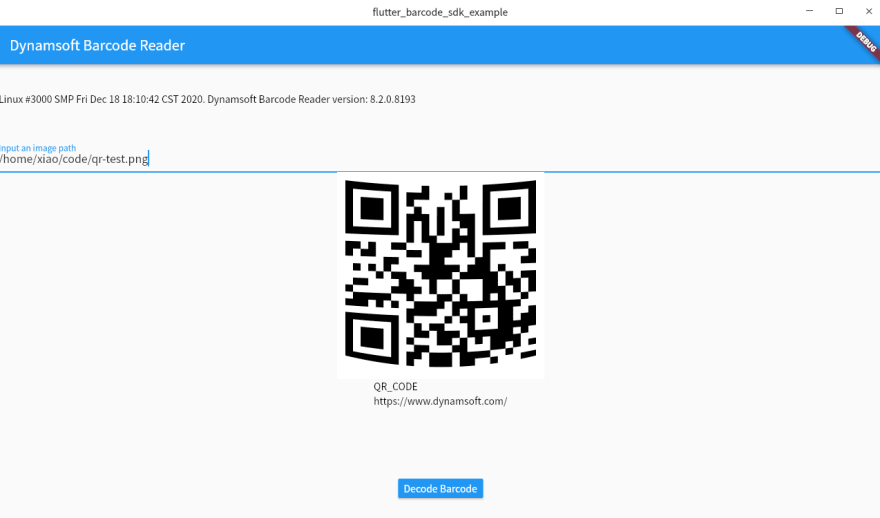
For the past several weeks, the Flutter plugin of Dynamsoft Barcode Reader has covered Windows, Android and Web. This week, we go through the plugin implementation for Linux. Similar to Windows, we combine Dart and C++ code for Linux. The unexpected thing is the C++ data types of Flutter defined for Linux change a lot. So it still takes a little bit of time to make the plugin work.
What You Should Know About Dynamsoft Barcode Reader
Learning Resources for Flutter Desktop Development
- https://flutter.dev/desktop
- https://github.com/google/flutter-desktop-embedding
- https://github.com/flutter/samples/tree/master/experimental/desktop_photo_search
Step-by-step Flutter Linux Plugin Development
To initialize the plugin template for Linux, we need to switch the coding environment to Linux firstly, and then run the following command to add the template to the existing plugin project:
flutter create --template=plugin --platforms=linux .
Here is the Linux plugin folder generated by the above command:
- include/
- CMakeLists.txt
- flutter_barcode_sdk_plugin.cc
It is a CMake project as well. We need Dynamsoft Barcode Reader libraries for linking. Therefore, the next step is to create a lib folder and copy DynamsoftBarcodeReader/Lib/Linux/*.so files to the folder. Afterwards, we configure link_directories, target_link_libraries and flutter_barcode_sdk_bundled_libraries in CMakeLists.txt:
cmake_minimum_required(VERSION 3.10)
set(PROJECT_NAME "flutter_barcode_sdk")
project(${PROJECT_NAME} LANGUAGES CXX)

# This value is used when generating builds using this plugin, so it must
# not be changed
set(PLUGIN_NAME "flutter_barcode_sdk_plugin")

link_directories("${PROJECT_SOURCE_DIR}/bin/")

add_library(${PLUGIN_NAME} SHARED
  "flutter_barcode_sdk_plugin.cc"
)
apply_standard_settings(${PLUGIN_NAME})
set_target_properties(${PLUGIN_NAME} PROPERTIES
  CXX_VISIBILITY_PRESET hidden)
target_compile_definitions(${PLUGIN_NAME} PRIVATE FLUTTER_PLUGIN_IMPL)
target_include_directories(${PLUGIN_NAME} INTERFACE
  "${CMAKE_CURRENT_SOURCE_DIR}/include")

target_link_libraries(${PLUGIN_NAME} PRIVATE flutter "DynamsoftBarcodeReader")
target_link_libraries(${PLUGIN_NAME} PRIVATE PkgConfig::GTK)

# List of absolute paths to libraries that should be bundled with the plugin
set(flutter_barcode_sdk_bundled_libraries
  "${PROJECT_SOURCE_DIR}/lib/"
  PARENT_SCOPE
)
So far, the build configuration is settled. Let's get started to code.
We open flutter_barcode_sdk_plugin.cc and find the flutter_barcode_sdk_plugin_handle_method_call() function.
The method name should be familiar to you if you have built plugins for other platforms.
Referring to the methods implemented for Windows, we can construct the skeleton:
static void flutter_barcode_sdk_plugin_handle_method_call(
    FlutterBarcodeSdkPlugin* self,
    FlMethodCall* method_call) {
  g_autoptr(FlMethodResponse) response = nullptr;

  const gchar* method = fl_method_call_get_name(method_call);
  FlValue* args = fl_method_call_get_args(method_call);

  if (strcmp(method, "getPlatformVersion") == 0) {
    struct utsname uname_data = {};
    uname(&uname_data);
    g_autofree gchar *version = g_strdup_printf("Linux %s. Dynamsoft Barcode Reader version: %s", uname_data.version, self->manager->GetVersion());
    g_autoptr(FlValue) result = fl_value_new_string(version);
    response = FL_METHOD_RESPONSE(fl_method_success_response_new(result));
  }
  else if (strcmp(method, "setLicense") == 0) {
    response = FL_METHOD_RESPONSE(fl_method_success_response_new(result));
  }
  else if (strcmp(method, "decodeFile") == 0) {
    response = FL_METHOD_RESPONSE(fl_method_success_response_new(results));
  }
  else if (strcmp(method, "decodeFileBytes") == 0) {
    response = FL_METHOD_RESPONSE(fl_method_success_response_new(results));
  }
  else if (strcmp(method, "decodeImageBuffer") == 0) {
    response = FL_METHOD_RESPONSE(fl_method_success_response_new(results));
  }
  else if (strcmp(method, "setBarcodeFormats") == 0) {
    response = FL_METHOD_RESPONSE(fl_method_success_response_new(result));
  } else {
    response = FL_METHOD_RESPONSE(fl_method_not_implemented_response_new());
  }

  fl_method_call_respond(method_call, response, nullptr);
}
Since the code logic is almost the same to Windows, as long as we know the data types and corresponding calling methods, it will be easy to implement the plugin for Linux. The relevant header file is located at example/linux/flutter/ephemeral/flutter_linux/fl_value.h.
According to the comments of the header file, we can get the ways of converting Dart arguments to C++ types for Linux:
-
String
FlValue* value = fl_value_lookup_string(args, "license"); const char* license = fl_value_get_string(value); -
Integer
value = fl_value_lookup_string(args, "width"); int width = fl_value_get_int(value); -
Bytes
FlValue* value = fl_value_lookup_string(args, "bytes");
unsigned char* bytes = (unsigned char*)fl_value_get_uint8_list(value);
In the meantime, the function return type and data wrapping method can be changed in barcode_manager.h as follows:
FlValue* WrapResults()
{
    FlValue* out = fl_value_new_list();

    TextResultArray *results = NULL;
    reader->GetAllTextResults(&results);

    if (results == NULL || results->resultsCount == 0)
    {
        printf("No barcode found.\n");
    }
    else
    {
        for (int index = 0; index < results->resultsCount; index++)
        {
            FlValue* map = fl_value_new_map ();
            fl_value_set_string_take (map, "format", fl_value_new_string(results->results[index]->barcodeFormatString));
            fl_value_set_string_take (map, "text", fl_value_new_string(results->results[index]->barcodeText));
            fl_value_set_string_take (map, "x1", fl_value_new_int(results->results[index]->localizationResult->x1));
            fl_value_set_string_take (map, "y1", fl_value_new_int(results->results[index]->localizationResult->y1));
            fl_value_set_string_take (map, "x2", fl_value_new_int(results->results[index]->localizationResult->x2));
            fl_value_set_string_take (map, "y2", fl_value_new_int(results->results[index]->localizationResult->y2));
            fl_value_set_string_take (map, "x3", fl_value_new_int(results->results[index]->localizationResult->x3));
            fl_value_set_string_take (map, "y3", fl_value_new_int(results->results[index]->localizationResult->y3));
            fl_value_set_string_take (map, "x4", fl_value_new_int(results->results[index]->localizationResult->x4));
            fl_value_set_string_take (map, "y4", fl_value_new_int(results->results[index]->localizationResult->y4));
            fl_value_set_string_take (map, "angle", fl_value_new_int(results->results[index]->localizationResult->angle));
            fl_value_append_take (out, map);
        }
    }

    CBarcodeReader::FreeTextResults(&results);
    return out;
}

  FlValue* DecodeFile(const char * filename)
  {
      FlValue* out = fl_value_new_list();
      int ret = reader->DecodeFile(filename, "");

      if (ret == DBRERR_FILE_NOT_FOUND)
      {
          printf("Error code %d. %s\n", ret, CBarcodeReader::GetErrorString(ret));
          return out;
      }

      return WrapResults();
  }

  FlValue* DecodeFileBytes(const unsigned char * bytes, int size)
  {
      reader->DecodeFileInMemory(bytes, size, "");
      return WrapResults();
  }

  FlValue* DecodeImageBuffer(const unsigned char * buffer, int width, int height, int stride, int format)
  {
      ImagePixelFormat pixelFormat = IPF_BGR_888;
      switch(format) {
          case 0:
              pixelFormat = IPF_GRAYSCALED;
              break;
          case 1:
              pixelFormat = IPF_ARGB_8888;
              break;
      }

      reader->DecodeBuffer(buffer, width, height, stride, pixelFormat, "");

      return WrapResults();
  }
Now, the Flutter barcode plugin for Linux has been finished. Since the Dart code for Windows also works for Linux, there is no extra code needed for the example project. We just need to run the example directly by setting Linux as the device:
flutter run -d linux
The tutorial of how to build Flutter barcode plugin for iOS and macOS is coming next week.
Flutter Barcode SDK Download
https://pub.dev/packages/flutter_barcode_sdk


Top comments (0)