Achieving specific layouts has been a daunting task in CSS and developers had to result to hacks to get the job done. It all started with using HTML tables to get a pixel perfect design then the float property came around that allow page element to be positioned to the left or right of its parent container, this had effect that were totally undesirable due to the default behaviors of floated elements.
In search of a solution the clearfix hack was discovered that allow developers to create layouts like the Holy grail. The clearfix hack grew in popularity and even made its way into frameworks like some earlier versions of Bootstrap.
Developers were at ease using frameworks like Bootstrap as it saved them all the headache of designing layouts with raw CSS. But still, there was a need for this to be available natively in CSS.
In the year 2009 the first Flexbox specification was published as a Working Draft on the W3C website. Some of the browser vendors to implement it were Firefox and Webkit with some inconsistencies. In the years that followed changes were made to the specification, a new editor took over, unofficial syntax was published that were supported in Chrome, Opera and Internet Explorer 10.
Between the year 2012 and 2013 the specification changed status from being a W3C Candidate Recommendation to a Working Draft and a new syntax was published in 2015. The current version of the specification as of November 2019 is dated 19th November 2018 and titled CSS Flexible Box Layout Module Level 1 and it is a W3C Candidate Recommendation which means it still subject to change and other specifications may supersede it.
Flexbox was designed with one thing in mind User Interface Design of websites and complex applications.
This post will serve as a beginners introduction to what Flexbox (or Flexbox Layout) is all about. Following the tradition of this series i will be using the specification in subsequent explanations. Some part of the specification are quite tricky and require you to create a mental model to really get what is going on but I'll do my best to explain and translate the specification.
Create a blank HTML and CSS files and make sure the CSS is linked with the HTML file. And kindly note that all screenshots are from Firefox 70 web browser and its Developer Tools.
With that out of the way, let's start.
In this series we've talked about floats, block layout , inline layout and positioned layout. Speaking in terms of computer science these "layouts" are actually algorithms that determine the size and position of boxes based on their relationship with their sibling and ancestor boxes (parent boxes). But you should know these layouts are part of CSS2.1 and Flexbox is part of the modular nature of CSS3 hence the title of the specification CSS Flexible Box Layout Module Level 1.
Flexbox layout is similar to block layout and items can be displayed in varying directions using flexbox specific properties unlike block layout where you had to result to properties like float, position.
I mentioned earlier that some part of the specification is tricky to understand, let's begin by explaining some key flexbox terminologies.
FLEXBOX LAYOUT TERMINOLOGY
Listed below are terms that you will definitely come by when designing web pages using flexbox.
- flex container
- flex item
- main axis
- cross axis
flex container
From the specification:
A flex container is the box generated by an element with a computed display of flex or inline-flex. In-flow children of a flex container are called flex items and are laid out using the flex layout model.
This means a flex container is a parent element which has the display property value set to flex or inline-flex. It can have child elements and these child elements are called flex items and they are laid out on screen using flexbox layout model.
Let's take an example. Save the following HTML and CSS.
<div class="parent">
  <p class="child-one">Lorem ipsum dolor sit amet, consectetur adipisicing elit.</p>
  <ul class="child-two">
    <li>One</li>
    <li>Two</li>
    <li>Three</li>
  </ul>
</div>
.parent {
  outline: 1px solid blue;     /* Just a cosmetic */
  background-color: #f9f9fa;   /* Another cosmetic */
}
Load the HTML file in your browser.
What you see in the image above is just the behavior of regular block elements displayed one after the other from top to bottom. Now let's apply the flexbox layout.
Update the .parent CSS rule with the following:
.parent {
  /* All other properties remain the same */

  display: flex;
}
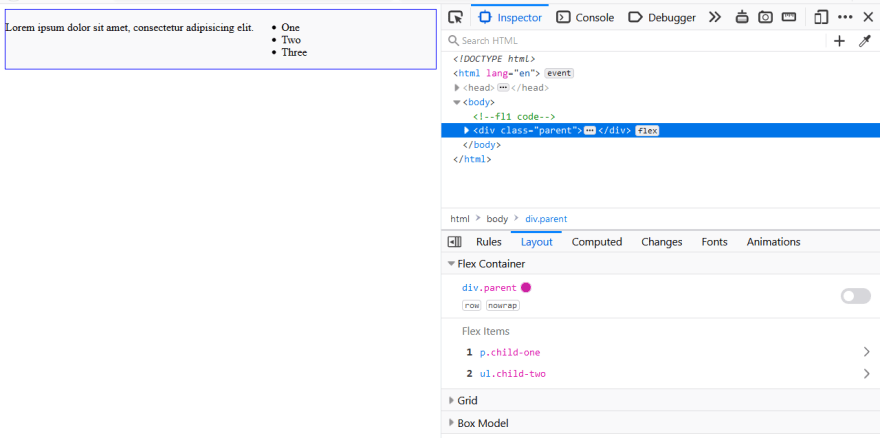
Save and refresh. You might be surprised.
What just happened? Use "Inspect Element" on an empty part of the box and navigate to the Layout tab.
Observe the image above, you will realize the browser indicate the paragraph (p.child-one) and the unordered list (ul.child-two) are Flex Items. You can play around by clicking the toggle switch in the Flex Container to see the flex item highlighted on screen.
As a take away from this explanation, update the .parent CSS rule by changing display: flex; to display: inline-flex; and observe the output in the browser. Then use "Inspect Element" on the output and flip the switch in the Developer Tools to see that the elements are truly inline.
flex item
Flex items are the child elements of a flex container as explained earlier.
main axis
The specification:
The main axis of a flex container is the primary axis along which flex items are laid out. It extends in the main dimension.
This means the main axis is the direction in which the flex items are laid out. This can be from left to right or top to bottom. The starting point in this direction is called the main start and the ending part is called the main end. In mathematics this can be the x or y axis on a graph.
cross axis
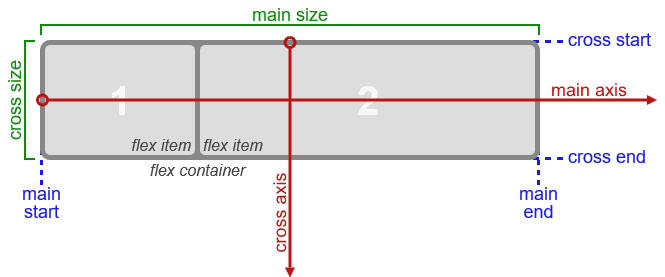
This is the area that is perpendicular to the main axis. The word "perpendicular" means opposite in direction. This means if the main axis runs from left to right, the cross axis will run from top to bottom. But it gets tricky.
The image below summarize the default behavior of a flex container.
Remember i said:
main axis runs from left to right and the cross axis will run from top to bottom
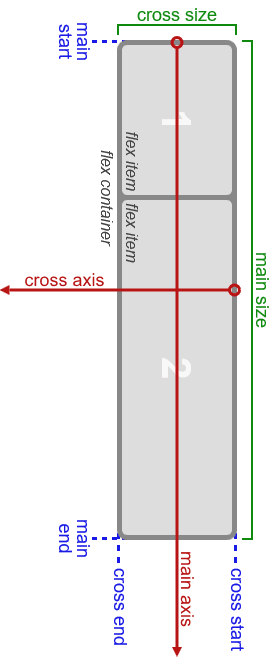
This is the default behavior but the tricky part is: If the image is turned in the vertical direction the main axis will run from top to bottom and the cross axis will run from left to right. Which is the opposite of what i said earlier.
Observe the image below.
Now the question is: How can we change the direction?. We'll have to talk about properties that have to do with direction in a flex container.
FLEX PROPERTIES: DIRECTION
These properties are:
flex-direction-
flex-wrap flex-floworder
flex-direction
From the specification:
The flex-direction property specifies how flex items are placed in the flex container, by setting the direction of the flex container’s main axis. This determines the direction in which flex items are laid out.
rowrow-reversecolumncolumn-reverse
The name of this values are self descriptive. Let's jump to some code.
We are still using the code from the previous explanation. Add the following cosmetic code to the ul and p element and make sure the display property on the .parent is still flex.
p {
  outline: 3px solid red;
}

ul {
  outline: 3px solid magenta;
}
Save and refresh your browser.
Now lets change the direction. Update the .parent CSS rule with the following:
.parent {
  /* All other properties remain the same */

  flex-direction: column;    /* Add this */
}
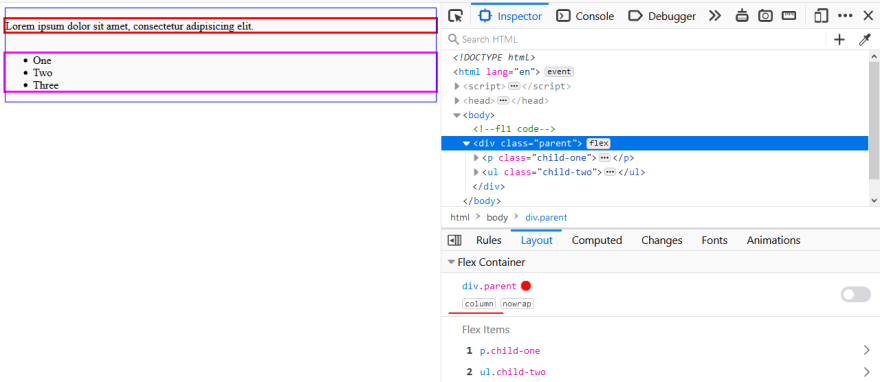
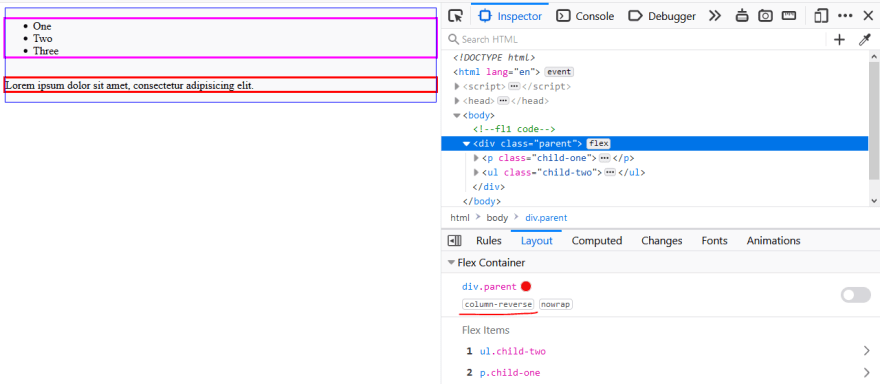
Save and refresh. The direction of the content changed. Take note of the highlighted part.
How about we reverse the layout? . Update the .parent CSS rule with the following:
.parent {
  /* All other properties remain the same */

  flex-direction: column-reverse;    /* Update with the new value */
}
Save and refresh your browser to see the changes.
The row value is the default value and I'll leave you to have fun with row-reverse.
flex-wrap
This property control if the flex container can span a single or multiple line.
Delete the flex-direction in the .parent CSS rule and add the following:
.parent {
  /* All other properties remain the same */

  flex-wrap: wrap;    /* Add this */
}
Save and refresh. You might not see the changes until you resize your browser window or the Developer Tools. In the image below i resized the Developer Tools.
The wrap-reverse will do the opposite.
Using the no-wrap value the flex items will not wrap into multiple lines and will remain on a single line.
flex-flow
The flex-flow property is a shorthand for setting the flex-direction and flex-wrap properties, which together define the flex container’s main and cross axes.
.selector {
  /*
   * 1. flex-direction
   * 2. flex-wrap
  */
             /*1*/  /*2*/
  flex-flow: column wrap;
}
order
Flex items are displayed and laid out in the order they appear in your document.
The default value for the order property is 0. Now let's have some fun.
In our HTML file the paragraph comes before the unordered list. Which means if we start counting from number one upwards, the paragraph will be one, the unordered list will be two. The order property can be used to change this ordering.
Add this to the p CSS rule. Don't forget to save your file before refreshing your browser.
p {
  /* All other properties remain the same */

  order: 2;   /* Add this*/
}
We gave the paragraph an order value of 2, with this it will appear after the unordered list when the page is rendered.
The order property also accepts a negative integer. If you delete the order: 2; from the p CSS rule and update ul with the code below you will get the same result.
ul {
  /* All other properties remain the same */

  order: -1;   /* Add this*/
}
If you have multiple page elements in the following order in your HTML document: header, main, article footer you can use the order property to make the footer appear before the header when the page is rendered.
In the Second part of this post we will continue with the following subheadings:
- FLEXBOX PROPERTIES: Flexibility
- FLEXBOX PROPERTIES: Alignment






Oldest comments (1)
Siguiendo.....saludos cordiales. Éxito!