
In this tutorial, we will be building a server using Node.js and Express to capture screenshots of video streams that occur using the Agora SDKs in your application by using the Cloud Recording APIs.
The client application that's using the Agora SDKs should request this server to capture the screenshots. Then, the server will request the Agora APIs on behalf of the client application. This will ensure that credentials for the Agora APIs are secure rather than exposing them in the app.
Goals
By the end of this tutorial, you’ll know:
How capturing screenshots from Agora streams works.
How to set up an Express server to acquire resources to capture screenshots.
How to start and stop capturing screenshots.
Prerequisites
This tutorial is for applications that use Agora and want to capture screenshots of the streams. If you are not using Agora SDKs in your application, then this tutorial is not for you.
If you'd like to learn how to build some applications with React Native and Agora, refer to the articles below.
The fundamentals of Node.js and Express will not be covered in this tutorial. If you are not comfortable with the fundamentals, this is a helpful tutorial that you can go through before beginning with this project.
You'll need Node.js to set up an Express server. I'll be using Postman to make requests to this server to test it.
Agora
Agora.io was founded in 2014. It's a service provider for real-time voice and video. Its core technology is real-time communication (RTC).
Agora provides SDKs to build apps that require real-time engagement like:
Audio/Video Calls.
Interactive Livestreaming (Audio/Video).
Interactive Gaming.
Real-Time Messaging (which is in BETA at the time of writing this article).
Agora is a paid service, but the first 10,000 minutes are free every month. You can check their pricing page for a comprehensive breakdown.
If you'd like to learn more about Agora, visit their website or read this article.
Overview
We'll be going through these steps in this article:
- Cloud recording vs. On-Premise recording
- Enabling Cloud Recording in Project management console.
- Acquiring Customer ID and Customer Secret for Agora APIs
- Setting up the server.
- Acquire resource ID.
- Start capturing screenshots.
- Stop capturing screenshots.
- Recap.
You can refer to the final code in this GitHub repository.
Cloud recording vs. On-Premise recording
Cloud recording is used to record voice calls, video calls, interactive streaming, and also capture screenshots of your streams and upload them to your cloud storage. You can record one-to-one or one-to-many audio and video calls. For cloud recording, Agora provides APIs to record the streams and capture screenshots. Once the session ends, Agora will upload the captured screenshots or the recorded video to your third-party cloud storage.
Agora supports uploads to Amazon S3, Qiniu Cloud, Alibaba Cloud, Tencent Cloud, Kingsoft Cloud.
I recommend using Amazon S3 as it is easy to set up. Agora will need the bucket name, the access key, and the secret key for the bucket to upload the recorded files to your cloud storage.
On-Premise recording is similar to cloud recording, but you need to set up your own Linux server using the components provided by Agora to record the streams or capture screenshots.
Compared with on-premise recording, cloud recording is more convenient as it does not require deploying Linux servers.
If you'd like to learn more about the differences between cloud recording and on-premise recording, refer to this FAQ answer.
Agora will bill you for the cloud recording service. You can check their billing policies for more information.
Enabling cloud recording in the project management console
To capture screenshots, you must enable cloud recording from the Agora Project Management Console.
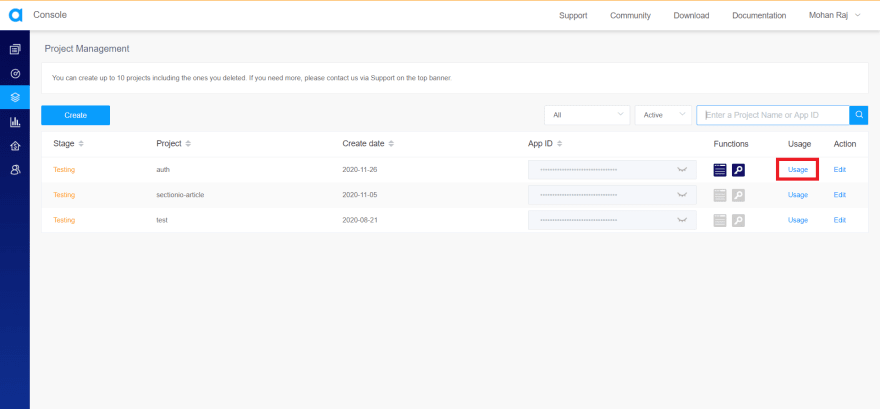
Head to the console and open Project Management.
Click on usage for the project you want to enable cloud recording for.
You can acquire the app ID right next to the Usage button. Click on the eye icon to reveal the app ID. We'll be needing the app ID later in this tutorial.
Click on duration under cloud recording. If you haven't already enabled it yet, It will ask you whether you want to enable cloud recording for this project. Click on the enable button.

It'll display the maximum number of channels that you can record at the same time. The default value is 50 channels. If you want more, you need to contact the Sales team of Agora (sales@agora.io).

Once you hit Apply, you'll see the statistics page of the cloud recording.
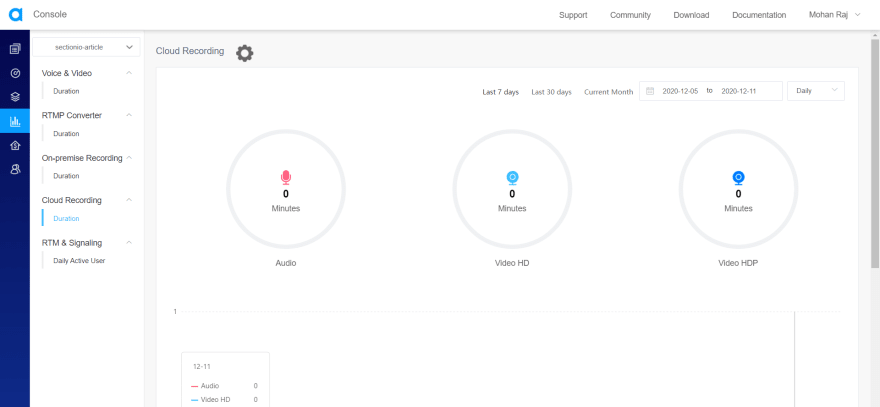
You have successfully enabled cloud recording for your project.
Acquiring customer ID and customer cecret for Agora APIs
If you want to work with Agora's APIs, you need to acquire the customer ID and customer secret from Agora.
Head to the console and click the account name on the top right corner and click on RESTful API from the dropdown.

Copy the customer ID and click on download under customer secret to get the customer secret.
You can download the customer secret only once. Keep the secret in a safe place.

For the API, we should convert the customer ID and secret to base64 using the Buffer.from() and converting it into a base64 string using .toString('base64).
Buffer.from(string).toString('base64');
I'll be using Axios to make requests to the Agora APIs. We need to pass the constructed base64 string as the authorization header on the request. You can learn more about Axios on the Axios nmp package page.
To install Axios, run:
npm install axios
It is not a good idea to add the key and the secret in the code. So, you can use environment variables. If you'd like to learn more about environment variables, refer to this article.
Setting up the server
You'll need Node.js to set up an Express server. You can download Node.js from here. I'll be using Postman to make requests to this server. You can download it from here.
Let's install Express using NPM.
npm install express
Now, we can import express in our code to create a simple server module that'll listen on port 3000.
const express = require("express");
const app = express();
app.use(express.json());

app.get("/", (req, res) => res.send("Agora Cloud Screenshots Server"));

const port = process.env.PORT || 3000;
app.listen(port, () => console.log(`Agora Cloud Screenshots Server listening at Port ${port}`));
You can start the server by running:
node index.js
This server will be listening on port 3000 and when you hit the '/' endpoint, it'll send "Agora Cloud Screenshots Server".
Capturing screenshots
We need to use the RESTful APIs in the following sequence.
- Acquire resources for capturing screenshots.
- Start capturing screenshots.
- Stop capturing screenshots.
Capturing screenshots is part of Agora's cloud recording. Hence why the process for capturing screenshots is very similar to recording streams. If you'd like to learn how to record streams, refer to this article.
You can't record and take screenshots simultaneously in one session. To do both, acquire two resource IDs, one for recording and the other for capturing screenshots. Agora will charge you for both the sessions.
First, you need to acquire a resource ID for capturing screenshots. This will allocate a recorder on Agora's servers for you to capture the screenshots. Then, we need to start capturing screenshots within 5 minutes from acquiring the resource ID. You can stop the session whenever you want.
We need to provide a UID for the recorder. The recorder is like a user who joins the channel, captures the screenshots, and uploads them to your third-party cloud storage. So make sure you provide a unique UID to the recorder that doesn't conflict with an existing user in the channel.
If you have set up token authentication for your Agora project, you should also pass a token while starting to capture screenshots. To learn more about token authentication, refer to this article.
At the time of writing this article, Agora cloud recording does not support user accounts yet. Make sure that the recording channel uses integer UIDs. If you'd like to learn more about user accounts, refer to this FAQ answer.
Acquire resource ID
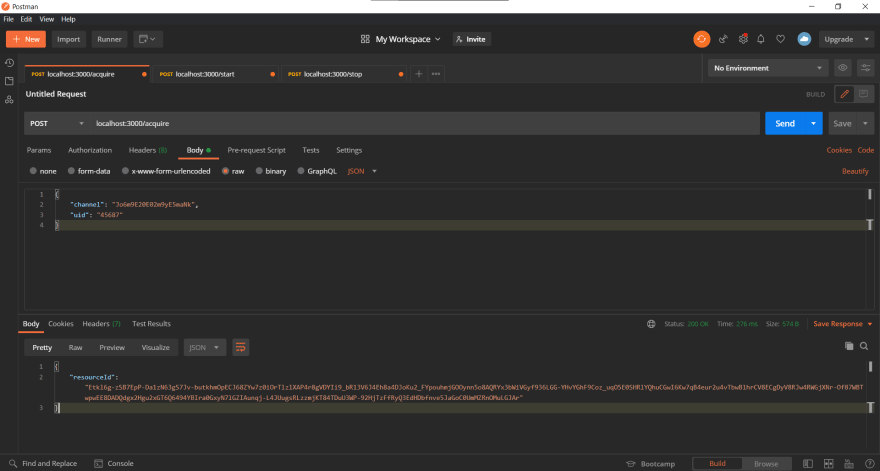
Let's add a POST request handler for a new endpoint called '/acquire' to acquire the resource ID for the recorder.
app.post("/acquire", (req, res) => {
  // Acquire Resource ID Here
});
You need to request this endpoint https://api.agora.io/v1/apps/{appId}/cloud_recording/acquire to get a resource ID. The endpoint URL should contain the Agora app ID.
In the body of the request, we should specify a UID for the recorder, the channel ID, and the time limit (in hours) for the cloud recording API calls. The time limit must be between 1 hour and 720 hours. The countdown starts when you start capturing screenshots. When you exceed the limit, you can no longer call other API methods.
If this request succeeds, you'll get a resource ID as the response. You need to start capturing screenshots with this resource ID within five minutes.
app.post("/acquire", async (req, res) => {
  const Authorization = `Basic ${Buffer.from(`${process.env.RESTkey}:${process.env.RESTsecret}`).toString("base64")}`;
  const acquire = await axios.post(
    `https://api.agora.io/v1/apps/${process.env.appID}/cloud_recording/acquire`,
    {
      cname: req.body.channel,
      uid: req.body.uid,
      clientRequest: {
        resourceExpiredHour: 24,
      },
    },
    { headers: { Authorization } }
  );

  res.send(acquire.data);
});
Request body:
{
  "channel": "Jo6m9E20E02m9yE5maNk",
  "uid": "45687"
}
Response:
{
  "resourceId": "Etkl6g-zSB7EpP-Da1zN63gS7Jv-butkhmOpECJ68ZYw7z0iOrTlzlXAP4r8gVDYIi9_bR13V6J4Eh8a4DJoKu2_FYpouhmjGOOynn5o8AQRYx3bWiVGyf936LGG-YHvYGhF9Coz_uqO5E0SHRlYQhuCGwI6Kw7qB4eur2u4vTbwBlhrCV8ECgDyV8RJw4RWGjXNr-Of87WBTwpwEE8DADQdgx2Hgu2xGT6Q6494YBIra0GxyN7lGZIAunqj-L4JUugsRLzzmjKT84TDuU3WP-92HjTzFfRyQ3EdHDbfnve5JaGoC0UmMZRnOMuLGJAr"
}
Start capturing screenshots
Now, let's add a POST handler for a new endpoint called '/start' to start capturing screenshots.
app.post("/start", (req, res) => {
  // Start Capturing Screenshots
});
You need to request this endpoint https://api.agora.io/v1/apps/{appID}/cloud_recording/resourceid/{resourceID}/mode/indvidual/start to start capturing screenshots.
The endpoint URL must contain the appID and the resourceID (from the previous step).
There are two recording modes, composite and indvidual. You can't take screenshots on the
compositemode. You can only take screenshots on theindvidualmode.
In the body of the request, we should specify the UID of the recorder, the channel ID, authentication token (if app certificate is enabled for your application), and configurations like recordingConfig, storageConfig, and snapshotConfig.
Snapshot Config:
Capture Interval: The time interval between two successive screenshots in seconds. The minimum value is 5 and the maximum value is 3600.
File Type: The file format of the captured screenshots. At the time of writing this article, this field can only accept the
jpgformat. You should pass it like["jpg"].
Recording Config:
Max Idle Time: The recorder automatically stops capturing screenshots and leaves the channel when there is no user in the channel after a period (in seconds) set by this parameter. The value range is from 5 to 2^32-1.
-
Stream Types: The type of media stream to record. Make sure you don't set audio streams only (0) for capturing screenshots.
- 0: Audio streams only.
- 1: Video streams only.
- 2: Both audio and video streams.
-
Channel Type: The channel profile.
- 0: Communication Channel (Audio Call/ Video Call).
- 1: Live Broadcast Channel.
Subscribe UID Group: The estimated maximum number of subscribed users.
Storage Config:
-
Vendor: The third-party cloud storage vendor.
- 0: Qiniu Cloud
- 1: Amazon S3
- 2: Alibaba Cloud
- 3: Tencent Cloud
- 4: Kingsoft Cloud
Region: The regional information specified by your third-party cloud storage.
Bucket: The bucket ID from your cloud storage where you want to save your recorded files.
Access Key: The access key to your cloud storage.
Secret Key: The secret key of your cloud storage.
File Name Prefix: An array of strings to set the path of the recorded files in your cloud storage.
Refer to the documentation to learn more about the parameters that you need to pass for storage configuration.
Let's write the POST request to Agora to start capturing the screenshots. Use environment variables to store the third-party cloud storage credentials and configurations.
app.post("/start", async (req, res) => {
  const Authorization = `Basic ${Buffer.from(`${process.env.RESTkey}:${process.env.RESTsecret}`).toString("base64")}`;
  const appID = process.env.appID;
  const resource = req.body.resource;

  const start = await axios.post(
    `https://api.agora.io/v1/apps/${appID}/cloud_recording/resourceid/${resource}/mode/individual/start`,
    {
      cname: req.body.channel,
      uid: req.body.uid,
      clientRequest: {
        recordingConfig: {
          maxIdleTime: 30,
          streamTypes: 2,
          channelType: 0,
          subscribeUidGroup: 0,
        },
        snapshotConfig: {
          captureInterval: 10,
          fileType: ["jpg"],
        },
        storageConfig: {
          vendor: 1,
          region: 2,
          bucket: process.env.bucket,
          accessKey: process.env.accessKey,
          secretKey: process.env.secretKey,
          fileNamePrefix: ["directory1", "directory2"],
        },
      },
    },
    { headers: { Authorization } }
  );

  res.send(start.data);
});
If the request is successful, the response will contain the recording ID (sid) and the resource ID. We need the recording ID to stop capturing screenshots.
Request body:
{
  "channel": "Jo6m9E20E02m9yE5maNk",
  "uid": "45687",
  "resource": "Etkl6g-zSB7EpP-Da1zN63gS7Jv-butkhmOpECJ68ZYw7z0iOrTlzlXAP4r8gVDYIi9_bR13V6J4Eh8a4DJoKu2_FYpouhmjGOOynn5o8AQRYx3bWiVGyf936LGG-YHvYGhF9Coz_uqO5E0SHRlYQhuCGwI6Kw7qB4eur2u4vTbwBlhrCV8ECgDyV8RJw4RWGjXNr-Of87WBTwpwEE8DADQdgx2Hgu2xGT6Q6494YBIra0GxyN7lGZIAunqj-L4JUugsRLzzmjKT84TDuU3WP-92HjTzFfRyQ3EdHDbfnve5JaGoC0UmMZRnOMuLGJAr"
}
Response:
{
  "resourceId": "Etkl6g-zSB7EpP-Da1zN63gS7Jv-butkhmOpECJ68ZYw7z0iOrTlzlXAP4r8gVDYIi9_bR13V6J4Eh8a4DJoKu2_FYpouhmjGOOynn5o8AQRYx3bWiVGyf936LGG-YHvYGhF9Coz_uqO5E0SHRlYQhuCGwI6Kw7qB4eur2u4vTbwBlhrCV8ECgDyV8RJw4RWGjXNr-Of87WBTwpwEE8DADQdgx2Hgu2xGT6Q6494YBIra0GxyN7lGZIAunqj-L4JUugsRLzzmjKT84TDuU3WP-92HjTzFfRyQ3EdHDbfnve5JaGoC0UmMZRnOMuLGJAr",
  "sid": "cb3765154b4a499f6d60569d484c1f65"
}

Stop capturing screenshots
Now, let's add a POST request handler for a new endpoint called '/stop' to stop capturing screenshots.
app.post("/stop", (req, res) => {
  // Stop Capturing Screenshots Here
});
You need to send a POST request to this endpoint https://api.agora.io/v1/apps/{appid}/cloud_recording/resourceid/{resourceid}/sid/{sid}/mode/indvidual/stop to stop capturing screenshots.
The endpoint URL must contain the appID, the resourceID, and the sid (recording ID).
In the request body, we should specify the UID of the recorder, the channel ID, and an empty clientRequest object. If the request is successful, the endpoint will respond with the resource ID, the SID, and the details about the upload status.
app.post("/stop", async (req, res) => {
  const Authorization = `Basic ${Buffer.from(`${process.env.RESTkey}:${process.env.RESTsecret}`).toString("base64")}`;
  const appID = process.env.appID;
  const resource = req.body.resource;
  const sid = req.body.sid;

  const stop = await axios.post(
    `https://api.agora.io/v1/apps/${appID}/cloud_recording/resourceid/${resource}/sid/${sid}/mode/individual/stop`,
    {
      cname: req.body.channel,
      uid: req.body.uid,
      clientRequest: {},
    },
    { headers: { Authorization } }
  );
  res.send(stop.data);
});
The response will contain an object called serverResponse. It'll contain the list of files, which is an array of objects containing the details about the files and the overall upload status.
The upload status can either be,
uploaded: All the recorded files are uploaded to the third-party cloud storage.
backuped: Some of the recorded files fail to upload to the third-party cloud storage and upload to the Agora Cloud Backup instead. Agora Cloud Backup automatically uploads these files to your cloud storage.
unknown: Unknown status.
Request body:
{
  "channel": "Jo6m9E20E02m9yE5maNk",
  "uid": "45687",
  "sid": "cb3765154b4a499f6d60569d484c1f65",
  "resource": "Etkl6g-zSB7EpP-Da1zN63gS7Jv-butkhmOpECJ68ZYw7z0iOrTlzlXAP4r8gVDYIi9_bR13V6J4Eh8a4DJoKu2_FYpouhmjGOOynn5o8AQRYx3bWiVGyf936LGG-YHvYGhF9Coz_uqO5E0SHRlYQhuCGwI6Kw7qB4eur2u4vTbwBlhrCV8ECgDyV8RJw4RWGjXNr-Of87WBTwpwEE8DADQdgx2Hgu2xGT6Q6494YBIra0GxyN7lGZIAunqj-L4JUugsRLzzmjKT84TDuU3WP-92HjTzFfRyQ3EdHDbfnve5JaGoC0UmMZRnOMuLGJAr"
}
Response:
{
  "resourceId": "Etkl6g-zSB7EpP-Da1zN63gS7Jv-butkhmOpECJ68ZYw7z0iOrTlzlXAP4r8gVDYIi9_bR13V6J4Eh8a4DJoKu2_FYpouhmjGOOynn5o8AQRYx3bWiVGyf936LGG-YHvYGhF9Coz_uqO5E0SHRlYQhuCGwI6Kw7qB4eur2u4vTbwBlhrCV8ECgDyV8RJw4RWGjXNr-Of87WBTwpwEE8DADQdgx2Hgu2xGT6Q6494YBIra0GxyN7lGZIAunqj-L4JUugsRLzzmjKT84TDuU3WP-92HjTzFfRyQ3EdHDbfnve5JaGoC0UmMZRnOMuLGJAr",
  "sid": "cb3765154b4a499f6d60569d484c1f65",
  "serverResponse": {
    "fileListMode": "json",
    "fileList": [
      {
        "filename": "M6ETnKVtPbAY892ffaj3.jpg",
        "trackType": "image",
        "uid": "fb2b6760-c2d8-48f6-b61a-066bd632b691",
        "mixedAllUser": true,
        "isPlayable": true,
        "sliceStartTime": 160786677
      },
      {
        "filename": "hlvM26hvtnXjj62fAkMc.jpg",
        "trackType": "image",
        "uid": "6dfdbe0e-2eb7-44c5-8b0c-af414fb2dc8f",
        "mixedAllUser": true,
        "isPlayable": true,
        "sliceStartTime": 1607866792
      }
    ],
    "uploadingStatus": "uploaded"
  }
}
Let's Recap
We learned the difference between Cloud Recording and On-Premise recording.
We enabled cloud recording from the project management console.
We acquired the customer ID and the customer secret from the project management console.
We set up a simple Express server.
We added a POST request handler to acquire the resource ID for the recording session.
We added a POST request handler to start capturing the screenshots. We learned about all the parameters that we need to pass to start capturing screenshots.
We added a POST request handler to stop capturing the screenshots.
Congratulations, 🥳 You did it.
Thanks for reading!

Top comments (0)