
When I was Learning about Kubernetes Deployment I found that the pods were running on worker nodes but not giving me the output that I was expecting, Later I figured out that Deployments are primarily focused on managing the desired number of replicas of my application. So After diving further, I found out about DaemonSets.
What is a DaemonSet In Kubernetes?
A DaemonSet design ensures that a single pod will run on each worker node. It shows that we can't scale its pods in a node. And if somehow the DaemonSet pod gets deleted then the DaemonSet controller will create it again. When nodes join the cluster, Pods are provisioned onto them, and when nodes leave the cluster, the associated Pods are automatically removed through garbage collection. Deleting a DaemonSet will trigger the cleanup of the Pods it had previously deployed.
let's understand DaemonSe with an example .. suppose there are 500 worker nodes and you deploy a DaemonSet, the DaemonSet controller will run one pod per worker node by default. That is a total of 500 pods. But will be very expensive if we try this example in the real world. However, using nodeSelector, nodeAffinity, Taints, and Tolerations, you can restrict the daemonSet to run on specific nodes.
As an example, if you have a specific number of worker nodes dedicated to platform tools example Ingress, Nginx, logs etc... and want to run Daemonset related to platform tools only on the nodes labeled as platform tools. In this case, you can use the nodeSelector to run the DaemonSet pods only on the worker nodes dedicated to platform tooling.
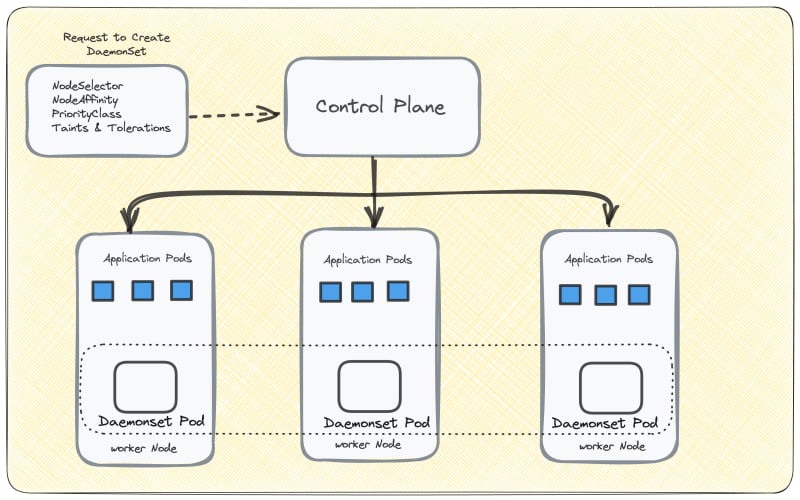
Kubernetes Architecture with DaemonSet

The Kubernetes cluster consists of one or more master nodes (control plane) responsible for managing the cluster and one or more worker nodes where applications run. Each worker node includes the Kube-proxy component, which runs as a daemon process.
Real-life Use Cases of Kubernetes DaemonSet
There are multiple use cases of DameonSet in the Kubernetes cluster. some of them are.
- Cluster Log Collection: Deploying a log collector like Fluentd, Logstash, or Fluent Bit on every node allows you to centralize Kubernetes logging data, making it easier to monitor and troubleshoot issues.
Centralized logging helps in aggregating logs from various containers and pods, allowing for easier analysis and alerting.
- Cluster Monitoring: Deploying monitoring agents like Grafana and Prometheus Node Exporter on every node collects node-level metrics such as CPU usage, memory usage, and disk space.
Prometheus can scrape these metrics and store them for later analysis and alerting, providing insights into the health of cluster nodes.
- Security and Compliance: Running tools like kube-bench on every node helps ensure that nodes comply with security benchmarks like CIS benchmarks. This enhances the security posture of the cluster.
Deploying security agents, intrusion detection systems, or vulnerability scanners on specific nodes with sensitive data helps identify and mitigate security threats.
- Storage Provisioning: Running a storage plugin or system on every node can provide shared storage resources to the entire cluster. This allows pods to access and persist data in a scalable and reliable manner.
Storage solutions like Ceph, GlusterFS, or distributed file systems can be used to provide storage to Kubernetes workloads.
- Network Management: Deploying a network plugin or firewall on every node ensures consistent network policy enforcement across the cluster.
Network plugins like Calico, Flannel, or Cilium manage network connectivity between pods and enforce network policies such as network segmentation and security rules.
DaemonSet Example
As per Kubernetes version 1.28, we can't use the CLI command to deploy a Daemonset but we can do it via using the YAML config file by using kubectl apply -f filename.
let us assume that we are about to deploy an nginx on multiple nodes.
apiVersion: apps/v1
kind: DaemonSet
metadata:
  name: nginx-daemonset
  labels:
    app: nginx
spec:
  selector:
    matchLabels:
      app: nginx
  template:
    metadata:
      labels:
        app: nginx
    spec:
      nodeSelector: # Specify node label selectors
        node-type: worker # I target nodes labeled with "node-type: worker
      containers:
      - name: nginx-container
        image: nginx:latest
        ports:
        - containerPort: 80
        resources:
          requests:
            memory: "64Mi"
            cpu: "250m"
          limits:
            memory: "128Mi"
            cpu: "500m"
DaemonSet will ensure that one pod with an Nginx container is running on each node that has the label "node-type: worker." The Nginx container will listen on port 80 and have resource limits and requests defined.
Implement Taints and Tolerations in a DaemonSet
Well Taints and Tolerations are the Kubernetes feature that allows you to ensure that pods are not placed on inappropriate nodes. We taint the nodes and add tolerations in the pod schema. the CLI command goes like kubectl taint nodes node1 key1=value1:<Effect>
There are 3 different kinds of effects and they are :
NoSchedule: Kubernetes scheduler will only allow scheduling pods that have tolerations for the tainted nodes.PreferNoSchedule:Kubernetes scheduler will try to avoid scheduling pods that don’t have tolerations for the tainted nodes.NoExecute: Kubernetes will evict the running pods from the nodes if the pods don’t have tolerations for the tainted nodes.
over here I'm using NoSchedule.
kubectl taint nodes -l node-role=worker my-taint-key=my-taint-value:NoSchedule
After adding the taint to the nodes, you can apply the DaemonSet YAML you provided. But make sure the YAML configuration will go like this.
apiVersion: apps/v1
kind: DaemonSet
metadata:
  name: nginx-daemonset
  labels:
    app: nginx
spec:
  selector:
    matchLabels:
      app: nginx
  template:
    metadata:
      labels:
        app: nginx
    spec:
      nodeSelector:
        node-role: worker # Node label key and value
      tolerations:
      - key: my-taint-key
        operator: Equal
        value: my-taint-value
        effect: NoSchedule
      containers:
      - name: nginx-container
        image: nginx:latest
        ports:
        - containerPort: 80
        resources:
          requests:
            memory: "64Mi"
            cpu: "250m"
          limits:
            memory: "128Mi"
            cpu: "500m"
DaemonSet Node Affinity
We can even take full control over our hands using nodeAffinity. The DemonSet controller then manage and crate pods which are matched by nodeAffinity.The nodeAffinity comes with set rules and some of them are :
-
NodeSelectorAffinity: This type of affinity specifies simple node selector rules based on node labels.
requiredDuringSchedulingIgnoredDuringExecution: Pods with this rule must be scheduled on nodes that satisfy the node selector rules. If no nodes match the criteria, the pod remains unscheduled.
preferredDuringSchedulingIgnoredDuringExecution: Pods with this rule are preferred to be scheduled on nodes that satisfy the node selector rules, but they can be scheduled elsewhere if necessary.
- NodeAffinity: This type of affinity allows more advanced node selection based on expressions.
requiredDuringSchedulingIgnoredDuringExecution: Specifies that the pod must be scheduled on nodes that satisfy all of the specified expressions.
preferredDuringSchedulingIgnoredDuringExecution: Specifies that the pod prefers to be scheduled on nodes that satisfy the specified expressions, but it can be scheduled elsewhere if needed.
To use nodeAffinity in a DaemonSet, you can specify the affinity field in the pod template's spec. Here's an example of how to set up node affinity for a DaemonSet:
apiVersion: apps/v1
kind: DaemonSet
metadata:
  name: nginx-daemonset
  labels:
    app: nginx
spec:
  selector:
    matchLabels:
      app: nginx
  template:
    metadata:
      labels:
        app: nginx
    spec:
      nodeSelector:
        node-type: worker
      affinity: # Add node affinity rules here
        nodeAffinity:
          requiredDuringSchedulingIgnoredDuringExecution:
            nodeSelectorTerms:
            - matchExpressions:
              - key: node-type # Customize this based on your node labels
                operator: In
                values:
                - worker # Customize this based on your node labels
      containers:
      - name: nginx-container
        image: nginx:latest
        ports:
        - containerPort: 80
        resources:
          requests:
            memory: "64Mi"
            cpu: "250m"
          limits:
            memory: "128Mi"
            cpu: "500m"
Rolling Update, Rollback, and Deleting DaemonSet
Let us now learn how we can Update, Rollback and Delete the DaemonSet
Rolling Update
Rolling Updates refer to a method of deploying updates or changes to applications while ensuring that the service remains available and stable throughout the update process. Rolling updates are a key feature in maintaining high availability and minimizing service disruption. we can simply edit the YAML for the update.
How does it work?
Here's how rolling updates works:
- Parallel Deployment: Instead of stopping all instances of the old version and starting all instances of the new version simultaneously, rolling updates deploy the new version incrementally, one or a few instances at a time.
- Gradual Transition: During a rolling update, a few new instances of the application are deployed, and traffic is gradually shifted from the old instances to the new ones. This allows the system to gracefully transition without causing a complete outage.
- Monitoring and Validation: The update process is continuously monitored for issues. Health checks and readiness probes are used to ensure that the new instances are healthy and ready to serve traffic before the old instances are taken down.
- Scaling and Load Balancing: Scaling and load balancing mechanisms may be employed to ensure that the system can handle increased traffic during the update, especially if the new version introduces changes that affect the application's resource utilization.
- Rollback: If issues are detected during the update, the process can be rolled back to the previous version, minimizing downtime and potential impact on users.
Strategy For Update
Two parameters determine the pace of the rollout: maxUnavailable and maxSurge.
They can be specified in the absolute number of pods, or percentage of the replica count.
There will always be at least replicas - maxUnavailable pods available.
There will never be more than replicas + maxSurge pods in total.
There will therefore be up to maxUnavailable + maxSurge pods being updated.
Rollback
Oh crap, we just updated the serves and not it is the least effective, What should we do to make things better like the previous one?
The Rollback is always a savior when we run into error-based updates. Here is how you can do it.
kubectl rollout undo daemonset <daemonset-name>
We can even do it by editing YAML. But what if the derived state we want is sitting way back? , When we apply kubectl rollout undo daemonset it will take us to the previous update but if we try to apply it again it will make a cycle between the last and the current state. It is very frustrating when we get stuck in a loop like this. To imagine it, here is a diagram below to understand things better.

Now to go bad to our healthy V1 state we to debug it and what is the better way than describing it? here is a command for it kubectl describe daemonset <name>
It is often recommended to apply the change by editing the YAML file for the DeamonSet cause most of the CLI commands do not work with the DeamonSet so generally it's best to edit the Config file.
Deletion
Well for deleting a DaemonSet We can simply use the CLI command which is kubectl delete daemonset <daemonset-name>.
DaemonSet Pod Priority
We can set a higher pod PriorityClass to the DaemonSet in case you are running critical system components as a Deamonset. This ensures that the DaemonSet pods are not preempted by lower-priority or less critical pods.
Here is the YAML File to understand it better.
apiVersion: scheduling.k8s.io/v1
kind: PriorityClass
metadata:
  name: high-priority
value: 1000000 # Set the priority value (adjust as needed)

---

apiVersion: apps/v1
kind: DaemonSet
metadata:
  name: nginx-daemonset
  labels:
    app: nginx
spec:
  selector:
    matchLabels:
      app: nginx
  template:
    metadata:
      labels:
        app: nginx
    spec:
      priorityClassName: high-priority # Assigned the PriorityClass here
      containers:
      - name: nginx-container
        image: nginx:latest
        ports:
        - containerPort: 80
        resources:
          requests:
            memory: "64Mi"
            cpu: "250m"
          limits:
            memory: "128Mi"
            cpu: "500m"
Resolving Issues with DaemonSets
A DaemonSet is called unhealthy when any pod is not running on the node. The generic reason for that is pod status is crashloopbackoff, the pod is pending or in an error state. We can fix this by:
- Pod might be running out of resources. We can lower the requested CPU and memory of the DaemonSet.
We can move some pods off of the affected nodes to free up resources. Use taint and tolerations to prevent the pods from running on certain nodes
Review the node selector in the DaemonSet spec to ensure it matches your node labels. Incorrect node selectors can lead to pods not being scheduled.
Using various debugging tools and utilities like kubectl exec, kubectl describe, and kubectl get events to gather more information about the issue.

Top comments (0)