
hey yes you prepare yourself to create an image drag and drop and add it to your Django project using pure javascript and Django forms for validation
first of all, if you want to start where I'm, you need to download this basic app from this link
The Coding part💻💻
in this simple app im using Django==3.0.7, Pillow==7.1.2, don't forget to install them, make/run migrations and create a superuser

let's start with our template index.html
we first need to make look better And here comes the role of CSS
in the styles.css add this code
/*image/static/styles.css*/

   .file-input{
     display: grid;
     grid-template-columns: auto;
     grid-template-rows: auto;
     width: 10rem;
     max-width: 12rem;
     height: 10rem;
     border: 1px dashed #4f86c3;

   }

  .file-input input{
    width: 0.1px;
    height: 0.1px;
    opacity: 0;
    overflow: hidden;
    position: absolute;
    z-index: -1;
   }
   .file-input label{
    width: 100%;
    height: 100%;
    cursor: pointer;
   }

   .file-input:hover{
     background-color: beige;
   }
   .file-input:active{
    border: 1px solid #4f86c3;
    box-shadow: inset 0 0 0 #4f86c3, 0px 10px 20px -10px #4f86c3;
  }
explanation :
.file-input input: we added this to hide the main file input because we are going to create a new one
.file-input:active: to add some effect when the user clicks
.file-input label: this is for a label that we are going to add now it will take the full width and high of its container and display some text on it to tell the user that he can click or drag and drop an image here
its time to add the label now 🙄, so go to the index.html
and add this inside the file-input div class
 <label class=" text-muted text-center" for="id_image">
                choose an image or drag and drop a one here
  </label>
our HTML template now will look like this
....
<body>

<form method="POST" >
    <div class="form-group">
        {{form.image.label_tag}}
        <div class="file-input">
            <label class=" text-muted text-center" for="id_image">
                choose an image or drag and drop a one here
            </label>
            {{form.image}}
        </div>

    </div>
</form>
...
but now I think that we need some font-awesome magic If you think the same add this right before the end of the body tag
....
<script src="https://cdnjs.cloudflare.com/ajax/libs/font-awesome/5.14.0/js/all.min.js" integrity="sha512-YSdqvJoZr83hj76AIVdOcvLWYMWzy6sJyIMic2aQz5kh2bPTd9dzY3NtdeEAzPp/PhgZqr4aJObB3ym/vsItMg==" crossorigin="anonymous"></script>
</body>...
before we start the javascript part lets center the form and make the label bolder
<!-- this is how we can
 center a form horizontally  using bootstrap-->
<div class="w-25 mx-auto mt-5">
    <form method="POST" >
        <div class="form-group">
            {{form.image.label_tag}}
            <div class="file-input">
....
</div>
now in our styles.css add this line of code
 label{
      font-weight: bold;
  }
JavaScript Part 😎
first, we need to prevent the dragover and the drop from happening because i don’t want to see a new window opening every time i try to drag and drop an image
window.addEventListener("dragover",function(e){
    e = e
    e.preventDefault();
  },false);
  window.addEventListener("drop",function(e){
    e = e
    e.preventDefault();
  },false);
here is the main part of our js code, its now when we will get the image and show it to the user in our index.js add this code
file_inputs_drop  = document.getElementsByClassName('file-input')
Array.prototype.forEach.call(file_inputs_drop, element=>{ #loop through the inputs
    input=  element.getElementsByTagName('input')[0]
    element.addEventListener('drop', event=>{
        handle_file(element,event.dataTransfer.files[0])
        element.getElementsByTagName('input')[0].files = event.dataTransfer.files

        console.log(element.getElementsByTagName('input')[0].files)
    })

    /// get input inside this element
    input.addEventListener('change', event=>{
        handle_file(element,event.target.files[0],)
    })
})
Explanation:
file_inputs_drop = document.getElementsByClassName('file-input'): we used this to get all the file inputes in case you want use a multi drag drops
  element.addEventListener('drop', event=>{
        handle_file(element,event.dataTransfer.files[0])
        element.getElementsByTagName('input')[0].files = event.dataTransfer.files

        console.log(element.getElementsByTagName('input')[0].files)
    })
⬆ in this part (above) what we did is we added a drop event to the image input, its like the input waiting for the user to drag and drop an image in the drag/drop section, to show it to him
 /// get input inside this element
    input.addEventListener('change', event=>{
        handle_file(element,event.target.files[0],)
    })
⬆and here (above) we add change event in the case when the user drag and drop another picture,to replace the old image
the handle_file function :
handle_file = (element,file)=>{
    const reader = new FileReader();
    reader.readAsDataURL(file)
    reader.onload = function fileReadCompleted() {
            delete_el(element,'label')
            delete_el(element,'droped-image')
            const img = new Image();          // creates an <img> element
            img.src = reader.result;         // loads the data URL as the image source
            img.className = "droped-image"
            element.appendChild(img);   // adds the image to the body

    };
}
⬆this function shows the dropped image in the drag/drop section
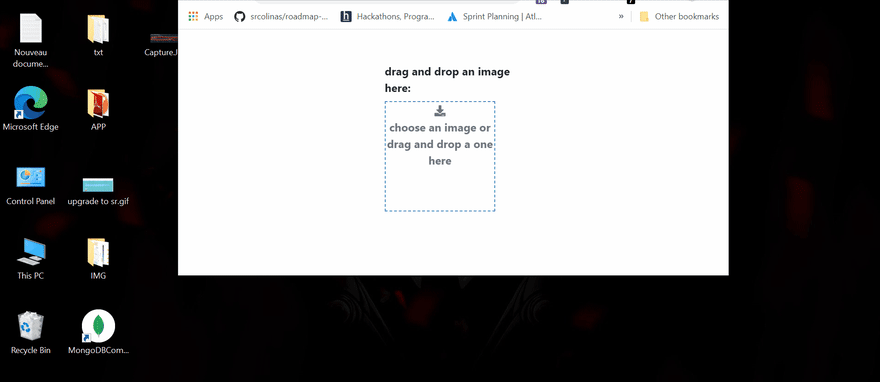
this is how our small app looks like now, we are done with client-side
we need to send our data to the server-side using ajax
add these lines of code
in the bottom of your index.js
//////// THE AJAX PART ////////////////////

  ///////////// get cookie /////////////////
function getCookie(name) {
  var cookieValue = null;
  if (document.cookie && document.cookie !== '') {
      var cookies = document.cookie.split(';');
      for (var i = 0; i < cookies.length; i++) {
          var cookie = cookies[i].trim();
          // Does this cookie string begin with the name we want?
          if (cookie.substring(0, name.length + 1) === (name + '=')) {
              cookieValue = decodeURIComponent(cookie.substring(name.length + 1));
              break;
          }
      }
  }
  return cookieValue;
}
var csrftoken = getCookie('csrftoken');
button = document.getElementsByTagName('button')[0]

  button.addEventListener('click', event=>{
    event.preventDefault()
    var xhttp = new XMLHttpRequest();
    formData = new FormData()
    formData.append('image', document.getElementById('id_image').files[0])

    xhttp.open("POST", '/', true);
    xhttp.setRequestHeader("X-CSRFToken", csrftoken);


    xhttp.send(formData)
    xhttp.onreadystatechange = function() {
        if (this.readyState == 4 && this.status == 200) {
            data = JSON.parse(this.responseText)

              console.log(data)

        }
    }
  })
im using getCookie to generate a csrf token because
Imposes on us to use csrf token with post request
Django Part 🐍🐍 :
first of all, you need to add a submit button inside the image form, (look at the code below)
.....
.....
                {{form.image}}
            </div>

        </div>
        <button type="submit">submit</button>
    </form>
....
now go to your settings.py and add
#settings.py
# Base url to serve media files
MEDIA_URL = '/media/'
# Path where media is stored
MEDIA_ROOT = os.path.join(BASE_DIR, 'media')
in your main url file add this
from django.conf import settings
from django.conf.urls.static import static

## server media files when debug false
if settings.DEBUG:
    urlpatterns += static(settings.MEDIA_URL,
                          document_root=settings.MEDIA_ROOT)
now we are done and we can save the image, but let's inform the user about errors and success
go to the views.py and replace the data variable with an HTTP response
#add this imports
from django.http import JsonResponse
from .models import ImageModel

def image(request):
    form = ImageForm()
    if request.method== "POST":
        form = ImageForm(request.POST, request.FILES)
        if form.is_valid():
            ImageModel.objects.create(image=form.cleaned_data.get('image'))#new
            return JsonResponse( {'details': "image saved  successfully"})#new
        else :
            data = {'details': form.errors}
            return JsonResponse(data)#new

    return render(request, 'image/index.html', {'form':form})
....
💥you can check your admin page you will find the images there
if you want to see the full code check this link

Top comments (0)