
This post was originally written by Nick Littman, Solution Engineer @Ably and Shashwat Johari, Solutions Engineer @Confluent on the Ably Blog
Realtime data is rapidly becoming a standard in many consumer applications. From responsive chat applications to low latency financial applications, nobody wants to refresh their browser for new data. With lots of data bouncing around Kafka behind a firewall, it begs the question of how you can serve this information to your users without sacrificing on latency. Ably provides a seamless way to serve this data to your end users devices, globally, through a direct integration with Confluent Cloud.
Based on Kafka and powered by the Kora Engine, Confluent Cloud enables you to stream, process and govern high volumes of data from disparate sources at low latency and in a secure, fault-tolerant way. Pairing this with Ably, you can get all of these guarantees at the edge. For more reasons to use these two technologies together, you can check out this article.
In this blog post, we’re going to walk through configuring the Ably Kafka Connector as a Confluent Cloud Custom Connector. The goal for this is to help you get a quick start on building with both Ably and Confluent Cloud. If you’d like to skip right to the code, click me!
Prerequisites
Before you get started with the tutorial, make sure you have all of the necessary accounts created and tools installed.
- Ably Account → https://ably.com/sign-up
- Confluent Cloud Account → https://www.confluent.io/get-started/
- Terraform installed → https://developer.hashicorp.com/terraform/downloads
- Node.js and npm installed → https://nodejs.org/en/download
Grabbing keys for later
For your Ably API key, you’ll need to navigate to your Ably dashboard, select the app you want, and click API Keys on the menu bar. For screenshots and more detailed instructions, check out these docs. Once you have the Root key, copy it and store it somewhere safe, we’ll need this for our first step.
While we’re grabbing API keys, let’s pop on over to Confluent Cloud so we’re prepared for our Terraform step. You’ll want to create a Global Cloud API Key and Secret on Confluent Cloud by following the steps here. Make sure to download and store both the API Key and Secret in a safe place as we will need these while creating and destroying Confluent Cloud resources with Terraform.
Additionally, for this tutorial we’re assuming that you have a basic understanding of Kafka, React, and Terraform. If you need primers on those tools we’ve included a set of resources below that will get you up to speed fast :
- Kafka → https://docs.confluent.io/kafka/introduction.html
- React → https://react.dev/
- Terraform → https://developer.hashicorp.com/terraform/intro
A lot to get through, I know. We’ll wait here while you run through these prerequisites.

Phew, that took a while, glad you made it through all that!
Cloning and configuring the project
Time to get started. You’ll want to grab a copy of the repo to get started. I listed a couple resources to get started but if you’d prefer a quick link to the repo, here you are.
For a refresher on cloning the repo, check out these docs. If you prefer to download a .zip of the repo, you can find instructions here. Once you’ve got the project locally, open it up in your code editor or navigate to the root directory.
Now we’ll need to configure our project. You’ll want to make a copy of the .env.example file and rename it to .env.local. This is where we will store our Ably api key from the prerequisites. Thankfully NextJS has native support variables from a .env file so we can just place it in our .env.local file.
API_ROOT=http://localhost:3000
ABLY_API_KEY="<YOUR_ABLY_API_KEY>"
Time to build our Confluent Cloud resources using Terraform
Time to break out your trusty Terminal for this next step. Navigate to the terraform directory of your repo, initialize and then apply the Terraform script, like this:
cd terraform
terraform init
terraform apply
You’ll be prompted for your Confluent Cloud API Key and Secret. Now we can reach into that safe place (your notes app lol) and paste them.
Plan: 8 to add, 0 to change, 0 to destroy.

Do you want to perform these actions?
  Terraform will perform the actions described above.
  Only 'yes' will be accepted to approve.

  Enter a value: yes
When asked for confirmation, say yes.
Congrats - the script ran successfully but you’re probably wondering, ‘what in the world did this do?’
Let’s debrief.
- The script sets up a Confluent Cloud Environment, essentially a workspace to house resources like clusters and schema registries for better organization.
- It also creates a Basic Cluster, a type of Confluent Cloud Kafka cluster designed for developmental or small production workloads.
- The Schema Registry Instance that's part of the setup is crucial for storing and managing schemas for data formats like Avro, Protobuff, or JSON Serialized enhancing data compatibility.
- A Service Account is established for secure interactions with Confluent Cloud resources, usually following the principle of least privilege.
- A Kafka topic named 'orders' is created to categorize and store order-related events, this can be anything but we set it up to process fake order data.
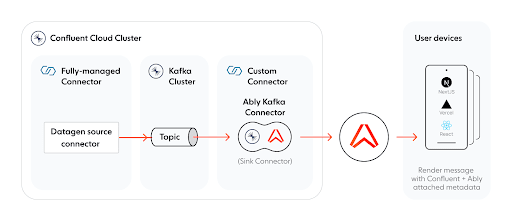
- Finally, a Datagen Source Connector is introduced to generate mock data, serving as a testing or demonstration tool for Kafka streaming.
We just saved a ton of clicks and typing doing this. I haven’t counted how many, but let’s call it a ton.
Upload the Ably connector to Confluent Cloud
We’re going to need to download the Ably connector. Follow the manual installation instructions in the readme in this repo to obtain the .zip of the connector.
Next, let’s navigate to Confluent Cloud. Once you’re in, navigate to the DemoEnvironment in Environments, select the Basic Cluster you created called DemoCluster. Next, go to the Connectors tab, and click on Add Connector. We’re going to be creating a Custom connector so we’ll need to click Add Plugin.
Custom connectors are connectors created based on Kafka Connect plugins that are uploaded to Confluent Cloud by users. This includes connector plugins that are built from scratch, modified open-source connector plugins, or third-party connector plugins.
Let’s give the connector a name and set the class to com.ably.kafka.connect.ChannelSinkConnector and then select Sink Connector. Grab the .zip of the connector by clicking Select connector archive and then click Submit to upload it. Boom! Now our Custom Connector is uploaded and ready to go!
Configure and deploy the Ably Connector
With our Ably Custom Connector ready to use. Let’s head back to the Connectors tab and select the plugin (with the name we created in the previous step) to start configuring. It should show up in the list of plugins for you to easily use. Once selected, hit Generate API key & download to create a Global API key for the connector then hit “Continue”.
Select the option to configure your connector via JSON and insert the following, replacing the client.key placeholder including the <> with your Ably API key:
{
"client.key": "<YOUR_ABLY_API_KEY>",
"connector.class": "com.ably.kafka.connect.ChannelSinkConnector",
"tasks.max": "1",
"group.id": "ably-connect-cluster",
"topics": "orders",
"client.id": "Ably-Kafka-Connector",
"channel": "#{topic}",
"message.name": "#{topic}_message",
"key.converter": "org.apache.kafka.connect.converters.ByteArrayConverter",
"value.converter": "org.apache.kafka.connect.converters.ByteArrayConverter",
"value.converter.schemas.enable": "false"
}
Looking good so far. Hit the “Continue” button and then you’ll be asked for an endpoint, enter rest.ably.io:443:TCP. This domain will serve as an allowed egress endpoint for data flowing out of the cluster and into Ably. Continue through the remaining steps of the connector configurations with the default selections and, drum roll please, hit launch!
Let’s run this thing!
Fingers crossed we’ve got everything configured so far. Now for the fun part, let’s run this thing. Open your terminal within the project directory and run the following.
npm install
npm run dev
If you’ve managed to make it this far, pop open http://localhost:3000. You’ll now be able to see messages from our datagen source connector streaming directly in the browser. If you click on one of the messages you can inspect additional metadata. All of these messages are being delivered over an Ably real-time connection.

Clean up your Confluent Cloud resources
You’ll probably want to make sure to clean up anything you created in Confluent Cloud so you don’t burn through your free credits. Thanks to the Terraform scripts and this handy guide, you’ll be able to rebuild this anytime you want.
First, let’s delete the Custom Connector in the Confluent Cloud UI.
Go back to the Connectors tab on your Confluent Cloud cluster, select the custom connector, navigate to the connector’s Settings tab and select Delete Connector.
Note: The Datagen Connector will be deleted with the rest of the Confluent Cloud environment in the next step.
Now, let’s spin down the Confluent Cloud environment using Terraform.
Run the following command on your terminal and confirm by typing "yes" when prompted. You will once again need to provide your Cloud API key and secret:
terraform destroy
Do you really want to destroy all resources?
  Terraform will destroy all your managed infrastructure, as shown above.
  There is no undo. Only 'yes' will be accepted to confirm.

  Enter a value: yes
Wrap up
Hopefully you’ve seen how easy it is to get started with these two powerful technologies. We haven’t even scratched the surface yet of what is possible. Now that the data is available at the edge, we can empower users to interact with that data over chat and collaboration. We could even configure more data streams to pipe into Ably from Confluent Cloud or even collect data from the edge and send it right back into Confluent Cloud through the firehose integration.
Stay tuned for next time where we venture deeper into the possibilities of this power combination of Confluent Cloud and Ably. If you have any questions or ideas in the meantime, reach out on Twitter or catch Nick [nick dot littman at ably dot com] and Shashwat [sjohari at confluent dot io] on email.

Top comments (0)