How would you transfer the links/text sent by your friend on the WhatsApp Smartphone app to the desktop?
The obvious answer is WhatsApp Web, right? Yes, but sometimes WhatsApp web just doesn't load and keeps retrying, especially if you are having a poor internet connection like me 😑. What would you do then? Mailing!? Not a good idea, since you have to copy text, then, open the mail app, paste it and send. Phew!😰 Too many clicks, right?
What if you can just forward the text message to a WhatsApp contact and it automatically reflects on your Pastebin from where you can access your content on the desktop. Isn't this way easier😁 than the previous method (mailing)?
This is what we will learn to build in this blog.
Table of Contents
- Overview
- Twilio WhatsApp Sandbox Setup
- Pastebin Setup
- Configuring end-point URL to handle incoming message by a Netlify Function
- Adding our just configured end-point URL to Twilio WhatsApp sandbox
- Drawbacks
- Future scope
- References
- Conclusion
Overview
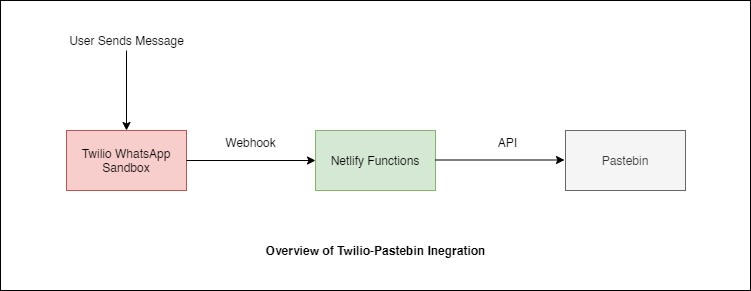
Let's see how this works 👀, you send a WhatsApp message to a specific number, that is Twilio registered number. Upon receiving a message Twilio Sandbox sends a payload to an end-point URL 🔗 we provide. We create an end-point URL using Netlify Functions, on receiving payload, the Netlify function is triggered and a script 📜 is executed in which we call Pastebin API, and paste our message. Also, an acknowledgment ✔ message is sent back to the user number.
I have shown below what we want to achieve 🏆 at the end of this blog.
- Send a message to a WhatsApp number.

- The message is pasted on the Pastebin site and acknowledgment is returned about the status of pasting.
Tools
Twilio WhatsApp Sandbox Setup
What is Twilio?
Twilio allows software developers to programmatically make and receive phone calls, send and receive text messages, and perform other communication functions using its web service APIs.
In our case, we will be using Twilio's WhatsApp Sandbox. Let's setup it.
Step 1: Sign up on Twilio
Step 2: Go to console and create a new account

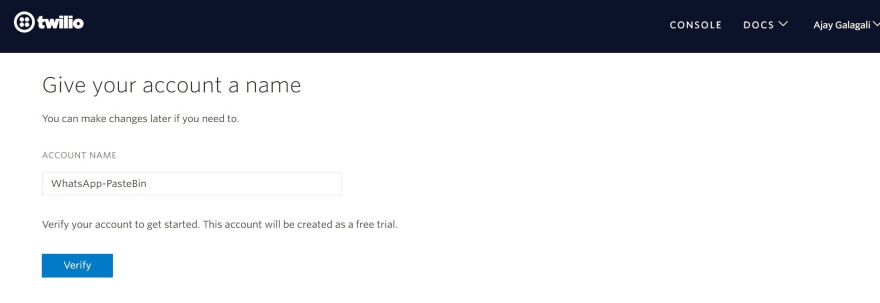
Give a catchy name to your project account
Step 3: Verify your account and answer the questions asked
Step 4: Go to Try It Out/ Try WhatsApp Tab

Follow the few steps as instructed by Twilio.
After following the steps, you would be guided to the WhatsApp Sandbox Settings page.

Time for mini-celebrations! 🎉 We have set up Twilio WhatsApp Sandbox successfully!
Twilio hits to end-point URL (which we provide later) whenever your Twilio Sandbox number receives a new message. Default end-point URL is configured to reply to you with the default message as shown below.

We will come back later to Twilio after setting up the end-point URL to handle incoming messages from the sandbox.
Pastebin Setup
We need to get some credentials from Pastebin.
Create a free account on Pastebin.
Getting Developer API Key
Get your dev key here (API Section) after log in.

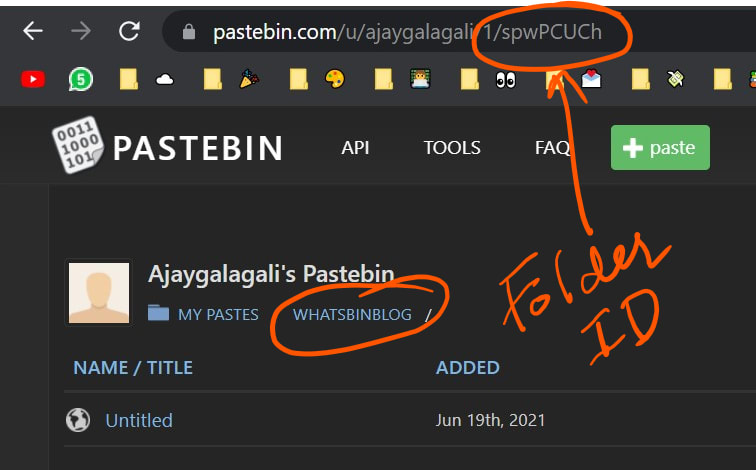
Getting Folder Id
Create a folder and copy its Id

Open the folder and copy its Id from URL
Now we have Developer Key and Folder Id. It's time to create your user key.
Creating Pastebin User Key
Run this curl command in this site to get your user key.
Note: Only one key can be active at the same time for the same user. This key does not expire, unless a new one is generated.
curl -X POST -d 'api_dev_key=YOUR_DEV_KEY' -d 'api_user_name=YOUR_USERNAME' -d 'api_user_password=YOUR_PASSWORD' "https://pastebin.com/api/api_login.php"

Configuring end-point URL to handle incoming message by a Netlify Function
Installing Netlify CLI and configuring
Prerequsite
NodeJs installed on your system
Step 1: Create a account on Netlify and a team
Step 2: Run this command from any directory in your terminal:
npm install netlify-cli -g
This installs Netlify CLI globally, so you can run netlify commands from any directory.
Step 3: Run this command to give access of your netlify account to Netlify CLI
netlify login
This will open a browser window, asking you to log in with Netlify and grant access to Netlify CLI.
Program to integrate Twilio endpoint and Pastebin
Read the comments to understand the code.
📁 Check out complete project files here.
// To make POST request to Pastebin API
// https://www.npmjs.com/package/axios
const axios = require("axios").default;

// To convert incoming URLencoded data to readable format
// https://www.npmjs.com/package/qs
const qs = require("qs");

// Keys and Tokens stored in Environment Variables

// Twilio Credentials
const twilioAccountSID = process.env.TWILIO_ACCOUNT_SID; // Available on your Twilio Dashboard
const twilioAuthToken = process.env.TWILIO_AUTH_TOKEN; // Available on your Twilio Dashboard
const twilioNumber = process.env.TWILIO_NUMBER; // WhatsApp Sandbox Contact Number
const clientNumber = process.env.CLIENT_NUMBER; // Your registred WhatsApp Number with Twilio

// Pastebin Credentials
const pbDevKey = process.env.PASTEBIN_DEV_KEY;
const pbUserKey = process.env.PASTEBIN_USER_KEY;
const pbFolderKey = process.env.PASTEBIN_FOLDER_ID;

// Client to send messages
// https://www.npmjs.com/package/twilio
const twilioClient = require("twilio")(twilioAccountSID, twilioAuthToken);

// Docs on event and context https://www.netlify.com/docs/functions/#the-handler-method
exports.handler = async (event, context) => {
try {
let dataMap = qs.parse(event.body.toString()); // Payload recieved from Twilio webhook
const content = dataMap.Body; // Message
var pasteTitle = content.slice(0, 50) + "..."; // Title of Paste

// Uploading message recieved from Twilio to Pastebin
// Refer Pastebin API for more details - https://pastebin.com/doc_api
const res = await axios({
method: "post",
url: "https://pastebin.com/api/api_post.php",
data: qs.stringify({
api_dev_key: pbDevKey,
api_option: "paste",
api_user_key: pbUserKey,
api_paste_code: content,
api_paste_name: pasteTitle,
api_paste_private: 0, // 0 => Public, 1 => Unlisted, 2=> Private
api_folder_key: pbFolderKey,
}),
headers: {
"content-type": "application/x-www-form-urlencoded;charset=utf-8",
},
});

// On sucessfull POST request
var successString = `Pasted Succesfully! at ${res.data}`;
console.log(successString);

await replyBack(successString); // Calling Reply Function at Success

return {
statusCode: 204,
};
} catch (err) {
// On Failed POST request
var errorString = "There was error => " + err.toString();
console.log(errorString);

await replyBack(errorString); // Calling Reply Function at Failure

return { statusCode: 500, body: err.toString() };
}
};

// Replies to user on WhatsApp with ackowledgement of paste on Pastebin
async function replyBack(msg) {
try {
const a = await twilioClient.messages.create({
from: "whatsapp:" + twilioNumber,
body: msg,
to: "whatsapp:" + clientNumber,
});
console.log(`Reply sent succesfully`);
return 0;
} catch (err) {
console.log("There was error while replying back.. => " + err.toString());
return -1;
}
}
Now, let's learn how to host this program on Netlify Functions.
Hosting on Netlify Functions
Prerequsite
Code Editor (I am using VSCode)
Step 1: Open a empty folder in VSCode
Step 2: Create sub-folder named "functions" under parent folder
Step 3: Create a your_file_name.js file and paste this code.
Step 4: Run command npm init to create package.json file.
Step 5: Run this command npm install , this will install required npm packages locally under folder name node_modules
Step 6: Run command netlify init
Select the team and site name as shown below

Step 7: Create a file netlify.toml in parent directory and paste the following code.
[build]
functions = "functions/"
Using this config file, netlify can recognize the path to functions.
By now your folder structure should be like below:
📦ParentFolderName<br>
┣ 📂.netlify<br>
┃ ┗ 📜state.json<br>
┣ 📂functions<br>
┃ ┗ 📜your_file_name.js<br>
┣ 📂node_modules<br>
┃ ┗ 📜....<br>
┃ ┗ 📜....<br>
┣ 📜.gitignore<br>
┣ 📜netlify.toml<br>
┣ 📜package-lock.json<br>
┗ 📜package.json<br>
Step 8: Deploying function to Netlify
Run command netlify deploy --prod .

Step 9: Adding Environmental Variables to Netlify console.
Go to Netlify console -> Your-Site->Site-Settings->Build-&-Deploy->Environment
https://app.netlify.com/sites/YOUR_SITE_NAME/settings/deploys#environment
Click on Edit Variable and add all necessary variable we used in code. Make sure variable names are same as used in code.

Step 10: Run deploy command netlify deploy --prod again to update our function with just added enviornment variables.
Adding our just configured end-point URL to Twilio WhatsApp sandbox
Go to Netlify Console-> YOUR_SITE -> Functions
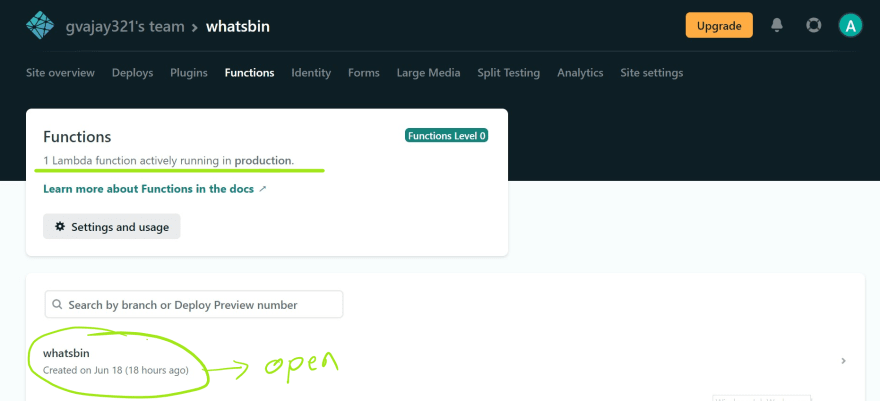
After opening your function tab, copy the end-point.
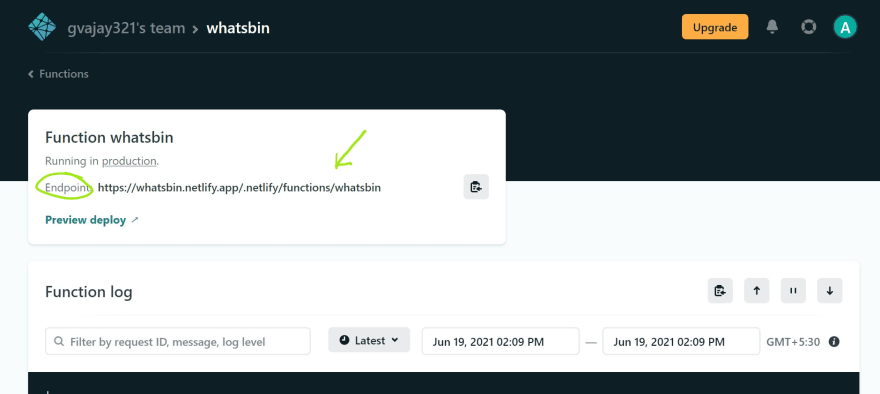
Paste the netlify function end-point in Twilio's WhatsApp sandbox settings and save.

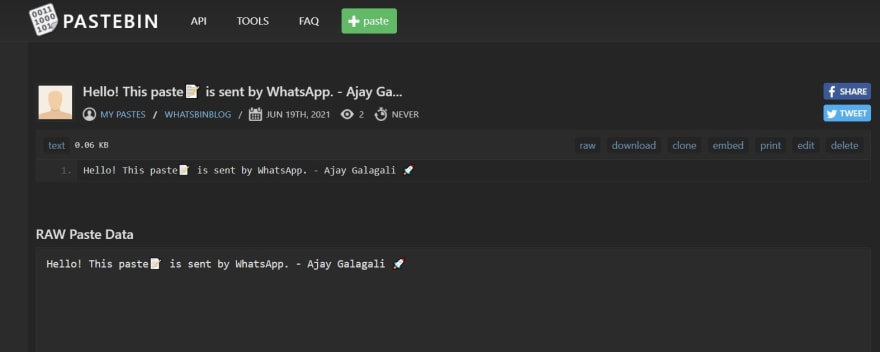
That's it! 🍾🥂 Now, any WhatsApp message sent to Twilio's number will be pasted in your Pastebin account under the folder you mentioned.
Drawbacks
- Pastebin free account has a restriction on pastes a free account user can do in 24 hrs period. More details at https://pastebin.com/faq#11a
- If you try to paste after hitting limits, Pastebin API returns an error with 422 code.
Future scope
- Develop your own Pastebin clone to minimize said drawbacks.
- Explore more about WhatsApp Business API and bypass Twilio.
Conclusion
I implemented this to solve my own problem, hope it solves others' too. I learned about Webhooks, Hosting on Netlify, and explored Twilio and Pastebin API.
References
- https://www.twilio.com/docs/whatsapp/sandbox
- https://pastebin.com/doc_api
- https://docs.netlify.com/functions/overview/
- https://www.youtube.com/watch?v=41NOoEz3Tzc (Webhook tutorial)
Thank you :)
Hit me up, if you need any help implementing this.
Note:
This is my first blog. I will be very happy to get your feedback and improve myself for the next blog.
Original Blog at Hashnode
See you in next blog 👋

Oldest comments (1)
Great work. Thanks for sharing.