
Following on from my post about moving from a CMS to Jekyll, the next pain point to tackle is the build and deployment of your site.
Jekyll does a great job of compiling your website into a neat _site folder which you can then FTP to your server, however this does mean that you need to have the convenience of an FTP client at hand. A better solution would be to automate this process and seeing our source code is already being stored on GitHub, we're already half way there.
Meet Travis
Travis CI is a free Continuous Integration service for testing and deploying your open source GitHub projects (a paid option is available for private Github projects).
Add a config file to your project, point Travis CI to your GitHub repo and when you push your code or merge a pull request, Travis CI builds your Jekyll site in a VM and deploys your code as per the settings in the config.
So, let's get started.
Creating a Travis CI config file
Create a new file in the root of your Jekyll project and name it .travis.yml. As this is a 'Dotfile' it may be hidden in Finder but should appear in your text editor. The contents of this file will tell Travis CI how to build and deploy your site. This is the contents of my file.
language: ruby
rvm:
  - 2.3.1

install:
  - bundle install
  - gem install jekyll
  - gem install jekyll-sitemap
  - gem install emoji_for_jekyll

branches:
  only:
    - master

env:
  global:
    - JEKYLL_ENV=production

notifications:
  email:
    recipients:
      - ajaykarwal@gmail.com
    on_success: always
    on_failure: always

script:
  - chmod +x _scripts/build.sh
  - _scripts/build.sh

after_success:
  - chmod +x _scripts/deploy.sh
  - _scripts/deploy.sh

sudo: false
addons:
  apt:
    packages:
      - ncftp
Let's break this down step-by-step
Define the build environment and dependencies
language: ruby
rvm:
  - 2.3.1

install:
  - bundle install
  - gem install jekyll
  - gem install jekyll-sitemap
  - gem install emoji_for_jekyll

branches:
  only:
    - master

env:
  global:
    - JEKYLL_ENV=production
This section tells Travis CI that the build requires Ruby and sets the version to 2.3.1. It also lists any Gem dependencies. 'jekyll-sitemap' and 'emoji_for_jekyll' are specific to my project.
The branches section allows you to control which branch in your repository you want to build. In my case I am just building the master branch but this section can be used to set up a staging environment too.
Setting JEKYLL_ENV to production means we can test for this environment variable while doing local testing to ignore things like Google Analytics.
Building and Deploying the site
script:
  - chmod +x _scripts/build.sh
  - _scripts/build.sh

after_success:
  - chmod +x _scripts/deploy.sh
  - _scripts/deploy.sh

sudo: false
addons:
  apt:
    packages:
      - ncftp
This section is telling Travis CI to find and execute the file located at _scripts/build.sh and on success execute the file at _scripts/deploy.sh.
The addons section tells Travis CI to also install an FTP client called ncftp. This will be used to deploy your site.
Create a folder in the root called _scripts and inside create a build and deploy shell script.
build.sh
#!/bin/bash

bundle exec jekyll build --config _config.yml
The build script is essentially the same as the command you run in Terminal while building your site locally with the addition of defining the _config.yml file as the site's configuration file.
deploy.sh
#!/bin/bash

if  [[ $TRAVIS_PULL_REQUEST = "false" ]]
then
    ncftp -u "$USERNAME" -p "$PASSWORD" "$HOST"<<EOF
    rm -rf site/wwwroot
    mkdir site/wwwroot
    quit
EOF

    cd _site || exit
    ncftpput -R -v -u "$USERNAME" -p "$PASSWORD" "$HOST" /site/wwwroot .
fi
The deploy script performs 3 main tasks
- Logs into your FTP account using the
$USERNAME,$PASSWORDand$HOSTvariables which you set in Travis CI settings. - Deletes the
site/wwwrootdirectory and recreates an empty one - Copies the contents of the
_sitefolder to/site/wwwroot
This script was written by Jamie Magee who provided some very helpful guidance during the whole process.
Setting up Travis CI
For the deploy script to work you need to configure the environment variables for your GitHub repository in Travis CI.
- Go your your Travis profile
- Find your Jekyll repository, switch Travis CI on and click the gear icon
- Set the Environment Variables for your FTP host.
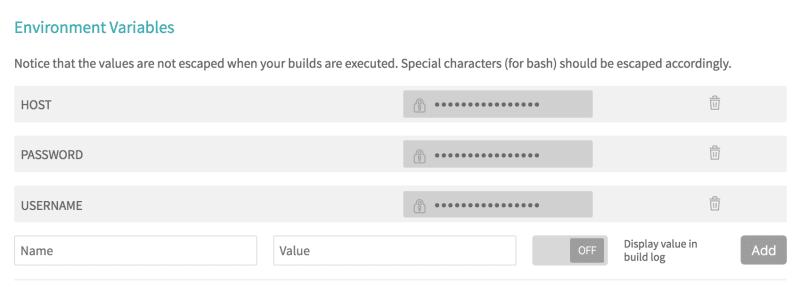
Note: Build logs for open source projects are publicly visible so remember to keep the 'Display value in build log' option off.
Automate all the things
Now that everything is set up and configured, its simply a case of pushing your code to your GitHub master branch. Travis CI will watch your repository for changes and automatically trigger a build. If, and only when, the build is successful, Travis CI will deploy your site to your FTP host.
With a Pull Request workflow, Travis CI will run a build on the PR and only when it is successful will it allow the branch to be merged into master.
The notifications section in .travis.yml file can be used to manage who receives build status email notifications.
notifications:
  email:
    recipients:
      - ajaykarwal@gmail.com
    on_success: always
    on_failure: always
Final thoughts
Deploying your Jekyll website using Travis CI is simple, fast and secure. The Pull Request workflow is perfect for collaborating on open source projects or simply scheduling your own content by merging branches when you're ready.
All of the build process is handled by Travis CI which means you can commit changes to your repository from anywhere, have your code tested and validated and then merge to push your content live. I use this method for making site updates from my phone via the GitHub website.
For more ways to use Travis CI to suit your needs check out the documentation.

Top comments (0)