The Raspberry Pi is a very powerful computer in a tiny package. The cheapest option, the Raspberry Pi Zero, is capable of running a fully featured Linux distribution and driving a high definition display. It is the size of 3 coins (US Quarters) and costs $5. At $10, the Raspberry Pi Zero W comes with integrated WiFi and Bluetooth.
BTW, we are giving away FREE Raspberry Pi kits! All you need to do is to follow our simple examples and create a Node.js app with Rust. It is easy as Pi! 🍕

With a generic ARM CPU and easy networking, the Raspberry Pi can easily become a personal application server for you. For example, you can put a web application (eg a collaborative record keeping app) on a Pi, bring it to a meeting, and make it accessible to everyone in the room. You do not even need the Internet. It is completely decentralized and censorship resistant.
The personal server is especially useful for developers. You can have a separate environment to deploy and test your server-side applications without having to mess with your laptop. The personal dev server is like Docker on steroids.
However, the $5 Pi is also, obviously, a resource constrained server. It only has 512MB of RAM and a single CPU core. It could benefit greatly from a lightweight and high-performance application runtime. But at the same time, we still like the ease-of-use and developer productivity of “heavy weight” scripting languages such as JavaScript. We want best of both worlds.
Our solution is to deploy high-performance and resource-efficient Rust functions inside Node.js JavaScript apps. The Second State WebAssembly VM (SSVM) provides a light, efficient, secure, and portable runtime for Rust code. In this article, I will teach you how to set it up.
Setup Raspberry Pi OS
The easiest way to set up your Raspberry device to install the Raspberry Pi OS from a MicroSD card. The Raspberry Pi OS is a Debian-based Linux distribution that is suitable for both desktop and server uses. You can buy a blank MicroSD card and use the Raspberry Pi Imager to load the NOOBS system on it. Or, you can buy one of those MicroSD cards with NOOBS pre-loaded.
Put the MicroSD card into your Pi device’s card slot, connect an HDMI display, keyboard, mouse, and power up! Follow the on-screen instructions to install Raspberry Pi OS. From there, you can create a user account, connect to WiFi, turn on SSH, and open the command line terminal. In order to use the Pi device as a “headless” server, you could request a static IP address from your router. In the future, you can just power it on, and connect to it via SSH from your laptop — there is no need for display, keyboard, and mouse. Once you are set up, use the following command to find your Pi’s IP address on your local network.
$ hostname -I
192.168.2.108 172.17.0.1
As with all new Linux installations, it is a good idea to update and upgrade to the latest packages. Run the command below and be patient. It could take an hour.
$ `sudo apt update && sudo apt upgrade`
Next, run the following command to install essential developer libraries.
$ sudo apt install build-essential curl libboost-all-dev
Install Node.js and SSVM
The following two commands install Node.js on your Pi.
$ `curl ``-``sL https``:``//deb.nodesource.com/setup_10.x | sudo bash -`
`$ sudo apt install nodejs`
From here, you can use npm to install modules. Here we install the Second State VM (ssvm) to support high performance Rust functions in Node.js applications.
$ npm install ssvm
Next, let’s try to run a couple of demo applications.
Run a demo Node.js application
Get the demo application from the Internet, and unzip the compressed archive.
`$ curl -O https://www.secondstate.io/download/quadratic.zip`
`$ unzip quadratic.zip`
Next, run a test program to make sure that the Node.js JavaScript function can correctly call the Rust function through SSVM.
`$ cd quadratic/node`
`$ node test.js`
`[0.5,-3.0]`
Start the Node.js server application from the command line terminal.
`$ npm install express // Required for the web app.`
`$ cd quadratic/node`
`$ node server.js`
Point the browser to http://localhost:8080/ or you can access it from another computer on your network.
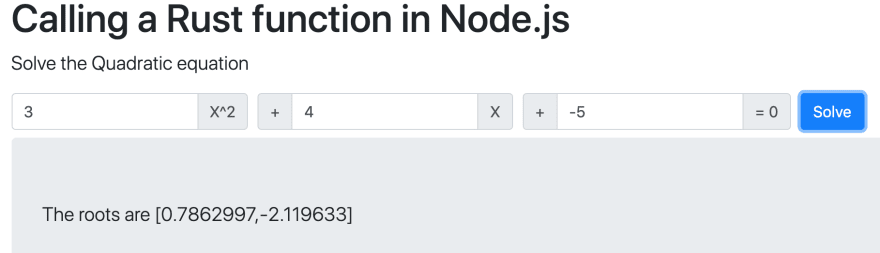
It is a web application that teaches math and solves quadratic equations. It could come really handy in a small group in a classroom!
Install developer tools
You do not really need developer tools on a personal server. But the Raspberry Pi device is powerful enough to compile and build software. In fact, one of its common uses cases is to teach programming. The Raspberry Pi OS comes pre-loaded with developer tools for Java, Python, and Scratch. Now, let’s install some serious tools on it! I always install Git on all my development environments.
$ sudo apt install git
The following command installs the Rust compiler toolchain on the Pi.
`$ curl --proto '=https' --tlsv1.2 -sSf https://sh.rustup.rs | sh`
Run the following command to set up the correct path without logging out and back in again.
$ source $HOME/.cargo/env
Next, you can clone our Rust learning repository, and learn from examples.
$ git clone https://github.com/second-state/wasm-learning.git
Here is the hello world example. Have fun!
$ cd wasm-learning/rust/hello
$ cargo build
   Compiling hello v0.1.0 (/home/pi/Dev/wasm-learning/rust/hello)
    Finished dev [unoptimized + debuginfo] target(s) in 4.35s
$ target/debug/hello
Hello, world!
Check out the official Rust web site and the Rust by Example books for more learning resources!
Next steps
Now you have everything you need on the Raspberry Pi device. The next steps are to learn more about creating high-performance and resource-constrained Node.js web applications on your $5 Raspberry Pi personal dev server.
- Why WebAssembly is the perfect runtime for server-side (or serverless) applications
- Getting started with Rust functions in Node.js
- Passing values between JavaScript and Rust
- Access operating system resources from WebAssembly
- High performance image recognition in Node.js
- Machine Learning: K-means clustering and visualization
Have fun, and let me know how you used your Raspberry Pi device!
Don’t forget to create and publish a Node.js app to receive your FREE Raspberry Pi. Can’t wait to see what you can do with Rust and WebAssembly!
Stay in touch! Get the email newsletter on Rust, WebAssembly, serverless, blockchain, and AI.

Top comments (4)
I have an unused Raspberry PI. I might try this tutorial out this weekend. Thank you for sharing!
Great! Looking forward to your project on Rasberry Pi.
Wasn't sure I could run wasm on raspberries but thanks to you I'm much more confident in the current project I have in mind, thanks!!!
Is there a way to 'size' the number of requests and whether there is latency in execution?
Some comments may only be visible to logged-in visitors. Sign in to view all comments.