
Hello everyone,
Thank you for joining in for this article about creating continuous integration and continuous deployment for Azure function apps using Azure DevOps. We will make it today a little discussion about taking it from end to end creating all that is necessary from scratch. We will see what Azure function apps are, how we can get started with it and where we use it all around with those little nuances that we may have missed here and there.
Prerequisites
Before we begin, as always we want to know what is the minimum for us to be able to start, be efficient and productive.
- Visual Studio Code
- Node.js
- Git Bash
- Azure Account
- Azure DevOps account
- Azure Functions App
- Azure Tools VSCode extention
Azure comes with free tier so you can jump right in with no worries. If you already have an Azure account then we would only need to create a function app and the DevOps project.
Prologue
I would like to provide with a simple and short description about what our goal is right now. We are not going to write some robust piece of code that reinvents the wheel, but rather we will create and use the serverless service provided by Microsoft Azure cloud platform. I want to tell you about the reason why we actually do need sometimes to harness this ability instead of writing our own Node.js web api, or any other web framework for that matter such as .Net or Python, etc.
As you can understand, Azure Function Apps are the serverless implementation that Azure provides us. If you know Firebase Cloud Functions or AWS Lambda or any other similar service, it serves the same purpose. Of course we also need to keep in mind that there are different types and templates for Azure functions, and we are going to implement one running on Node.js and it will be triggered by HTTP calls. I know what you are thinking right now.. it sounds exactly like reaching out to an API endpoint but with one major difference and that is we don't write the entire API but we write only the piece of code for one particular endpoint!
Serverless abilities provide us the choice to get up and running with tasks that may be recursive over a time period like reaching out to a remote / 3rd party API to get data from and write it into our database, or maybe we need to run some logic when certain events are triggered, maybe using a message queue or file storage. No matter the reason is, there is an entire service dedicated for these kind of tasks and we need to know how to make them talk to each other. A big advantage using serverless is that in the long run it can actually saves us some money and it is actually considered a best practice! It does so for several reasons and I will note mine. First of all serverless functions are powered off until they are triggered, there are couple types of triggers as mentioned above. Second of all due to the reason that you do not need to write the entire API, you are left with plenty of time to work on other tasks. You are focused on specific business logic and need only to implement it and worry about anything else. This way you progress faster and accomplish more work in the same period of time. Third of all you need to understand that serverless service is a managed service provided by the cloud provider and its resource management for scale and elasticity is automatic and none of your concern. Azure actually lets you use the compute power for running serveless for 1 million executions for free before you start paying for the actual compute power and even then its very low. You can read more in the Azure function Apps pricing section. Forth of all and this is my last note is that the serveless functions can support multiple programming languages (major once at this point of time) and you do not need to worry for missing out this generous service.
Now that we got this out of our way, let's get down to business and do something, because all we did so far is talk (or read actually).
Make theory become reality
People who know me as a programmer know that i am not a GUI person and i like coding my way to the target, but since this is somewhat of a tutorial and i assume some of you are not familiar with all these services in Azure, we will then use a GUI to create what we need. In the future, when i will have more free time and not so busy with work, we will see some advanced stuff going on Azure and there is no GUI there boys and girls.
We will start with creating Azure function app with a Node.js template using Javascript programming language. We then inspect what the template consist of and explain some nuances. Once we get this out of the way we will proceed to Azure DevOps and do what is needed there and be done for today.
Let's open vscode and install the extension named Azure tools if you have not done it already. I provided the link to it above.
You may need to login to your Azure account to have the resources available to you. We then click the icon on the side bar and locate the functions section.

If we hover on the Functions row we will get a menu. We want to choose Create Function option, the symbol of the lightning.

We will be prompted that in order to have a function we need to create a project, so we will choose Create new project. This is a logical container that will hold all of our functions in one place. Obviously if you have an existing project, then we can select it and carry on from there.

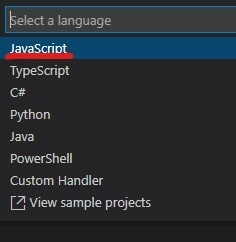
We will create a folder on the Desktop or anywhere else you want and then we will choose the programming language, here we want to select JavaScript.
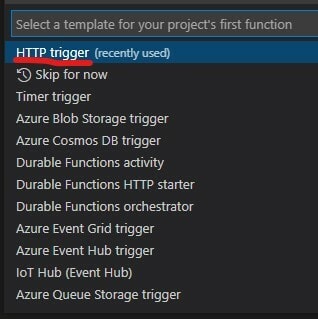
The next step is to choose the type of the function and here we want to choose HTTP Trigger. There are many types of functions and we will choose the one that fits the demand.
Now we need to name this function, usually I will name it after the project it belongs to and the business logic it implements, for instance _GetAllNotes, but since this is an example, I will leave it as it is for the default name.

The next step is to choose the authorization level, it means who or what can access this function. We have 3 options and we want to choose Anonymous. It means that anyone, anything, anywhere that can speak HTTP can access the function to be able to trigger it. Once you get the hang of it, you will decide the access rights for your functions. In actuality, we want to see and implement for the general use case and only after we are proficient with the tool, we would be able to implement for the specific use cases.

Now it is the final step we need to tell vscode that we want to open the project in the current window so we could be the root of the containing folder.
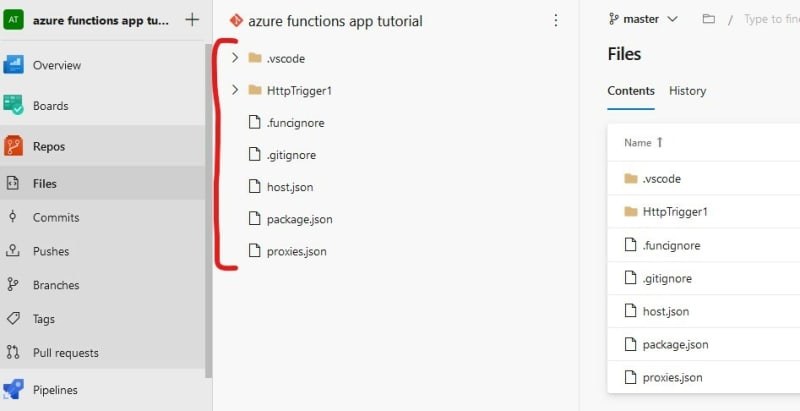
Congratulations! Your first Azure function. You can see that the template gave us a sample code that returns a text message. Nothing fancy. Nobody cares. Now what ? So, as i said earlier, we want to inspect the template we got, we need to understand the folder structure, we need to understand the different config files and eventually we will need to understand the actual code so we could manipulate it as we fancy.
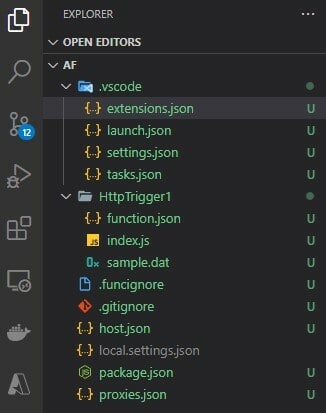
As you can see in the image, the root folder is actually the project we opened during the process of creating the function. It contains files and folders. The folders we see are the vscode settings for the Azure functions project itself for local development and the function itself named as we chose during the function creation process.
Let us inspect the files we have in the root folder. The first file we inspect is the host.json, it holds the configurations for this specific Azure function project and holds 3 configuration options or more. This file holds global configurations that affect all the functions that are part of it. The first one is the version of the Azure functions runtime available to us for use and it is 2. The second option is actually also version, but there is a difference, because this version is pointing on the extension bundle of the function, basically, the programming language runtime you decided to work with and the library used for it. In Javascript actually there was a major update not long ago migrating from v2 to v3. The third option is logging and Azure provides us with a built in tool named Application Insights. We can choose to enable it if we want to use it, in my honest opinion, you should, even if you are using another tool of your own. The second file we inspect is the local.settings.json, it hold the minimum configurations to enable you as a developer, run and test your function code locally in your environment as if they were running in the cloud. You will need to provide the values for the storage account this project is using in order to store the deployed version of the code and the runtime you are targeting. You should also provide the local project you running in your computer, the value for the traffic whether to encrypt it or not.
This file, by the way, is ignored by GIT when you commit as it holds sensitive data that you are not interested to expose to the world.
The third file is proxies.json, we will not talk about this today as it is a bit of an advanced feature for our discussion today. I will explain what proxies are and in the future, which is not today, we will see them in action. So proxies are basically a tool to specify routes or endpoints in your function app project that are implemented by a 3rd party resource (maybe another function app that out of your responsibility). It allows you to present a microservices architecture under the hood while exposing one single and unified API for the consumers. There are, in addition to what we'd mentioned, another 2 major features to proxies, and it is the ability to modify the requests and responses of the API and also version your exposed API. Sounds very interesting and leaves us intrigued for the upcoming.
We are done with the files and now let us inspect the folders. In our newly created project we can see 2 folders. One named .vscode and the other is the name of our recently created function HttpTrigger1. If you are using vscode as i am then you can see the .vscode folder. We will ignore it because it holds the configuration for vscode to support the function app inside our local development environment. It is created when you create a project from the vscode Azure tools extension as we actually did earlier. This folder right off the bat, comes with 3 files and we are only interested in the index.js file as this is the file that will hold our actual code. The function.json file holds the configurations affecting this particular function only. Should you recall the global configurations file host.json, this file scope is the function only and that is it. This file is pretty self explanatory and we are ignoring it.
Deep Dive Function
I would like to take a closer look at the template code we received. You can see in the first line of the code the expression module.exports, in Node.js when we want to export by default we use it. Here the function exported as asynchronous exposed with 2 arguments, context and request. The request is holding the data we receive from the client consumer of the function and the context holds the invocation information of the function. As this is a managed service in Azure the function is running in a process of its own and we use the context object to pass information in and out the function. If you ever used Node.js web framework called Koa, then this is probably the most exact same.
In our example we are implementing a function that its trigger is an Http call. Methods like Http GET or Http POST are the way to consume this function. We are only left to write the code for our use case. One important thing we should always keep in mind when writing functions is that they are limited in their lifespan. A function can live only for a maximum of 15 seconds or 15000 milliseconds. So what ever you are implementing, make sure that its not time consuming. Now, before we proceed to the next part, if you take a glimpse in the file function.json, you can see that the allowed Http methods are GET and POST. We will leave it for testing later.
How to CI/CD
After we have created the project and the function we can actually use the vscode extension Azure tools to deploy it, this way we are creating the basis for the CI/CD that we want to implement. Let us go on and deploy the function and carry on for the next part.
Back in the Azure tools extension we will hover on top of Functions and click the Deploy button. We will choose our subscription. Then we will choose Create new function app in Azure advanced mode . We will provide the name we want. We then choose the runtime stack Node.js. We now select the OS Linux. Afterwards we want to choose the resource group we want this project be a part of. An important note: if you don't have a resource group already exist, do not create it here with the tool, but rather log into the Azure portal and do it there, it is very simple. From my experience there was always something wrong with creating the function and the resource group in one go. Next we choose the location near us to deploy the function to, i will choose west Europe. Now we need to choose the plan, here we are going on Consumption, which is basically free tier and then pay as you go once you go over the top, but know that when you will need to implement some serious stuff with Azure Functions App then Consumption plan is not the one you want to choose. We will talk about it in the future as this is out of this discussion scope. Next in line is the storage account for the functions app and you can create one on the fly if you do not already have and existing one that you want to use. Next is Azure Application insights and we will skip it now, we will enable it from the portal later.
Generally we do not want to do it this way only because we are not the only ones who may need to work on this function and we want to have a copy stored in case something bad will happen with our computer, but for the initial step it is inevitable or we could do it from the Azure portal, whatever you find easier.
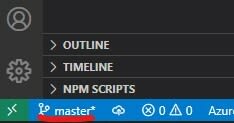
Before we do anything we need to save the changes in our functions project. Back in vscode verify that we are on the master branch.
We want to commit everything. Inside the terminal we will execute git add . and the next command is git commit -m "first commit". We cannot push it anywhere because we do not have a repository in this project defined yet. This is where we all think about GitHub repositories and we are actually going to use Azure Repos for that, so let's go there (link provided above). If you do not have an Azure DevOps account then this is the time to create one, otherwise lets open a new repository. There is a major reason for you having the Azure DevOps account set and it is the ability to connect the functions app project to the deployment center automatically. There is an option to add it later manually, but this is can be a bit tedious, so pay attention please.
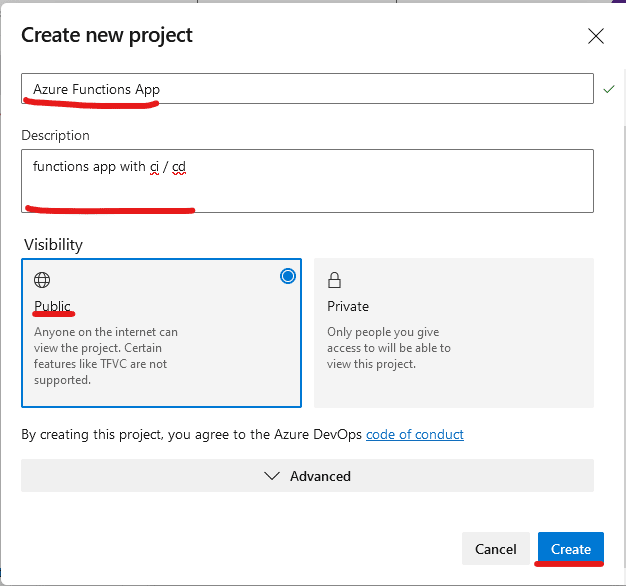
We will click on the button New Project located on the top right corner.

We will provide the name for the repository and a description which is optional, we will choose to set it public so we do not have to bother with authentication and authorization for the repository, not at this point at least and we will click the Create button at the bottom of the pop up screen.
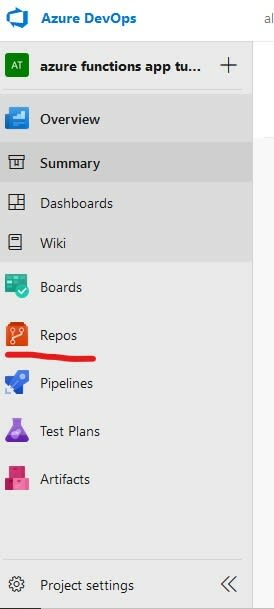
Next step is to upload our function app's project into the repo, so once the repository project was created we were navigated to the Summary screen, we will locate the Repos option under the left hand menu and click it.
Since this is a clean repository we have 2 options here to add code, Either we clone the repo and start all from scratch or we can add an existing project, we will choose the later.
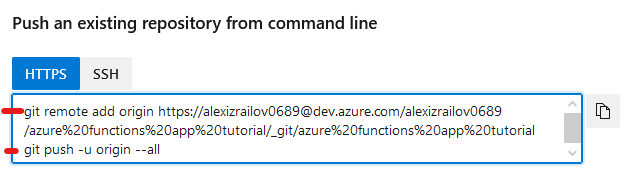
Locate the 2 commands under the Push an existing repository from command line title. We will copy the commands one by one and go back to our vscode terminal and execute it.
Once you are done a quick page refresh will show you the code.
As we created the repository and uploaded our project to it we are now ready to proceed and create the pipeline that will implement our CI/CD. Having the code here is not going to do much, no matter who is working on it. The first thing we will do now is create a pipeline that will eventually create a deployment bundle for our function. This pipeline should be triggered automatically when we commit new version of the code. We will work with the master branch now, but when you will take it to the next level, by all means, create couple more branches with triggers and pipelines for them as well.
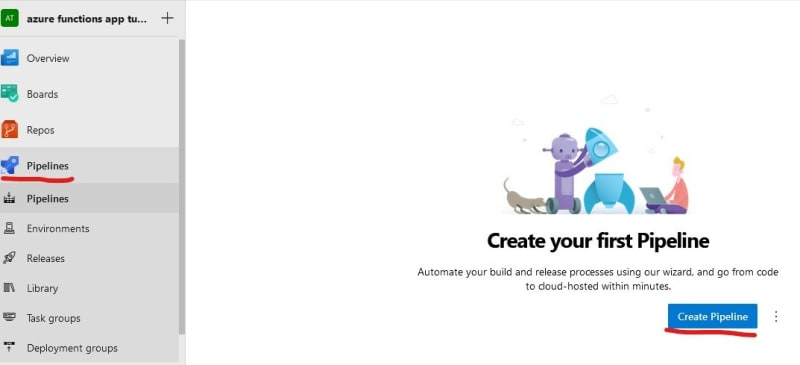
Locate the Pipelines option under the menu on left hand side and click it. Once you see the pipelines screen click the Create Pipeline button on the bottom right hand side.
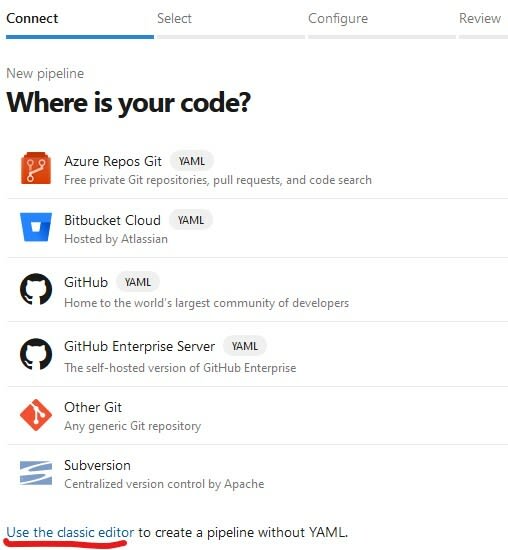
In the screen in front of us locate at the very bottom the link Use the classic editor and click it.
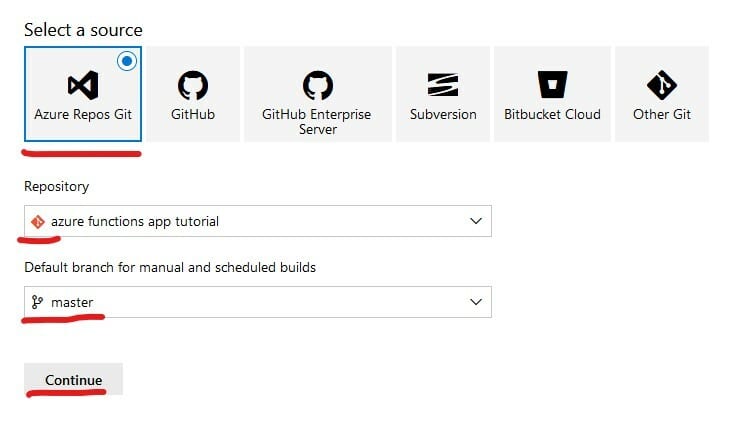
We now need to choose the source of our code and it is Azure Repos Git. We will verify that the repo project is the one we want and the branch we want to target. Finally click Continue.
The next step is to select a template. Basically we could go on with an empty job and add the relevant tasks manually, but luckily Azure was resourceful enough to think ahead and create a template just for this use case (Thanks guys!). In the search field look for the phrase function node and select Apply on the item in the results named Azure Functions For Node.js

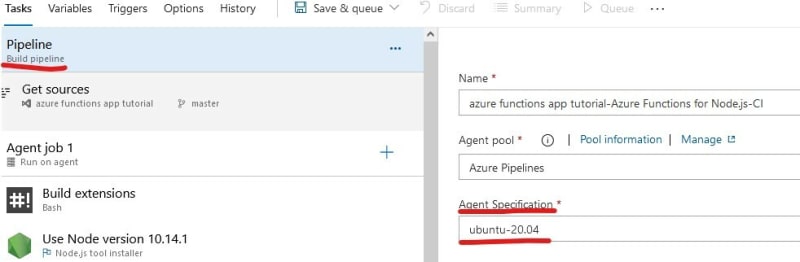
Once we are inside the pipeline task section we can see all the tasks provided by the template. No need to touch anything here, but we need to make a change on the Build pipeline change the Agent Specifications to Ubuntu-20.04. If you remember when we deployed the function we set the OS to be Linux, we need to have the same environment for the pipeline as our runtime.
Next we locate the Triggers tab at the top and select Enable continuous integration and Batch changes while a build is in progress. This means that every time we push new code to the master branch this pipeline will be triggered. Finally click Save & Queue.

In the pop up window verify all the settings and click Save and Run.

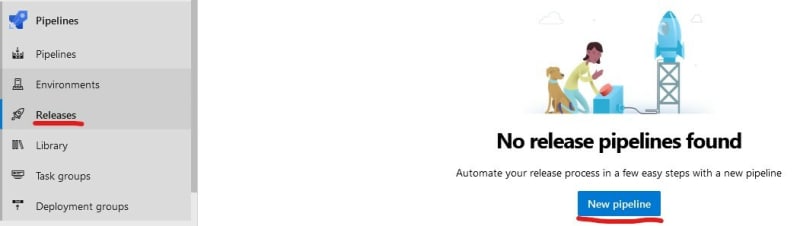
The pipeline is now running and creating our bundle that will be used for deployment. Our next step is to create the deployment pipeline. In order to create it we need to locate the Releases under the Pipeline menu and click it. Since we do not have any release pipeline we need to create one by clicking the New Pipeline button.
This step is fairly easy because we do not need much done here for Azure function Apps deployment. But these release pipelines can benefit you a lot if you choose to dig a bit deeper and see what is hiding under the hood.
In the screen in front of us we can look for a template for this use case again as we did with our build pipeline. Search for the phrase function and click Apply on Deploy a function app to Azure Functions

Once we are inside the release pipeline screen the first thing we need to do is to fetch the build artifact the the build pipeline generated. On the left hand side there is a step called Artifacts, locate it and click add. You will see that on the right hand side there is a pop up window and we want to select there the artifact. Since we did not change the name of the build pipeline you should have the same name as mine that was generated by the template. Once selected click Add button at the bottom.

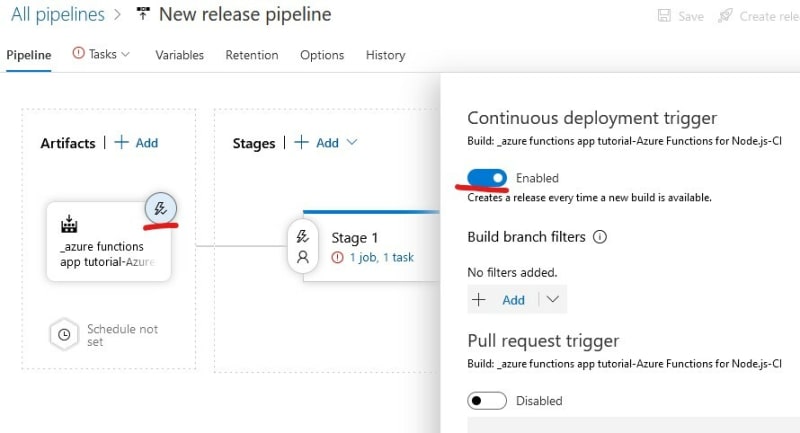
Still on the artifacts we now want to enable the continuous deployment trigger, so click on the lightning button and switch the radio button to enabled mode. To close the pop up window click the X on the top right hand side.
Now we will proceed to the Stages section on the right hand side of the screen and we will click the 1 job, 1 task link in the empty stage we already have Stage 1.

In this stage we will need to provide our Azure subscription, App Type which is Function app on Linux and the name of the Azure function we deployed earlier manually.

Once you are done filling this information click Save and afterwards Create release buttons at the top. What will happen now is that the release pipeline will start working and will take the code for the function we created as an artifact by the build pipeline and deploy it to the function app itself. Obviously nothing is going to be actually different with the function code because we did not change it. Well, we did not change it yet. All we care about now is to make sure that the pipeline is working and we will test everything later.
Epilogue
Hopefully by now the release pipeline is done and the deployment process was successful. Now let's test it from the far end of the code, so going back to vscode, we want to change the code to something simple.
module.exports = async function (context, req) {

    context.res = {
        body: "This is the change we made to the original function so we could test our ci/cd!"
    };

}
As you can see, nothing fancy. We now will use git to commit this change on the master branch. Make sure you have the Azure DevOps window opened in front of you so we would be able to see the triggering of the build pipeline and the release pipeline. Ok, now back in the vscode, open the terminal and execute the next commands:
- git add .
- git commit -m "first change to test cicd"
- git push
In a second or two you should see the magic happens. If you want to test it to see that it is working as expected, it is very easy. Let us open the Azure portal and search for the phrase Function App in the search bar. We locate the project we created earlier and on the left hand side menu locate and click the Functions option. Now we will select from the list the name of our function and navigate to its dedicated screen. In the menu on the left hand side locate Overview and select it. In the middle of the screen there should be a button that says Get Function Url. Copy the url to a new tab and see what you get, or you can use postman for it. Hopefully the deployment was done and you get to see the updated version of the code.
One last thing before we are done for today. We wanted to set the Azure Application Insights that we skipped during the deployment of the function app. I wanted to show you one manual step in the process of creating a function app and selected the easier of them all. If you go back to the Function App page in the portal and select the project we created, in the menu on the left hand side look for Application insights under settings. Click enable on the switch, choose the storage account to store all the logs generated by the application insights that we created earlier for the project and click Apply.
Some final words, We saw in this discussion how we can go from 0 to 100 with Azure Function Apps and the minimum resources that it takes for it to work. Starting out from resource groups, moving to storage account and application insights that integrates into the function apps. We also saw how in a few and not so difficult steps, were able to create a build and release pipelines for the continuous integration and deployment process, and in the end of it all we were able to test it with no effort. I am planning to go deeper with this function apps soon to show the more advanced stuff we can implement and i hope you will enjoy and benefit it in some way.
In a personal note i would really appreciate if you could provide some feedback on what you are reading, this would help me a lot. I am talking about my English skills, or something that i missed to address in the article itself, whatever you find can be very valuable for me to improve.
Stay tuned for next
Like, subscribe, comment and whatever ...
Goodbye

Top comments (1)
Liked and Subscribed, already waiting for future content from you!!