
Hello All,
In this blog we are going to learn about how to create an Azure AD joined MCS catalog.
Pre-requisite for creating azure AD joined MCS Catalog
- The Azure Active Directory joined identity type requires version 2106 or later as the minimum functional level for the catalog
- Rendezvous V2 must be enabled
- Master VMs can be Azure AD joined or non-domain joined. This functionality requires VDA version 2212 or later.
- Users need to be added to Azure role Virtual Machine User Login
Catalog Limitations
- Single Sign-on to VDI is not supported.
- Windows Hello for business is not supported.
- When you shut down a non-persistent VM, it might not always unregister from Azure AD.
- The first time a virtual desktop session is launched, the Windows sign-in screen may show the logon prompt for the last logged on user without the option to switch to another user.
Installing the VDA in the master image
Deploy the VDA software (version should be greater or equal to the versions mentioned in the pre-requisites). rest all installation steps are same as that of a normal VDA master image creation process.
Creating the Catalog
To create the Azure AD joined MCS catalog, navigate to Citrix Cloud-->DaaS-->Manage-->Machine catalogs and click on "Create machine catalog".
Skip the introduction page, in the machine type select the desired machine catalog type. In this example, I am creating Single session catalog.

- In the machine management tab, select "machines that are power managed" and in the deploy machine using section, select "deploy using machine creation service. From the resources drop down menu, select the Azure hosting connection and click Next.

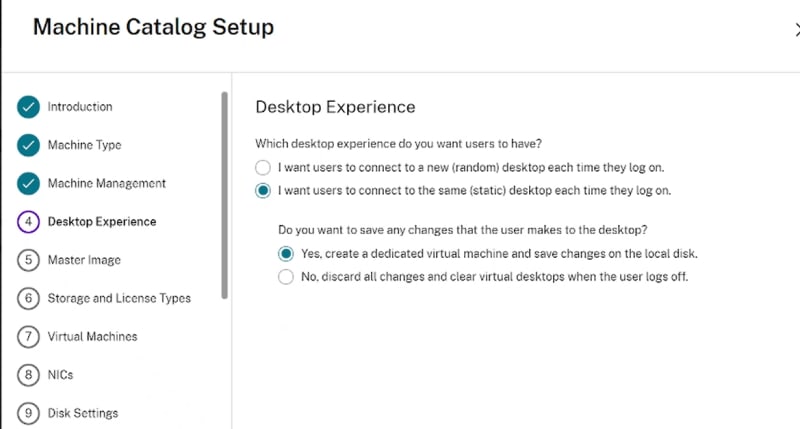
- In the desktop experience tab, select either non-persistent or persistent VDI.
- In the master image section, select the master image snapshot
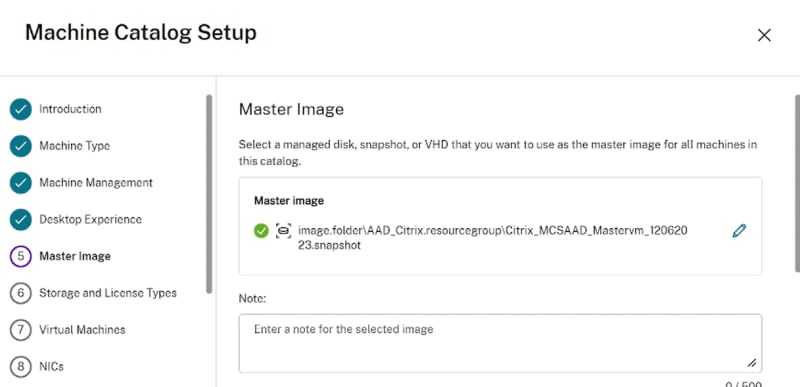
- In the master image section, under tick the "use a machine profile" option as this is a mandatory step for Azure AD deployments. Click on "+select a machine profile" and select a Azure VM reference.

- In the master image section, select the functional level to match the minimum functional level required as per the pre-requisites mentioned above.

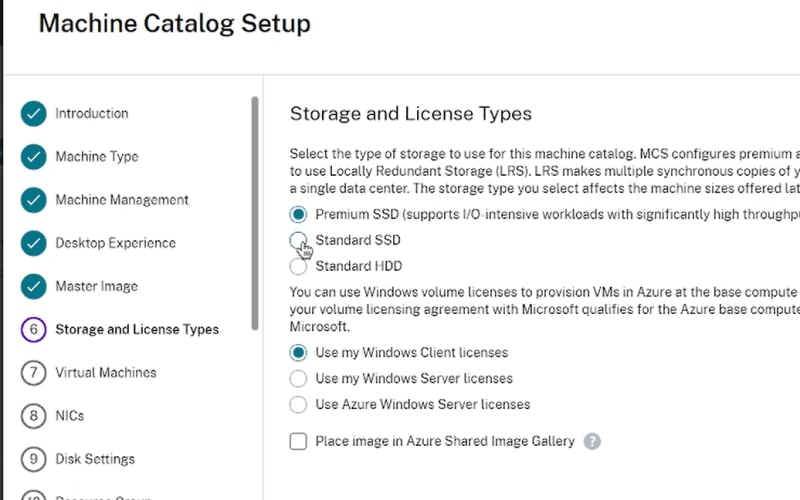
- In the storage and license type tab, select the disk storage type(premium SSD, standard SSD or Standard HDD) and also select the license type as appropriate. You can optionally add the VMs to the shared image gallery as well.
- In the virtual machines tab, select the number of virtual machines, availability zones where the machines need to be placed, and the machine size.Click Next to continue.

In the NICs tab, select the virtual network and the subnet and click next
In the disk settings tab, optionally select the tick box if you need to enable storage savings and also to encrypt your disks using customer managed keys.
In the resource group tab, select either an existing resource group or let citrix create a resource group.
Note:- Make sure you add the "Virtual machine user login" role to the resource group so that users accessing the desktops from this catalog can access it.
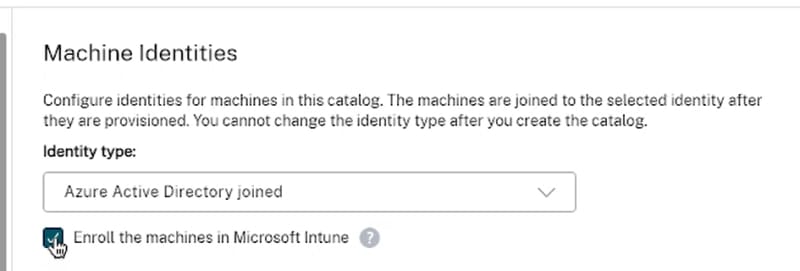
- Next is the "machine identities" tab and it is very important. In the Identity type, select "Azure active directory joined" from the drop down. You can optionally create an azure AD security group. and also select if you need the machines to be auto enrolled to Intune. Enrolment to intune can be done by selecting the tick box.
Provide the machine account naming scheme and click next.
Scopes and WEM tab are optional and I am skipping them for this blog.
- In the summary tab, provide a name and description of the catalog and click on Finish to create the catalog.
Create the Delivery group
Follow the normal delivery group creation steps to create the delivery group.
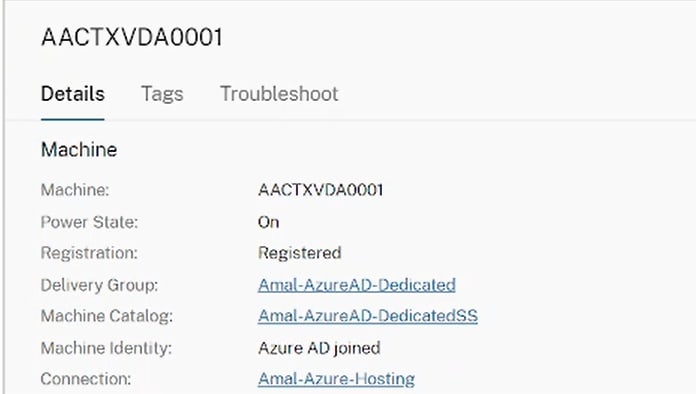
verifying if the machine is working as expected.
Once added to delivery group and the machine is started, check for the below indicators.
Machine is registered.
Machine identity is showing as Azure AD joined.
- Check in the intune console to see if the machine got enrolled to intune.

Troubleshooting the Azure AD joined catalog registration and connectivity issues.
Make sure the user is given the "Virtual machine user login" role
Verify is rendezvous V2 is enabled.
If using Windows 11 22H2, then follow the citrix article CTX475187.
If the Azure AD user is MFA enabled, then exclude "windows sign in" from MFA.
Hope this blog is informative to you, please let me know your comments if any.

Top comments (0)