
In the last few years, GraphQL has become a popular choice to build an API. It also serves a great equivalent and alternative to REST approach.
GraphQL is an open source query language for developing APIs. In contrast to REST, which is an architecture or 'a way of doing things', GraphQL was developed with the concept that a client requests only the desired set of items from the server in a single request.
In this tutorial, you will be building a bare minimum Twitter clone (front-end) with Apollo Client and React application.
To follow this tutorial, you are going to need a server which serves the data from the MongoDB database via a GraphQL API. If you haven't read the previous post, you can clone this Github Repository, follow some instructions to start the server and follow along with this tutorial.
Also, make sure you have MongoDB installed on your local dev environment, or if you know how to deploy a MongoDB instance on the cloud, go ahead and use that.
Contents
- Requirements
- Getting Started: Create a New React Project
- Integrate Apollo Client
- Create the Tweets Component
- Creating GraphQL Queries
- Creating GraphQL Mutations
- Display All Tweets
- Creating a new Tweet
- Connecting Crowdbotics support to Your Github Repo
- Conclusion
Requirements
- Nodejs
8.x.xor higher installed along with npm/yarn -
create-react-appglobal module to scaffold a React project - The server-side app up and running that serves the GraphQL API for the React Client
Bonus: You can now use npx to generate a new React project without installing create-react-app.
Getting Started: Create a New React Project
To create a new React project, make sure you have create-react-app installed as a global module. Run the following command, to create a new project.
create-react-app twitter-clone-apollo-client

# traverse inside the project dir
cd twitter-clone-apollo-client
You can name your React project anything at the moment. After it is created, traverse inside it and to test or verify if everything is running correctly, start the development server with the following command.
npm start
This will open a new browser window at the URL http://localhost:3000 with the default app. Also, for this tutorial, I am currently using create-react-appversion 3. You need at least this version or greater in order to follow along.
Integrate Apollo Client
Apollo is a team that builds and maintain a toolchain of GraphQL tools for various use cases like frontend (client), server and engine. There different ways to use or integrate Apollo in your app. In the Twitter Clone Server tutorial, we learned that you can use Apollo on a server-side application to query data and create a GraphQL API.
The Apollo Client helps you use a GraphQL API on the frontend side of an application. Using Apollo Client you can query the API in two ways, whether you have your own server or a third party GraphQL API. It integrates very well with popular frontend frameworks like React, Angular, Vue and so on.
How can you use Apollo in a React app?
To use Apollo, you will need to install dependencies that will be required in order to hook Apollo in the React app. Install the following dependencies either using npm or yarn. I will be using yarn since it is the default package manager for any React project.
yarn add apollo-boost graphql react-apollo
Briefly, what do these dependencies do?
-
apollo-boostis the package that contains everything that you need to set up an Apollo Client. -
graphqlis required to parse the GraphQL queries. -
react-apollois the Apollo integration for React.
In order to proceed, make sure you have the MongoDB instance running on your local dev environment. You can bootstrap one using the command mongod from the terminal. Also, make sure that the Twitter clone server is also running.
Now, open up the file src/index.js. You will modify this file in order to connect the backend endpoint to ApolloClient. This ApolloClient will later help us to build a UI comfortably by fetching the data from the GraphQL QPI. You are also going to wrap App component with ApolloProvider that will in return allow us to access the context of the ApolloClient anywhere in this React app.
import React from 'react'
import ReactDOM from 'react-dom'
import ApolloClient from 'apollo-boost'
import { ApolloProvider } from 'react-apollo'

import './index.css'
import App from './App'
import * as serviceWorker from './serviceWorker'

const client = new ApolloClient({
  uri: 'http://localhost:5000/graphiql'
})

const AppContainer = () => (
  <ApolloProvider client={client}>
    <App />
  </ApolloProvider>
)

ReactDOM.render(<AppContainer />, document.getElementById('root'))

// If you want your app to work offline and load faster, you can change
// unregister() to register() below. Note this comes with some pitfalls.
// Learn more about service workers: https://bit.ly/CRA-PWA
serviceWorker.unregister()
The ApolloClient is imported from the apollo-boost library and the ApolloProvider is imported from the react-apollo library. It is always recommended to put the wrapper like ApolloProvider somewhere high in the component tree of your React app. The reason being is that you need to make sure that all components in the component tree are able to fetch data from the GraphQL API.
In most cases, you are going to end up wrapping App component inside the ApolloProvider. In the above snippet, client is the endpoint that will allow you to fetch data from the API.
Create the Tweets Component
Let us now create a new component components/Tweets.js like below.
import React from 'react'

class Tweets extends React.Component {
  render() {
    return (
      <div>
        <h1>Twitter Clone</h1>
      </div>
    )
  }
}

export default Tweets
Modify the App.js and import the newly created Tweets component.
import React from 'react'
import Tweets from './components/Tweets'

function App() {
  return <Tweets />
}

export default App
Notice, in the above snippet, App is a functional component. This is create-react-app version 3. On running yarn start you will get the following result.

Right now it does not look good. Let us add some styling a skeleton component of what things are going to look like. To add styling, create a new file inside the components/ directory called Tweets.css.
body {
  background-color: #e6ecf0;
}

.tweet {
  margin: 20px auto;
  padding: 20px;
  border: 1px solid #ccc;
  height: 150px;
  width: 80%;
  position: relative;
  background-color: #ffffff;
}

.author {
  text-align: left;
  margin-bottom: 20px;
}

.author strong {
  position: absolute;
  top: 40px;
  margin-left: 10px;
}

.author img {
  width: 50px;
  height: 50px;
  border-radius: 50%;
}

.content {
  text-align: left;
  color: #222;
  text-align: justify;
  line-height: 25px;
}

.date {
  color: #aaa;
  font-size: 14px;
  position: absolute;
  bottom: 10px;
}

.twitter-logo img {
  position: absolute;
  right: 10px;
  top: 10px;
  width: 20px;
}

.createTweet {
  margin: 20px auto;
  background-color: #f5f5f5;
  width: 86%;
  height: 225px;
  border: 1px solid #aaa;
}

.createTweet header {
  color: white;
  font-weight: bold;
  background-color: #2aa3ef;
  border-bottom: 1px solid #aaa;
  padding: 20px;
}

.createTweet section {
  padding: 20px;
  display: flex;
}

.createTweet section img {
  border-radius: 50%;
  margin: 10px;
  height: 50px;
}

textarea {
  border: 1px solid #ddd;
  height: 80px;
  width: 100%;
}

.publish {
  margin-bottom: 20px;
}

.publish button {
  cursor: pointer;
  border: 1px solid #2aa3ef;
  background-color: #2aa3ef;
  padding: 10px 20px;
  color: white;
  border-radius: 20px;
  float: right;
  margin-right: 20px;
}

.delete {
  position: absolute;
  right: 10px;
  bottom: 10px;
  cursor: pointer;
}

.edit {
  position: absolute;
  right: 30px;
  bottom: 10px;
  cursor: pointer;
}
Now, edit the file Tweets.js as the following snippet.
import React from 'react'
import './Tweets.css'
import TwitterLogo from '../assets/twitter.svg'

class Tweets extends React.Component {
  render() {
    return (
      <div className="tweets">
        <div className="tweet">
          <div className="author">
            <img
              src={'https://api.adorable.io/avatars/190/abott@adorable.png'}
              alt="user-avatar"
            />
            <strong>@amanhimself</strong>
          </div>
          <div className="content">
            <div className="twitter-logo">
              <img src={TwitterLogo} alt="twitter-logo" />
            </div>
            <textarea autoFocus className="editTextarea" value="" onChange="" />
          </div>
        </div>
      </div>
    )
  }
}

export default Tweets
It is nothing a but a simple box with static user image, twitter logo and a text area for now. You can find the TwitterLogo inside the src/assets with this project's Github repository. In the browser window, you will get the following result.

Creating GraphQL Queries
In this section, you are going to write queries and mutations in order to fetch the data when communicating with GraphQL API. To get started, create a new directory inside the src/ directory and name it graphql/. This directory will have two further sub-directories, one for each mutations and queries. Both of these sub-directories will have a file called index.js. In short, here is the new project structure is going to look like.

First, let us create a query. Open up queries/index.js file and add the following.
import { gql } from 'apollo-boost'

export const QUERY_GET_TWEETS = gql`
  query getTweets {
    getTweets {
      _id
      tweet
      author
      createdAt
    }
  }
`
The above snippet will be responsible for making a request to the Graphql API. In return, it wants all the tweets stored in the database, hence the name getTweets. The query itself in written inside the string templates. The gql tag parses this query string into an AST. It makes it easier to differentiate a graphql string like in the above snippet from normal JavaScript string templates.
To fetch tweets create a new component called Query.js. This component will utilize the helper component known as Query that comes with react-apollo. This component accepts props from the graphQL query and tells React what to render. It has three pre-defined properties that can be leveraged: loading, error and data in order to render. Depending on the state of the query one of them will be rendered.
import React, { Component } from 'react'
import { Query as ApolloQuery } from 'react-apollo'

class Query extends Component {
  render() {
    const { query, render: Component } = this.props

    return (
      <ApolloQuery query={query}>
        {({ loading, error, data }) => {
          if (loading) {
            return <p>Loading</p>
          }
          if (error) {
            return <p>{error}</p>
          }
          return <Component data={data || false} />
        }}
      </ApolloQuery>
    )
  }
}

export default Query
Creating GraphQL Mutations
The mutations will be following a similar pattern as the query we built in the previous section. Open graphql/mutations/index.js file and add two mutations as below.
import { gql } from 'apollo-boost'

export const MUTATION_CREATE_TWEET = gql`
  mutation createTweet($tweet: String, $author: String) {
    createTweet(tweet: $tweet, author: $author) {
      _id
      tweet
      author
    }
  }
`

export const MUTATION_DELETE_TWEET = gql`
  mutation deleteTweet($_id: String) {
    deleteTweet(_id: $_id) {
      _id
      tweet
      author
    }
  }
`
The first mutation is to create a new tweet with the tweet and the author of the tweet, both represented by the scalar type string. In return, you are getting the newly created tweet's id, tweet, and the author fields. The second mutation is to delete the tweet itself. An _id has to be provided in order to delete a tweet from the database.
Now, let us create a component to run these mutations. Again, we are going to leverage the helper component from react-apollo called Mutation. Create a new component file, Mutation.js. This is going to be a long component so let us break it into parts. Start by importing the helper function.
import React, { Component } from 'react'
import { Mutation as ApolloMutation } from 'react-apollo'

class Mutation extends Component {
  // ...
}

export default Mutation
Define the incoming props inside the render function. The Mutation component in the above snippet accept a different number of props. For our use case, we are interested in the following.
-
mutation: This is a required prop by the helper component. It parses a GraphQL mutation document into an AST using gql string templates. -
query: It parses a GraphQL query into an AST using gql string templates. -
children: Another required prop. It is a function that allows triggering a mutation from the UI. -
onCompleted: This is a callback that executes once the mutation successfully completes.
render() {
  const {
  mutation,
  query,
  children,
  onCompleted
  } = this.props;

  return(
  <ApolloMutation>
  {*/... */}
  </ApolloMutation>
  )
}
Next, return the helper component to render. It will accept the usual props such from above such as mutation. Next, it will utilize a function as a prop to update the cache after a mutation occurs. This function is again available to our ApolloMutation helper component. Further, you responsible to get the name of the query and mutation which both are being received as props to helper component and then get the cached data from the previous query.
<ApolloMutation
  mutation={mutation}
  update={(cache, { data }) => {
  const { definitions: [{ name: { value: mutationName } }] } = mutation;
  const { definitions: [{ name: { value: queryName } }] } = query;
  const cachedData = cache.readQuery({ query });
  const current = data[mutationName];
>
In the above snippet, we consume the state of the current data from mutation prop. Then, define a new array that will contain the state of the updated data in case of a new mutation happens. Converting a mutation name in lower case helpful to run a series of if statements to check whether the mutation is being deleted or created.
let updatedData = []
const mutationNameLC = mutationName.toLowerCase()

if (mutationNameLC.includes('delete') || mutationNameLC.includes('remove')) {
  updatedData = cachedData[queryName].filter(row => row._id !== current._id)
} else if (
  mutationNameLC.includes('create') ||
  mutationNameLC.includes('add')
) {
  updatedData = [current, ...cachedData[queryName]]
}
Lastly, update the data to refresh the list of tweets. Then, render the content of the component but before it, use the onCompleted method as a prop such that when a mutation to delete or create a new tweet completes, it triggers the method onCompleted.
<ApolloMutation
  // ...
  cache.writeQuery({
    query,
    data: {
    [queryName]: updatedData
    }
    });
  }} // update prop ends here
  onCompleted={onCompleted}
>
  {children}
</ApolloMutation>
The complete code for ApolloMutation component looks like below.
import React, { Component } from 'react'
import { Mutation as ApolloMutation } from 'react-apollo'

class Mutation extends Component {
  render() {
    const { mutation, query, children, onCompleted } = this.props

    return (
      <ApolloMutation
        mutation={mutation}
        update={(cache, { data }) => {
          const {
            definitions: [
              {
                name: { value: mutationName }
              }
            ]
          } = mutation
          const {
            definitions: [
              {
                name: { value: queryName }
              }
            ]
          } = query
          const cachedData = cache.readQuery({ query })
          const current = data[mutationName]
          let updatedData = []
          const mutationNameLC = mutationName.toLowerCase()

          if (
            mutationNameLC.includes('delete') ||
            mutationNameLC.includes('remove')
          ) {
            updatedData = cachedData[queryName].filter(
              row => row._id !== current._id
            )
          } else if (
            mutationNameLC.includes('create') ||
            mutationNameLC.includes('add')
          ) {
            updatedData = [current, ...cachedData[queryName]]
          }
          cache.writeQuery({
            query,
            data: {
              [queryName]: updatedData
            }
          })
        }}
        onCompleted={onCompleted}
      >
        {children}
      </ApolloMutation>
    )
  }
}

export default Mutation
Display All Tweets
Since both of the helper components are now wind up, to proceed new to create a Tweet component that will handle mutations to create and delete a new tweet. Create a file called Tweet.js inside the components directory. Again, there is a lot going on in this component. So let us break it down into understandable parts. Later, in this section, you will get the complete code for the component.
We start by importing the necessary that includes GraphQL mutations and the query and the Mutation helper component. Then, we are importing assets like TwitterLogo and a placeholder image for the user's avatar.
import React, { Component } from 'react'
import Mutation from './Mutation'
import {
  MUTATION_DELETE_TWEET,
  MUTATION_UPDATE_TWEET
} from '../graphql/mutations'
import { QUERY_GET_TWEETS } from '../graphql/queries'
import TwitterLogo from '../assets/twitter.svg'

const Avatar = 'https://api.adorable.io/avatars/190/abott@adorable.png'
Inside the Tweet component there is a function to delete the tweet by running the required mutation.
handleDeleteTweet = (mutation, _id) => {
        mutation({
            variables: {
                _id
            }
        })
    }
}
Next, inside the render function, map all the existing tweets and display them and then make use of Mutation component.
render() {
        const {
            data: { getTweets: tweets }
        } = this.props

        return tweets.map(({ _id, tweet, author }) => (
            <div className='tweet' key={`tweet-${_id}`}>
                <div className='author'>
                    <img src={Avatar} alt='avatar' />
                    <strong>{author}</strong>
                </div>

                <div className='content'>
                    <div className='twitter-logo'>
                        <img src={TwitterLogo} alt='Twitter' />
                    </div>
                    {tweet}
                </div>
                <Mutation mutation={MUTATION_DELETE_TWEET} query={QUERY_GET_TWEETS}>
                    {deleteTweet => (
                        <div
                            className='delete'
                            onClick={() => {
                                this.handleDeleteTweet(deleteTweet, _id)
                            }}
                        >
                            <span>Delete Tweet</span>
                        </div>
                    )}
                </Mutation>
        ))
  }
Here is the complete code for Tweet.js file.
import React, { Component } from 'react'
import Mutation from './Mutation'
import { MUTATION_DELETE_TWEET } from '../graphql/mutations'
import { QUERY_GET_TWEETS } from '../graphql/queries'
import TwitterLogo from '../assets/twitter.svg'

const Avatar = 'https://api.adorable.io/avatars/190/abott@adorable.png'

class Tweet extends Component {
  handleDeleteTweet = (mutation, _id) => {
    mutation({
      variables: {
        _id
      }
    })
  }

  render() {
    const {
      data: { getTweets: tweets }
    } = this.props

    return tweets.map(({ _id, tweet, author }) => (
      <div className="tweet" key={`tweet-${_id}`}>
        <div className="author">
          <img src={Avatar} alt="avatar" />
          <strong>{author}</strong>
        </div>

        <div className="content">
          <div className="twitter-logo">
            <img src={TwitterLogo} alt="Twitter" />
          </div>
          {tweet}
        </div>
        <Mutation mutation={MUTATION_DELETE_TWEET} query={QUERY_GET_TWEETS}>
          {deleteTweet => (
            <div
              className="delete"
              onClick={() => {
                this.handleDeleteTweet(deleteTweet, _id)
              }}
            >
              <span>Delete Tweet</span>
            </div>
          )}
        </Mutation>
      </div>
    ))
  }
}

export default Tweet
We haven't created the functionality that adds a new tweet yet but I have added two tweets manually to verify that the Tweet function is working properly. Modify the Tweets.js file like below to fetch all the existing tweets from the database.
import React from 'react'
import Tweet from './Tweet'
import Query from './Query'
import { QUERY_GET_TWEETS } from '../graphql/queries'
import './Tweets.css'
import TwitterLogo from '../assets/twitter.svg'

class Tweets extends React.Component {
  render() {
    return (
      <div className="tweets">
        <div className="tweet">
          <div className="author">
            <img
              src={'https://api.adorable.io/avatars/190/abott@adorable.png'}
              alt="user-avatar"
            />
            <strong>@amanhimself</strong>
          </div>
          <div className="content">
            <div className="twitter-logo">
              <img src={TwitterLogo} alt="twitter-logo" />
            </div>
            <textarea autoFocus className="editTextarea" value="" onChange="" />
          </div>
        </div>
        <Query query={QUERY_GET_TWEETS} render={Tweet} />
      </div>
    )
  }
}

export default Tweets
If you add the one or two tweets manually, you will get the following result.

Creating a new Tweet
In this section, let us create a new component called CreateTweet to pursue the functionality of adding a new tweet to the database. As usual, start by importing the necessary files as below.
// Dependencies
import React, { Component } from 'react'
import Mutation from './Mutation'
import { MUTATION_CREATE_TWEET } from '../graphql/mutations'
import { QUERY_GET_TWEETS } from '../graphql/queries'
const Avatar = 'https://api.adorable.io/avatars/190/abott@adorable.png'

class CreateTweet extends Component {
  state = {
    tweet: ''
  }

  handleChange = e => {
    const {
      target: { value }
    } = e

    this.setState({
      tweet: value
    })
  }

  handleSubmit = mutation => {
    const tweet = this.state.tweet
    const author = '@amanhimself'

    mutation({
      variables: {
        tweet,
        author
      }
    })
  }

  render() {
    return (
      <Mutation
        mutation={MUTATION_CREATE_TWEET}
        query={QUERY_GET_TWEETS}
        onCompleted={() => {
          this.setState({
            tweet: ''
          })
        }}
      >
        {createTweet => (
          <div className="createTweet">
            <header>Write a new Tweet</header>

            <section>
              <img src={Avatar} alt="avatar" />

              <textarea
                placeholder="Write your tweet here..."
                value={this.state.tweet}
                onChange={this.handleChange}
              />
            </section>

            <div className="publish">
              <button
                onClick={() => {
                  this.handleSubmit(createTweet)
                }}
              >
                Tweet
              </button>
            </div>
          </div>
        )}
      </Mutation>
    )
  }
}

export default CreateTweet
Define a local state that will store the creation of the new tweet and will get an update as soon as there is a change in the textarea. The handleChange listens to any changes in the input value of the textarea and then updates the tweet variable from the state. To execute the mutation MUTATION_CREATE_TWEET when the user clicks the button Tweet, the method handleSubmit is responsible.
Add this component to Tweets.js file as below.
import React from 'react'
import Tweet from './Tweet'
import CreateTweet from './CreateTweet'
import Query from './Query'
import { QUERY_GET_TWEETS } from '../graphql/queries'
import './Tweets.css'

class Tweets extends React.Component {
  render() {
    return (
      <div className="tweets">
        <CreateTweet />
        <Query query={QUERY_GET_TWEETS} render={Tweet} />
      </div>
    )
  }
}

export default Tweets
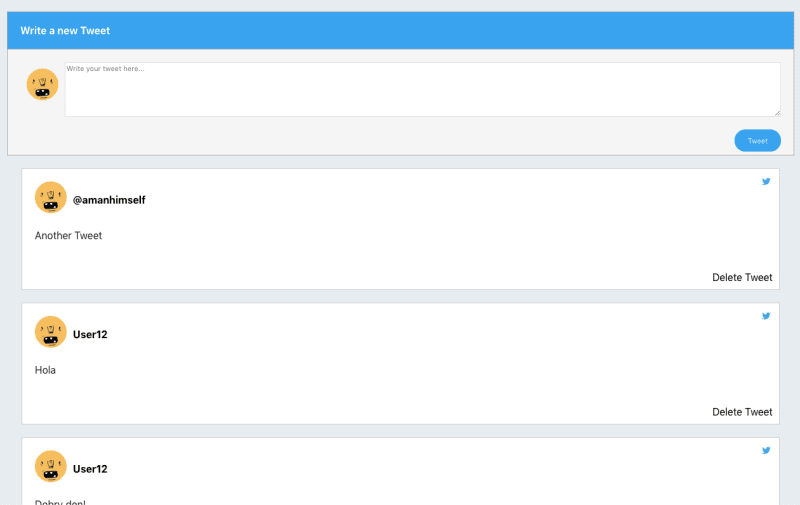
To add a new tweet, try writing something and then hit the Tweet button. You will get similar results.
Conclusion
By the end of this tutorial, we've gone through:
- how to integrate an
ApolloClientin a React app - use GraphQL query and mutations to receive and send data to the API
- to utilize helper functions such as
MutationandQueryfrom thereact-apollolibrary - also, understand each helper functions' props
- understand the reason behind why to wrap the
Appcomponent with ApolloProvider - how to use
gqltemplate literals in order to create a query or a mutation
To learn more about react-apollo library, you can visit the official API documentation here.
You can find the complete code for this post at this Github Repository.
Originally published at Crowdbotics.com
I often write on Nodejs, Reactjs, and React Native. You can subscribe to my weekly newsletter to receive new updates straight to your inbox 💌

Top comments (1)
Great suggestion. I do use
styled-componentssometimes, but wanted to keep things simple for the styles part in this one. Thanks for reading it :)