
Shipping software is a challenge. Endless installation instructions explain in detail how to install and configure an application as well as all its dependencies. But in practice, following installation instructions ends with frustration: the required version of PHP is not available to install from the repository, the configuration file is located in another directory, the installation instructions do not cover the operating system you need or want to use, etc.
And it gets worse: to be able to scale on demand and recover from failure on AWS we need to automate the installation and configuration of our application and its runtime environment. Implementing the required automation with the wrong tools is very time-consuming and error-prone.
But what if you could bundle your application with all its dependencies and run it on any machine: your MacBook, your Windows PC, your test server, your on-premises server, and your cloud infrastructure? That's what Docker is all about.
In short: Docker is a toolkit to deliver software.
Or as Jeff Nickoloff explains in Docker in Action (Manning): "Docker is a command-line program, a background daemon, and a set of remote services that take a logistical approach to solving common software problems and simplifying your experience installing, running, publishing, and removing software. It accomplishes this using a UNIX technology called containers."
You will learn how to use Docker to ship your web application to AWS in this part of the series. Most importantly, we will show you how to build Docker images to bundle your web application.
Before we proceed, I want to highlight a few essential best practices when working with Docker containers.
- Use one process per container. If your application consists of more than one process, split them up into multiple containers. For example, if you run NGINX and PHP-FPM, create two containers. The PHP example in the following section shows how to do that.
-
Do not use SSH. Do not install or enable SSH within a container. Use
docker attachto log into a container if needed for debugging. Or even better, optimize logging for debugging. - Use environment variables instead of configuration files. Do not use files to store the configuration for your application. Use environment variables instead. We will cover how to do so in the following section.
- Use standard output (stdout) and standard error (stderr) for logging. Do not write log files. Docker has built-in support to ship log messages from STDOUT and STDERR to various centralized logging solutions.
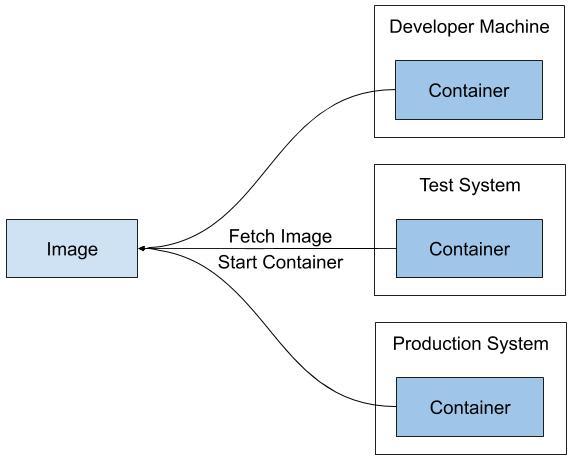
With Docker containers the differences between different platforms like your developer machine, your test system, and your production system are hidden under an abstraction layer. But how do you distribute your application with all its dependencies to multiple platforms? By creating a Docker image. A Docker image is similar to a virtual machine image, such as an Amazon Machine Image (AMI) that is used to launch an EC2 instance. The Docker image contains an operating system, the runtime environment, 3rd party libraries, and your application. The following figure illustrates how you can fetch an image and start a container on any platform.
But how do you create a Docker image for your web application? By creating a script that builds the image step by step: a so called Dockerfile.
In the following example you will learn how to dockerize your web application. The example uses a simple web application written in PHP without using any frameworks.
The sample application uses the following project structure:
-
confthe configuration directory (contains .ini files) -
cssthe stylesheet directory (contains .css files) -
imgthe images directory (contains .gif files) -
libthe libraries directory (contains .php files) -
index.phpthe main file
A typical setup to serve a PHP application consists of:
- A web server (for example NGINX)
- A PHP process (for example PHP-FPM)
Therefore, we need to run two processes: NGINX and PHP-FPM. However, a container should only run exactly one process at a time. Which means we need to build two images. The following figure shows the two containers: the NGINX container receives the request from the client and forwards PHP requests to the PHP-FPM container. Both containers run on the same host to avoid additional network latency.

Start with creating a Docker image for NGINX. NGINX serves the static files. In our example application the static files are stored in the css and img directory already. On top of that, NGINX forwards PHP requests to PHP-FPM.
The following snippet shows the configuration file docker/nginx/default.conf which tells NGINX to serve static files from /var/www/html and forward PHP requests to PHP-FPM. You do not need to make any changes to the NGINX configuration when dockerizing your web application.
server {
    listen       80;
    server_name  localhost;
    root         /var/www/html;
    # pass the PHP scripts to FastCGI server
    # listening on 127.0.0.1:9000
    location ~ \.php$ {
        fastcgi_pass   127.0.0.1:9000;
        fastcgi_index  index.php;
        fastcgi_param  SCRIPT_FILENAME  $document_root$fastcgi_script_name;
        fastcgi_param  SCRIPT_NAME      $fastcgi_script_name;
        include        fastcgi_params;
    }
    # redirect / to index.php
    location ~ ^\/$ {
        return 301 $scheme://$http_host/index.php$is_args$args;
    }
}
Next, you need a Dockerfile for building your own NGINX image. The following snippet shows the file docker/nginx/Dockerfile that we created for our sample application.
The first instruction defines the base image. When creating an image, we don't have to start from scratch. We can use a pre-built base image.
FROM nginx:1.14
The next instruction copies the NGINX configuration file from your disk to the Docker image.
COPY docker/nginx/default.conf /etc/nginx/conf.d/default.conf
The next two instructions copy the css and img directories from your local disk to the NGINX root directory /var/www/html/ in the Docker image.
Customization Depending on where you are storing the static files of your web application, you'll need to modify these instructions accordingly. Make sure you are copying all static files to
/var/www/html/.
COPY css /var/www/html/css
COPY img /var/www/html/img
The next instruction runs the chown command to transfer ownership of all static files to the nginx user. The nginx user is part of the base image.
RUN chown -R nginx:nginx /var/www/html
The Dockerfile is ready. It's time to build your first image.
docker build -t php-basic-nginx:latest -f docker/nginx/Dockerfile .
The following table explains the parameters of the docker build command to build a new image:
| Parameter | Explanation |
|---|---|
-t php-basic-nginx:latest |
Add a tag (name) to the new image. |
-f docker/nginx/Dockerfile |
Location of the Dockerfile. |
. |
Use the current directory as the build context (all paths, e.g. in COPY, are relative to the build context). |
The next step is building the PHP-FPM image. The following snippets show the file docker/php-fpm/Dockerfile used by our sample application.
The first instruction defines the base image. We are using a base image with PHP 7.3 pre-installed for our sample application.
Customization The following versions are supported as well: 7.2 and 7.1.
FROM php:7.3-fpm-stretch
Followed by enabling the PHP configuration optimized for production workloads and installing the PHP extensions pdo and pdo_mysql.
Customization Feel free to install additional extensions if needed.
RUN mv "$PHP_INI_DIR/php.ini-production" "$PHP_INI_DIR/php.ini"
RUN docker-php-ext-install -j$(nproc) pdo pdo_mysql
The next commands install envsubst. You will learn more about how to create configuration files with envsubst in a second. No need to change anything here.
RUN apt-get update && apt-get install -y gettext
COPY docker/php-fpm/custom-entrypoint /usr/local/bin/
RUN chmod u+x /usr/local/bin/custom-entrypoint
ENTRYPOINT ["custom-entrypoint"]
RUN mkdir /var/www/html/conf/
Afterwards, the script copies all configuration templates .tmp located in conf/.
COPY conf/*.tmp /tmp/conf/
The following instructions copy the PHP files from your disk to the root directory of PHP-FPM.
Customization When dockerizing your own application you will most likely need to modify these COPY instructions to make sure all PHP files are copied to the image. Also, as you add new PHP files to your application, make sure to add them to this list as well.
COPY *.php /var/www/html/
COPY lib /var/www/html/lib
RUN chown -R www-data:www-data /var/www/html
The last instruction tells Docker to start the PHP-FPM process by default. You do not need to change anything here.
CMD ["php-fpm"]
The Dockerfile is ready. But we have skipped one challenge: the configuration files. We assume you are storing the configuration for your web application within files. When using Docker, and especially when using Fargate, using configuration files is cumbersome. Instead, you should use environment variables to configure your application.
You have two options:
- Modify your application to read all configuration from environment variables.
- Do not modify your application, but use environment variables to create configuration files with
envsubst.
In the following steps you will learn how to write configuration files on container startup based on environment variables with envsubst.
Our sample application uses a configuration file to configure the database connection: conf/app.ini
[database]
host=mysql
name=test
user=app
password=secret
Our goal is to use environment variables for each property. To do so with envsubst, we need to create a configuration template. The following snippet shows the template conf/app.ini.tmp for our conf/app.ini configuration file.
In the template, each value has been replaced with a placeholder. For example, ${DATABASE_HOST} references the environment variable DATABASE_HOST.
[database]
host="${DATABASE_HOST}"
name="${DATABASE_NAME}"
user="${DATABASE_USER}"
password="${DATABASE_PASSWORD}"
By default, the Dockerfile adds all configuration template files .tmp stored in conf to the image. Each time a container starts it executes the script located in docker/php-fpm/custom-entrypoint. The following snippet shows how the custom-entrypoint script creates the configuration files based on all your configuration templates.
echo "generating configuration files"
FILES=/tmp/conf/*
for f in $FILES
do
  c=$(basename $f .tmp)
  echo "... $c"
  envsubst < $f > /var/www/html/conf/${c}
done
Customization To add your own configuration files, create a configuration template by replacing all dynamic values with placeholders (e.g.
$ENV_NAME). Store the configuration template in theconffolder. That's it. During runtime the container will create a configuration file based on the template.
Next, use the docker build command to create your PHP-FPM image:
docker build -t php-basic-php-fpm:latest \
  -f docker/php-fpm/Dockerfile .
You have successfully built two Docker images. You will learn how to test your Docker images locally in the 3rd part of the series.
Do you have any questions? Please leave them in the comments. This is the 2nd post of a series. Follow me to make sure you are not missing the following posts.
This post is an excerpt from our new book Rapid Docker on AWS. The book includes code samples for PHP, Ruby (Rails), Python (Django), Java (Spring Boot), and Node.js (Express).

Top comments (0)