
The secret sauce allowing you to set up your cloud infrastructure within minutes, which consists of around 100 resources, is Infrastructure as Code. It removes the need for clicking through the AWS Management Console manually.
In our opinion, Infrastructure as Code works best when following the declarative approach. Define the target state in source code and use a tool which calculates and executes the needed steps to transform the current state into the target state. Our tool of choice is AWS CloudFormation.
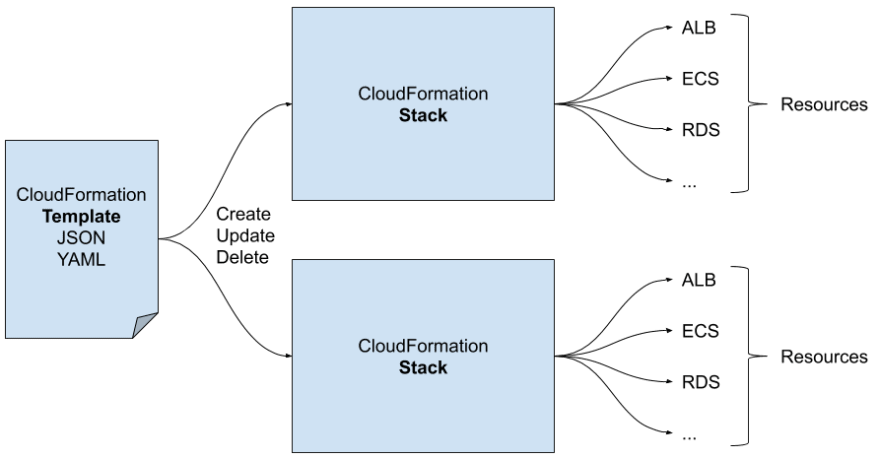
The figure below explains the key concepts of CloudFormation.
- You create a JSON or YAML file describing the target state of your infrastructure, which CloudFormation calls a template.
- You upload your template and ask CloudFormation to create, update or delete your infrastructure. The state of your infrastructure is stored within a so-called stack.
- CloudFormation transforms the current state of your stack into the target state defined in your template. To do so, CloudFormation creates, updates, or deletes resources as needed.
First, install the CloudFormation modules. To do so, create a package.json file with the following content.
{
  "name": "rapid-docker-on-aws-rapid-docker-on-aws",
  "version": "1.0.0",
  "description": "Rapid Docker on AWS: Demo",
  "author": "Michael Wittig <michael@widdix.de>",
  "license": "Apache-2.0",
  "private": true,
  "dependencies": {
    "@cfn-modules/alb": "1.0.4",
    "@cfn-modules/alb-listener": "1.0.0",
    "@cfn-modules/alerting": "1.2.0",
    "@cfn-modules/client-sg": "1.0.0",
    "@cfn-modules/cloudwatch-dashboard": "1.2.0",
    "@cfn-modules/ecs-cluster": "1.1.0",
    "@cfn-modules/ecs-alb-target": "1.2.0",
    "@cfn-modules/fargate-service": "2.5.0",
    "@cfn-modules/kms-key": "1.2.0",
    "@cfn-modules/rds-aurora-serverless": "1.5.0",
    "@cfn-modules/secret": "1.3.0",
    "@cfn-modules/vpc": "1.1.1"
  }
}
Next, create the CloudFormation template. To do so, create a template.yml file with the following content.
---
AWSTemplateFormatVersion: '2010-09-09'
Description: 'Rapid Docker on AWS: Demo application'
Parameters:
  AppImage:
    Description: 'The Docker image to use for the app container.'
    Type: String
    Default: 'cloudonaut/docker-on-aws-rapid-docker-on-aws-php-fpm:latest'
  ProxyImage:
    Description: 'Docker image to use for the proxy container.'
    Type: String
    Default: 'cloudonaut/docker-on-aws-rapid-docker-on-aws-nginx:latest'
  AdminEmail:
    Description: 'Optional email address of the administrator.'
    Type: String
    Default: ''
Conditions:
  HasAdminEmail: !Not [!Equals ['', !Ref AdminEmail]]
Resources:
  Alerting:
    Type: 'AWS::CloudFormation::Stack'
    Properties:
      Parameters:
        Email: !If [HasAdminEmail, !Ref AdminEmail, !Ref 'AWS::NoValue']
      TemplateURL: './node_modules/@cfn-modules/alerting/module.yml'
  Dashboard:
    Type: 'AWS::CloudFormation::Stack'
    Properties:
      Parameters:
        DashboardName: !Ref 'AWS::StackName'
        AlbModule: !GetAtt 'Alb.Outputs.StackName'
        FargateServiceModule: !GetAtt 'AppService.Outputs.StackName'
        RdsAuroraServerlessModule: !GetAtt 'AuroraServerlessCluster.Outputs.StackName'
      TemplateURL: './node_modules/@cfn-modules/cloudwatch-dashboard/module.yml'
  Key:
    Type: 'AWS::CloudFormation::Stack'
    Properties:
      Parameters:
        AlertingModule: !GetAtt 'Alerting.Outputs.StackName'
      TemplateURL: './node_modules/@cfn-modules/kms-key/module.yml'
  DatabaseSecret:
    Type: 'AWS::CloudFormation::Stack'
    Properties:
      Parameters:
        KmsKeyModule: !GetAtt 'Key.Outputs.StackName'
        Description: !Sub '${AWS::StackName}: database password'
      TemplateURL: './node_modules/@cfn-modules/secret/module.yml'
  Vpc:
    Type: 'AWS::CloudFormation::Stack'
    Properties:
      Parameters:
        AlertingModule: !GetAtt 'Alerting.Outputs.StackName'
        NatGateways: 'false' # reduce costs
      TemplateURL: './node_modules/@cfn-modules/vpc/module.yml'
  AuroraServerlessClientSg:
    Type: 'AWS::CloudFormation::Stack'
    Properties:
      Parameters:
        VpcModule: !GetAtt 'Vpc.Outputs.StackName'
      TemplateURL: './node_modules/@cfn-modules/client-sg/module.yml'
  AuroraServerlessCluster:
    Type: 'AWS::CloudFormation::Stack'
    Properties:
      Parameters:
        VpcModule: !GetAtt 'Vpc.Outputs.StackName'
        ClientSgModule: !GetAtt 'AuroraServerlessClientSg.Outputs.StackName'
        KmsKeyModule: !GetAtt 'Key.Outputs.StackName'
        AlertingModule: !GetAtt 'Alerting.Outputs.StackName'
        SecretModule: !GetAtt 'DatabaseSecret.Outputs.StackName'
        DBName: test
        DBMasterUsername: master
        SecondsUntilAutoPause: '900'
        MinCapacity: '1'
        MaxCapacity: '2'
        EngineVersion: '5.6.10a'
      TemplateURL: './node_modules/@cfn-modules/rds-aurora-serverless/module.yml'
  Alb:
    Type: 'AWS::CloudFormation::Stack'
    Properties:
      Parameters:
        VpcModule: !GetAtt 'Vpc.Outputs.StackName'
        AlertingModule: !GetAtt 'Alerting.Outputs.StackName'
      TemplateURL: './node_modules/@cfn-modules/alb/module.yml'
  AlbListenerHttp:
    Type: 'AWS::CloudFormation::Stack'
    Properties:
      Parameters:
        AlbModule: !GetAtt 'Alb.Outputs.StackName'
        Port: '80'
      TemplateURL: './node_modules/@cfn-modules/alb-listener/module.yml'
  AppTarget:
    Type: 'AWS::CloudFormation::Stack'
    Properties:
      Parameters:
        AlbModule: !GetAtt 'Alb.Outputs.StackName'
        AlbListenerModule: !GetAtt 'AlbListenerHttp.Outputs.StackName'
        VpcModule: !GetAtt 'Vpc.Outputs.StackName'
        AlertingModule: !GetAtt 'Alerting.Outputs.StackName'
        Priority: '2'
        HealthCheckPath: '/health-check.php'
      TemplateURL: './node_modules/@cfn-modules/ecs-alb-target/module.yml'
  Cluster:
    Type: 'AWS::CloudFormation::Stack'
    Properties:
      TemplateURL: './node_modules/@cfn-modules/ecs-cluster/module.yml'
  AppService:
    Type: 'AWS::CloudFormation::Stack'
    Properties:
      Parameters:
        VpcModule: !GetAtt 'Vpc.Outputs.StackName'
        ClusterModule: !GetAtt 'Cluster.Outputs.StackName'
        TargetModule: !GetAtt 'AppTarget.Outputs.StackName'
        AlertingModule: !GetAtt 'Alerting.Outputs.StackName'
        ClientSgModule1: !GetAtt 'AuroraServerlessClientSg.Outputs.StackName'
        ProxyImage: !Ref ProxyImage
        ProxyPort: '80'
        AppImage: !Ref AppImage
        AppPort: '9000'
        AppEnvironment1Key: 'DATABASE_PASSWORD'
        AppEnvironment1SecretModule: !GetAtt 'DatabaseSecret.Outputs.StackName'
        AppEnvironment2Key: 'DATABASE_HOST'
        AppEnvironment2Value: !GetAtt 'AuroraServerlessCluster.Outputs.DnsName'
        AppEnvironment3Key: 'DATABASE_NAME'
        AppEnvironment3Value: 'test'
        AppEnvironment4Key: 'DATABASE_USER'
        AppEnvironment4Value: 'master'
        Cpu: '0.25'
        Memory: '0.5'
        DesiredCount: '2'
        MaxCapacity: '4'
        MinCapacity: '2'
        LogsRetentionInDays: '14'
      TemplateURL: './node_modules/@cfn-modules/fargate-service/module.yml'
Outputs:
  Url:
    Value: !Sub 'http://${Alb.Outputs.DnsName}/'
  AlbDnsName:
    Value: !GetAtt 'Alb.Outputs.DnsName'
  DashboardUrl:
    Value: !Sub 'https://${AWS::Region}.console.aws.amazon.com/cloudwatch/home?region=${AWS::Region}#dashboards:name=${AWS::StackName}'
  AppLogsUrl:
    Value: !Sub "https://${AWS::Region}.console.aws.amazon.com/cloudwatch/home?region=${AWS::Region}#logs-insights:queryDetail=~(source~(~'${AppService.Outputs.LogGroupName}))"
Finally, you will deploy the demo web application into your AWS account.
Warning Costs arise when you launch the demo infrastructure and application. You can expect costs of around $4.50 per day.
In your temporary working environment (replace $NICKNAME), execute the following commands:
npm i
aws s3 mb s3://rapid-docker-on-aws-$NICKNAME
aws cloudformation package --template-file template.yml \
  --s3-bucket rapid-docker-on-aws-$NICKNAME \
  --output-template-file .template.yml
aws cloudformation deploy --template-file .template.yml \
  --stack-name rapid-docker-on-aws --capabilities CAPABILITY_IAM
The last command takes around 20 minutes to complete with an output like this:
Waiting for changeset to be created..
Waiting for stack create/update to complete
Successfully created/updated stack - rapid-docker-on-aws
The AWS resources are created. The following command fetches the URL:
aws cloudformation describe-stacks --stack-name rapid-docker-on-aws \
  --query 'Stacks[0].Outputs[?OutputKey==`Url`].OutputValue' \
  --output text
The output looks like this:
http://demo-LoadB-[...].elb.amazonaws.com
Open the URL in your web browser. Remember all the benefits of the Rapid Docker on AWS architecture. Isn't it amazing how easy you can launch this architecture?
It's time to delete the running demo web application to avoid future costs. Execute the following commands (replace $NICKNAME):
aws cloudformation delete-stack --stack-name rapid-docker-on-aws
aws s3 rb --force s3://rapid-docker-on-aws-$NICKNAME
Do you have any questions? Please leave them in the comments. This is the 4th post of a series. Follow me to make sure you are not missing the following posts.
This post is an excerpt from our new book Rapid Docker on AWS. The book includes code samples for PHP, Ruby (Rails), Python (Django), Java (Spring Boot), and Node.js (Express).


Top comments (0)