
Anvil is a platform for building web apps using nothing but Python, both on the client and the server. This means that, with Anvil, you can create and deploy a web application without needing to learn HTML, JavaScript or CSS. Moreover, it means that Anvil developers can take advantage of Python's rich library of packages, and build a web interface that makes use of those packages.
If you're completely new to Anvil, you might like to check out our Feedback Form tutorial - it'll walk you through the essentials of building an Anvil app!
You can install and use any Python package you like in your Anvil apps, either directly from PyPI, or any method supported by pip's requirements.txt file method. Packages you install are available in your app's Server Modules, and can be used from client Python code in that app by making server calls.
This tutorial will walk you through the process of building an Anvil app that uses custom packages, and by the end you'll know how to install and use any custom package you want in your Anvil apps.
In this example tutorial, you'll build an app that generates and displays a word cloud based on the text of a random Wikipedia page. You'll use the wikipedia, wordcloud and Plotly Express packages to do this.
To use custom packages in your Anvil apps, you'll need a Personal plan or above. If you're on a Free plan, you can get an instant 7 day trial, no credit card required - just follow this tutorial, and hit the Start Trial button when prompted!
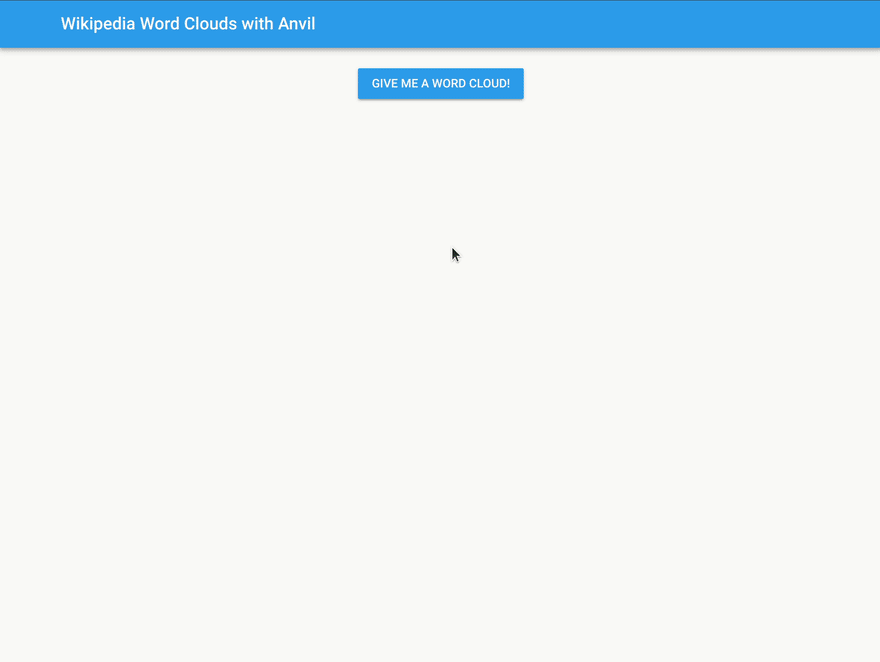
Here's what you'll build:
This tutorial contains the following sections:
- Creating your Anvil app
- Importing packages into your server environment
- Generating word clouds from Wikipedia
- Building your app's UI
- Writing client Python code
Step 1: Create your Anvil app
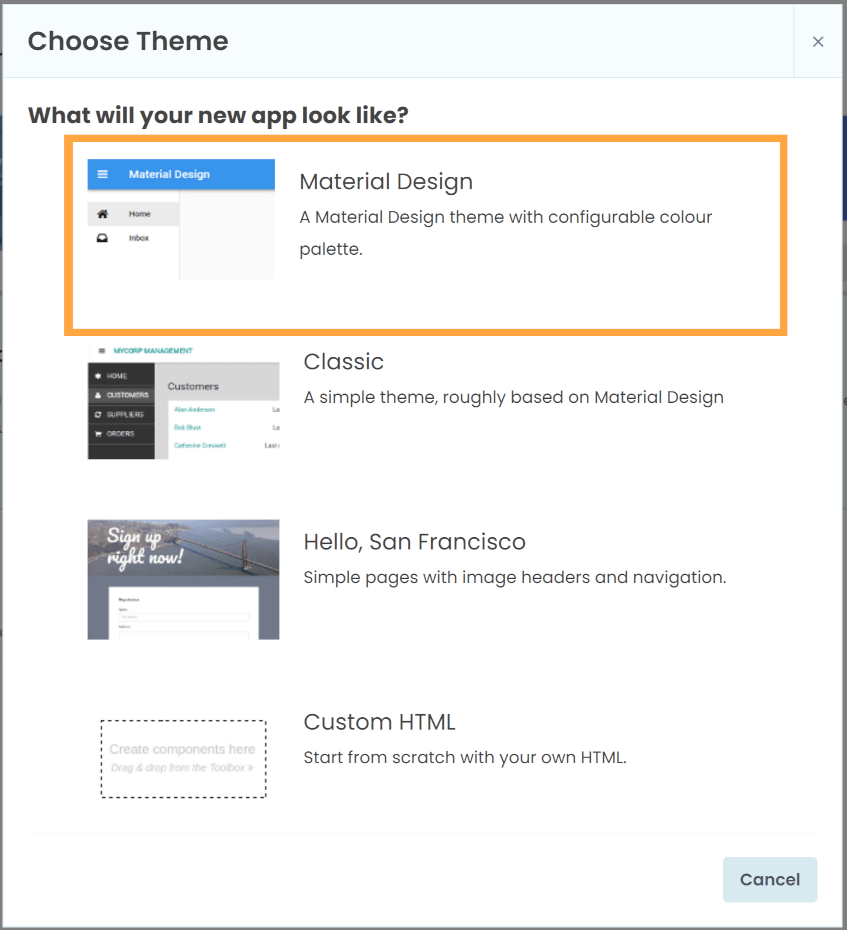
First, you'll need to create your new app. To get started, head to the Anvil Editor. On the landing page of the Editor, click 'Create a new app'.

Choose 'Blank app' from this screen., and from the dialog that appears, choose 'Material Design'.
You'll now see the Anvil Editor.
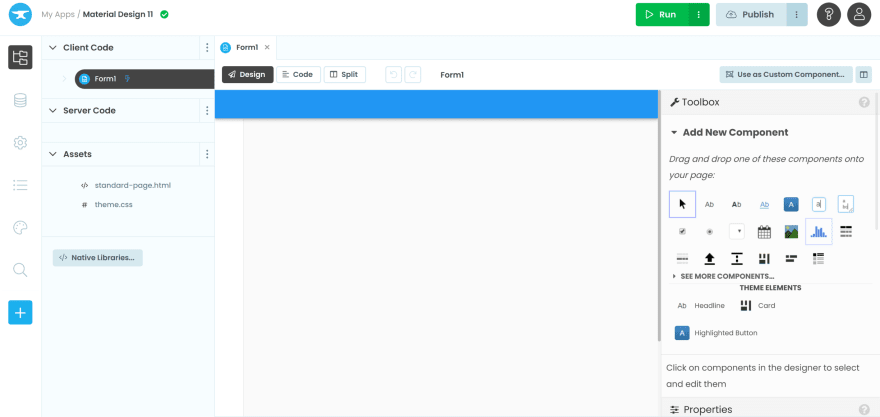
You are now editing a new, blank Anvil app, and you're ready to start building!
Step 2: Install packages into your app's server environment
In order to use custom packages in your app's Server Modules, you'll need to install them into the environment that your server code runs in. This step shows you how to do that.
To install custom packages, go to your App's Settings page. Select the gear icon from the Sidebar Menu, and you'll see this page:
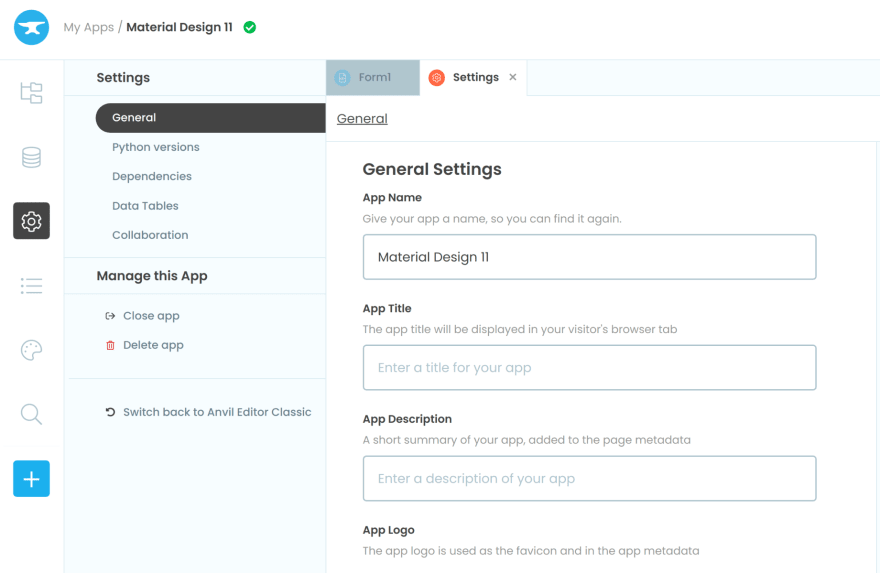
Now select 'Python versions' from the options on the left, and then select 'Python 3.10' from the drop-down.

Anvil provides several base environments, each of which has various packages pre-installed. You're going to start with the Data Science environment, then install three packages in addition.
From the 'Base packages' section, choose 'Data Science' from the drop-down. Then, under the 'Package' section, add the following packages:
- wikipedia
- wordcloud
- plotly-express
For each package, type its name as it appears above into the text box on the left, and leave the right-hand text box blank. Then, click the 'Add' button that appears, and you will be able to add another package. Here's how it will look as you add packages:
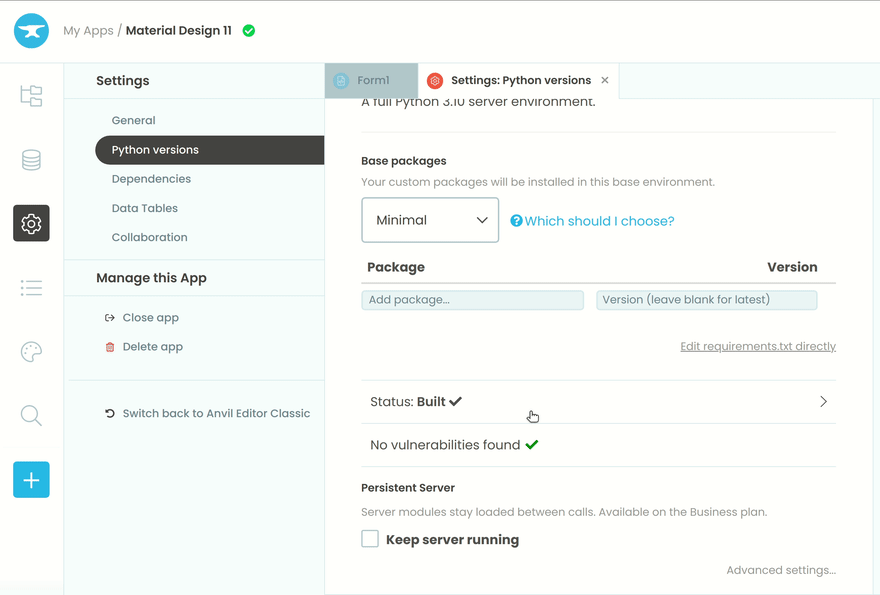
Now, your packages are ready to use in your Anvil app's server environment.
Step 3: Write a function to generate word clouds
Now you've installed our libraries, it's time to write some code that uses them! Custom packages are available in Server Modules, so you're going to write a server-side function to generate your word cloud. Then, in Step 4, you'll build a client-side user interface to call that server function and display the results.
If you want to learn more about the structure of the web and the differences between Client and Server code, check out our Client vs Server Code in Anvil article.
To add a Server Module to your app, go to the App Browser by clicking the folder icon at the top of the Sidebar Menu. Then, under 'Server Code' on the left, click on Add Server Module

This is the Python environment in which you can write your server function. At the top, add the following lines to import the packages you installed earlier:
import wikipedia
from wordcloud import WordCloud
import plotly.express as px
Next, you're going to write a function that gets data from a random Wikipedia page, uses it to create a word cloud, and then returns that word cloud along with a link to the Wikipedia page.
Getting a random Wikipedia page
Here's the part where you'll write Python code to use your custom packages.
You can get a title of a random Wikipedia page with the wikipedia.random() function, as seen in the package's documentation. Once you have a title, you can get information about that page by calling the wikipedia.page() function.
So, to start, your function looks like this:
def get_cloud():
    title = wikipedia.random()
    page = wikipedia.page(title)
    text = page.content
    url = page.url
However, it's possible that the title returned by wikipedia.random() might give you a DisambiguationError if you call wikipedia.page() with it. This represents the 'Disambiguation' pages on Wikipedia (example). To avoid this, add code to retry the function call up to 5 times if that happens:
def get_cloud():
  for i in range(5):
    try:
      title = wikipedia.random()
      page = wikipedia.page(title)
      text = page.content
      url = page.url
    except wikipedia.exceptions.DisambiguationError:
      continue
    break
Next, you'll want to take that text and use it to create a word cloud. Do this with the WordCloud class you imported at the top of your Server Module.
wordcloud = WordCloud(width=1000, height=700).generate(text)
python
Now, you'll use Plotly Express to turn that WordCloud object into something we can display.
  cloud = px.imshow(wordcloud)
  cloud.update_xaxes(showticklabels=False)
  cloud.update_yaxes(showticklabels=False)
Finally, this function needs to be able to be called from your app's client code, which we'll see in the next section. To make your function callable from the client, add the @anvil.server.callable decorator above the def line.
Your final function should now look like this.
@anvil.server.callable
def get_cloud():
  for i in range(5):
    try:
      title = wikipedia.random()
      page = wikipedia.page(title)
      text = page.content
      url = page.url
    except wikipedia.exceptions.DisambiguationError:
      continue
    break
  wordcloud = WordCloud(width=1000, height=700).generate(text)
  cloud = px.imshow(wordcloud)
  cloud.update_xaxes(showticklabels=False)
  cloud.update_yaxes(showticklabels=False)
  return cloud, title, url
Now, you're ready to build your app's user interface!
Step 4: Build your app's UI
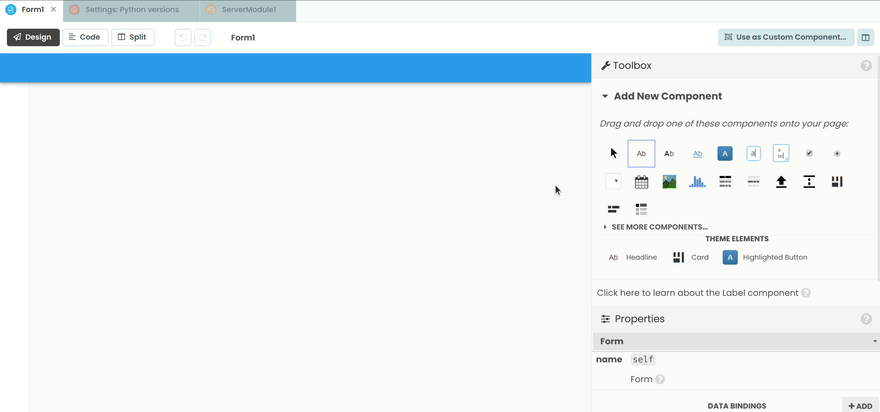
In this step, you'll use Anvil's drag-and-drop UI designer to build a user interface for your app. Every component that you drag and drop onto your app's page is a Python object, with properties that you can set either from the designer itself, or by setting them in client code.
In the App Browser, click on 'Form1' under 'Client Code'. This will open up your app's Form within the Editor, allowing you to start building your UI.

On the right, you'll see the Component Toolbox. You can drag and drop visual elements from the Toolbox onto your app's Form.
To start, drag and drop a Label component into the Title slot on your Form. Click on it to bring up its Properties Panel, and change its text property to "Wikipedia Word Clouds".
Here's how that looks:
Similarly, you're going to want to add a few other components on your app's Form:
- Drag a Card component into the main body of your Form.
- Within that Card, drop a Plot component.
- Drop a Link component below that, and change its
alignmenttocenterand itsfont sizeto 40. - Drag a Button component underneath your Card component, and change its
textproperty toGive me a word cloud!, and itsroletoprimary-color.
Here's how that looks:
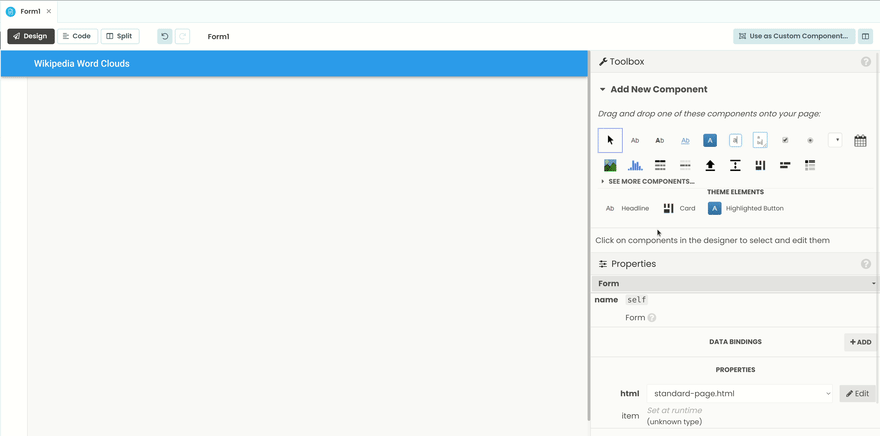
Finally, set your Card's visible property to False by unchecking the box. Later, once we have a word cloud to display within it, we'll change this property from client code, making it visible again.
Now, you're done with dragging and dropping components. It's time to write some client code!
Step 5: Writing client Python code
In the last step, you built your UI. Now, you'll write some client-side Python code that will define how your UI behaves when a user interacts with it.
Double-click on the Button at the bottom of your Form. This will take you to the code that drives your app's Form.
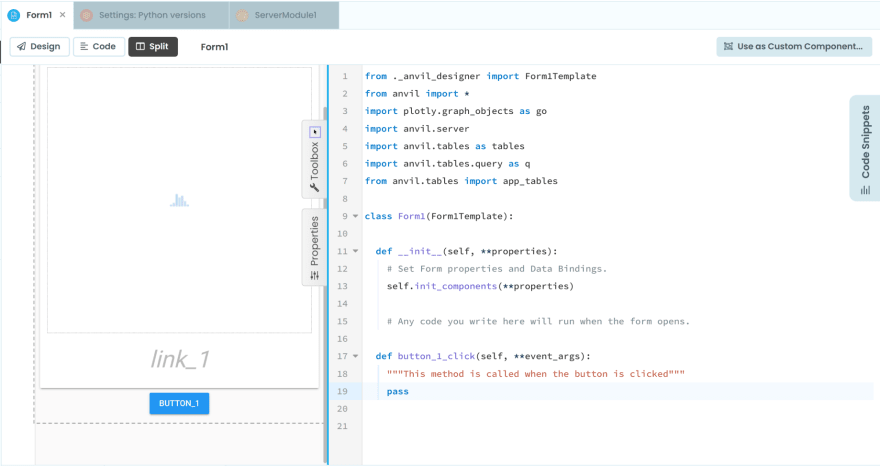
A button_1_click method has just been added to your Form's code; this method is called whenever a user clicks on the button. Modify it so that it calls your server function, get_cloud, and uses the return values to change the UI elements on your Form:
  def button_1_click(self, **event_args):
    """This method is called when the button is clicked"""
    cloud, title, url = anvil.server.call('get_cloud')
    self.button_1.text = "Give me another word cloud!"
    self.card_1.visible = True
    self.plot_1.figure = cloud
    self.link_1.text = title
    self.link_1.url = url
First, this method gets the word cloud, title and URL for a random wikipedia page, using the server function you wrote earlier. Then, the method does the following:
- changes the text on the Button
- makes the Card (along with the Plot and Link) visible
- changes the Plot to display the word cloud
- changes the Link so that it links to the Wikipedia page, with the title of the page as its
textproperty
And that's all the code you need to write! Click 'Run' in the top right of the Editor, click the button that says 'Give me a word cloud!', and watch your app generate a word cloud for you.
Finally, you can publish your app to make it available to anyone you like, by clicking the 'Publish' button in the top right.
Clone the App
You can click the link below to clone the example app, and see how yours compares:
Happy building!
New to Anvil?
If you're new here, welcome! Anvil is a platform for building full-stack web apps with nothing but Python. No need to wrestle with JS, HTML, CSS, Python, SQL and all their frameworks – just build it all in Python.
Yes – Python that runs in the browser. Python that runs on the server. Python that builds your UI. A drag-and-drop UI editor. We even have a built-in Python database, in case you don’t have your own.
Why not have a play with the app builder? It's free! Click here to get started:

Top comments (0)