Redux is a library that helps you manage the status of your app. In this article, demystifying redux, we will not discuss why to use it and how to use it correctly, we will only focus on how to create our own implementation by approaching the final result without having to cover all its aspects, details and tools. The goal is to understand how it works in broad strokes to eliminate most of the mystery behind this simple library.
Our demystifying redux example is based on a list of Korfbal players which we will be able to add as summoned in the match next week. It is the typical example but with a personal touch;)
In order to see all the parts, a repository has been created with different branches in which we can observe and understand the different blocks or sections by parts.
- Setup: Github link
- Init Store: Github link
- Actions: Github link
- Reducers: Github link
- Store subscriptions: Github link
- Visualization: Github link
Demystifying redux: setup
To start, we will use Webpack to configure the entire environment and it will serve us through devServer the html on port 3000, in addition to using the ATL module to load the Typescript files. We will also create a package.json which will be responsible for exposing the start script as well as the necessary dependencies for the project.
For more information:
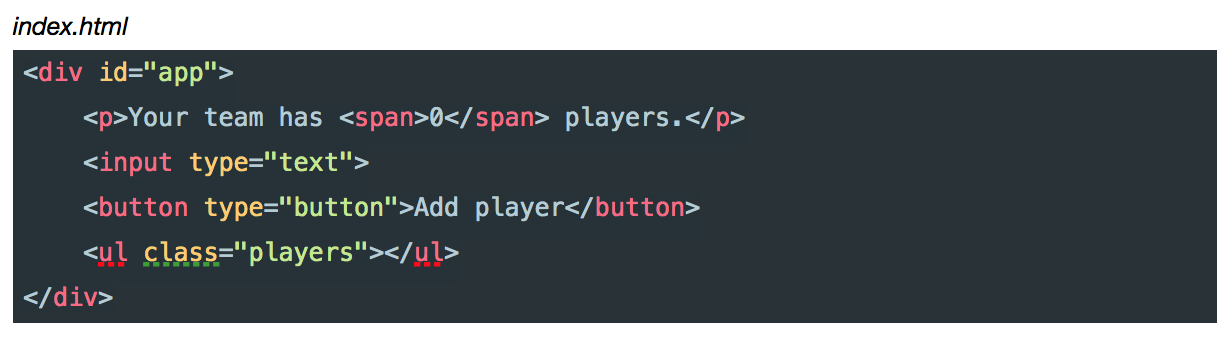
We will start with an index.html file that will show us the number of players we have and an input with a button to add new players.
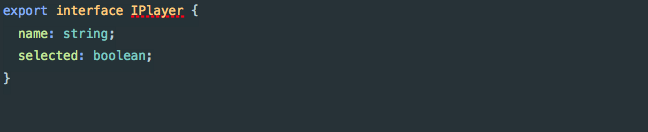
We will create a player interface and will use it to distinguish our players into different types. We will not use classes and builders for this article, only typed flat objects.
src/models/Player/entity.ts
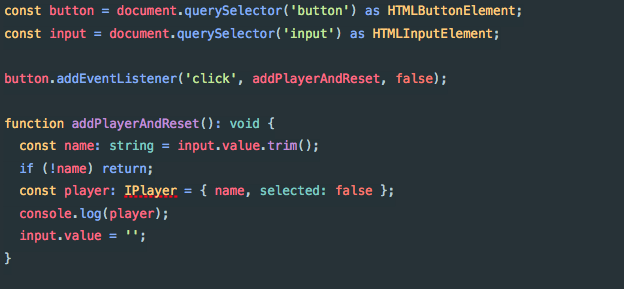
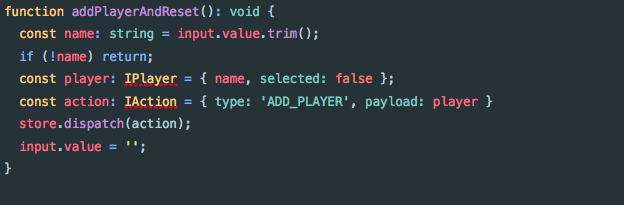
To start our demystifying redux example we will create an app.ts file with an option/selector of the “add player” button and another selector of our input. Next, we will register an event to the button so that, when it is clicked, with a small validation, it prints us a player object by the console and resets the input.
src/app.ts
With all this configured and created, we can start the project, installing the dependencies and executing the command start in console.

Now we should be able to open the browser, go to apiumhub.com: 3000, you will be able to see our html and click on the button to see our players with the status by the browser console.
In our example, we can see a third parameter of boolean type in our event listener. According to my experience, it is not very common for people to know this parameter “useCapture” so, let me give you an article that explains it very well: https://javascript.info/bubbling-and-capturing
Demystifying redux: Init Store
Now, let’s start with the important content of this article.
We start creating our Store.
src/store/store.ts
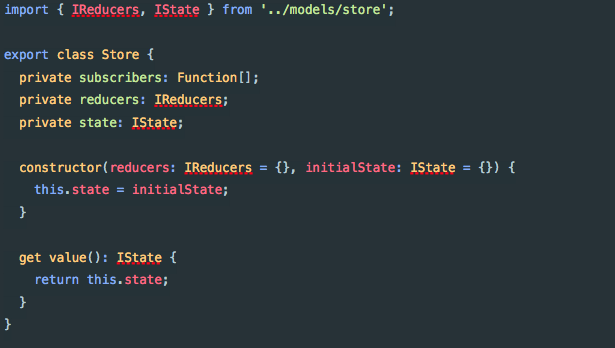
src/models/store.ts
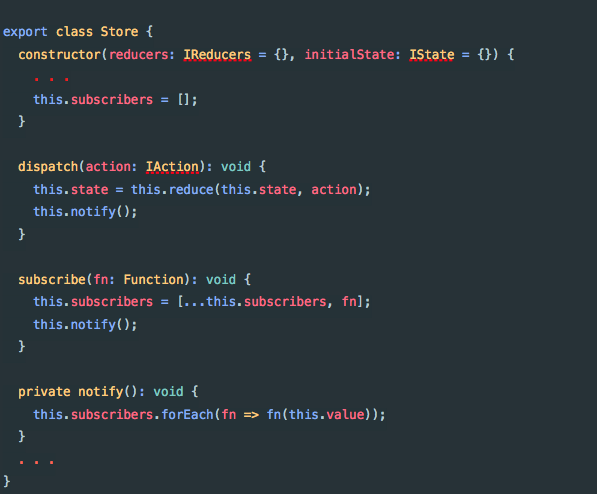
As we can see, it is a class that will basically contain an array of subscribers to the Store, it will manage our list of Reducers and will also have a status, which is nothing more than a flat object.
The first argument of the constructor will be the reducers and the second an initial state, and we will make both of them an empty object by default. In order to create instances of our Store, we will make a binding of the initial state to the state of the store within the constructor.
Finally, as we may need to know the status of our application at any time, thanks to the get property of Typescript we will create a getter to access the value of the state that has been defined as private.
To see our first step, we will create a Barrel file inside the store folder that will export all the contents of our Store, we will import this file with the name fromStore in the app.ts and we will create a new instance of the Store with an empty object like reduce and a default state.
Finally we will make a console.log of the value of the app’s status.
src/app.ts

If we refresh the browser, we should see the initial state that we have defined by console.
Demystifying redux: actions
We are going to create our first action to update the status of the store when it is executed from the “add player” button.
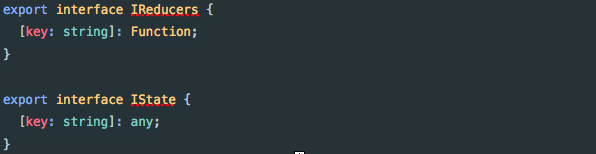
An action always has a type of something like string and can also has a payload, and to be executed, our Store must have a method called “dispatch” by convention that receives this action as a parameter.
src/models/store.ts

src/store/store.ts
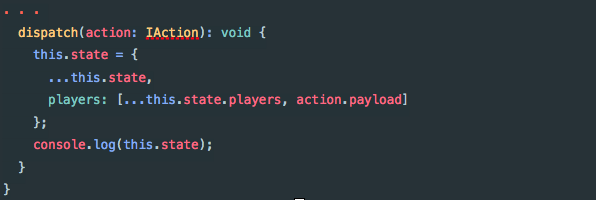
At the moment, we will do the change of the state within the dispatch method to the players since reducer will be in charge of the process which will be developed later on.
To make the change of state, it must be done in an immutable way, and for that we are going to generate a new object that will merge the previous state with the new players state using the spread operator. We also add a console.log within the dispatch method to see that the status of the app has been modified correctly.
Finally, in our app.ts we remove the console log from the initial state, change the console.log from the event listener method by executing the dispatch method with a type and payload the player.
src/app.ts
Now, we should verify that in console that the state is modified correctly when we add new players.
Demystifying redux: reducers
In this part, we create a reducer for players.
src/store/reducers.ts
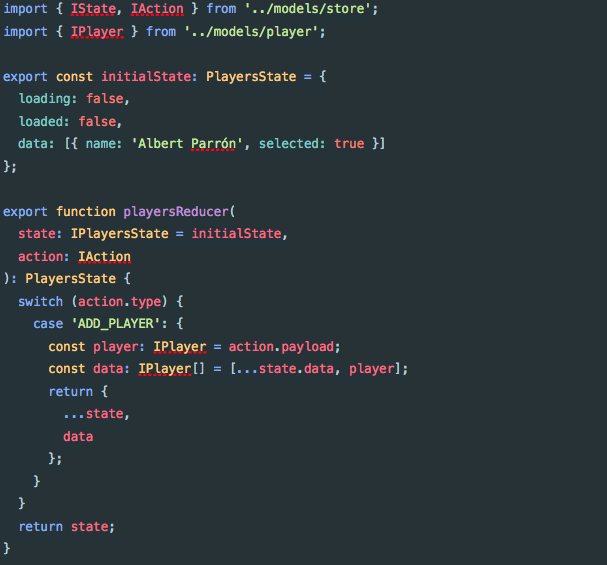 src/models/Player/state.ts
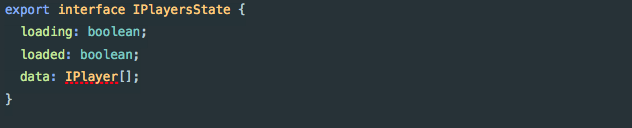
As you can imagine, in the state we can have multiple properties. We have created an initial state with the loaded property that will indicate if the players has loaded (for example, an http call), and loading that will indicate if it is in that process.
These two properties are not going to be used since we do not have any asynchronous call to change this state, but it serves as an example to understand a little better what this management provides us as well as to see more data in the console. We will also create the property data that will be an array where we will store all the players with the value that we passed by parameter to the instance of the Store to have an example data.
We will also create the property data that will be an array where we will store all the players with the value that we passed by parameter to the instance of the Store to have an example data.
The playersReducer function receives a first state parameter that has the initial state by default that we have created and as a second parameter it receives an action that, as we have already explained, has a type and an optional payload.
Inside we will evaluate the type of the action with a switch and as a case we will add the type ‘ADD_PLAYER’ that we are using in the dispatch of the action in the button event. We compose the new data state with the payload we receive (in this case the player) and finally we return the value of the modified state in an immutable way.
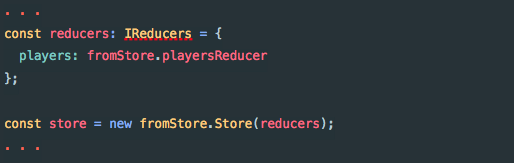
Ahora necesitamos registrar este reducer, y para ello exportaremos todo el contenido del archivo reducers.ts en el archivo Barrel y lo importaremos en el app.ts.
We create a constant called reducers which is an object with an item players assigned to its reduce function. One of the interesting parts when we are learning the Redux pattern is that we can say that we want several reducers that change different parts of the Store state.
Now we can replace the reducers parameter of the Store instance with our new object reducers.
src/app.ts
In the constructor of our store, we make the binding of the first parameter to reducers and in the dispatch method we can change the modification of the state by a method called reduce. We should not confuse it with the prototype reduce of the Array, it is a function of our class. Reduce is called with the current state of the store and with the action that has been executed.
src/store/store.ts

What comes next is an important part, so pay attention.
First remember our object reducers:
src/app.ts

The reduce method is responsible for generating an object with the same keys as the object reducers but assigns as value to each key the return value of the function reducer assigned.
This function, in this case specific playersReducer, given a state and an action, evaluating the action with a switch, it returned either the modified state or the unmodified status.
The state that is passed to playersReducer is the specific iterator (that is, the last value of the key) so that it won’t not have access to the other states of our Store. Like this we obrain the new state of our Store.
src/app.ts

To complete this part, we have replaced the binding of the state in the constructor with a call to reduce with an empty action and we have added a console.log of the value of the state of the app after the dispatch within the event assigned to the button.
Demystifying redux: store subscriptions
So far we have practically finished our Store, but we have done absolutely nothing with the DOM yet. We are not updating the elements or showing information.
If we go to the store, we will see that we have covered the reducers, and we have covered the status of the app but not the subscriptions.
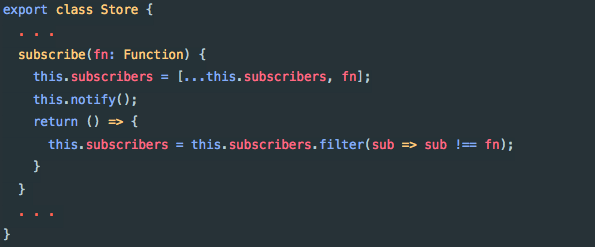
As a start, we will assign an empty array to the subscriptions in the constructor. Next, we will create a subscribe method that will allow us to receive changes from the store at any point of our app. This method basically what will do is receive a function, add it as a subscriber to the array and call each of the subscribers passing the value of the store, the status of our app. Let’s call this invocation process notify.
In addition, we will notify all the subscribers each time we do a dispatch, so that they receive the new status each time it is modified.
src/store/store.ts
Next, we will remove the console.log from the eventListener and we will make a subscribe within our app.ts, which we will make as a parameter to receive a function that makes a console.log. What we pass as a parameter is what will run our store every time it calls notify internally.
src/app.ts

If we refresh the browser, we will see that the initial state is printed by console and that when we add a player, our subscriber makes us the console.log with the new status of the app.
Demystifying redux: vizualization
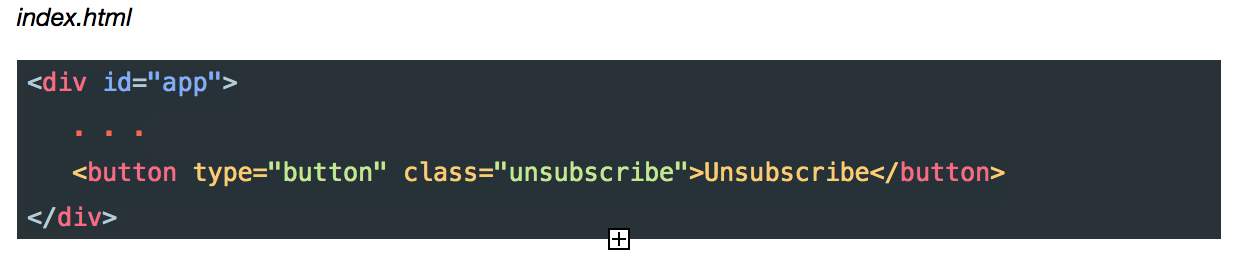
All this starts to take shape, but to leave it a bit more flashy we will add behavior on the DOM and also create an unsubscribe method with its corresponding button so that we won’t have memory leaks of subscriptions to the store, whether we change the scenario, we eliminate the component, we re-render it or other reasons that can give us this problem.
We will create a function renderPlayers that will allow us to iteratively add elements to the DOM inside the element ul with the class “players”.
This function is responsible for receiving a list of players by parameter, adding in the DOM the total number of players and also for each of them add a list item with the player’s name and a delete button. In addition we will change the function that we passed to it by parameter to subscribe for this new one and we will assign the subscription to the variable unsubscribe.
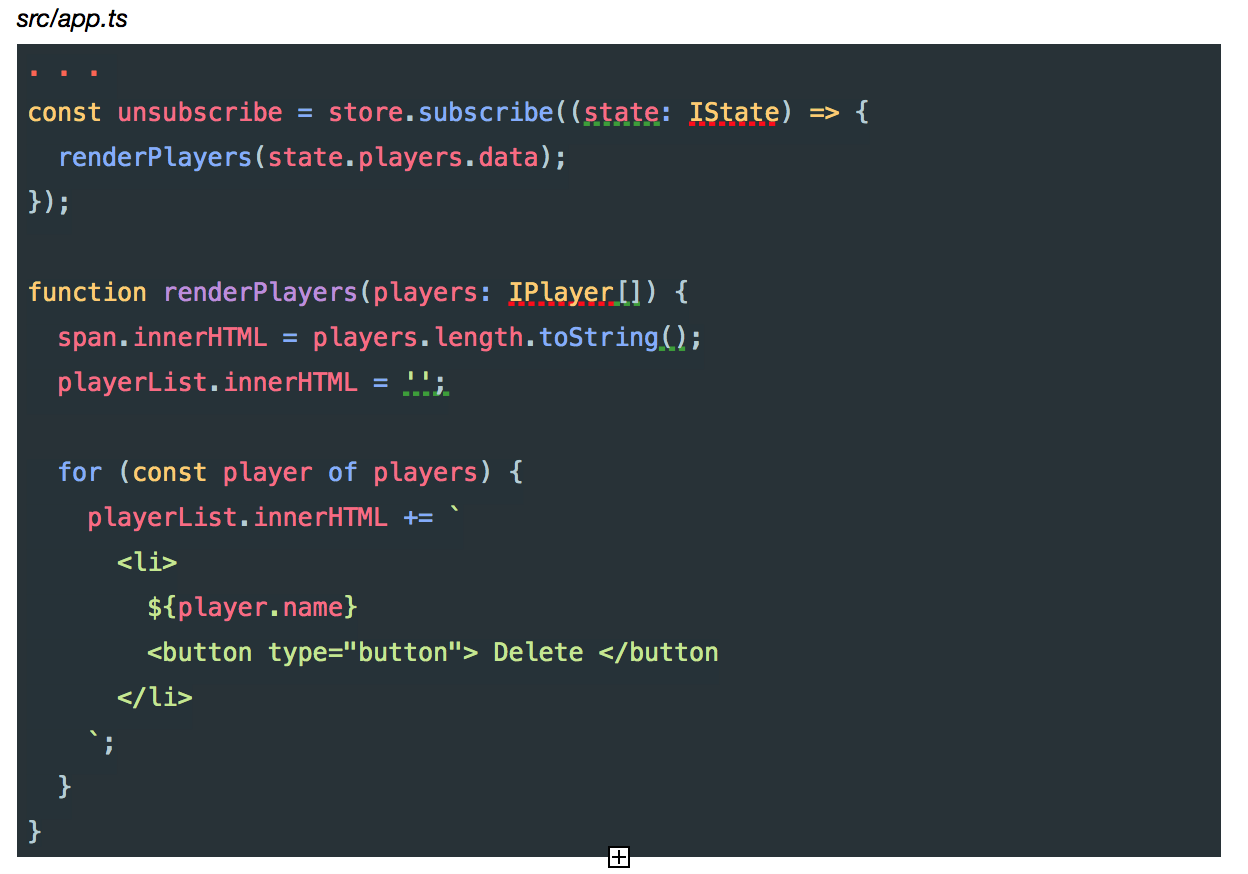
It is not the most correct way to update the DOM in terms of performance but for our example it is OK.
The assignment of the subscription to the “unsubscribe” variable will allow us to remove this function from the array subscriptions of the Store so that when the notify () method is executed it is no longer inside and therefore does not run. In order to do this, we just have to return a function in the subscribe method that handles this task with a simple filter.
src/store/store.ts
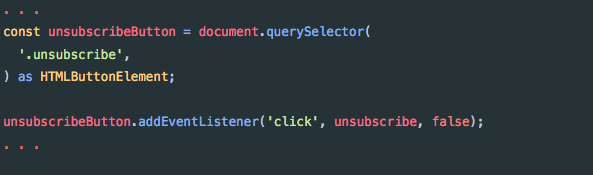
Finally, to prove that we can unsubscribe, we will create a button at the end of our html, and we will add an event that executes this function.
src/app.ts
With this, we can go to the browser, add players, see how the DOM is updated, click on the “Unsubscribe” button and see how the DOM stops updating even though by console we can see how the state keeps changing.
At this point, we can say that we have already finished our implementation of Redux. To complete our demystifying redux example, we should add more evaluations of
actions in our reducer so that it modifies the state in the way it is expected.
src/store/reducer.ts
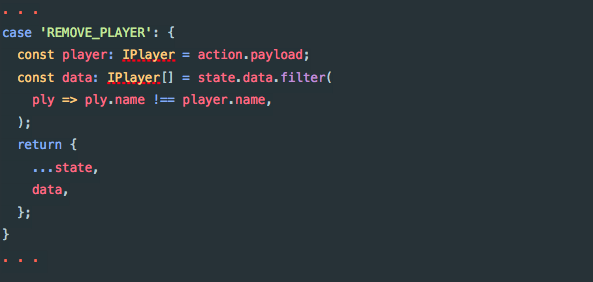
This new evaluation is responsible for filtering the player that is received through the action in an immutable way.
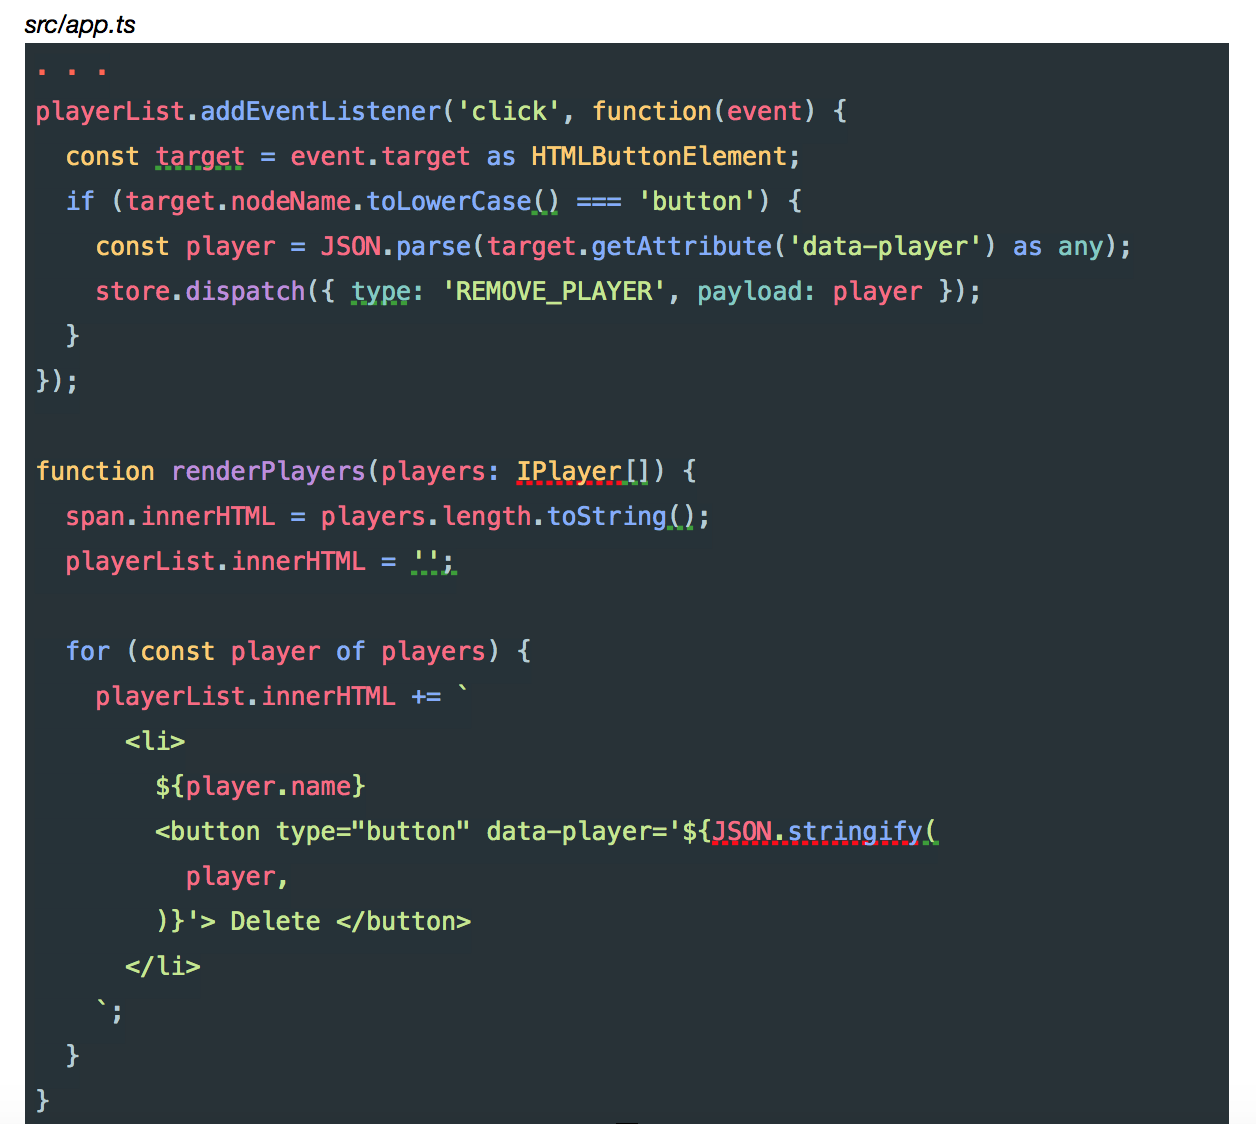
We finally add an event to the list of players by targeting the event element and making it dispatch a REMOVE_PLAYER with the player assigned to the data-player attribute.
Demystifying redux: conclusion
As we can see, it is a simple library with which we can manage the status of our app. We have eliminated all the mystery behind it step by step. Now we only have to develop tools that allow us to have more functionalities or less verbosity when working with it.
If you would like to know more about demystifying redux, I highly recommend you to subscribe to our monthly newsletter by clicking here.
And if you found this article about demystifying redux interesting, you might like…
Scala generics I: Scala type bounds
Scala generics II: covariance and contravariance
Scala generics III: Generalized type constraints
F-bound over a generic type in Scala
Microservices vs Monolithic architecture
iOS Objective-C app: sucessful case study
Mobile app development trends of the year
Banco Falabella wearable case study
Viper architecture advantages for iOS apps
Be more functional in Java ith Vavr
The post Demystifying Redux appeared first on Apiumhub.

Top comments (0)