
Apps built with Elixir can support massive scalability, real-time interactivity, great fault tolerance, and the language's syntax is actually a joy to use. Elixir is a natural fit for applications such as chat apps, data dashboard apps, and anything needed to support a large userbase.
In this article, we'll use Elixir — specifically, the web framework Phoenix — to build a multi-tenant link shortening app.
Let's get started!
What's Needed for Our Phoenix Project Built with Elixir
With the growing popularity of social media, there's been an increase in the use of URL shortening services. As a budding entrepreneur, you believe there's a market for yet another URL shortening service. And since such an app lives in between a generated short URL and the long version, it's necessary that the app be fast and scalable.
These features and more are already built into Phoenix, which makes it a great choice for this project, enabling you to stand out in the market.
Takeaways
After this tutorial, you will:
- Understand the internal workings of an Elixir/Phoenix app (for example, how to create and use a custom Ecto type, how to handle authentication, and more).
- Understand the concept of multi-tenancy, including the different strategies available.
- Build a multi-tenant link shortening Elixir/Phoenix app that can be extended into something more advanced with real-world use.
To follow along with the tutorial, let's set up a few things.
Prerequisites
- Elixir installed on your development machine. If you don't have it installed, follow this guide. For this tutorial, we're using Elixir version 1.14.0.
- Since we'll be using Phoenix for the web app build, you'll also need to have it installed on your local development machine. We're using Phoenix version 1.7.2 in this tutorial.
- PostgreSQL - Ensure you have PostgreSQL installed, as it's the default database used by Elixir/Phoenix apps.
With that in place, let's see what kind of app we'll be building next.
An Overview of the Phoenix App We'll Build
The app that we'll build is a simple multi-tenant URL shortening app with the following features:
- User authentication - users can register and log in to the application.
- Multi-tenant separation - users can create shortened links within their own separate accounts.
- URL shortening - users can input normal links and generate shortened versions that redirect back to the original link when clicked.
- View metrics - users can see how many times a link was clicked.
Implementing these features should add to your experience in working with Elixir and provide a good foundation to build even more complex Elixir apps.
Next, let's understand what multi-tenancy is and how it works.
An Overview of Multi-tenancy
At the most basic level, a multi-tenant app is one where the same application and database serve several tenants, with each client's data kept separate from that of other clients. There are thousands of real-world multi-tenant app examples, including AppSignal, Gmail, and others.
In our app, a user will be able to register and create shortened links that are associated with their account. Other users will also be able to sign up and create shortened links associated to them, but users won't be able to see other users' links. This is a simplified but very good example of multi-tenancy in action.
In the next section, we'll outline the different strategies a developer can use when building a multi-tenant app. It's important to point out that these strategies aren't exclusive to Elixir. Rather, think of them as universal building blocks for developing multi-tenant apps regardless of the programming language used.
Multi-tenancy Strategies
Several multi-tenancy strategies are available, including:
- Separate databases - Here, each tenant gets their own database for complete isolation of each client's data. The beauty of this approach is that it's very scalable and great for applications where data security and isolation is key: for example, patient medical records, financial records, and other similar use cases. As you can imagine, one of the biggest disadvantages with this approach is how complex and costly it is to build and maintain apps using this strategy.
- A shared database with separate schema - In this strategy, each client gets a separate schema within a shared database. This approach allows for a scalable system that is not too complex to build and maintain. That said, having separate schemas for each client is not something you can easily use to handle massive scale.
- A shared database with shared schema - Here, all tenants share a common database and schema. It is a great choice for low-to-medium traffic apps and offers a convenient way to get started with multi-tenancy. Many SaaS startups are often built using this strategy. The biggest disadvantage of this strategy is that it's not built for scale or speed.
- Hybrid strategy - A not-so-common approach where you have both the shared database and shared schema for some groups of users (say, the ones that pay the least in a SaaS app), and a common database with a separate schema for premium customers. This approach offers some level of scaling but is very complex to build and maintain.
- Containerization - Similar to the separate databases approach, here, each tenant is provided with a completely separate and isolated app container. The obvious advantages are speed and scalability, but this is complex to build and maintain.
You now have a good overview of what strategy to use when you build your own Elixir app next time.
For this app project, we'll be using the shared database with shared schema approach and an app stack described in the next section.
Our Elixir Application Stack
To build our app project, we will use the up-and-coming Elixir stack called "PETAL", short for:
- P - Phoenix
- E - Elixir
- T - Tailwind CSS
- A - Alpine JS
- L - Liveview - LiveView is an Elixir library that you include as a dependency in a Phoenix app to handle interactivity and other real-time flows characteristic of single-page applications (SPAs).
Since our goals are simple, employing the full PETAL framework in this case is overkill. Instead, we'll use the simple stack you get when you generate a new Phoenix web application:
- Phoenix
- PostgreSQL
- HTML and Tailwind CSS
We are now ready to jump into the build, but before we do, it's necessary that we understand how link shortening actually works. This will form the basis for the steps we'll take during the build.
How Link Shortening Works
Link shortening is actually very simple. The link shortening app lies between a long URL and a generated short URL. When a visitor hits a short URL, their request is received by the app and a quick database search is done to find the matching long URL. Once that long URL is found, the visitor is redirected to it, and the link visits counter updates.
Obviously, this is a very simplified outline, but it will suffice for now. Next, let's start off our build.
Generating a New Phoenix Application
Begin by generating a new Phoenix application using the following mix command:
mix phx.new urlbot
Then open your project directory in a text editor and edit the dev.exs file with your development environment's database settings:
# config/dev.exs

import Config

config :shorten_my_links_app, ShortenMyLinksApp.Repo,
  username: "DATABASE USERNAME", # Edit this line
  password: "DATABASE PASSWORD", # Edit this line
  hostname: "localhost",
  database: "DATABASE NAME", # Edit this line
  stacktrace: true,
  show_sensitive_data_on_connection_error: true,
  pool_size: 10

  # ...
Create the database for the application:
mix ecto.create
Once that is done, run mix phx.server in the terminal to compile the application and spin up an instance of the compiled app on localhost:4000, where you can see the default Phoenix home page:

Next up, let's set up the multi-tenant structure and user authentication.
Setting Up Multi-tenancy for Elixir
The tenant structure needs to be implemented as early as possible into a project build, since doing it later can result in all sorts of challenges. To put the shared database with shared schema multi-tenant strategy that we chose into actuality, we'll make use of foreign keys and related models.
Specifically, we'll have two main models: User and Account (this can also be called Organization, Team, or even Company); a User belongs to the Account model.
We'll also have a third Link model which will belong to the Account model. This way, the User model can be used exclusively for authentication purposes, while resource ownership will be handled by Account.
This structure is represented in the diagram below:
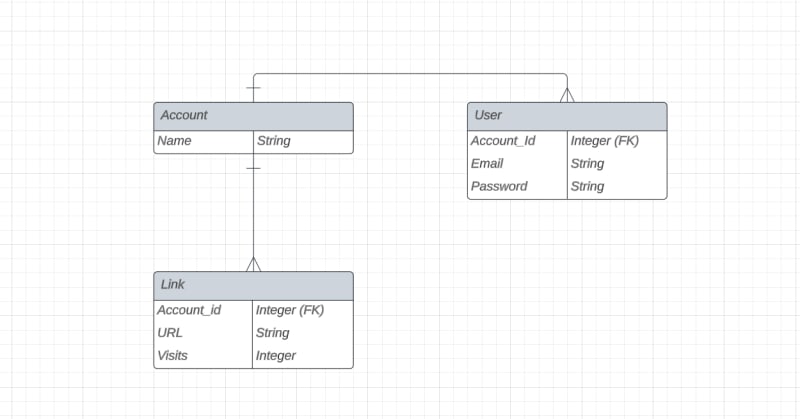
With this structure in place, all resources created, updated, or deleted in the app can be scoped to a specific Account and User. And just like that, we can achieve our goal of having separate tenant resources in a shared database with shared schema setup.
An additional benefit to using this structure is that you can easily expand it to invite other users to an account as "teammates" and assign them different roles. However, we won't cover this feature in this tutorial.
Let's begin by generating the Account context.
Generating an Account Context
Generate the Account context, schema, and migration file with the command below:
mix phx.gen.context Accounts Account accounts name:string
Then run the migration with:
mix ecto.migrate
Next, let's move on to the User.
Building a User Context and Authentication with Elixir
The User context will be used for authentication purposes. Instead of generating the User context and trying to integrate it into an authentication flow from scratch, Elixir gives us several libraries we can use, including phx.gen.auth, Coherence, and Pow, a modular and extendable authentication library for Phoenix apps.
We first add Pow to the project's dependencies:
# mix.exs

defp deps do
  [
    # ...
    {:pow, "~> 1.0.30"}
  ]
end
And fetch it:
mix deps.get
Then finish by installing it:
mix pow.install
With that, we get a User context, schema, and migration file. User authentication routes are also appended to the router.
At this point, we could run the migration, but there are a couple of changes we should make to our generated user files first to ensure they are properly related.
Adding the User and Account Relationship
Begin by adding a belongs_to association to User:
# lib/shorten_my_links_app/users/user.ex

defmodule Urlbot.Users.User do
  use Ecto.Schema
  use Pow.Ecto.Schema

  schema "users" do
    pow_user_fields()

    belongs_to :account, Urlbot.Accounts.Account # Add this line

    timestamps()
  end
end
Let's also modify Account to include the has_many relationship:
# lib/urlbot/accounts/account.ex

defmodule Urlbot.Accounts.Account do
  use Ecto.Schema
  import Ecto.Changeset

  schema "accounts" do
    field :name, :string

    has_many :users, Urlbot.Users.User # Add this line

    timestamps()
  end

  ...
end
Next, let's modify the users migration to add the account_id field as a foreign key. We also need to indicate that a user will be deleted whenever their related account is deleted:
# priv/repo/migrations/XXXXXXXXXX_create_users.exs

defmodule Urlbot.Repo.Migrations.CreateUsers do
  use Ecto.Migration

  def change do
    create table(:users) do
      add :email, :string, null: false
      add :password_hash, :string

      # Add this line
      add :account_id, references(:accounts, on_delete: :delete_all), null: false

      timestamps()
    end

    create index(:users, [:account_id]) # Add this line
    create unique_index(:users, [:email])
  end
end
Finally, it's nice to have an Account automatically created the first time a user registers on the app.
Creating an Account on User Registration
We need a way to capture the one attribute of the Acccount model (the account_name in the user registration form) and pass this attribute to a modified user creation process which will create a related Account for us.
That sounds like a lot, but let's go step-by-step.
First, add the account_name attribute to the user registration form. Since we are working with Pow which comes with pre-built view templates, we need to generate the templates by running the command:
mix pow.phoenix.gen.templates
This will generate Pow's view templates, but we are only interested in the user registration view for now. Edit it by adding the account_name field:
# lib/urlbot_web/controllers/pow/registration_html/new.html.heex

<div class="mx-auto max-w-sm">
  ...

  <.simple_form :let={f} for={@changeset} as={:user} action={@action} phx-update="ignore">
    ...

    <!-- Add this line -->
    <.input field={f[:account_name]} type="text" label="Account name" />

    ...
  </.simple_form>
</div>
By the way, instead of adding the account_name like this, we can use a nested form for working with Account from User (but this method should work just as well).
Next, we want to add account_name as a virtual attribute in the User schema. The reason it's a virtual attribute is simply because it's not an attribute that is built into the User schema, but we still need to use it in there. You can read more on virtual attributes.
# lib/urlbot/users/user.ex

defmodule Urlbot.Users.User do
  use Ecto.Schema
  use Pow.Ecto.Schema

  schema "users" do
    pow_user_fields()

    # Add this line
    field :account_name, :string, virtual: true

    belongs_to :account, Urlbot.Accounts.Account

    timestamps()
  end
end
At this point, you can run mix ecto.migrate to create the user table.
Next, we want to make sure that the virtual attribute we've just added is passed on to the User changeset, which we'll add since it's not included by default when we run the Pow generator.
We'll also add a custom private function to create an account at the same time a user is created:
# lib/shorten_my_links_app/users/user.ex

defmodule Urlbot.Users.User do
  use Ecto.Schema
  use Pow.Ecto.Schema

  # Add this line since we'll be using Ecto's changeset in this schema
  import Ecto.Changeset

  # Add this line to reference Account since it's used in the private function
  alias Urlbot.Accounts

  ...

  # Also add this block of code to add a changeset
  def changeset(user, attrs) do
    user
    |> pow_changeset(attrs)
    |> cast(attrs, [:account_name])
    |> validate_required([:account_name])
    |> create_user_account(user)
    |> assoc_constraint(:account)
  end

  # Add the custom private function
  defp create_user_account(%{valid?: true,  changes: %{account_name: account_name}} = changeset, %{account_id: nil} = _user) do
    with {:ok, account} <- Accounts.create_account(%{name: account_name}) do
      put_assoc(changeset, :account, account)
    else
      _ -> changeset
    end
  end

  defp create_user_account(changeset, _), do: changeset

end
Let's break down what's going on. First, we define a changeset block passing in a user and the user attributes. Then we cast the virtual attribute we added, followed by a validation rule to make sure it's present. We then call the private function create_user_account (defined just below the changeset block) and finalize with an assoc_constraint which checks that the associated field, account_id, exists.
With all that done, whenever a new user registers, a connected account will be automatically created. Any link resources created by the logged-in user will always be scoped to them. For example, an index view under /links will only display links created by the user, and not list other users' links, even if they are available. This resource separation at the account or user level is the foundation of a multi-tenant structure.
Up Next: Adding Link Resources and Custom Ecto Types
We've explored how multi-tenancy works and discussed a few multi-tenancy strategies. We created a Phoenix app and set up multi-tenancy. Finally, we added accounts, users and authentication, and associated users and accounts.
In the next and final part of this series, we'll look at:
- Generating the link resource
- Using Ecto custom types
- Generating a
current_account - Assigning a
current_accountto links - Redirecting links and updating the
viewscounter
Until then, happy coding!
P.S. If you'd like to read Elixir Alchemy posts as soon as they get off the press, subscribe to our Elixir Alchemy newsletter and never miss a single post!

Top comments (0)