Microsoft Excel is a powerful GUI tool to create and manipulate spreadsheets, to analyze numerical data in the form of Charts and Pivot Tables and to do complex formula calculations. But when it comes to programming and generating Microsoft Excel documents in some server-side language, there are very limited options. One such option is Aspose.Cells.
Aspose.Cells for .NET API is a library to create and manipulate Excel documents without the need of Microsoft Excel. It means, you do not need to install Microsoft Office or Excel to create Excel documents. It is suitable for both Desktop and Server applications. It supports almost all the features of Microsoft Excel e.g. Charts, Pivot Tables, Formula Calculations, Conditional Formatting, Tables etc.
Supported Platforms
Aspose.Cells API supports all .NET frameworks e.g. .NET 2.0, .NET 3.5, .NET 4.0, .NET 7.0, .NET Core, .NET Standard 2.0, Xamarin etc. It is also available in other platforms e.g. Java, C++, Android, JavaScript, PHP etc. Besides, Aspose.Cells is available in Cloud as REST or RESTful APIs.
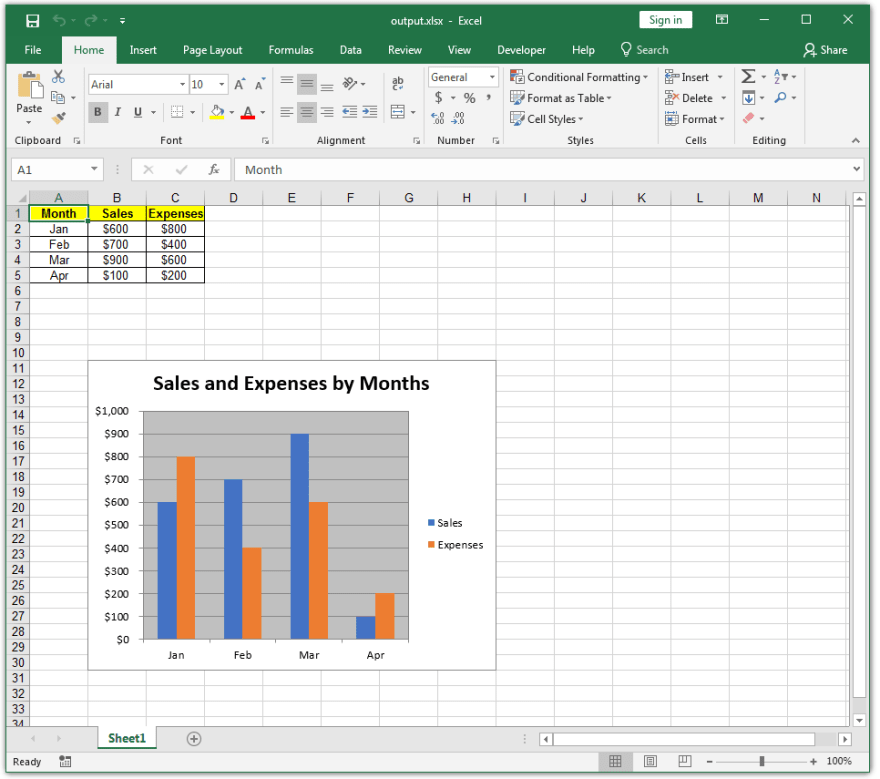
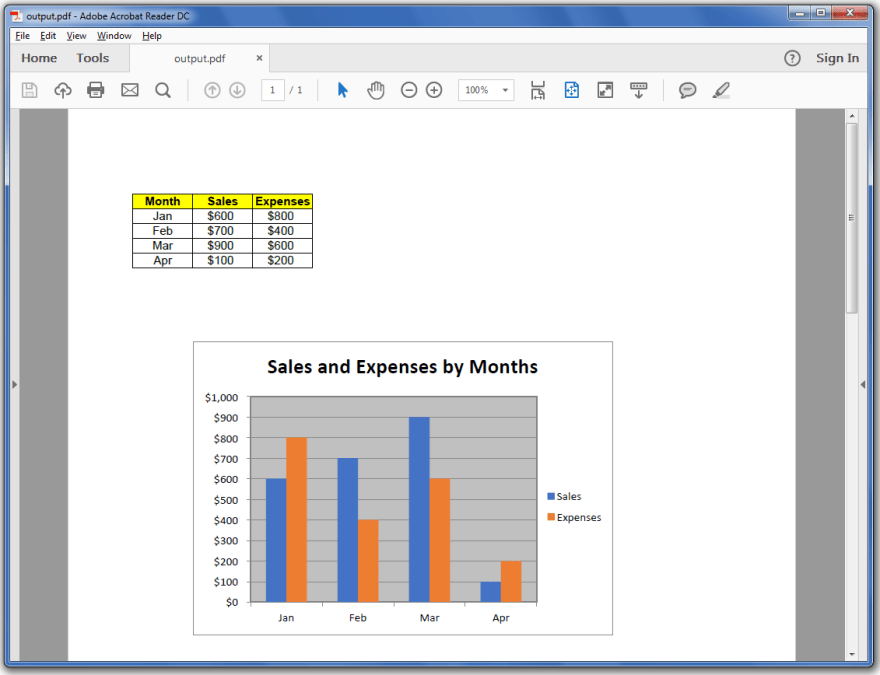
In this article, we will learn Aspose.Cells API by adding some data in cells and formatting it in C# programming. We will create a simple Column Chart based on the entered data. Lastly, we will save our Workbook object into XLSX, PDF and HTML formats.
Please scroll down to the bottom to see the entire sample code and its screenshots showing the output XLSX, PDF and HTML formats.
Working with Workbook, Worksheet and Cells
Create Empty Workbook
When you press Ctrl+N in Microsoft Excel, a brand new or empty workbook is created. Similarly, the following code creates a brand new empty workbook using Aspose.Cells APIs.
//Create Empty Workbook.
Workbook wb = new Workbook();
Access Worksheet
Whenever a new workbook is created, it always has one sheet at least. You can access sheet by sheet indices or by sheet name. The following code accesses the first worksheet using sheet indices. Please note, unlike Microsoft Excel, indices in Aspose.Cells APIs start from 0. So, first sheet index will be 0 and second sheet index will be 1.
//Access First Worksheet.
Worksheet ws = wb.Worksheets[0];
Access Cell By Row and Column Indices
As explained earlier, unlike Microsoft Excel, indices in Aspose.Cells APIs start from 0. So if you are to access cell located at 5th row and 3rd column i.e. C5, you will access it like this.
//Access cell on 5th row and 3rd column i.e. cell C5
Cell cell = ws.Cells[4, 2];
Access Cell By Name
Similarly, you can access cell by its name. For example, the following code accesses the cell C5 by its name.
//Access cell C5 by its name
Cell cell = ws.Cells["C5"];
Add Data in Cell
Cell object has a PutValue() method. It has various overloads. You can use it to add different types of data. For example, the following code explains how to add text in cell and how to add number in cell.
//Add text in cell
cell.PutValue("Sales");

//Add number in cell
ws.Cells["B2"].PutValue(600);
Working with Cell Formatting
Fill the Cell with Color
You can fill the cell with some color using the Style object. Please use Style.Pattern and Style.ForegroundColor properties for this purpose. In order to change cell style, please use Cell.GetStyle() and Cell.SetStyle() methods. The following color fills the cell with Yellow color.
//Get the Style object of the Cell
Style st = cell.GetStyle();

// Set the Pattern and ForegroundCOlor properties
st.Pattern = BackgroundType.Solid;
st.ForegroundColor = Color.Yellow;

//Set the Style object of the Cell
cell.SetStyle(st);
Set the Font of the Cell Bold
You can make the font of the cell bold using the Style.Font.IsBold property. The following code sets the cell value font bold.
//Get the Style object of the Cell
Style st = cell.GetStyle();

//Set the Pattern and ForegroundColor properties
st.Font.IsBold = true;

//Set the Style object of the Cell
cell.SetStyle(st);
Set the Horizontal and Vertical Alignment
Horizontal and Vertical Alignment of the cell can be set using the Style object. Please use Style.HorizontalAlignment and Style.VerticalAlignment properties to set the alignment. The following sample code sets the Horizontal and Vertical Alignment of the Cell to Center.
//Get the Style object of the Cell
Style st = cell.GetStyle();

//Set the horizontal and vertical alignment of the cell
st.HorizontalAlignment = TextAlignmentType.Center;
st.VerticalAlignment = TextAlignmentType.Center;

//Set the Style object of the Cell
cell.SetStyle(st);
Set the Line Style of the Borders e.g. Top, Bottom, Left and Right Borders
Style object can be used to set the line style of the borders. The following code sets the line style of top, bottom, left and right borders to thin.
//Get the Style object of the Cell
Style st = cell.GetStyle();

//Set the Line Style of the Borders
st.Borders[BorderType.TopBorder].LineStyle = CellBorderType.Thin;
st.Borders[BorderType.BottomBorder].LineStyle = CellBorderType.Thin;
st.Borders[BorderType.LeftBorder].LineStyle = CellBorderType.Thin;
st.Borders[BorderType.RightBorder].LineStyle = CellBorderType.Thin;

//Set the Style object of the Cell
cell.SetStyle(st);
Set the Number Format of the Cell Value to Currency
Please use Style.Number property and sets its value to 5, 6, 7 or 8. These numbers are defined by Microsoft Excel and they are called built-in Number formats. The following code assigns 5 to Style.Number property. Now, if the cell value is 100, it will be formatted as $100.
//Get the Style object of the Cell
Style st = cell.GetStyle();

//Set the built-in currency format
st2.Number = 5;

//Set the Style object of the Cell
cell.SetStyle(st);
Combine Multiple Types of Cell Formatting
All of the above codes can be merged like this. For example, the code given below does the following things.
1 - Fill the Cell with Yellow Color
2 - Set the Font of the Cell Bold
3 - Set the Horizontal and Vertical Alignment of the Cell to Center
4 - Set the Line Style of the Borders e.g. Top, Bottom, Left and Right Borders to Thin
5 - Set the Number Format of the Cell Value to Currency
//Get the Style object of the Cell
Style st = cell.GetStyle();

//Set the Pattern and ForegroundColor properties
st.Pattern = BackgroundType.Solid;
st.ForegroundColor = Color.Yellow;

//Set the font bold
st.Font.IsBold = true;

//Set the horizontal and vertical alignment
st.HorizontalAlignment = TextAlignmentType.Center;
st.VerticalAlignment = TextAlignmentType.Center;

//Set the borders
st.Borders[BorderType.TopBorder].LineStyle = CellBorderType.Thin;
st.Borders[BorderType.BottomBorder].LineStyle = CellBorderType.Thin;
st.Borders[BorderType.LeftBorder].LineStyle = CellBorderType.Thin;
st.Borders[BorderType.RightBorder].LineStyle = CellBorderType.Thin;

//Set the number style to currency
st2.Number = 5;

//Set the Style object of the Cell
cell.SetStyle(st);
Use Range object to Apply Cell Formatting to Entire Range of Cells
When you want to apply cell formatting to lots of cell, then you should not use Cell.GetStyle() and Cell.SetStyle() methods. Instead, you should use Range.ApplyStyle() method. This method takes two parameters i.e. Style and StyleFlag. The following code explains how to apply built-in currency number format to range B2:C5.
//Set the Currency format of Range
Range rng2 = ws.Cells.CreateRange("B2:C5");
StyleFlag flag2 = new StyleFlag();
flag2.NumberFormat = true;
Style st2 = wb.CreateStyle();
st2.Number = 5;
rng2.ApplyStyle(st2, flag2);
Working with Chart
Add Column Chart in Worksheet
The following code adds the column chart in worksheet with ChartCollection.Add() method.
//Add Column Chart.
int idx = ws.Charts.Add(ChartType.Column, 10, 1, 30, 8);

//Access Chart.
Chart ch = ws.Charts[idx];
Add Vertical Series in Chart
The following two lines add two vertical series in chart.
//Add Two Vertical Series
ch.NSeries.Add("B2:B5", true);
ch.NSeries.Add("C2:C5", true);
Set the Category Data of the Chart Series
The following line sets the category data i.e. X-Axis of the chart series.
//Set the Category Data.
ch.NSeries.CategoryData = "A2:A5";
Set the Names of the Chart Series
This is how you set the name of the chart series by specifying the cell name to Series.Name property.
//Set the Series Names.
ch.NSeries[0].Name = "=B1";
ch.NSeries[1].Name = "=C1";
Set the Chart Title
Please use the Chart.Title.Text property to set the Chart Title.
//Set the Chart Title.
ch.Title.Text = "Sales and Expenses by Months";
Calculate the Chart Items
Once, you have created your chart, please call Chart.Calculate() method. This method is only necessary when you want to create PDF or HTML formats as well. But if you only want to save to Excel format, then this method is not necessary because Microsoft Excel will calculate chart items automatically on opening.
//Calculate Chart Items.
ch.Calculate();
Save Workbook in Various Formats
Save the Workbook in XLSX format
Please use SaveFormat.Xlsx to save the workbook in Xlsx format.
//Save Workbook in Xlsx format.
String dirPath = "D:\\Download\\";
wb.Save(dirPath + "output.xlsx", SaveFormat.Xlsx);
Save the Workbook in PDF format
Please use SaveFormat.Pdf to save the workbook in PDF format.
//Save Workbook in PDF format.
wb.Save(dirPath + "output.pdf", SaveFormat.Pdf);
Save the Workbook in HTML format
Please use SaveFormat.Html to save the workbook in PDF format.
//Save Workbook in HTML format.
wb.Save(dirPath + "output.html", SaveFormat.Html);
Entire Sample Code
After understanding all the above concepts and APIs, you can understand the following entire code easily. Please read the comments inside the code for more help.


Top comments (0)