If you have been following along, we now have our back end deployed to AWS and can interact with it through the CLI on our computer. But that really isn't something you can show friends or share as a portfolio project. Now we will build out a (very) simple front end that we can deploy to interact with our resume assistant Lambda function. Lets get to work.
A simple web page
Lets get started in the root of CDK project by making a static_site directory that will hold our website files. For now we can just put a basic index.html file in there.
mkdir static_site
touch static_site/index.html
<!-- static_site/index.html -->

<!DOCTYPE html>
<html>
  <head>
    <title>It's alive!</title>
  </head>
  <body>
    <h1>Hello from S3</h1>
  </body>
</html>
S3 Bucket for Front-End
Now that we have a simple index for our site, we will need an S3 bucket to store it in, and a way to deploy the code from our repo to that bucket (much in the same way we needed a Lambda and a way to package and deploy it.)
Bucket
The bucket is simple enough. We will ensure that the objects are encrypted and non-public, and set an index. We will also set the removal_policy and auto_delete_objects to the values that make cleanup easier. Note that we are also setting a value for website_index_document.
# resume_assistant/resume_assistant_stack.py

from aws_cdk import aws_s3 as s3
from aws_cdk import RemovalPolicy

from constructs import Construct

class ResumeAssistantStack(Stack):
    def __init__(self, scope: Construct, construct_id: str, **kwargs) -> None:
        super().__init__(scope, construct_id, **kwargs)

        site_bucket = s3.Bucket(self, "SiteBucket",
            versioned=True,
            encryption=s3.BucketEncryption.S3_MANAGED,
            enforce_ssl=True,
            block_public_access=s3.BlockPublicAccess.BLOCK_ALL,
            removal_policy=RemovalPolicy.DESTROY,
            auto_delete_objects=True,
            public_read_access=False,
            website_index_document="index.html",
        )
Note: all future additions to the CDK code (minus module imports) will be done inside that __init__ function in the ResumeAssistantStack class at the same indentation level as site_bucket above. So that means if you copy and paste code blocks you will have to do some indentation yourself.
Bucket Deployment
This is how we automate the movement of code from out static_site directory to out bucket.
# resume_assistant/resume_assistant_stack.py

from aws_cdk import aws_s3_deployment as s3deploy

s3deploy.BucketDeployment(self, "DeployWebsite",
    sources=[s3deploy.Source.asset("./static_site")],
    destination_bucket=site_bucket,
)
OAI and CloudFront Distribution
It's not enough to have just the bucket and the deployment. We need that sweet s at the end of http and to make an OAI that can actually access the objects in our bucket (we did block access to it after all). We will also set a ttl of 0 seconds so that CloudFront doesn't cache while we are actively developing (we can change that later if we release this to the world).
Also we might as well have an output so that we can see the CloudFront URL of our page.
# resume_assistant/resume_assistant_stack.py

from aws_cdk import aws_cloudfront as cloudfront
from aws_cdk import Duration
from aws_cdk import CfnOutput


oai = cloudfront.OriginAccessIdentity(self, "OAI",
    comment="OAI for Resume Assistant"
)

distribution = cloudfront.CloudFrontWebDistribution(self, "Distribution",
    origin_configs=[
        cloudfront.SourceConfiguration(
            s3_origin_source=cloudfront.S3OriginConfig(
                s3_bucket_source=site_bucket,
                origin_access_identity=oai,
            ),
            behaviors=[
                cloudfront.Behavior(
                    is_default_behavior=True,
                    default_ttl=Duration.seconds(0),
                    min_ttl=Duration.seconds(0),
                    max_ttl=Duration.seconds(0),
                )
            ]
        )
    ]
)

CfnOutput(self, "WebsiteURL", value=distribution.distribution_domain_name)
Note: CloudFront distributions take a while to provision and propagate. Don't be surprised if you are waiting for 10+ minutes or so for the CDK to finish deploying. You can get a sneak preview of what the CloudFront URL will be by going to CloudFront in the console.

Woohoo!!
Route53 and ACM Certificate (Very Optional)
Right now you have a website at the URL <bunchacrap>.cloudfront.net and if you ask me, that is good enough for a little proof of concept site. But if you want to have it accessible from a domain name you might own it's easy enough to add some CDK to make the site accessible from subdomain.yourdomain.com
I find it very convenient to have a wildcard certificate outside of IAC for use in projects like this. A wildcard certificate is one that is valid for *.yourdomain.com and can be used for any number of subdomains. it makes projects like these easier to share with people and add to a portfolio. I think it should be outside of your IAC because you don't want to mistakenly tear down a project where the certificate is managed and break all of your other projects that depend on it!
We can set that up in AWS Certificate Manager by requesting a certificate for *.yourdomain.com and then adding the CNAME name and CNAME value as a CNAME record wherever that domain is managed. Once you have that certificate validated you can export its ARN and the domain and subdomain you want to use. The dexample below would be if you wanted the address to be resume.yourdomain.com
export CERTIFICATE_ARN='arn:aws:acm:us-east-1:123456789100:certificate/some-uuid'
export DOMAIN_NAME='yourdomain.com'
export SUB_DOMAIN='resume'
You can then use it in your CDK like you have been using the OpenAI API key. We will import the certificate object and then use it in our CloudFront distribution
# resume_assistant/resume_assistant_stack.py

from aws_cdk import aws_certificatemanager as acm
from aws_cdk import aws_cloudfront as cloudfront
from aws_cdk import Duration
import os

cert = acm.Certificate.from_certificate_arn(self, "cert", os.environ.get("CERTIFICATE_ARN", "empty"))

domain = os.environ.get("DOMAIN_NAME", "empty")
sub_domain = os.environ.get("SUB_DOMAIN", "empty")

distribution = cloudfront.CloudFrontWebDistribution(self, "Distribution",
    origin_configs=[
        cloudfront.SourceConfiguration(
            s3_origin_source=cloudfront.S3OriginConfig(
                s3_bucket_source=site_bucket,
                origin_access_identity=oai,
            ),
            behaviors=[
                cloudfront.Behavior(
                    is_default_behavior=True,
                    default_ttl=Duration.seconds(0),
                    min_ttl=Duration.seconds(0),
                    max_ttl=Duration.seconds(0),
                )
            ]
        )
    ],
    viewer_certificate=cloudfront.ViewerCertificate.from_acm_certificate(
        certificate=cert,
        aliases=[f"{sub_domain}.{domain}"],
        security_policy=cloudfront.SecurityPolicyProtocol.TLS_V1_2_2021,
        ssl_method=cloudfront.SSLMethod.SNI,
    )
)
Finally you need to add an A record to your hosted zone to send traffic that arrives for resume.yourdomain.com to the CloudFront URL. You can do that manually if you are using a DNS provider that is not Route53 (or can also do it manually if your provider is Route53 I suppose..) but lets manage that with the CDK if we can.
You will need to get and import one more environmental variable and that is the ID of the yourdomain.com hosted zone.
Export that:
export HOSTED_ZONE_ID='NUM83R5AND13TT3R5'
Then we can add that A record.
# resume_assistant/resume_assistant_stack.py

from aws_cdk import aws_route53 as route53,
from aws_cdk import aws_route53_targets as route53_targets,
import os

domain = os.environ.get("DOMAIN_NAME", "empty")
sub_domain = os.environ.get("SUB_DOMAIN", "empty")

dns_zone = route53.HostedZone.from_hosted_zone_attributes(self, "HostedZone",
    hosted_zone_id=os.environ.get("HOSTED_ZONE_ID", "empty"),
    zone_name=domain,
)

route53.ARecord(self, "SiteAliasRecord",
    zone=dns_zone,
    record_name=sub_domain,
    target=route53.RecordTarget.from_alias(
        route53_targets.CloudFrontTarget(distribution)
    ),
)
There! Now you have a friendly URL for your site. But it isn't much of a site yet is it? Lets start building that out.
Building a Front End
Note: If You are a front end guru and love to write React or some other high-speed front end framework that can be served statically you can just stop paying attention and do that (remember to modify te S3 deployment to point to the appropriate directory).
I, however, am terrible at that stuff. So for those of you remaining, we are about to write some janky HTML/JavaScript/CSS that was the product of a conversation I had with ChatGPT. Its not very good, but gets the job done. You have been warned!
Lets Write Some HTML!
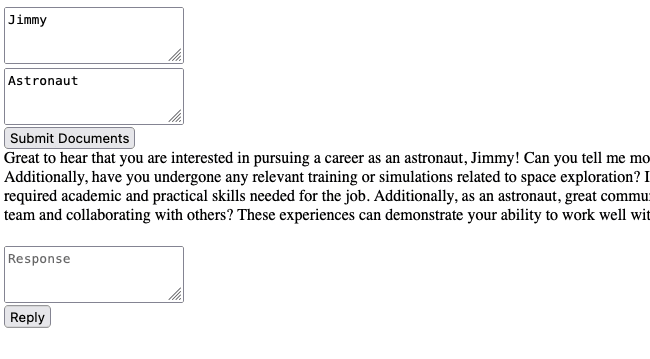
So the first thing we are going to need are two text boxes to allow users to add their resume and job descriptions to and a button to submit that data to our Lambda for our initial request. We will also need a place for the assistant's response as well as a place to input text for our future replies.
Lets start in the <body> of our index.html by making a div where our elements will live.
<!-- static_site/index.html -->
<html>
  <body>
    <div>
      <textarea id="resume-input" placeholder="Add resume here"></textarea>
      <br>
      <textarea id="jd-input" placeholder="Add job description here"></textarea>
      <br>
      <button>Submit Documents</button>
      <br>
      <div id="api-response"></div>
      <br>
      <textarea id="additional-input" placeholder="Response"></textarea>
      <br>
      <button>Reply</button>
    </div>
  </body>
</html>
A nice base but our buttons don't do anything yet. Lets fix that by adding some onclick properties and loading the javascript file we are about to make.
<!-- static_site/index.html -->
<html>
    <body>
        <div>
            <textarea id="resume-input" placeholder="Add resume here"></textarea>
      <br>
      <textarea id="jd-input" placeholder="Add job description here"></textarea>
      <br>
      <button onclick="handleSubmit()">Submit Documents</button>
      <br>
      <div id="api-response"></div>
      <br>
      <textarea id="additional-input" placeholder="Response"></textarea>
      <br>
      <button onclick="handleReply()">Reply</button>
    </div>
    <script src="script.js"></script>
  </body>
</html>
Some initial JavaScript
Lets add that script.js file to our static_site directory and review what our Lambda Function is expecting.
Initial Submission:
- A resume at resume:
- A job description at jd:
- An empty uuid at uuid:
- An empty reply at user_response:
Followup Submissions
- An empty resume at resume:
- An empty job description at jd:
- A uuid at uuid:
- A reply at user_response:
This is why we will be creating both a handleSubmit and handleReply function so that we can form the appropriate request to our Lambda. Lets work on the initial submission first.
We first set the values of chatUuid and apiURL and then create the function that the initial request will be sent into. There we will load the values in the text boxes into variables and then create our initial payload for the first request to our Lambda.
Because the call to the Lambda will be the same we will create a second function to pass that payload to that actually calls the API and posts the response to the api-response div.
// static_site/script.js

let chatUuid // this is initialized but left empty
let apiURL = 'The lambda url from your cdk stack'


function handleSubmit() {
    var resumeInput  = document.getElementById('resume-input').value;
    var jdInput = document.getElementById('jd-input').value;

    var initalPayload = {
        'resume': resumeInput,
        'jd': jdInput,
        'uuid': '',
        'user_response': ''
    };
    callAPI(initalPayload);
};

function callAPI(requestPayload) {
    fetch(apiURL, {
        method: 'POST',
        headers: {
            'Content-Type': 'application/json',
            'Access-Control-Allow-Origin': '*'
        },
        body: JSON.stringify(requestPayload)
    })
    .then(function(response) {
        return response.json();
    })
    .then(function(data) {
        chatUuid = data.uuid;
        document.getElementById('api-response').textContent = data.message;
    })
    .catch(function(error) {
        loadingElement.style.display = 'none';
        console.log('Error:', error);
    });
};
Remember that you will have to refresh or even open in a private window if browser caching is happening. It can also be helpful to add a console.log("fixed misspelled url") sort of message to make sure you are getting the version you think you are. Go ahead and test by just adding some sparse information and see what happens.
Obviously we have some work to do with our styling. But lets get the reply part working first.
We will add a the handleReply function and format the request in the way that the Lambda is expecting.
// static_site/script.js

let chatUuid // this is initialized but left empty
let apiURL = 'The lambda url from your cdk stack'


function handleReply() {
    var additionalInputValue = document.getElementById('additional-input').value;

    var replyPayload = {
        'resume': '',
        'jd': '',
        'uuid': chatUuid,
        'user_response': additionalInputValue
    };
    callAPI(replyPayload);
};

function callAPI(requestPayload) {
    document.getElementById('api-response').textContent = '';
    document.getElementById('additional-input').value = '';

    fetch(apiURL, {
        method: 'POST',
        headers: {
            'Content-Type': 'application/json',
            'Access-Control-Allow-Origin': '*'
        },
        body: JSON.stringify(requestPayload)
    })
    .then(function(response) {
        return response.json();
    })
    .then(function(data) {
        chatUuid = data.uuid;
        document.getElementById('api-response').textContent = data.message;
    })
    .catch(function(error) {
        loadingElement.style.display = 'none';
        console.log('Error:', error);
    });
};
Note that in addition to the handleReply() function that we added, we also added a couple lines to callAPI() to clear out the assistant's last response as well as the reply we just submitted. That should clean things up a bit.
We could also do a bunch of things like remove the initial input items upon our fist submission so that the user doesn't accidentally restart the conversation. We could also add some fancy loading spinners so that the used doesn't think that their request isn't coming back. I will leave that for you to improve and implement on your own.
But we should make it a little bit prettier... First lets slightly modify index.html to import the stylesheet and add some class names to the two divs.
<!-- static_site/index.html -->

<!DOCTYPE html>
<html>
  <head>
    <title>It's alive!</title>
    <link rel="stylesheet" type="text/css" href="style.css">
  </head>
  <body>
    <div class="container">
      <textarea id="resume-input" placeholder="Add resume here"></textarea>
      <br>
      <textarea id="jd-input" placeholder="Add job description here"></textarea>
      <br>
      <button onclick="handleSubmit()">Submit Documents</button>
      <br>
      <div id="api-response" class="api-response"></div>
      <br>
      <textarea id="additional-input" placeholder="Response"></textarea>
      <br>
      <button onclick="handleReply()">Reply</button>
    </div>
    <script src="script.js"></script>
  </body>
</html>
Lets get working on that style.css. We will make the main area of the page 75% of the window width and set all the boxes to be that width. We will also make it so the buttons are a little nicer.
/* static_site.style.css */

.container {
    max-width: 75%;
    margin: 0 auto;
    padding: 20px;
}

textarea {
    width: 100%;
    height: 100px;
    resize: both;
    margin-bottom: 10px;
    padding: 5px;
}

button {
    padding: 10px 20px;
}

.api-response {
    margin-top: 20px;
    border: 1px solid #ccc;
    padding: 10px;
    white-space: pre-wrap;
}
Easy (But not really. Like I said, ChatGPT helped bootstrap most of this front end and I have just edited it down into a minimal and straightforward package for your consumption).
Now that you have that deployed yourself give it a nice try. Break it and see what needs to be modified in your Lambda code. Here are some ways you could improve it:
- What happens when the OpenAI API is down? What about when you hit your billing limit? (you better have set one!) Add some sensible exceptions.
- What happens if the user doesn't enter any information? Add some validations.
- Can you make the site more user friendly? Add a loading or "thinking" animation. Collapse the initial user inputs down once they er submitted.
- We are saving all sorts of conversations that is probably in violation of GDPR and other laws. Set up lifecycle rules on out bucket to delete conversations as soon as they are over or allow the user to purge their conversation.
- Do something else and let me know what you did! I would love to hear about it!

Top comments (0)