
I am so, so excited about the brand new Amplify Admin UI, which the team that I'm on at work launched this week. You can create and configure a backend for an application in minutes, start building it without an AWS account, create a schema in clicks, add authentication, and easily deploy to AWS. You don't need to know backend development or AWS to use it -- I think it's an awesome tool for new developers looking to get started in these domains. In this tutorial, we'll build out a backend for a blog with comments, and add user authentication.
First head to the Amplify Admin UI homepage. Then, click "Get Started" under "Create an app backend."

Create a Data Model
Choose "data" and then "blank schema" on the next page. You can also start with a sample schema in the future if you want, but for this tutorial, we'll start from scratch! Under the hood, the data model utilizes DataStore, which will allow your data to be available both offline and online and across your application's users.
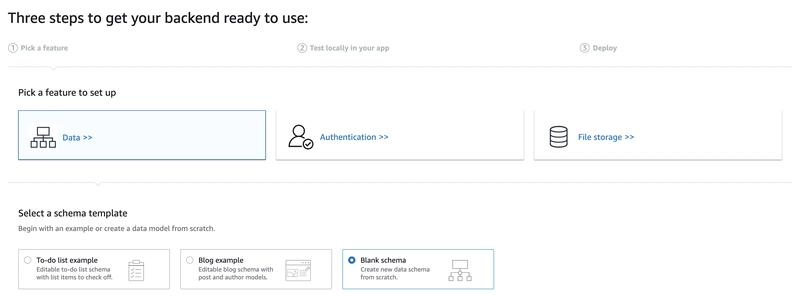
Then, click "create new schema". We'll add two models: Post and Comment.
Click the add button, then add model.

Name your model "Comment" and then add two fields: text and author. Both will be strings.

Add the "Post" model. This one will have two more fields: title and content.

We'll also add a relationship so that each post has comments attached to it.
Click "Add a relationship" under the "Post" model. Select "Comment" as your related model, and choose "one Post to many Comment" since we want each post to be able to have multiple comments.

I also made all the fields required. If you focus on a field, a panel shows up on the right-hand side of the screen where you can make a field required. In this view, you can also create array fields which would help if you wanted to add an array of tags to your blog posts!

Then click the orange "Next: Test locally in your app" button.
Test your data
Then, you can test out your data model in an app to make sure it works the way you want it to.
On this screen, you'll see options for what type of app you're setting up and how to do so -- you can choose a web, iOS, or Android app. I'm going to pick Web as my platform and React as my framework for the sake of the tutorial. Once you choose, there will be instructions for creating your app.
If you're just starting out with React, here's a tutorial on getting started with it! I'm going to move fast through this part since I want to focus this post on the Admin UI.
Run the following command to create a React app and move into its directory.
$ npx create-react-app blog
$ cd blog
Then, install the Amplify CLI.
$ curl -sL https://aws-amplify.github.io/amplify-cli/install | bash && $SHELL
Also, pull down your newly created backend in order to test it out locally.
amplify pull --sandboxId your-app-id
We'll need to install a few packages, first typescript since DataStore uses it for your generated models, and the Amplify libraries which will give us utilities for using and extending our backend.
npm install aws-amplify typescript
Then, open up your index.js file and add the following piece of code to configure Amplify in your project:
import Amplify from 'aws-amplify'
import awsconfig from './aws-exports'

Amplify.configure(awsconfig)
Then, we can write our React code! For this tutorial, we'll create a post and list all of our posts on the page. Let's create components for each:
touch src/PostList.js
touch src/CreatePost.js
First, we'll create a standard React form for creating a new blog post.
// CreatePost.js
import { useState } from 'react'

export default function CreatePost () {
  const [title, setTitle] = useState('')
  const [content, setContent] = useState('')

  const handleSubmit = async e => {
    // When the form is submitted, prevent the default form behavior (don't refresh the page)
    e.preventDefault()

    // set the tile and content back to empty strings
    setTitle('')
    setContent('')
  }

  return (
    <form onSubmit={handleSubmit}>
      <div>
        <label htmlFor='title'>Title</label>
        {/* Update the title in state every time the title field is changed */}
        <input type='text' name='title' id='title' value={title} onChange={e => setTitle(e.target.value)} />
      </div>
      <div>
        <label htmlFor='content'>Content</label>
        {/* Update the content in state every time the content field is changed */}
        <textarea id='content' name='content' type='text' value={content} onChange={e => setContent(e.target.value)} />
      </div>
      <input type='submit' value='create' />
    </form>
  )
}
We'll then add the Amplify code for saving our data to DataStore.
// Import data store and the Post model
+ import { DataStore } from '@aws-amplify/datastore'
+ import { Post } from './models'

...diff
  const handleSubmit = async e => {
    e.preventDefault()

    // Save our Post using the title and content the user inputted.
+ await DataStore.save(
+ new Post({
+ title,
+ content
+ })
+ )
    setTitle('')
    setContent('')
  }
...
Then, we'll create a component to display each post.
// PostList.js

import { useEffect, useState } from 'react'
import { Link } from 'react-router-dom'
import { DataStore } from '@aws-amplify/datastore'

import { Post } from './models'

export default function PostList () {
  const [posts, setPosts] = useState([])
  useEffect(() => {
    const getData = async () => {
      // Get all of our posts and update state with them
      const postData = await DataStore.query(Post)
      setPosts(postData)
    }
    getData()
  }, [])

  // Loop through
  return (
    <div>
      {posts.map(post => (
        <div key={post.id}>
          <h2>{post.title}</h2>
          <p>{post.content.substring(0, 300)}...</p>
        </div>
      ))}
    </div>

  )
}
Finally, link both components in the App component:
import CreatePost from './CreatePost'
import PostList from './PostList'

function App () {
  return (
    <div>
      <CreatePost />
      <PostList />
    </div>
  )
}

export default App
For the sake of tutorial length, I'll skip over the rest of the components since this shows how to get data and add it, but my full application code will be linked at the end of the tutorial.
You should be able to create posts and then see them on the page!
If you want to make any changes to your schema, you can click the 'model' tab and make edits. You will then need to pull your changes by re running the amplify pull --sandboxId your-sandbox-id command.
Also, if you don't want to test your app before deploying it, you can skip the testing page and move on to the "Deploy" one.
Deploy
Right now, your data is only local. We need to deploy our backend to AWS in order to make it available to a wider user base.
On the deploy page, you can either signup for a new AWS account or sign into one you already have.

Choose one, and you will be taken to a "Create App Backend" page. Enter any name for your app, and choose an AWS region to deploy to. You'll normally want to pick a region that will be closest to the majority of your users. I'll pick us-east-1 since I'm in the United States on the east coast. In the future, you can make your app multi-region to better support users across the world. Here's a map of all the regions if you want to learn more!
It'll take a few minutes to initialize your backend environment, but once it does, you can click the "Backend environments" tab and then "Open admin UI."
From this view, you'll be able to edit your schema, manage your application content, add authentication to your app, and to extend your app with any of the other Amplify services.
First, click the "Local setup instructions" on the top right for another amplify pull command -- this one will hook your app up to your deployed API instead of the sandbox one.
$ amplify pull --appId your-live-app-id --envName staging
Manage App Content
If you click on the "Manage app content" button, you'll be taken to a dashboard where you can create, edit, and delete your app's data. Switch to your "Post" table and click "Create post". You can then add a title and content -- click "Edit in markdown" to launch a markdown preview tool for your blog posts!
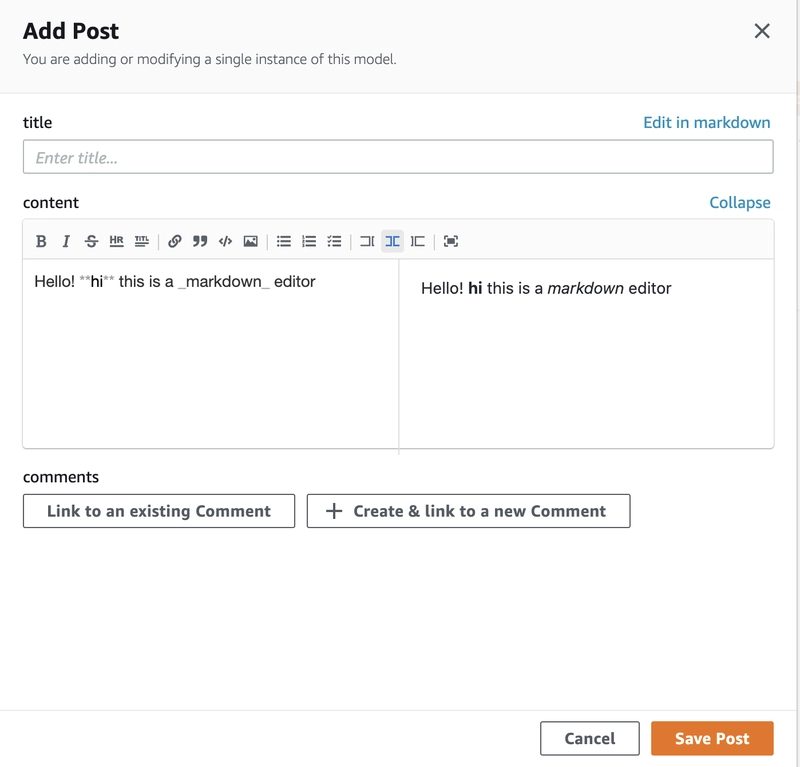
You can also add a comment directly to your post. This is a great way to add initial data to your application, and it makes it so that you don't need to write an admin panel for your application yourself!
Admin UI Access
You can give people without an AWS account access to the Admin UI -- you can allow non-technical team members to just interact with app content, and give full access to your developers. to do this, head back to your app's homepage in the AWS console. You can go to this link and then click on your app if you moved off of that page!
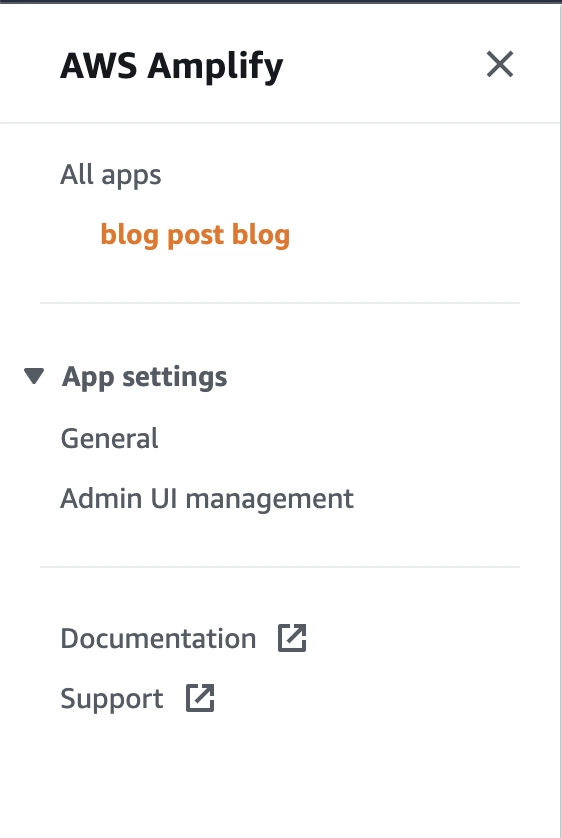
Click "Admin UI management" and then you can click the "Invite users" button to invite users to the admin UI via email.

Add Authentication
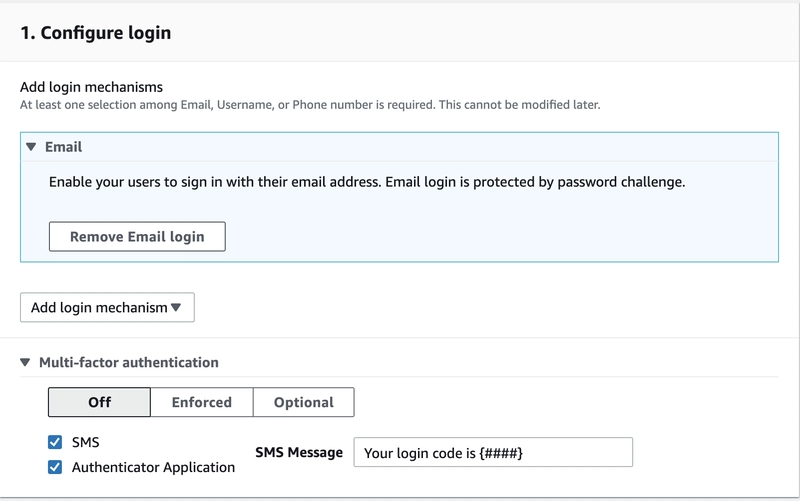
Back in the admin UI, you can initialize authentication for your application in clicks. You can configure both the sign up and login requirements for your users, including social and multi-factor authentication. Click "Enable authentication" to get started.

Once you've deployed your authentication, you can manage users and create user groups on the "Manage groups" page, so if you wanted.

Then, back on the data model page, you can add authorization roles to your tables. Change the authorization mode to Cognito User Pools and then only signed in users will be able to access and manipulate data, and you can make it so that only certain groups or owners can perform actions on data.

You can also use IAM users if you want to allow public read access but only signed in users to manipulate data.
You can use the Amplify UI React Components to add your configured authentication to your app.
First, install the React components:
$ npm i @aws-amplify/ui-react
Then we could add authentication to the whole application by wrapping your component in the withAuthenticator higher order component:
import { withAuthenticator } from '@aws-amplify/ui-react'
...
export default withAuthenticator(App)
Use the Existing Amplify Commands
You can use Amplify's command line interface in tandem with the Amplify UI -- so you can still utilize the GraphQL APIs, S3 storage, Lambda functions, etc. You can view the instructions for adding these by clicking the items in the lefthand menu or via the documentation.

Deploy Frontend
Once you have your frontend code written, you can deploy it via Amplify as well. Here's a tutorial on how.
Conclusion
I can't wait for you to try this tool out! If you do, please feel free to message me with any feedback you have or requests for future tutorials.
Here is a link to my full code!

Top comments (1)
Wow that is pretty cool. Great work! Very cool how you have code snippets and commands built on demand.