Learnings from tinkering around with React Reconciler.
This is a mildly edited Transcript + Presenter Notes of my talk at ReactFoo Delhi 2018. I’m trying something new here instead of sharing slides, let me know which is better.
Sync Rendering Demo
Before we get started what is Asynchronous Rendering, let’s take a look at what Synchronous Rendering looks like.
Demo: azizhk.github.io/rrrww/
So here’s an example and what we are going to do is that we are going to try to improve its perceived performance. This is a worst case example and it might not be related to real world use case but it will help in understanding the differences in the numbers.

So this is how the timeline recording of the sync rendering example.
Quick reference, because I’ll use this again and again:
- Blue is HTML & DOM Parse
- Yellow is JavaScript Parse, Compile, Execution, everything related to scripting.
- Purple is Computing Styles and Layout.
- Green is Paint and Composite.
In our demo, first and complete paint happens 6 seconds after page load.
And it paints everything including content which is below the fold.
Do you want better first paint? You can use server side rendering. What will happen in the timeline is the order of the process will change. Purple (Layout) & Green (Paint) will happen before Yellow (Script). So that will not improve time till the page becomes interactive.

When you interact with the page after page load, Synchronous Rendering makes the website freeze (unresponsive) for 20s. Some browsers may even block scrolling or might even freeze your computer / other tabs as well.
Don’t block the main thread
We need to break things up.
We want 60fps
That is 1000ms divided by 60.
That gives us 16ms per frame budget.
We’ve heard this time and again.
But do we really need to split things up?
- Chrome (Canary and thus possibly future versions of Chrome) still allows scrolling. This is because the layers have already been painted and translating them does not need to wait for the main thread. Scrolling is a simple composite of already painted layers.
- CSS Transform Animations will still run as they are already off the main thread. See this great video by Jake Archibald on Compositor Threads.
V8@v8jsStarting with Chrome 66, @v8js compiles JavaScript source code on a background thread, reducing main thread compile time up to 20%! v8project.blogspot.com/2018/03/backgr…17:14 PM - 26 Mar 2018770
1710


- Browsers have also been helping us by moving things off the main thread.
V8 first moved the script parsing off the main thread and now it has also moved the script compilation off the main thread. This does help us at load time but does not necessarily help us at interactivity.
And sometimes things take time, when the page has a lot of items. ¯_(ツ)_/¯

Think about it, People who use your product extensively are going to accumulate data and to display this data you need to add lots of elements to the DOM. These are your power users, users who share your product, endorse your product. If your website is not fast for them, they will definitely move on to the next platform.
So whatever you do don’t let your website freeze on your users.
Async Rendering Demo
There are multiple ways / approaches to splitting work on the main thread. Let’s check out the one that we are going to build.
URL: https://azizhk.github.io/rrrww/async/

For our demo, at load time, the first paint happens earlier at 3.9s while everything gets painted at 20s. Similarly at interactivity you can see things changing without the browser freezing on you but overall time increases.

So its a tradeoff between lowering first paint and overall time. But there is an added advantage of freeing the main thread for any other task that might want to jump in and utilize the main thread.

So we are aiming for an improved perception of speed / perception of performance by showing changes in content faster and while not blocking the main thread.
Building Blocks
I’ll give a brief introduction to some of the technologies that we are going to use.
- Web Workers
- RequestIdleCallback
- React Reconciliation
- React Fiber
- Data Structures for DOM
Key Takeaways
- Create your Own Renderer with React API
- Get ready for React’s Own Async Renderer
- Free the main thread with Web Workers
Web Workers
- Javascript (the language) is single threaded.
- Platforms provide API to spawn threads through callbacks.
- Node gives you clusters, Browsers give you Web Workers

So lets say you have your worker code in worker.js
You initialize it from the main thread by passing the path to new Worker() call.
const worker = new Worker('/worker.js')

// Send message to the worker
worker.postMessage({ ... })

worker.onmessage = ({data}) => {
  // Recieve message from the worker
}
You can send messages to the worker using worker.postMessage.
And receive messages by defining the worker.onmessage function.
If you want you can spawn multiple threads of the same worker as well but we will just stick to one.
self.onmessage = (message) => {
  // Receive message from main thread.
}

// Send message to main thread
self.postMessage({ ... })
Similarly on the worker you can send and receive messages using on message and postmessage.
requestIdleCallback
window.requestIdleCallback(function (deadline) {
  while (deadline.timeRemaining() > 0) {
    // do tasks
  }
}, {timeout: 100})
Next up requestIdleCallback. This is kinda like setTimeout, but instead of specifying when the browser should invoke our callback we give it a lose reign; that hey call me when the main thread is free.
You can also specify a timeout, which is max delay. This is kinda like priority, telling the browser, take your time but not longer than 100ms.
The callback function receives a deadline as well. The deadline is currently set to 50ms and timeRemaining() gives you the time available. After that the browser won’t stop your script or terminate abruptly but its just a simple way of helping people write non blocking code.
React Reconciler
But before I talk about the Reconciler I want to talk about React 15 & React 16, what changed. You call setState, that would trigger React’s render process.

In React 15, React DOM would traverse the Virtual DOM Tree, compute the diff and simultaneously patch the diff to the DOM (the light green part).
And because we are mutating the DOM, that would trigger Layout and Paint.
Now our aim is to free the main thread and to do that we need to split things up. So with this approach, React cannot just pause at any time. Can anyone think what can be the problem here? // Hint its there in the timeline.
If we split the javascript execution as is, if you modify the DOM, layout would get triggered. So instead of layout getting triggered just once at the end of the JS execution, it would keep getting triggered after every pause that you take.
Now React has no way of knowing how long layout will take or how to minimize its time.
Its a trade off between freeing up the main thread and repeatedly blocking it with layout.

Now what React 16 is doing is that it traverses the VDOM, records whatever changes happened and then applies those changes in one shot.
The phase in which it records the changes is called the Render phase.
The phase in which it applies those changes is called the Commit phase.

Now because we are not doing anything to the DOM in the Render phase, we can now split it up very easily. This is where React is headed in the future release. Plus they are also going to provide hooks in which we can break up the commit phase if we’ve overused our time budget, I’ll get to that later.
My Async Renderer Version
But lets go back to now.
So while the next version of React is still under development. I wanted to try my hands at Async Rendering using Web Workers.

So what we are going to do is move the diffing part i.e. the Render Phase onto the web worker.
And send what needs to be patched to the main thread using postMessage.
This helps us free the main thread at-least when the diff is going on. Then we are also going to split the commit phase as well, naively for now, using time provided by requestIdleCallback’s deadline.

Back to React Reconciler
So in order to explain the reconciler, we also need to understand what is a renderer.

The reconciler handles the VDOM, compares diffing trees and then sends the changes to the renderer.
The renderer actually communicate with the UI layer. Devices can have different renderers while sharing a reconciler. For example you can have two renderers one targeting the DOM and another targeting lets say the canvas element inside the DOM. The two renderers will consume different browser APIs but they can share a common reconciler which helps them in determining the diff and what needs to be applied to the DOM.
React DOM

So you write your code using the same familiar React API, you will create your Component Classes extending React’s Component etc.
The Renderer in this case: React DOM, is a bridge between the reconciler and the DOM API. The Reconciler gets your classes & components and creates the VDOM for them. The Reconciler will tell React DOM that hey this element was added, this was removed, this property was modified. Now React DOM will look at the property see if its an attribute, class or an event listener and calls respective DOM functions.
React Native

Similarly for React Native you write almost similar code with slightly different primitives but essentially the same React API.
React Native is the bridge between Reconciler and Native iOS and Android.
Benefits of React Renderers
- Same Declarative API to define UIs. (i.e. Your UI is a function of your data)
- Learn Once Write Anywhere
Renderers in the wild
- React DOM
- React Native
- React ART
- react-tiny-dom
- React Canvas
- … and many more.
react-tiny-dom
react-tiny-dom is a very small implementation of react-dom covering only the DOM elements, attributes and properties, skipping on the Synthetic Event part. Its only 200 lines of significant code. Its a great place to get started learning how to write a react renderer and I’ll be using its code as example to cover some of the functions

Let’s get started
import Reconciler from 'react-reconciler';
const WebWorkerRenderer = Reconciler({
  // host config
});
We import Reconciler from ‘react-reconciler’ and then pass a host config object to it. This host config is nothing but a collection of callback hooks for when the reconciler wants to pass information to the renderer about changes in the VDOM.
const hostConfig = {
  supportsMutation: true,
  now: Date.now,
  getRootHostContext: () => {},
  prepareForCommit: () => {},
  resetAfterCommit: () => {},
  getChildHostContext: () => {},
  shouldSetTextContent: () => {},
  createInstance: () => {},
  createTextInstance: () => {},
  appendInitialChild: () => {},
  finalizeInitialChildren: () => {},
  appendChildToContainer: () => {}
}
I’ll go over the main callback hooks, while the other ones can be left as no ops.
createInstance(type, props, root, context, interInstance) {
  return document.createElement(type);
},

createTextInstance(text, root, interInstance) {
 return document.createTextNode(text);
},
So first we have createInstance and createTextInstance. Here you create instances your UI’s low level component. These functions will be called for each and every element that was created by your components.
In tiny-dom’s case it is calling document.createElement and document.createTextNode
// Now to give an illustration, if you had a three.js renderer it would create the shape elements here, a D3.js renderer would create svg elements etc.
appendInitialChild(parentInstance, child) {
  parentInstance.appendChild(child);
},

appendChildToContainer(parentInstance, child) {
  parentInstance.appendChild(child);
},
Then the appendInitalChild is called, so here you can add your instance to its parent. Your container is your top level div in which want to render your components. appendChildToContainer is where you add your instances to your top level container.
For a DOM renderer both appendInitialChild and appendChildToContainer are the same, but they might be different for lets say a Canvas Renderer. Where your container would be the canvas element but in appendInitialChild the parentInstance might be a Group.
finalizeInitialChildren (domElement, type, props) {
  Object.keys(props).forEach(propName => {
    const propValue = props[propName];
    // Apply each prop to the domElement
    // For DOM these properties can be
    // style, className, eventListeners or attributes
  });

  // Return true if anything needs to be done
  // after it has been committed.
  // commitMount function will be called after mounting.
  return false;
},
Then finalizeInitialChildren is where is you apply your props to the domElement that you just created.
Here you go through over each prop, check out its type, if its style or className or if its an eventListener or if its a simple HTML attribute.
Also if you need to do something after the element has been committed, you can return true.
By committed, I mean when it has been displayed on the screen. For a DOM renderer, a commit would mean it has been added to the DOM tree and a layout has been triggered.
commitMount(domElement, type, props, interInstance) {
  domElement.focus();
},
So lets say you returned true in finalizeInitialChildren the commitMount function will be
called after the element has been added to DOM.
A good example for the use case of this function is that if you need to autoFocus on the element after it has been added, you check for the autoFocus prop in finalizeInitialChildren and then focus on it in the commitMount function
Order
Render Phase:
-
createInstance,createTextInstance -
appendInitialChild(for child nodes of a new tree) finalizeInitialChildren
First your elements are created, then they are added to their parents, only if the parents are not part of the the DOM tree yet, i.e. the parent elements are also created in the current patch process.
And then props get added on the elements.
Commit Phase
-
appendChildToContainer,appendInitialChild(top level node added to DOM) -
commitMount(after mount, iffinalizeInitialChildrenreturned true)
Then in the Commit phase, they are added to the DOM, and if anything needs to be done after they are committed.

Mutation
So to inform reconciler that your renderer supports mutation, you have to set the supportsMutation flag to true.
Order Change
One type of mutation is reordering of elements and to handle that reconciler gives three hooks, append, insertBefore and removeChild
So we just call the lower level DOM functions here, they are also of the same name.
appendChild(parentInstance, child) {
  parentInstance.appendChild(child);
},

insertBefore(parentInstance, child, beforeChild) {
  parentInstance.insertBefore(child, beforeChild);
},

removeChild(parentInstance, child) {
  parentInstance.removeChild(child);
},
And because this can be at container level as well, we have corresponding container level functions as well. appendChildToContainer, insertInContainerBefore and removeChildFromContainer
appendChildToContainer(parentContainer, child) {
  parentContainer.appendChild(child);
},

insertInContainerBefore(parentContainer, child, beforeChild) {
  parentContainer.insertBefore(child, beforeChild);
},

removeChildFromContainer(parentContainer, child) {
  parentContainer.removeChild(child);
},
Properties / Attributes Change
In the Render phase you prepare the diff, create a list of attributes which have changed.
prepareUpdate(domElement, type, oldProps, newProps) {
  const uniqueProps = new Set([...Object.keys(oldProps), ...Object.keys(newProps)]);
  const changedProps = Array.from(uniqueProps).filter(
    propName => oldObj[propName] !== newObj[propName]
  );
  return changedProps;
},
And in the commitUpdate function you apply those changes. What you return in prepareUpdate that is the first parameter you get in commitUpdate.
commitUpdate(domElement, changedProps, type, oldProps, newProps, internalInstanceHandle) {
  changedProps.forEach(propName => {
    // Set changed attributes to domElement
 });
},
Plug React Components
So we saw creation and mutation. Now how to pass our React Components to this renderer? So you create a render function which takes the Component and a target div and there you pass the Component to the reconciler.
export function render(element, domContainer, callback) {
  let root = domContainer._reactRootContainer;

  if (!root) {
    const newRoot = Renderer.createContainer(domContainer);
    root = domContainer._reactRootContainer = newRoot;
  }

  return Renderer.updateContainer(element, root, null, callback);
}


render(<App />, document.getElementById('root'))
Here the render function creates a simple cache on the element if it already has a react tree initiated or not and calls updateContainer on it.
Now Lets make it Async
So this is a rough diagram of what we are going to build.
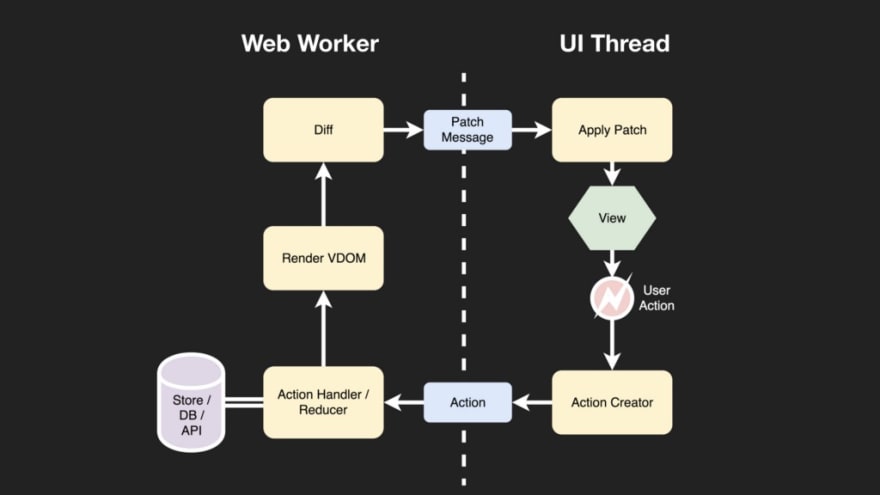
Our Web Worker will send the initial DOM structure. When a user event occurs, we send that event to an Action Creator which creates an action payload to be sent to the worker. The worker consumes that payload. Here I’m are using redux so the payload is dispatched as an action which goes to the reducer changes the store state and that triggers a re-render.

So we saw the host config right.
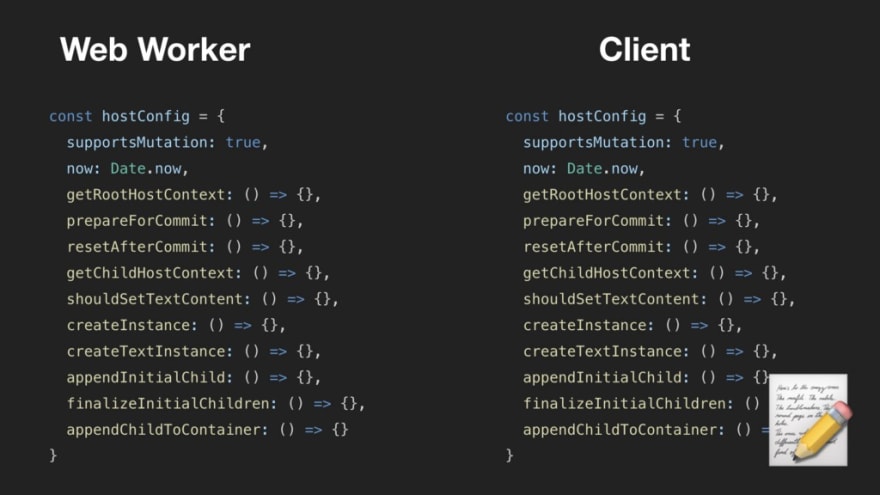
What we are going to do is make two configs, one on the Web Worker, one on the Main Thread.
The Web Worker config will be plugged into the Reconciler and when its functions get called it will create a note of the parameters and will batch these notes and postMessage them to the main thread.

So this is the object representation of our elements that we would be creating in the Web Worker. They have type, props, and children etc. (no event handlers for now)

But unfortunately during mutation when the reconciler provides references of the parent object, we cannot communicate the same to the Main Thread as the objects are passed by value and so every time a new object is created.

So we assign a unique identification to every object created.
And while sending messages to the client we reference the elements using this unique id. ‘uuid/v4’ gives us a 16 character long id, and we can namespace them which can help us in server side rendering as well.
Events?
Communicating events is difficult. Here is where we will not be able to plug and play every React Component. And hence will have to implement some custom logic. So back to our diagram.
It’s going to be difficult to send the entire event over to the worker from the main thread, so instead we will define action creators on the main thread, which would get the event, the action creator would extract whatever basic information is needed for the action and send it the worker by post message.

So define a data-onclick which defines the action creator that we wish to trigger.

We have a global action creators object. It gets the event that was dispatched and from the event you can extract the target, its attributes, anything needed to create a action payload to be sent to the worker. (Don’t like it myself, does not scale well, will not support tree shaking even if you split across multiple files.)

And this is how you add the event listeners and connect the actionCreators and the worker. I’m using delegate for event delegation. This is not part of the renderer only because it does not touch the reconciler directly but can be part of boilerplate needed to use this renderer.
Tree Traversal

Last step is tree traversal in the Main Thread during the Commit Phase.

In the commit phase, we have received the DOM object representation from the Web Worker, if we need to pause this process in the commit phase when we approach the deadline we need to save the stack position where we paused. (deadline is from the requestAnimationFrame we saw earlier.)
Now this is going to be tedious, if we save the stack position every time before we pause, its going to take time for us to unwind to this stack position when we resume. And this is also forewarned by Sebastian Markbage from Facebook in this Fiber Principles document. Where he says that this generation of stack and rewinding to the place where you stopped, might take up a lot of your time of the very small 50ms budget that we have.
Fiber Principles: Contributing To Fiber · Issue #7942 · facebook/react

So instead of saving the stack position we change the way in which we traverse, such that we only need to save at which element we are instead of the entire stack position. So you’ve heard from Ankit that the traversal algorithm has changed, this is the reason why it was changed.
Also this document is for traversing the VDOM for computing the diff, but we are taking those same principles and applying them to the commit phase.
Here each node defines where you need to go. first you traverse down to its child, if it does not have any children, you go towards its sibling, if it does not have a sibling you go towards it parent’s sibling and so on and so forth.
So now for this new traversal, arrays won’t work.
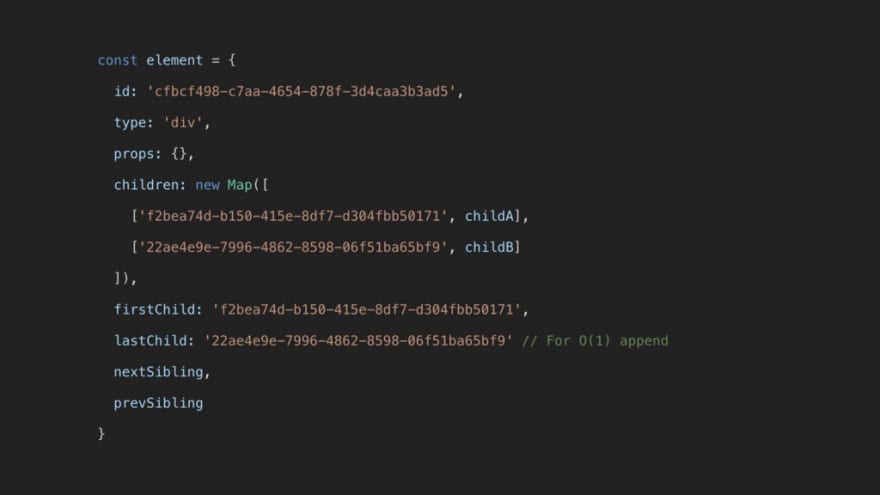
So instead of using an array you use a map for your children.
Each child has the unique identifier of itself, its parent, its next sibling, its previous sibling, its first child, its last child.
All of these are so that you can do appendChild, insertBefore and removeChild in O(1)
Outcome Demo:
https://azizhk.github.io/rrrww/async/
Source Code:
https://github.com/azizhk/rrrww/tree/async_initial
Cons
Well there is a reason why we have not seen these ideas go mainstream.

- Triple Memory required for VDOMs
- Can’t Read DOM Dimensions
- Serialization Overhead
- State Inconsistencies
- No Prioritization (Commit Phase was split by time, not based on priority)
So then what?
Well, I don’t want to look at this a failure but as experience gained. And then is lot more to look for in the future.
Future React Versions
Here’s what you can expect from the future versions of react.
- Asynchronous Rendering
- Prioritization of Work
- Pull Based Approach where React takes decisions for you.
- Push Approach as well where you decide priority
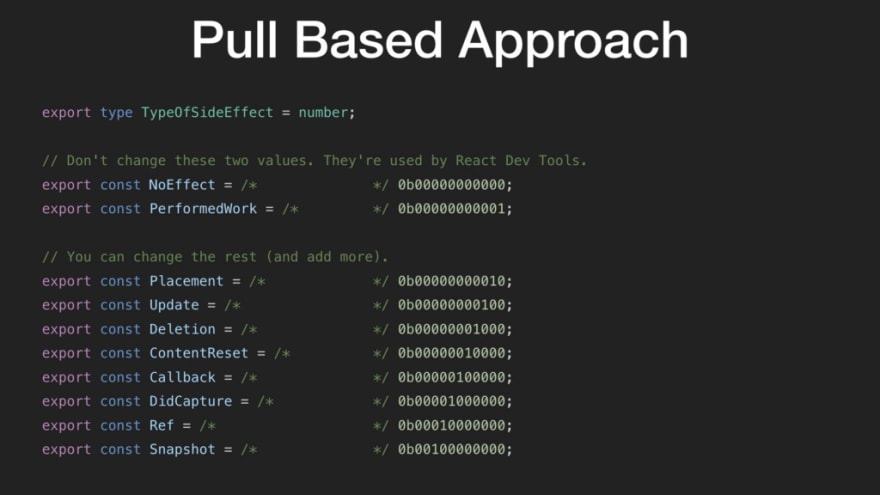
What’s Pull Based Prioritization Approach. So react would know what type of Mutation has occurred. Here is the list of how React defines the types of Side Effects. And based on some heuristic it can decide on its own the priority of which components should it render. Some components might just have callback functions changed probably because they were defined inside the render function, so might not really modify the DOM. And react can deprioritize them over other components.

And another example of Pull Based Prioritization is based on the type of event has occurred. Let’s say you want to define the priority of events which are handled and prioritize the side effects caused by these events in the same manner. Your events are also handled by React, you are using onClick, onChange etc. So it knows which event’s handler called setState and can track side effects and prioritize them accordingly.
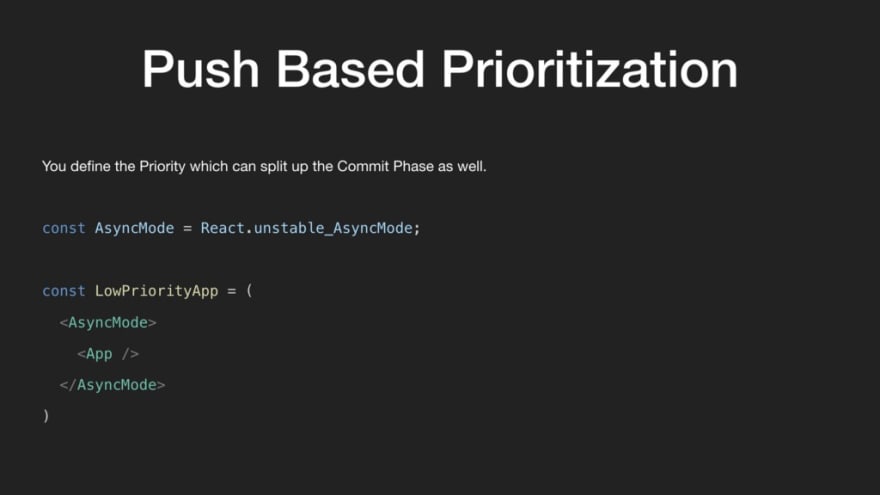
Push based Prioritization is where you tell react how to prioritize Components. Well so far we don’t know of any API to precisely define numeric priority of Components but there is one way to tell react to de-prioritize a particular react tree. You can use React.unstable_AsyncMode to wrap your low priority Component Tree.
Other Ideas to look forward to:
react-native-dom
So in the end, I would also like to also reference one great project that is react-native-dom by Vincent Reimer. We took the approach where we moved React DOM to the Web Worker. His approach is basically take React Native; which is asynchronous by default; and port it to the DOM.
vincentriemer/react-native-dom
worker-dom
Open Sourced by Google’s AMP team recently, worker-dom duplicates all low level DOM functions on the worker thread and gives you the ability to move to application to the worker without any complicated setup. They even give you the DOM event transferred over to the Web Worker Thread. So cool.
So that’s the end. I wrote this in a hurry, because I kept procrastinating and wanted to get it done with and move on to my next blog. So if you find any errors, suggestions, duplicate text, do write a note and I’ll fix it up.
Key Takeaways
- Push for Async Rendering
- Create your own Renderer
- Free the main thread
- Free the main thread with Web Workers

Top comments (0)