Last year Azure Devops was released. The CI integration with GitHub looked neat, so I thought I’d try it out for some serverless apps.
So here’s how I went about configuring a very simple setup!

Pre-requisites:
- An existing Azure Function App — (Tutorial)
- A GitHub repository with your function code in. If you don’t have one, you can fork my Super Simple Function repo and follow along.
Let’s start out with the Azure Pipelines Plugin from the GitHub Marketplace.

Let’s go ahead and set up a plan.
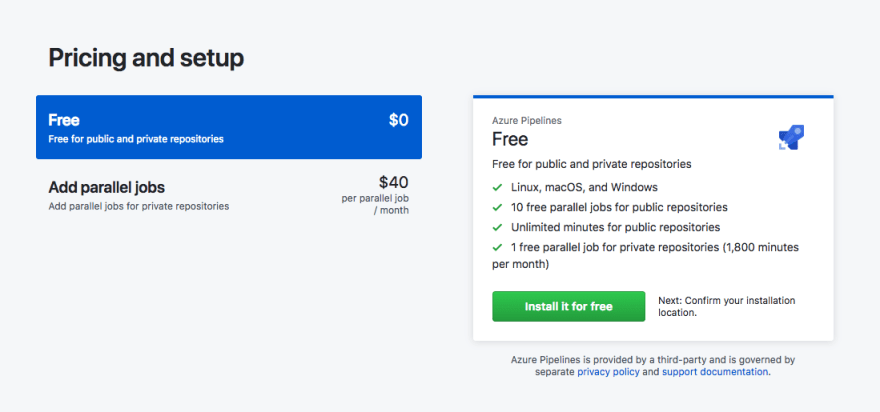
Azure Pipelines is free for both public and private projects, and public repositories even get 10 parallel jobs for free too. So, unless you need multiple parallel jobs for your private repositories, which we most definitely don’t for this tutorial, you can select the free plan .
Go ahead and install the marketplace app, and log in to your Azure account. You should be redirected to the Azure Devops portal. You’re now ready to setup Azure Pipelines for our serverless app! 😀
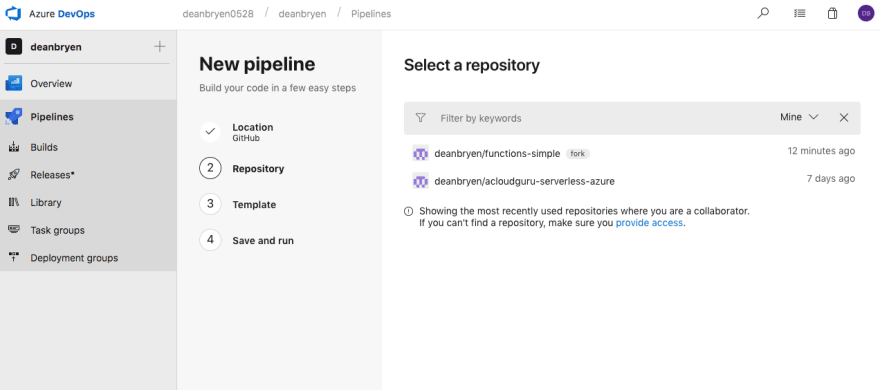
First, go ahead and select your repository, I’ll be using my functions-simple repository.
Pipelines will now analyse the git repository and recommend a starter template. This may differ depending on your application, and feel free to play around here. But I’m just going to select the ‘Starter Template’ as we’ll be scrapping this and writing our build pipeline from scratch.

This is where the magic starts to happen. You define your build pipeline as code, by creating a YAML file calledazure-pipelines.yml . We’ll write ours in a moment. But let’s first understand why that’s awesome.
- You place your
azure-pipelines.ymlfile at the root of your repository. - Upon a push to your linked GitHub repository, Pipelines will trigger a build, which will follow the steps and configuration outlined in
azure-pipelines.yml - So you can keep your build pipeline configuration right beside your application code and version controlled in GitHub.
So what does the azure-pipelines.yml file for our build pipeline look like?
Agent Configuration
The first section of our YAML file defines the agent pool which will be running our jobs. These are the hosts that run our build steps for us. Here we have decided to use Hosted Linux Agents running Ubuntu.
pool:
  vmImage: 'Ubuntu 16.04'
Build Steps
Next, we need to define our build steps. Our build will have three steps.
- Run an
npm install - Create a zip archive of our code
- Publish our build artifacts for our release pipeline to pick up
Of course in a real environment you may run mocha to perform tests, do some static code analysis, or use tools like funcpack to improve cold starts. All of these are easily achievable within pipelines too. But for the purpose of simplicity, we’ll stick to these three steps.
First up, we run npm install using the script step. Pretty self explanatory.
steps:
  - script: |
      npm install
    displayName: "npm install"
Secondly, we create an archive of our code using the built in Archive task.
- task: ArchiveFiles@2
    displayName: "Archive files"
    inputs:
      rootFolderOrFile: "$(System.DefaultWorkingDirectory)"
      includeRootFolder: false
      archiveFile: "$(System.DefaultWorkingDirectory)/$(Build.BuildId).zip"
Scripts enable us to run command line scripts on the agent hosts, tasks are extra functionality that is either first party from Azure Devops or in the marketplace. Here we are using the ArchiveFiles task to package up our code. We can also reference some useful variable that Azure Devops provides us here, you can see we are using these to identify the $(System.DefaultWorkingDirectory) and $(Build.BuildId) to both locate our code and save it with a meaningful name.
Finally, we add a task to publish our build artifact.
- task: PublishBuildArtifacts@1
    inputs:
      PathtoPublish: '$(System.DefaultWorkingDirectory)'
      name: 'drop'
Here, we are putting our artifact into the DefaultWorkingDirectory with the name of drop . We’ll be picking this up from there in our release pipeline when we deploy to Azure Functions.
And that’s all there is to our build pipeline! Our azure-pipelines.yml file that defines our build pipeline is finished, the final file should look like this:
pool:
  vmImage: 'Ubuntu 16.04'
steps:
  - script: |
      npm install
    displayName: "npm install"
  - task: ArchiveFiles@2
    displayName: "Archive files"
    inputs:
      rootFolderOrFile: "$(System.DefaultWorkingDirectory)"
      includeRootFolder: false
      archiveFile: "$(System.DefaultWorkingDirectory)/$(Build.BuildId).zip"
  - task: PublishBuildArtifacts@1
    inputs:
      PathtoPublish: '$(System.DefaultWorkingDirectory)'
      name: 'drop'
You can delete the starter template in the browser, and replace it with your YAML file that will be similar to that above. Then click ‘Save and Run’. this will prompt you to commit your azure-pipelines.yml to the linked GitHub repository. Add an optional commit description and then click ‘Save and Run’ again.
Release Pipeline
So now we’ve built our build pipeline and published our build artifact. We now need to create a release pipeline to deploy our application to Azure Functions. Unfortunately, Release pipelines don’t support YML today. So we’ll be creating this in the GUI.
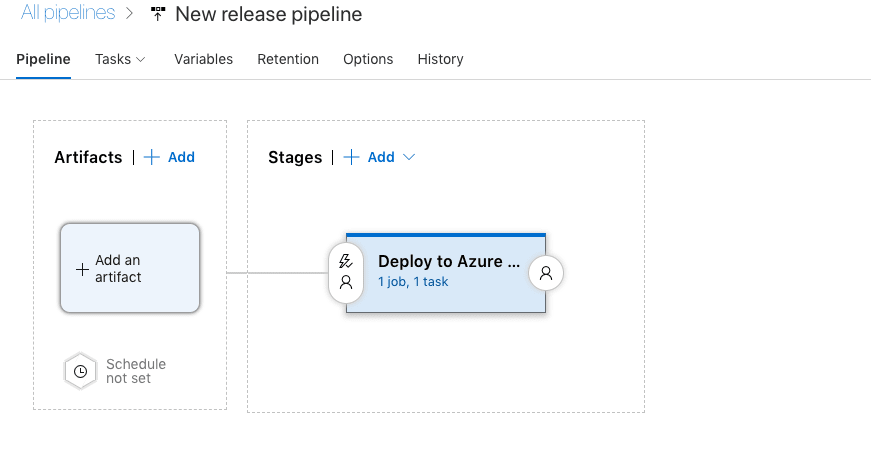
Firstly, click on Releases under the Pipelines heading in the Devops Portal and then click the ‘New’ button.

We’re going to be using the ‘Azure App Service Deployment’ Template , so we’ll select that one, and then hit ‘Apply’.

You can give your stage a name if you wish. So I’ve named mine ‘Deploy to Azure Functions’

Next, we’ll need to configure the tasks that we want to perform as part of this stage within the release pipeline. We’ll click on the ‘1 job, 1 task’ link in within our pipeline to get these set up.

You’ll be warned that our App Service Deployment task has some missing settings. Let’s fix these up.
First of all, we need to authorise the connection between Azure Devops and our Azure Account where our function app lives. If you’re logged into Azure Devops with the same account that you use for Azure, you should be able to select the relevant subscription from the drop down menu. Once selected, click ‘Authorise’. You will get a pop up, asking you to log into your Azure account and authorise, in the background, this is creating a Service Principal with a contributor role, that allows Azure Devops to deploy to the Function App in your Subscription.
Make sure you’ve set the App type to ‘Function App’ and then you should be able to select your function app from the pre-populated drop down under ‘App Service Name’.
We’ll leave the Package or folder field with the default value of $(System.DefaultWorkingDirectory)/**/*.zip , this is where it’ll grab the published artifact of our build pipeline from.

Head back over to the Pipeline tab in the portal. Next, we need to tell our release which build artifact we want it to deploy. So click on ‘Add an artifact’.
Here, we are configuring our artifact with the settings of our build pipeline. Simply complete the form using the pre-populated drop down menus and selecting the values for the build pipeline that we created earlier.

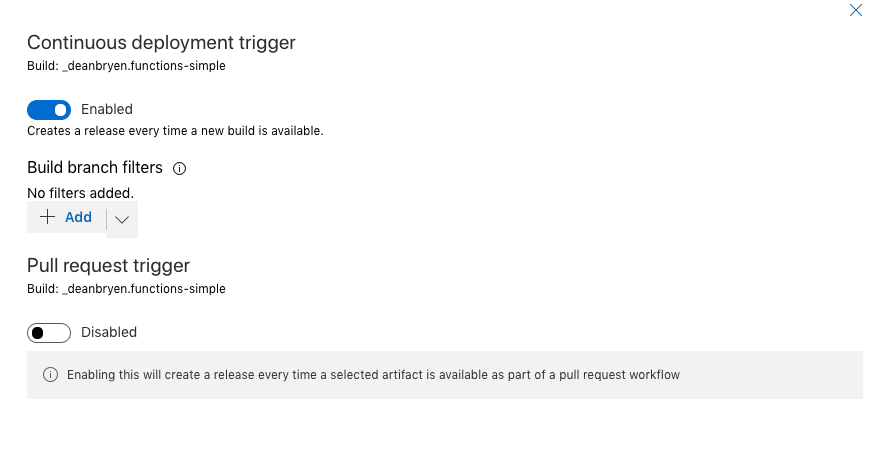
So now we have an artifact, and some steps to perform for this release. We now need to setup a Continuous deployment trigger. This will tell Azure Devops when to run our release. Go ahead and click on the Lightning Bolt symbol next to our artifact.
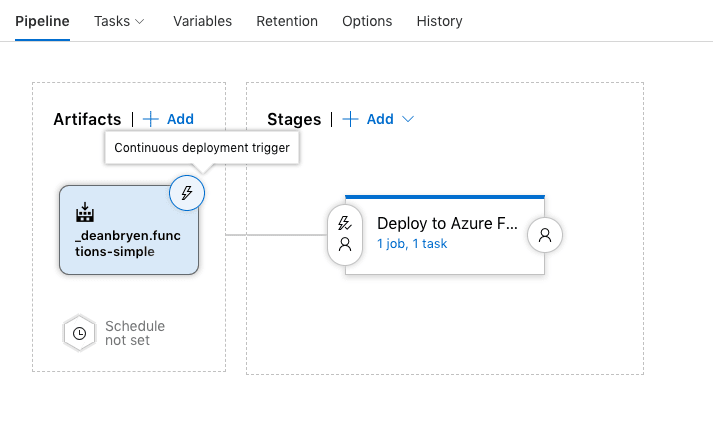
We can tell the service to create a release each time a new build is available, which will be each time we commit to our master branch thanks to the GitHub CI integration we setup earlier. So check the box to enable the Continuous Deployment trigger.
Testing
And there we have it, we now have a GitHub CI integration with our build pipeline, which upon completion will trigger our continuous deployment to Azure Functions via our release pipeline.
To check this works, Edit something in your function code, commit this to git and push to your linked GitHub repository. Sit back, and watch the magic happen…
Note: If using my functions-simple example, you can simply change the response body of /hello/index.js to something different.
If you click on Builds, you should see in that upon pushing to GitHub a new build has started. Clicking on that specific build will provide a summary of the build. Once completed, you should have a big green check mark!

If you want to dive deeper into the steps, you can click on the Logs tab and see each step of the build and exactly how long each one took, and if you click onto one of the steps, you will see the raw logs from the underlying agent when it was running that build step.

Once our build is complete, our Continuous deployment trigger should have been fired and our release pipeline should have kicked off. Click ‘Releases’ on the left hand side to see how our pipeline is getting on.
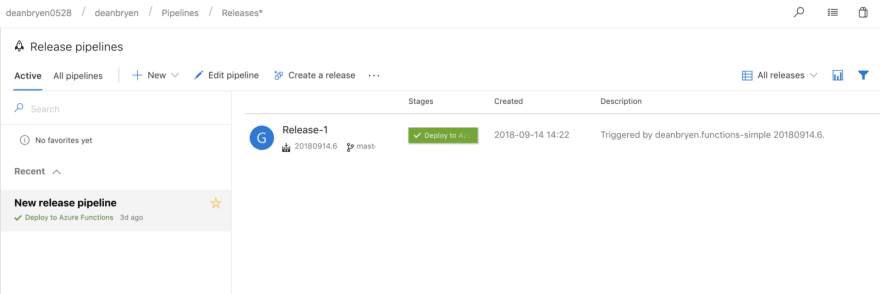
Here you will see that the release pipeline has been triggered, and you should see our stage ‘Deploy to Azure Functions’ highlighted green with a check mark to indicate there was a success.
Now you can execute your Azure Function and see the changes that you made have taken effect. Happy Days!
Woohoo
And that’s it, you now have CI/CD setup for your Azure functions using Azure Pipelines, directly from a push to your GitHub Repository 😀
If you want to dive deeper, head on over to the Azure Devops Documentation. Where you can build on the what we have done here to include multiple environments, release gates, project management and much more!

Top comments (0)