
I recently made a new video on using the coolest new feature released at Microsoft Build 2020, Static Web Apps. Last time we used Hugo and it was pretty darn easy. This time we'll focus on the React framework Next.js.
Requirements
- GitHub Account
- Azure Account - check out the $200 in free credit trial.
- npm - at least 10
- npx
Look I am new to this.
No problem! A static site is more like a collection of HTML pages rather than dynamically rendered pages in the browser. We won't be accessing a database to provide the information in our site. In this case, we'll be creating .js files that contain CSS and HTML that can easily be flattend into simple HTML. Once that HTML page is built, you can deploy the output to your web host.
In the past, serving these files required you to provide some form of simple web server along with the supportive storage to host the files. Before the cloud, these types of static pages would actually require virtual hosts on Apache Servers or IIS. This meant additional system administration, deployment methods and maintenance of the hardware. Deployments were not automatic either. Most of the time, new deployments using these older methods would be shipped by basic scripts or even via FTP.
What is Next.js?

Next.js is a static site generation framework. You build server-rendered React pages rather than dynamically generated, allowing you to quickly serve your website. The configuration is near minimal which makes it so powerful. Just create a site, add adtitional pages, use HTML/CSS and React to customize it to your needs.
Tons of big companies are using the Next.js frameworks like Hulu, Docker, Jet and many more. It's the ease of creation and deployment that really helps organizations like this ship faster and easier.
This free interactive course will guide you through how to get started with Next.js. For the case of this demo today, we'll use a pre-created site you can fork and modify.
Deployment Method

GitHub Actions is an API for cause and effect on GitHub: orchestrate any workflow, based on any event, while GitHub manages the execution, provides rich feedback and secures every step along the way. With GitHub Actions, workflows and steps are just code in a repository, so you can create, share, reuse, and fork your software development practices.
- Get Fast CI/CD - Any language or platform.
- YAML builds
- Live logging
- Workflows are reusable - like code! (Hello fellow StackOverflow Devs!)
If you'd like to follow with this tutorial, make sure you have a GitHub account!
Azure Static Web Apps
Accelerate your app development with a static front end and dynamic back end powered by serverless APIs. Experience high productivity with a tailored local development experience, GitHub native workflows to build and deploy your app, and unified hosting and management in the cloud.
- Productivity from local development to GitHub native workflows for CI/CD
- Managed global availability for static content
- Dynamic scale for serverless APIs
- Streamlined management including custom domain configuration and authentication and authorization
Azure Static Web Apps allows for native GitHub integration so that when you deploy, your workflow file will be generated for you, allowing you to build and deploy right to Azure.
If you don't have an Azure account yet and you'd like to follow along with this post, check out the $200 in free credit trial.
Getting Started
Fork this repository into your GitHub account. It's just a silly static site dedicated to my pug Rico.
This is a starter template for Learn Next.js.
This is a basic website about my dog that is used for deployment to different static site host.
Start locally with npn dev start
Export pages using npx next build && npx next export and find your static content in the out directory.
If you'd like to test out the application before you deploy it, you can clone the application locally and start the development server:
git clone https://github.com/jaydestro/riconext.git
cd riconext
npm install
npm run dev
You should now have a development Node server running at localhost on port 3000 for you to test your website:

You can modify the site in any way or just follow the Next.js documentation on creating your own example site.
When you've completed your design and are ready to build the static pages
Create your Static Web App Service
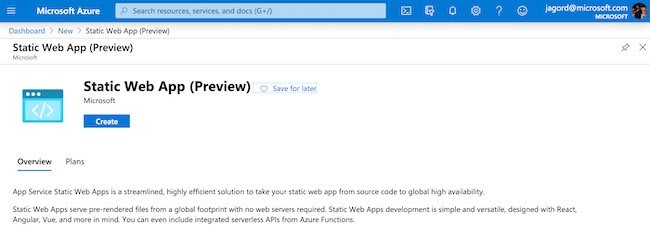
Creating the service just takes a few steps, here's how to get started in the Azure Portal.
Go to your Azure Portal
In the upper left hand corner of your portal click the three dashes, click "Create a resource"

In the "Search the Marketplace" search bar, type "Static Web App (Preview)" - hit enter and you'll be taken to the Azure Resource Manager template to create the site.
Click the "Create" button in the Azure Marketplace description
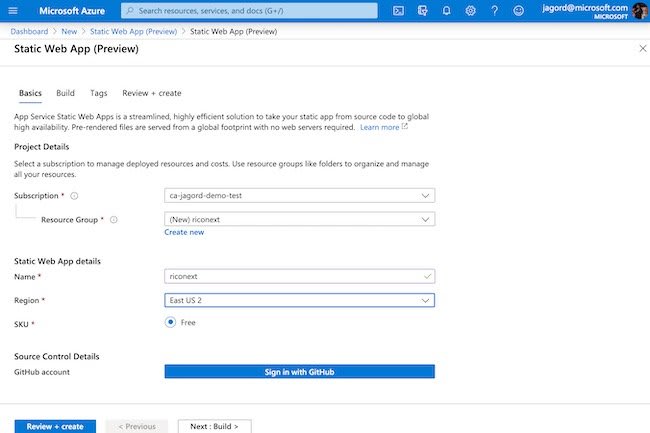
Select your subscription, then create a new, or select a resource group would like to create your app in.
Provide it with a name to identfy your App (this will not be the hostname)
Select one of the Azure Regions the service is available in.
Select the SKU Free! (that's right, free!)
Click "Sign in with GitHub" for your source control - authenticate your GitHub account (you will need this!)
Select your Organization, in my case it's
jaydestro, Select your repositoryriconextand finally the branchmasterClick the Build button at the bottom to select your build details
-
Update the build details with the following:
- App Location :
/This is the location of your application code. For example, '/' represents the root of your app, while '/app' represents a directory called 'app'. - Api location: LEAVE BLANK, DELETE
apiLocation of your Azure Functions code. For example, '/api' represents a folder called 'api'. - App artifact location:
publicThe path of your build output relative to your apps location. For example, setting a value ofbuildwhen your app location is set to/appwill cause the content at/app/buildto be served.

- App Location :
Click "Review and Create"
Review your summary and click create!
Build with GitHub Actions
Since you've created a trust between GitHub and Azure, you Azure will drop a workflow file into your repository located in .github/workflows. Azure will create a YAML file in the directory for you with the directions on how to build and deploy your application. The YAML file will have a name that will be similar to the randomized hostname eventually created for you.
Here's an example:
name: Azure Static Web Apps CI/CD

on:
  push:
    branches:
    - master
  pull_request:
    types: [opened, synchronize, reopened, closed]
    branches:
    - master

jobs:
  build_and_deploy_job:
    if: github.event_name == 'push' || (github.event_name == 'pull_request' && github.event.action != 'closed')
    runs-on: ubuntu-latest
    name: Build and Deploy Job
    steps:
    - uses: actions/checkout@v2
    - name: Build And Deploy
      id: builddeploy
      uses: Azure/static-web-apps-deploy@v0.0.1-preview
      with:
        azure_static_web_apps_api_token: ${{ secrets.AZURE_STATIC_WEB_APPS_API_TOKEN_GREEN_MUD_0FB62DF0F }}
        repo_token: ${{ secrets.GITHUB_TOKEN }} # Used for Github integrations (i.e. PR comments)
        action: 'upload'
        ###### Repository/Build Configurations - These values can be configured to match you app requirements. ######
        # For more information regarding Static Web App workflow configurations, please visit: https://aka.ms/swaworkflowconfig
        app_location: '/' # App source code path
        api_location: 'api' # Api source code path - optional
        app_artifact_location: 'public' # Built app content directory - optional
        ###### End of Repository/Build Configurations ######

  close_pull_request_job:
    if: github.event_name == 'pull_request' && github.event.action == 'closed'
    runs-on: ubuntu-latest
    name: Close Pull Request Job
    steps:
    - name: Close Pull Request
      id: closepullrequest
      uses: Azure/static-web-apps-deploy@v0.0.1-preview
      with:
        azure_static_web_apps_api_token: ${{ secrets.AZURE_STATIC_WEB_APPS_API_TOKEN_GREEN_MUD_0FB62DF0F }}
        action: 'close'
Now whenever we commit to master GitHub Actions will follow the instructions in the GitHub Actions workflow file. If we wanted to add tests, make changes or anything else, all master deploys will automatically build and deploy. Let's look at what GitHub Actions has done.

GitHub Actions was triggered by the commit of the YAML file into my repository. This triggered action tells GitHub Actions based on the workflow file in .github\workflows to build our static web app then deploy it to the App Service. Actions will provide you logs of your build and deploy so you can troubleshoot when issues arise.
Once the build is completed you'll get a summary of what occurred during deployment.
Once our deployment has completed you can now navigate back to the Azure portal and view the details and hostname of your new deployment:
If I click on the hostname, I am now able to see my new website!

We have options to integrate Azure Functions, add a custom hostname or even set up staging environments that are automatically created when a pull request is generated, and are promoted into production once the pull request is merged.
Links to help you!
Almost any static content will work using this service making your decision of what to use nearly limitless.
The tutorial should help provide you with a great start on using this service with your Azure Static Web App Service. Utilizing resources like GitHub actions can help you on your journey to becoming a Microsoft DevOps Certified Expert.
- Microsoft Learn: Azure Fundamentals
- Microsoft Learn: Deploy Static Web App
- Microsoft Docs: App Service Documentation
- GitHub Actions Documentation
- Get 12 Months of free service and $200 for Microsoft Azure

Top comments (4)
not sure if they have changed something but this doesn't work for me, I get this error Failed to find a default file in the app artifacts folder (.next). Valid default files: index.html,Index.html.
Personally, I had to use different paths as this guide does. I'd highly recommend checking out this guide which worked for me: medium.com/bb-tutorials-and-though...
hey thomas, even i get the same error, did you find a fix for it??
Not sure if your still looking for this - make sure your exporting it after you build,
next build && next exportto create out folder.