
Securing access to the storage account with a key vault and key” usually means protecting a cloud storage account by using a managed encryption key stored in a secure key-management service. with this few steps we will learn how to secure a storage account with a key vault and a key.
- step 1 first as usual we create a storage account. on your azure portal, search and click on storage account, click on +create


- step 2 Provide a Storage account name. Ensure the name is unique and meets the naming requirements, click on review + create. move to the encryption tab, Check the box for Enable infrastructure encryption, click on review + create, after validation click on create.


- step 4 we are going to Provide a managed identity for the web app to use. click on Goto resource, on the portal bar bar, search and click on managed identities. create, Select your resource group, Give your managed identity a name, Select Review and create, and then after validation click on create.


- step 5 search on the storage account earlier created, on the overview page, click on the access control blade, Select +Add


- step 6 On the Job functions roles page, search for and select the search for and select the Storage Blob Data Reader role.

- On the Members page, select Managed identity

- Select Select members, in the Managed identity drop-down select User-assigned managed identity, Select your managed identity, Click Select and then Review + assign, Select Review + assign a second time to add the role.


- step 7 In the portal, search for and select Resource groupsSelect your resource group, and then the Access Control blade, On the Job functions roles page, search for and select the Key Vault Administrator, On the Members page, select User, group, or service principal.
Select Select members.
Search and select your user account. Your user account is shown in the top right of the portal.
Click Select and then Review + assign.
Select Review + assign a second time to add the role assignment.


- step 8 we are going to create the key vault to store the access key. In the azure portal, search for and select Key vaults, Select Create, Select your resource group you already created, Provide the name for the key vault, The name must be unique globally.


- ensure both Soft-delete and Purge protection are enabled.

- make sure on the Access configuration tab that Azure role-based access control (recommended) is selected. select review + create

after validation click on create

After the deployment, select Go to resource.

- step 9 In your key vault, in the Objects section, select the Keys blade, select Generate/Import and Name the key, take the defaults for the rest of the parameters, and Create the key.


now we still don t have the authorization to view the content until we create the RBAC,

- step 10 In the portal, search for and select Resource groups.
Select your resource group, and then the Access Control (IAM) blade.
Select Add role assignment
On the Job functions roles page, search and select the Key Vault Crypto Service Encryption User role.
On the Members page, select Managed identity. Select members, in the Managed identity drop-down select User-assigned managed identity.
Select your managed identity.
Click Select and then Review + assign.
Select Review + assign again to add the role assignment.


- step 11 Return to your the storage account.
In the Security + networking section, select the Encryption blade.
Select Customer-managed keys.
Select a key vault and key. Select your key vault and key.
Select to confirm your choices.
Ensure the Identity type is User-assigned.
Select an identity.
Select your managed identity then select Add.
Save your changes.
If you receive an error that your identity does not have the correct permissions, wait some minutes and try again.


- step 12 we will configure a time-based retention policy and an encryption scope
Navigate to your storage account.
In the Data storage section, select the Containers blade.
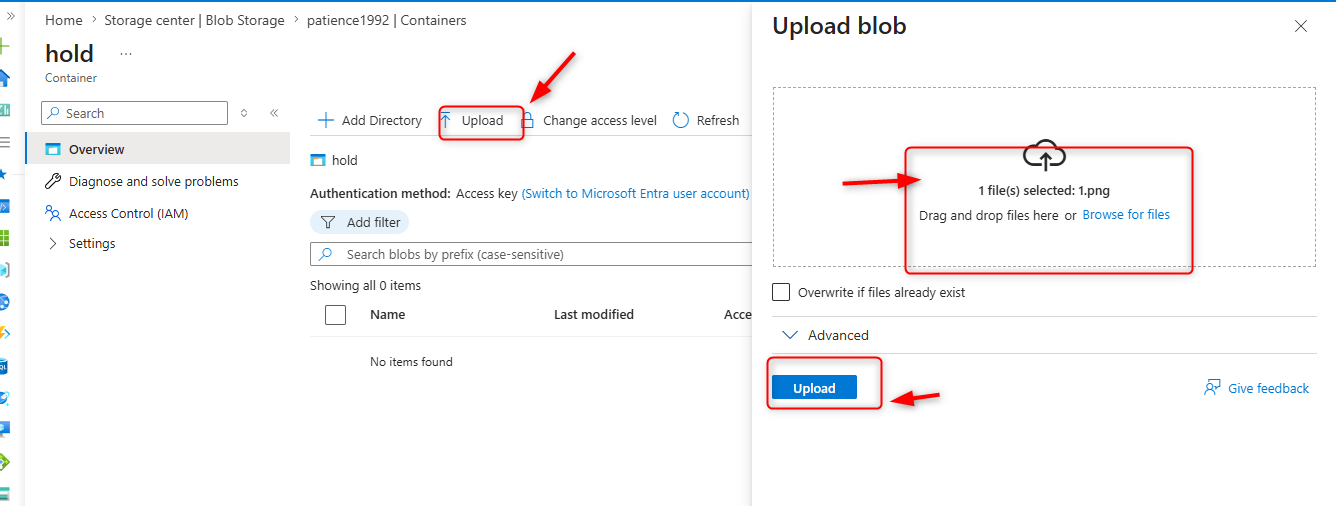
Create a container called hold. Take the defaults. Be sure to Create the container.
Upload a file to the container.
In the Settings section, select the Access policy blade.
In the Immutable blob storage section, select + Add policy.
For the Policy type, select time-based retention.
Set the Retention period to 5 days.
Be sure to Save your changes.


](https://media2.dev.to/dynamic/image/width=800%2Cheight=%2Cfit=scale-down%2Cgravity=auto%2Cformat=auto/https%3A%2F%2Fdev-to-uploads.s3.amazonaws.com%2Fuploads%2Farticles%2Feu8dbcb74vp7c4kw9asy.png)


- step 13 Navigate back to your storage account.
In the Security + networking blade, select Encryption.
In the Encryption scopes tab, select Add.
Give your encryption scope a name.
The Encryption type is Microsoft-managed key.
Set Infrastructure encryption to Enable.
Create the encryption scope.
Return to your storage account and create a new container
see in the Advanced section you can select the Encryption scope you created and apply it to all blobs in the container.


Top comments (0)