
Zapier lets you automate workflows by using trigger events to initiate actions. In this demo, we show you how to automate sending an email in response to an object being created in your Backendless database.
To make this demonstration easier to consume, we have broken it into two parts. In the main part, you will see how to take a form created in Backendless and automate, using Zapier, two potential outcomes when that form is submitted.
To view a live example of the completed form, click here.
In this part, we take a detailed walk through the building of the form itself. We will get into the weeds of all components and logic included in this form so that you can easily follow along and recreate the form itself in its entirety.
We will also go through the setup of the approval page. When we’re done, you will have all of the setup in place to complete the automation using the other article.
To start, let’s revisit the workflow scenario that this demo will be working through.
Workflow scenario
We will consider automating the workflow of ordering office supplies.
In this scenario, if it is necessary to order office supplies, an employee fills out an order form and sends it for approval. If the order value is less than or equal to the specified limit (in our example 200), then the order is approved automatically.
However, if the order value exceeds the specified limit, then an email is automatically sent to the manager. The email will contain a link to a web page where the manager can see all the details of the order and then approve or reject it.
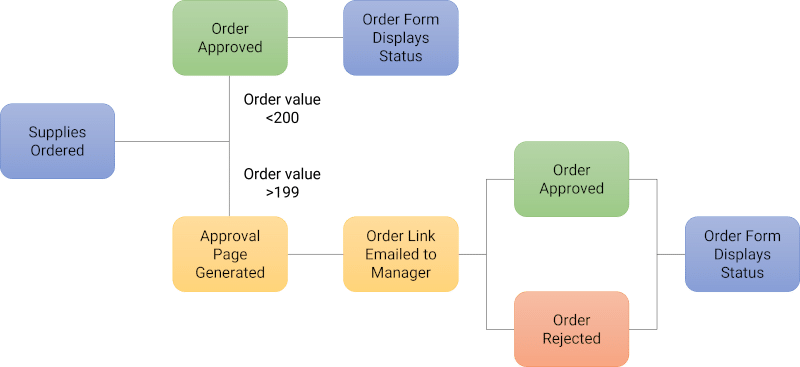
The decision made by the manager is displayed for the employee who made the order, and can also be displayed for other interested employees (for example, employees of the purchasing department).
Backendless Setup
Database tables
Our app has two tables. The first table PurchaseRequest stores information about the purchase request.

The request column stores information about the purchase request and is an array of objects in JSON format. This column does not have to be JSON, however. In our opinion, in a proper data model for an app of this type, this column would include a relation to a separate table referencing ordered supplies.

The Column isApproved will contain true if the order is approved and false if the order is rejected.
The column manager contains a relation to the second table Employees. The Employees table contains information about managers.

From the email column, we will take the email address for submitting the purchase request.
Order Page
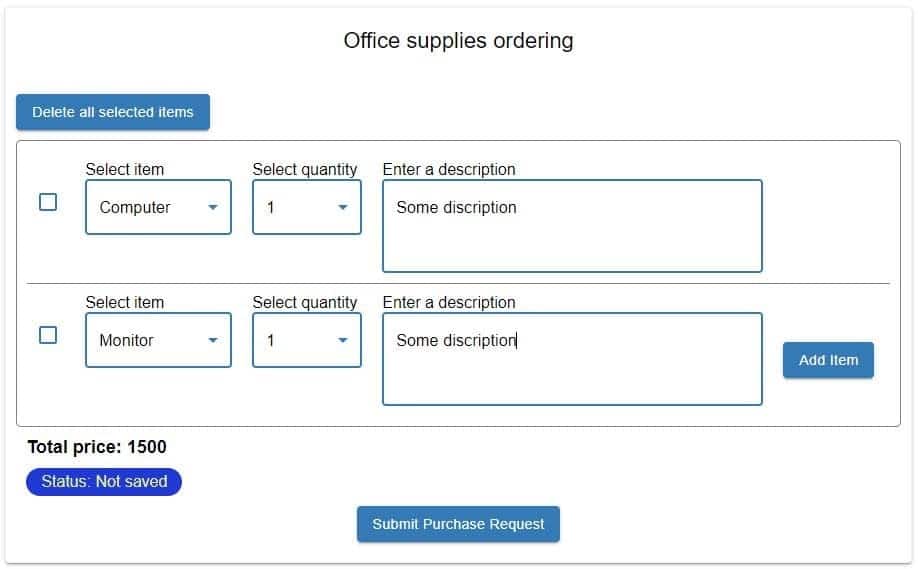
The user interface is shown below. We will be creating this interface using UI Builder in Backendless.
To see a live example, click here.
What the employee making a purchase request sees:
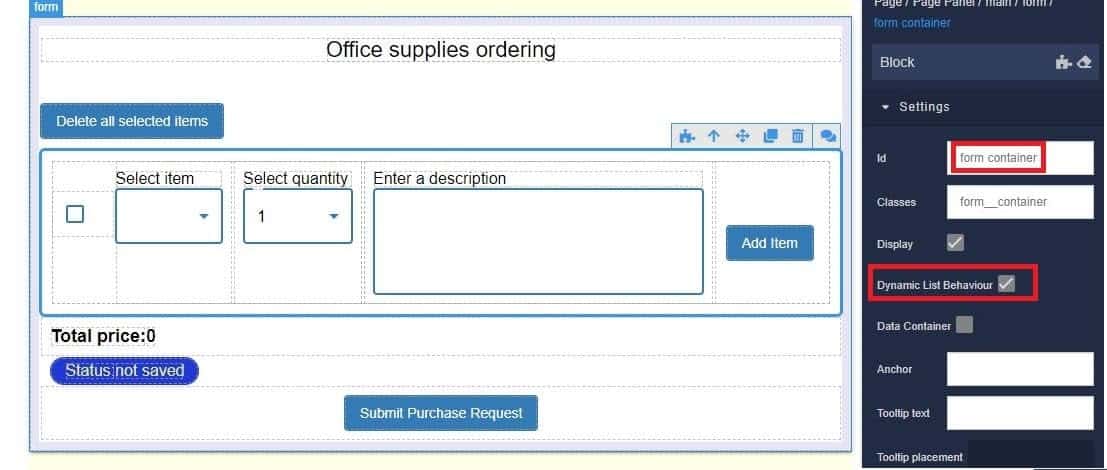
What you see in UI Builder:
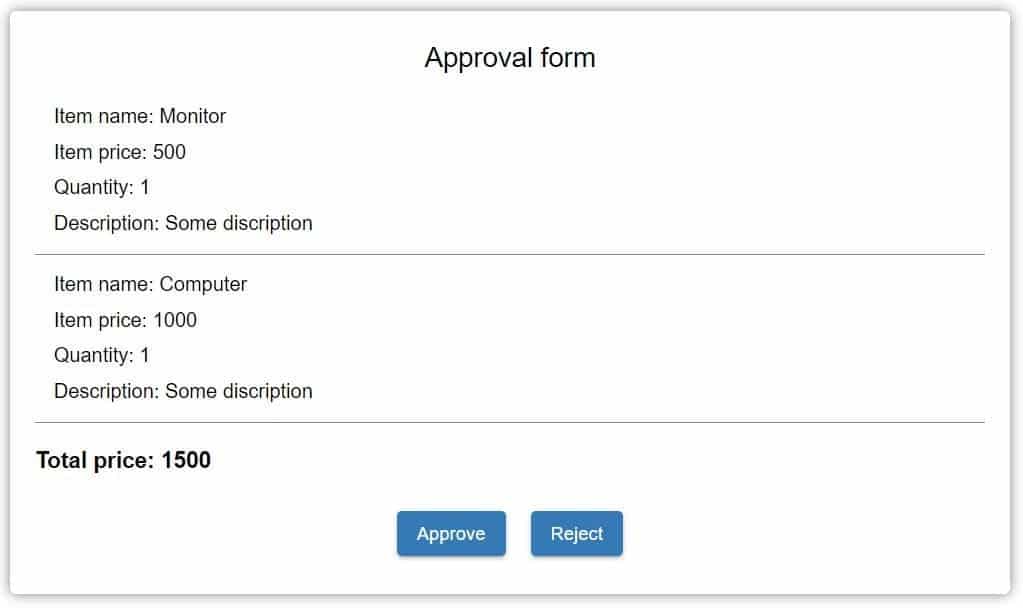
The user interface consists of a purchase order form in which the user can add, remove and select the required items as well as their quantity. The total price is calculated automatically.
The user interface includes a “form container” Block, which is a dynamic list. This dynamic list contains the following elements:
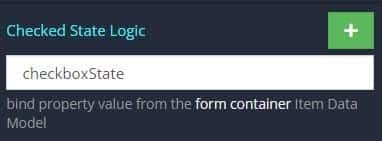
- checkbox – this element allows you to select the items you want to delete. The logic is implemented so that when selecting items to delete, the last remaining item cannot be selected.
The “Checked State Logic” property of this element has the following data binding:
 (Learn more about data binding here.)
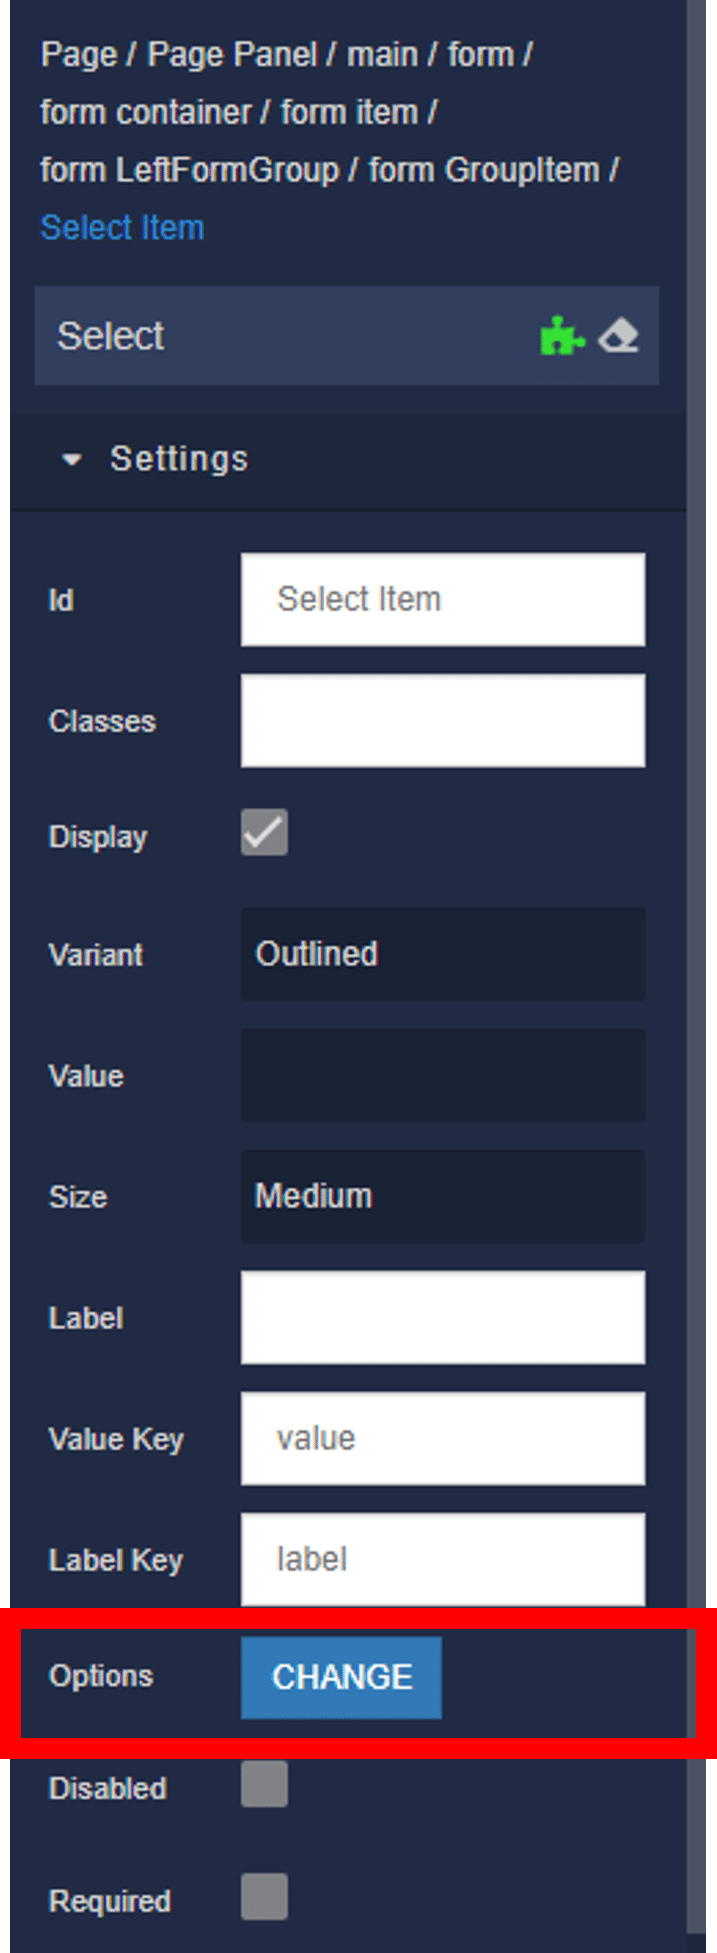
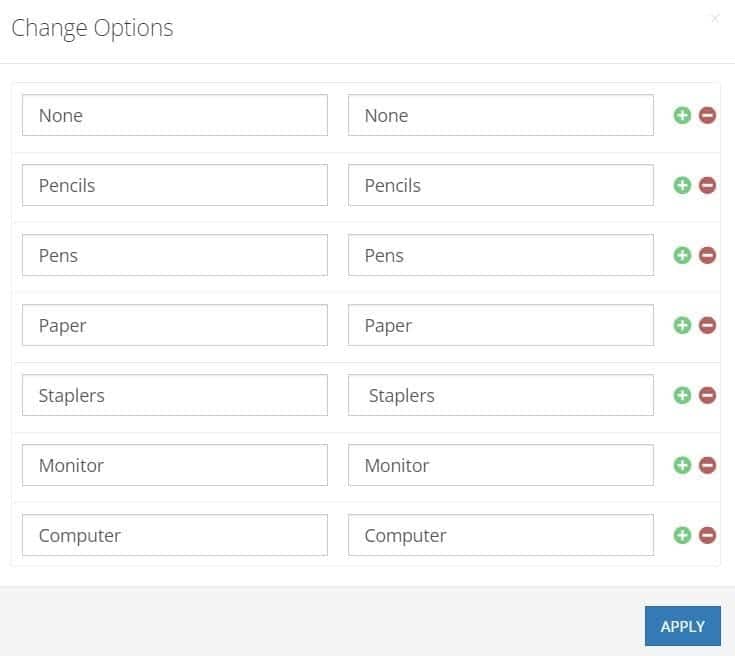
 - select (“Select item”) – this element allows you to select the desired item. To set the items in a select dropdown, click on the
CHANGEbutton under options:
 The “Value Logic” property of this element has the following data binding:

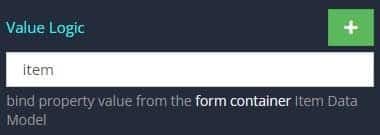
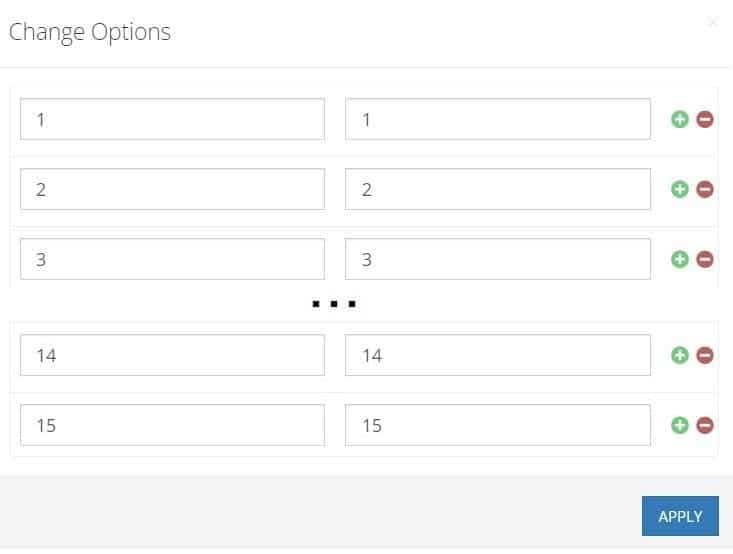
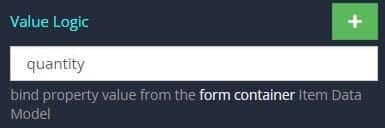
- select (“Select quantity”) – this element allows you to select the desired number of items (in this example, 15 items are available for simplicity).
 The “Value Logic” property of this element has the following data binding:

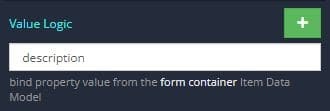
- textarea (“Enter a description”) – this element allows you to add a justification for the purchase.
The “Value Logic” property of this element has the following data binding:

- button (“Add Item”) – this element allows you to add an item to a purchase order.
The user interface also contains the following text elements:
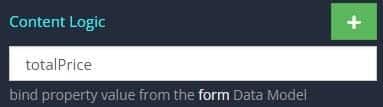
- “Total price” – which displays the total price of the order and has the following data binding:

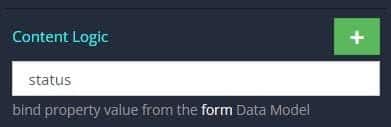
- “Status value” – which displays the current status of the order sending and has the following data binding:

Also the user interface contains two buttons: “Delete all selected items” and “Submit Purchase Request”. We will go over those buttons’ logic later.
The Codeless logic that is triggered when entering the page is shown below.
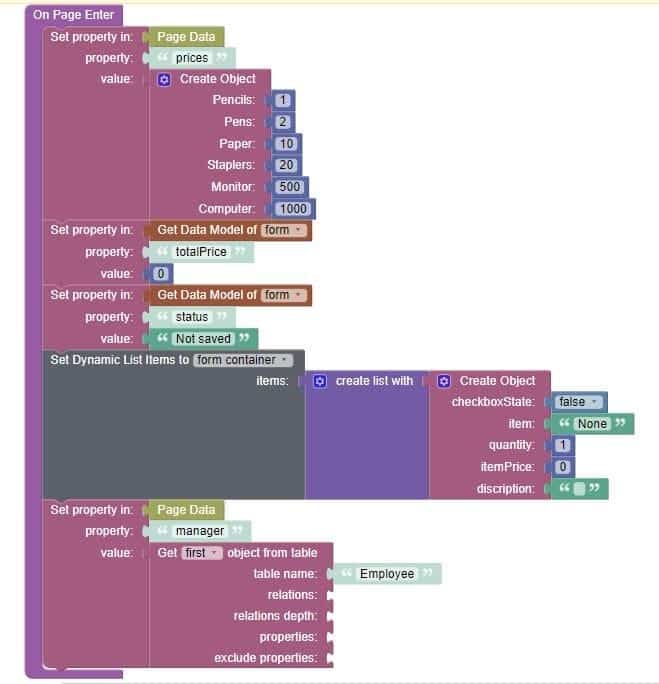
In this logic, we initialize an object (“Set Property “prices” in Page Data) with the values representing the prices for each item type. We then set the initial values for the elements “Total price” (0) and “Status” (Not saved).
Then we create a list with the initial object to the dynamic list. The only item in this list is a “None” item with price of 0 and quantity of 1; this item will excluded in the logic for submitting the order. This initial object includes the same properties (Value Logic and Check State Logic described above) of the elements in the dynamic list.
At the end of this block of logic, we load from the table “manager” the data of the manager who will approve the order (in this example, For simplicity, the first record from the table is loaded).
Let’s consider how the logic of individual elements of the UI works.
“Add Item” button
The logic “on Click Event” of the button is shown below. This button is used to add an item to the purchase list. This demo does not include logic that would prevent a user from adding the same item type more than once.
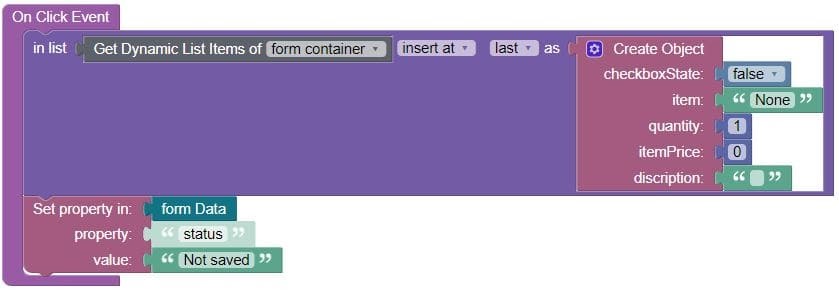
When you click on this button, a new item is added to the dynamic list (by creating a data object) and the “Status value” is changed to “Not saved”. Adding a new object to the dynamic list leads to corresponding changes in the UI.
The “Visibility Logic” logic for this button is shown below.

This logic hides the “Add Item” button on all items in the list except for the first (None) item. This will prevent the user from accidentally double-adding an item that they already added to the list.
“Delete all selected items” button
The logic “on Click Event” of the button is shown below. The purpose of this button is to remove all items from the purchase order list that the user has selected using the checkboxes.

A filter is used to delete items. From all objects of the existing dynamic list, the filter returns only those objects for which the value checkboxState = false (checkboxes without ticks).
Then, using the Map element, we create an array of new objects (clones) and assign it to the dynamic list.
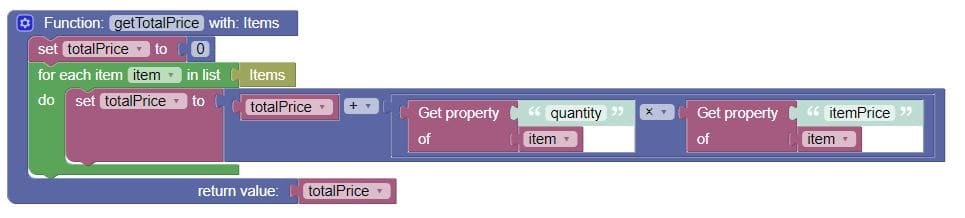
Also in this block of logic, the “Status value” is changed to “Not saved” and the “Total price” is recalculated.
To recalculate the “Total price” function getTotalPrice is used, the logic of which is shown below.
“Checkbox”
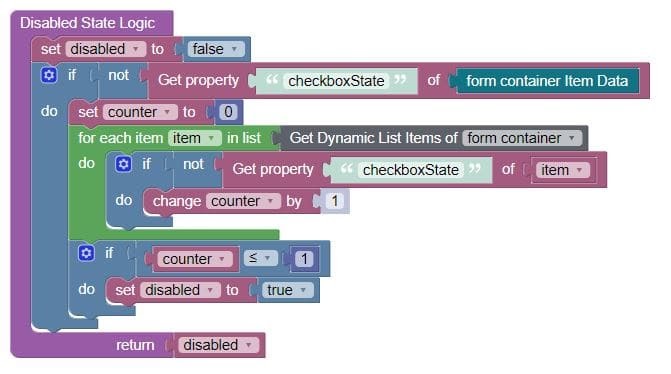
The “Disabled State Logic” of the checkbox is shown below. This logic is designed to prevent the user from completely deleting all items.
It is arranged in such a way that if only one unchecked checkbox remains, then the disabled property of this checkbox is assigned the value true and the user cannot select this item for deletion.
To do this, in this block of logic, for each checkbox with the property checkboxState = false, we check whether it is a single checkbox with checkboxState = false. If so, then we make it disabled.
“Select item”
The “On Change Event Logic” of the select item select component is shown below. The purpose of this logic is to temporarily store in page data the item name, price, and total cost based on the quantity already selected. This temporary data can then be added to the item list when the “Add Item” button is clicked.
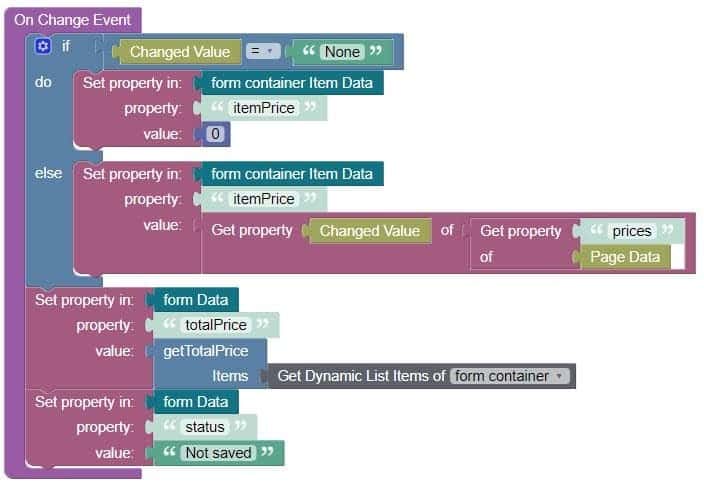
This logic writes the itemPrice property (the price of one item) to a dynamic list, depending on which item the user has selected. For this, the “prices” property from the “Page Data” is used, which is created when entering the page (in a real application, this data could be loaded from a separate database table). For the logic to work correctly, the names of the properties of the “prices” object and the values of the “Select item” are the same.
Also in this block of logic, the “Status value” is changed to “Not saved” and the “Total price” is recalculated.
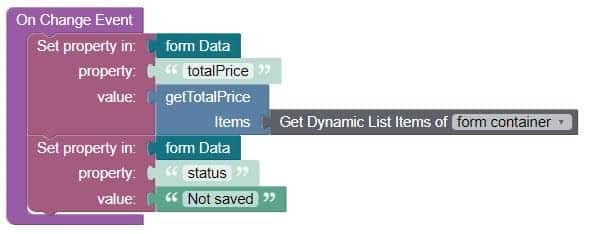
“Select quantity”
The “On Change Event Logic” of the select quantity select component is shown below. This logic changes the “Status” value to “Not saved” and recalculates the “Total price”.
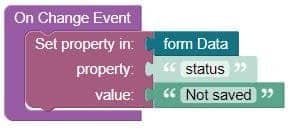
“Enter a description” (Text area)
The “On Change Event Logic” of the text area is shown below. This logic only changes the “Status value” to “Not saved” when text is entered in the text area.
“Submit Purchase Request ” button
When the user clicks the “Submit Purchase Request” button, the Submit event handler is launched. This logic checks that all required fields are filled, then submits the purchase request (stores it in the database). It will also inform the employee if the purchase order is automatically accepted.

The Submit event handler logic consists of three main blocks:
1) Validation
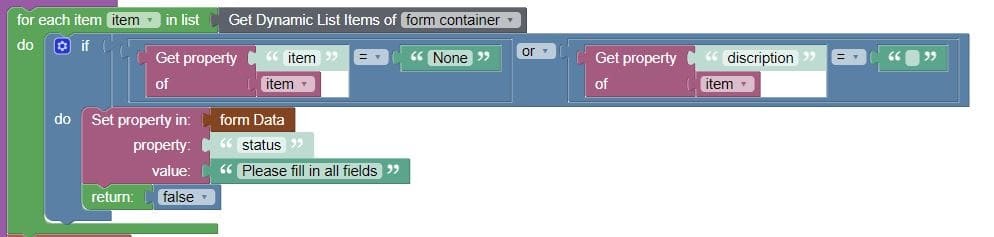
This block of logic checks that the user has selected an item and filled in the Description field. If the user has not filled in all these fields, then the message “Please fill in all fields” will be displayed in the Status and the logic will not be executed further.
2) Saving a purchase request to a database table

In this block of logic, we disable the “Submit Purchase Request” button, and then we take the data from the form and save it in the PurchaseRequest table. The creation of a new object in the PurchaseRequest table will be a signal (trigger) that will start the operation of Zapier.
After saving the data to the PurchaseRequest table, the server will return the ID of the saved object. We use this ID to establish a relation to the “Employee” table.
And at the end of this block of logic, we change the message in Status to “Your request has been submitted”.
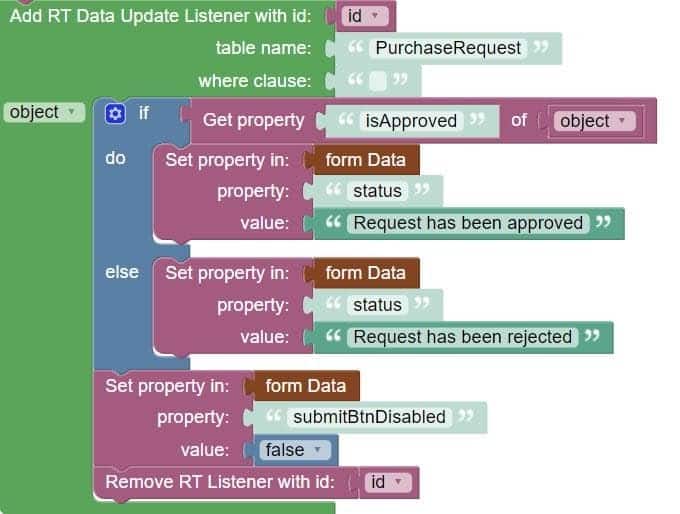
3) Using logic in “RT Date Update Listener”
After a decision on the purchase order is made (automatically or by a manager), the isApproved field of the PurchaseRequest table will be changed to true (if approved) or false (if rejected). Updating the object in the table triggers the logic in the “RT Data Update Listener”.
The “RT Data Update Listener” logic will output to Status “Request has been approved” if isApproved is true or “Request has been rejected” if isApproved is false. The logic then unlocks the “Submit Purchase Request” button.
Approval Page
The user interface is shown below.
What the manager sees:
What you see in UI Builder:
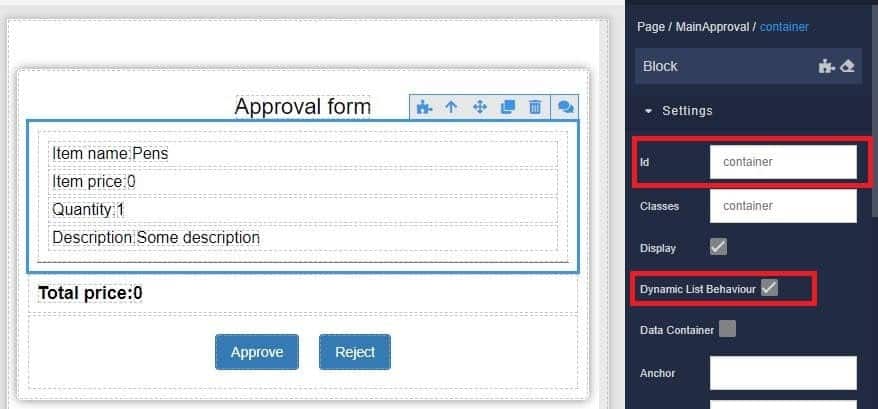
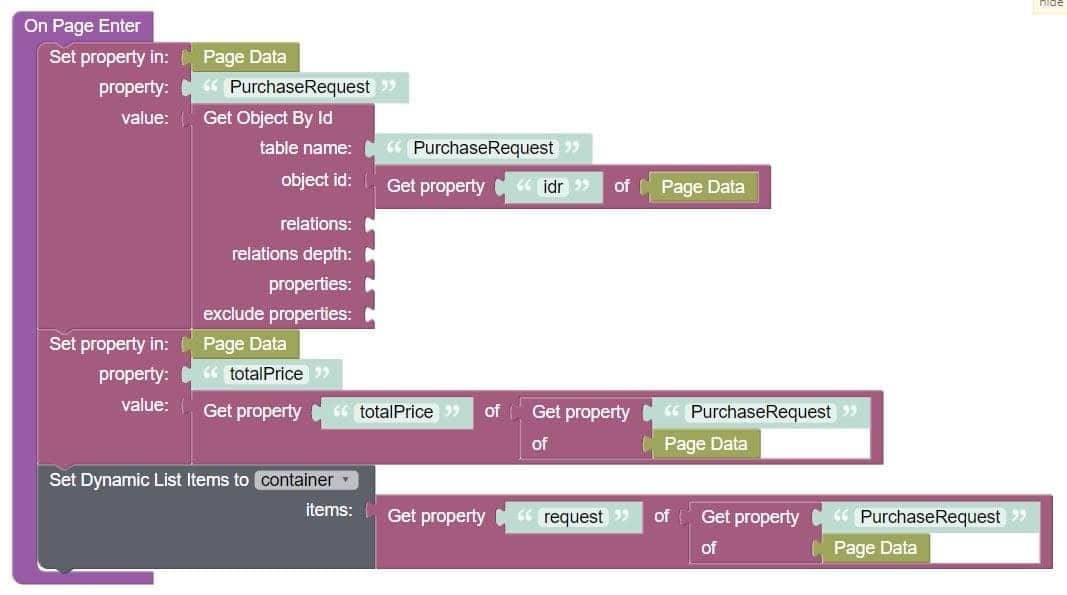
The user interface includes a “container” Block, which is a dynamic list. This list will automatically be populated with the items added to the purchase order (see the On Page Enter logic below).
A dynamic list contains text elements that output information from the database table to the UI.
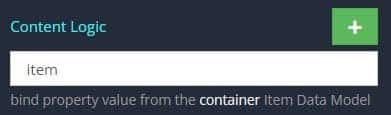
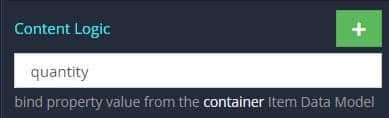
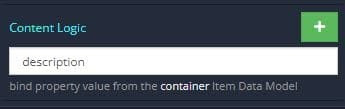
First, let’s look at the data binding for each of the text elements. This is done with “Content Logic” as follows:
Text element displaying “Item name”
Text element displaying “Item price”
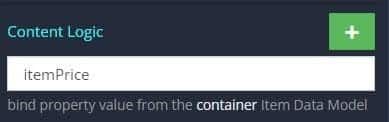
Text element displaying “Quantity”
Text element displaying “Description”
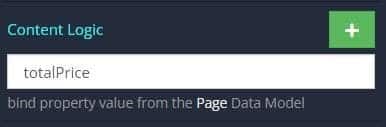
Finally, the user interface contains a text element that displays the “Total price”:
Now let’s look at what happens when the user enters the page. When you enter the page, the data of the purchase request is loaded from the table using the ID obtained through the URL parameters. Then this data is output to the UI.
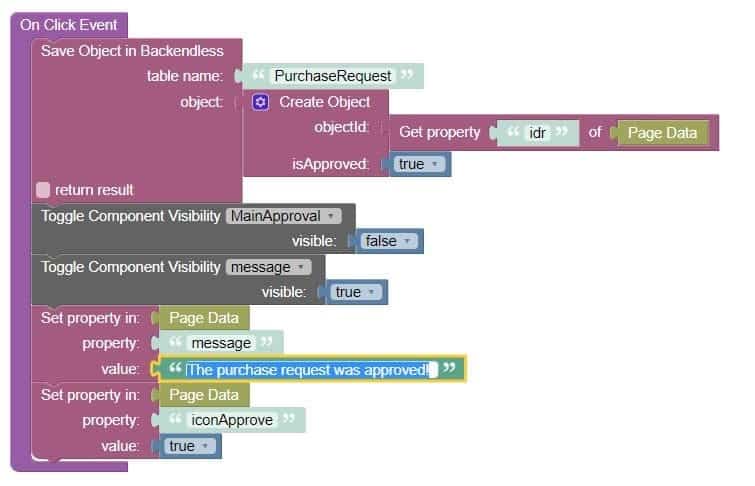
When you click on the “Approve” button, the isApproved property of the object is saved to the PurchaseRequest table with the value true.
Then the message “The purchase request was approved!” is displayed in the UI.
The “Reject” button works the same as the “Approve” button, except that the value false is stored in the table and the message “The purchase request was rejected!” is displayed in the user interface.
To Be Continued… With Zapier Integration
From this point, we will jump into the details of the automation itself, starting with setting up an email template in Backendless. To continue on with this workflow, head over to the main article.
Be sure to check out our other Zapier demo articles:
- Creating a language translator using Zapier
- Send An Automated SMS Message When Registering A New User
Thanks for reading, and as always, Happy Codeless Coding!
This article was originally published on backendless.com on February 1st, 2022.

Top comments (1)
Some comments may only be visible to logged-in visitors. Sign in to view all comments.