
Introduction
In this article, I will show you how I converted my manual hand crank desk into an automated IoT connected desk. I’ll be talking about how to size and pick motors, and how to connect your custom IoT devices to Google using Heroku as a public interface.
In short, there are two sides of this tech project: the first is to get from Google to Heroku using voice commands, and the second is to get from Heroku to the desk using MQTT. MQTT is the protocol of IoT, and I’ll explain some of the reasons why it is a good solution for IoT as well as some hurdles that it will help you overcome.
First and foremost, I’m doing this just for fun! I’m completely open to suggestions and I’m more than happy to learn something new from you, so feel free to leave me any suggestions. Hopefully you’ll find something entertaining in this article and that motivates you to get out there and build something!
With that being said, let’s get started!
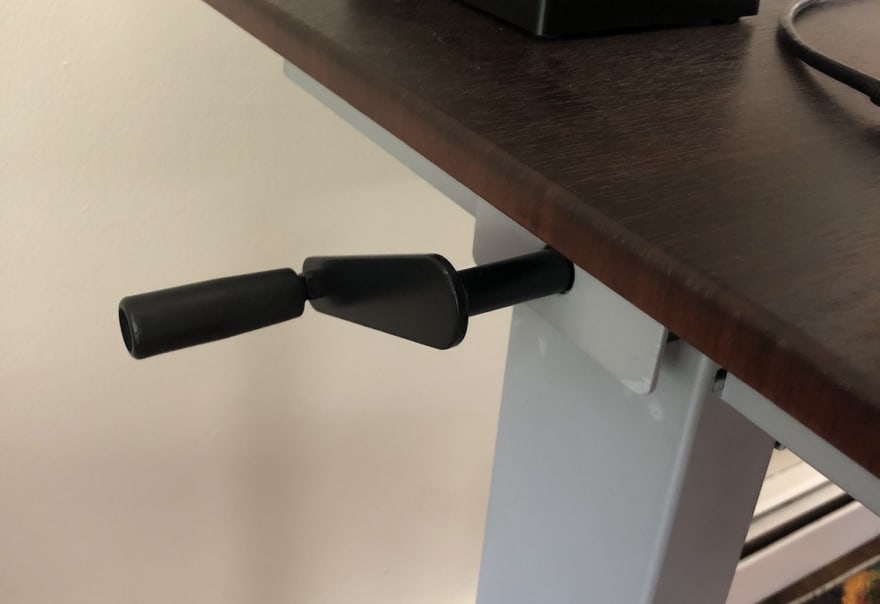
The original hand crank for the desk
Hardware
The first, and arguably the most difficult, part was to modify the desk. In its past life, the desk had a removable hand crank that sat at the edge of the desk. Initially I thought about attaching something to the hand crank port so that the desk would remain unaltered. I purchased various gears to figure out how to attach the motor to the desk, but to no avail. Then I had an idea: There is a rod that runs the length of the desk that connects the two legs of the desk so they can be raised and lowered at the same time. If I fastened a gear that fit around the rod, then I would be able to use a belt to connect the rod to a motor. I would also still be able to add a motor to the desk without altering the desk all that much.
Torque Matters
I ordered the necessary gears and belt, and then searched Amazon for “High Torque Motor”. Lo and behold, I found a multitude of motors that matched my specific needs — or so I thought. I bought a small “high torque” motor and waited nearly a month for the gears to ship from China. I was so excited when they arrived! I couldn’t wait for the weekend to put it all together and finally have my motorized desk.
Things did not go according to plan. I spent the day cutting a hole in a metal shield on the desk to run the belt through. At the time, I only had manual tools, so it took longer than I’m willing to admit. As it got closer to the end of the day, I finally finished putting everything together and was ready to try out the desk.
I plugged in the motor, turned the voltage up on my bench power supply, and… nothing happened. A few moments later, the motor started spinning and grinding the teeth off the belt I purchased. I learned two important lessons from this: First of all, the belt was obviously not up to the challenge and a “high torque” motor doesn’t mean “I can lift anything in the world”. Secondly, look at how small that motor is compared to my fingers. It’s tiny!

The photo on the left is the motor and the belt. Top right is the gear attached to the desk (you’ll see later more of what is going on here). Bottom right is the motor in position on the desk.
An appropriate motor
I needed to do some math to calculate how much torque was required to lift the desk so I could select the right motor. Off to Google for this one!
I was surprised to discover how simple it was to calculate the torque necessary.
T = F * r
Or torque is a function of force multiplied by the lever arm length.
Well, I had a lever arm (the hand crank) now I just needed a way to measure the force necessary to easily turn the lever arm. I loaded up my desk, tied a milk jug to the handle, and gradually added water to it until the lever arm spun. Then, I rotated the handle to the top with the filled milk jug and made sure that the weight could easily turn the handle. I discovered that the lever arm was 11cm and the force required was 4 lbs. I used this calculator to figure out that I needed a motor capable of providing at least 19.95 kg/cm of torque. Let the shopping begin!
I decided to make irreversible changes to the desk. I also knew that the rod that ran through the middle of the desk was hollow. I searched for a double shaft motor so I could cut the rod into pieces and reassemble it with the motor in the middle. I bought two 20 kg/cm motors to ensure I had plenty of torque necessary to lift the desk.
Another beautiful Saturday rolled around and I hacked my desk to pieces. I split the rod in four places and filed down the shafts of the motors so they could be used to connect the rod back together again. I cut more holes in the metal shield for the two new motors to fit in. There was no belt this time, and the motors connected directly to the rod so these holes were quite large. As the evening approached I put all the pieces back together and loaded my desk with my office equipment.
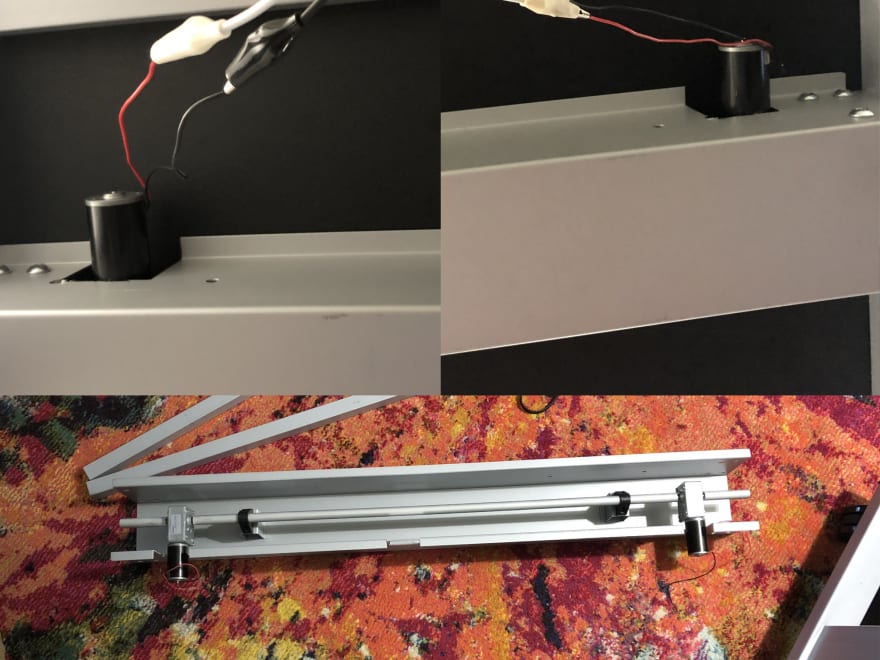
The top two photos are the motors completely installed in the desk. The bottom photo is the rod that runs the length of the desk with the motors integrated with it.
I wired up the motors and connected them to my bench power supply. Then, I turned it on and… THE DESK MOVED! I was more confident this time since I sized the motors appropriately. I had also doubled up on the motors just to be sure, but seeing it move was an awesome feeling.
Let me tell you though, the desk was slow. Like really slow. I took a video to show one of my friends that it worked and had to use the time-lapse feature of my iPhone so he didn’t have to watch a five-minute video of my desk going from a sitting to a standing position. It was slow enough that I could start the desk movement, go grab a cup of coffee, come back, and still have to wait a minute before it reached the standing position.
RPM Matters, Final Version
Finally, what I learned boils down to two things: RPM and torque. I had nailed down the torque and now I just needed to find a motor with high enough RPM’s while maintaining the torque necessary to lift the desk.
This wasn’t too hard to do, but I couldn’t find a double shaft motor like I had used previously so I had to find a 90 degree 1:1 gear box that could convert the motor into a double shaft motor.
Long story short, after another month of waiting for the perfect gear box to show up from China, and another Saturday, I had the desk moving at the speed I wanted!

My latest high torque motor on the left. Installed on the right.
A little more hardware and a lot more software
I wasn’t satisfied with a huge bench power supply on my desk at all times just to adjust the height of my desk. I was also swapping the power leads of the supply in order to reverse the direction of the desk. Not a big deal but the goal of the desk project was to use up and down buttons as well as several presets to tell the desk to adjust to my preferred height.
Bluetooth
My first foray was to add Bluetooth to the desk. After all, it seems that nearly every device has Bluetooth these days. The phone also seems like a great interface for controlling something like this.
I purchased a motor controller board, a Nordic NRF52 dev board (eventually I switch the Bluetooth board to an ESP32), some distance measuring sensors, and began mucking around with some control firmware.
I’ll post links at the end of the article for all the software and firmware that I wrote for this project. Feel free to comment on that code as well since I’m in no way a firmware engineer and would love some pointers!
As a quick introduction, the ESP32 is written in C++ using Arduino libraries to communicate with the BLE Terminal app on the phone. Setting up and configuring BLE is pretty complicated. Initially, you need to create all the characteristics for the values you’d like to control over BLE. Think of a characteristic like a single variable in your code. BLE wraps this variable in a bunch of handlers to retrieve and set the value of this variable.
Then, your characteristics are packaged up in a service with a custom UUID that you provide to make your service unique and identifiable from the app. Finally, you must add this service to the advertisement payload in order for your service to be discoverable by other devices. When a remote device connects to your service and sends data via a characteristic, the desk will recognize that a user wants the desk to adjust to another preset height and will begin its work.
In order to adjust the height, the desk has an TFMini-S LiDAR sensor mounted to the bottom to determine the current height. This sensor is funny because it is named LiDAR but doesn’t actually use a laser. It uses an LED and optics to determine the time-of-flight of the IR light. Anyway, the sensor determines the current height of the desk. Then, the control board determines the difference between the current height and the requested height, and activates the motor to spin in the necessary direction. Some of the code highlights are below but you can read the entire file here.
void setup()
{
   Serial.begin(115200);
   Serial2.begin(TFMINIS_BAUDRATE);
   EEPROM.begin(3); // used for saving the height presets between reboots

   tfminis.begin(&Serial2);
   tfminis.setFrameRate(0);

   ledcSetup(UP_PWM_CHANNEL, PWM_FREQUENCY, PWM_RESOLUTION);
   ledcAttachPin(UP_PWM_PIN, UP_PWM_CHANNEL);

   ledcSetup(DOWN_PWM_CHANNEL, PWM_FREQUENCY, PWM_RESOLUTION);
   ledcAttachPin(DOWN_PWM_PIN, DOWN_PWM_CHANNEL);

   state_machine = new StateMachine();
   state_machine->begin(*t_desk_height, UP_PWM_CHANNEL, DOWN_PWM_CHANNEL);

   BLEDevice::init("ESP32_Desk");
  ...

   BLEServer *p_server = BLEDevice::createServer();
   BLEService *p_service = p_server->createService(BLEUUID(SERVICE_UUID), 20);

   /* ------------------- SET HEIGHT TO PRESET CHARACTERISTIC -------------------------------------- */
   BLECharacteristic *p_set_height_to_preset_characteristic = p_service->createCharacteristic(...);
   p_set_height_to_preset_characteristic->setCallbacks(new SetHeightToPresetCallbacks());
   /* ------------------- MOVE DESK UP CHARACTERISTIC ---------------------------------------------- */
   BLECharacteristic *p_move_desk_up_characteristic = p_service->createCharacteristic(...);
   p_move_desk_up_characteristic->setCallbacks(new MoveDeskUpCallbacks());
   /* ------------------- MOVE DESK UP CHARACTERISTIC ---------------------------------------------- */
   BLECharacteristic *p_move_desk_down_characteristic = p_service->createCharacteristic(...);
   p_move_desk_down_characteristic->setCallbacks(new MoveDeskDownCallbacks());
   /* ------------------- GET/SET HEIGHT 1 CHARACTERISTIC ------------------------------------------ */
   BLECharacteristic *p_get_height_1_characteristic = p_service->createCharacteristic(...);
   p_get_height_1_characteristic->setValue(state_machine->getHeightPreset1(), 1);
   BLECharacteristic *p_save_current_height_as_height_1_characteristic = p_service->createCharacteristic(...);
   p_save_current_height_as_height_1_characteristic->setCallbacks(new SaveCurrentHeightAsHeight1Callbacks());
   /* ------------------- GET/SET HEIGHT 2 CHARACTERISTIC ------------------------------------------ */
  ...
   /* ------------------- GET/SET HEIGHT 3 CHARACTERISTIC ------------------------------------------ */
  ...
   /* ------------------- END CHARACTERISTIC DEFINITIONS ------------------------------------------ */
   p_service->start();

   BLEAdvertising *p_advertising = p_server->getAdvertising();
   p_advertising->start();

   xTaskCreate(
       updateDeskHeight,     // Function that should be called
       "Update Desk Height", // Name of the task (for debugging)
       1024,                 // Stack size
       NULL,                 // Parameter to pass
       5,                    // Task priority
       NULL                  // Task handle
   );
}
There is a lot more going on in the main file but this code has enough context for us to see what is happening. You’ll notice that we are creating and configuring all the BLE callbacks for all the characteristics, including moving the desk manually, setting/retrieving the preset values, and most importantly, adjusting the desk to a specific preset.
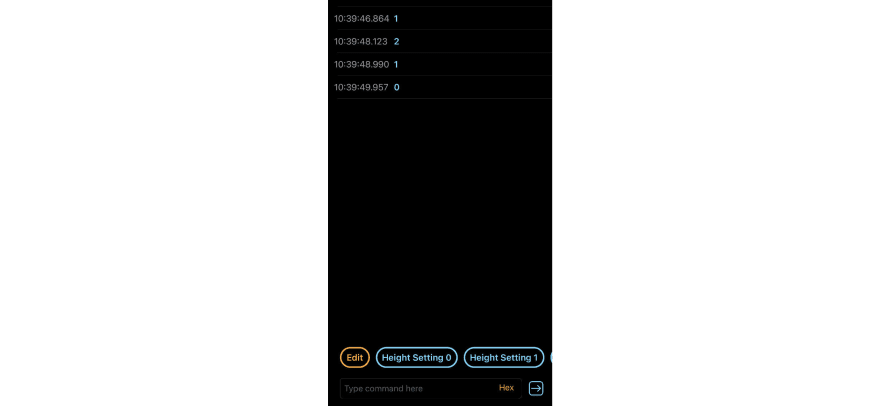
The image below shows me interacting with that characteristic to adjust the desk height. The last piece of the puzzle is the state machine, which knows the current height of the desk, the requested height of the desk from the user, and works to align those two pieces of data.
So I finally had the desk doing everything I wanted. I could save heights into presets and recall those heights to move the desk into my favorite positions. I was using a BLE Terminal app on my phone and computer so I could send the raw messages to my desk in order to control its position. This worked but I knew that the battle with BLE was just beginning. In order to have a seamless interface with my desk I would also need to learn how to write an iOS app so I didn’t have to remember the HEX codes to send to my desk to save a preset and recall a position.
The raw bluetooth interface… all that was left at this point was to learn how to program an iOS app…
Then my wife said something that would change everything… "What if you could control it with your voice?"
In addition to being way cooler, and adding to our growing list of Google Assistant devices in our house, I wouldn’t have to write an iOS app to control it. I also wouldn’t have to take my phone out of my pocket to set the desk height. The little wins!
This article is getting a little long so I’ll split this into a second article where I discuss adding Google Smart Home IoT here.

Top comments (0)