
Written by Nirmalya Ghosh✏️
This tutorial will demonstrate how to create a clone of product curation app Product Hunt using Hasura and Next.js. We’ll show you how to conduct authentication and authorization using Hasura and how to leverage GraphQL to fetch and write data from a Next.js frontend application.
We’ll discuss these tasks within the context of three applications:
- Frontend using Next.js
- Backend using Hasura (which uses the Postgres database)
- Authentication using Node.js
The whole project is available on GitHub.
What are Next.js and Hasura?
I’ve been using Next.js for over a year and have been satisfied with the overall developer experience because it supports many exciting features, such as server-side rendering, out of the box.
Hasura is an engine that autogenerates GraphQL APIs, as well as migration files for creating, updating, and deleting tables and columns in the Postgres database.

Getting started with Hasura
Let’s start by bootstrapping our backend application.
First, we’ll need to install the Hasura CLI. Once it’s installed, we can initialize the directory for storing Hasura GraphQL migrations.
hasura init --directory backend --endpoint http://localhost:8080 --admin-secret secret
For more details about the flags --directory, --endpoint, and --admin-secret, see the official Hasura documentation.

The above command will create a backend directory.

The config.yam file will contain the following.
// backend/config.yaml

admin_secret: secret
endpoint: http://localhost:8080
We’ll use Docker to install Hasura. According to the official docs, it supports Mac, Windows, and Linux. We’ll need to create a new file called Dockerfile inside our backend directory.
// backend/Dockerfile

FROM hasura/graphql-engine:v1.0.0
RUN mkdir /backend-app
WORKDIR /backend-app
COPY . /backend-app/
Let’s also create a .env file to store all the credentials for Hasura.
// backend/.env

HASURA_GRAPHQL_DATABASE_URL=postgres://postgres:@db:5432/postgres
HASURA_GRAPHQL_ENABLE_CONSOLE=false
HASURA_GRAPHQL_MIGRATIONS_DIR=./migrations
ENDPOINT=http://localhost:8080
HASURA_GRAPHQL_ADMIN_SECRET=secret
HASURA_GRAPHQL_JWT_SECRET={"type": "RS256", "key": ""}
It’s always a good idea to store credentials in environment files. We’ll add the HASURA_GRAPHQL_JWT_SECRET after we initialize our authentication application.
That’s all the coding we need to do for our backend application. The migration files will be generated automatically when we add tables and columns to our database.
Getting started with Next.js
We’ll create the Next.js application inside a new frontend directory. We’ll use Docker for Next.js as well.
Next.js has many examples to bootstrap our application. We’ll use the with-docker example.
yarn create next-app --example with-docker with-docker-app

The above command will generate a frontend directory.

Let’s update the contents of Dockerfile with the follwing.
// frontend/Dockerfile

FROM mhart/alpine-node:11.1.0
RUN mkdir /frontend-app
WORKDIR /frontend-app
RUN apk update && apk upgrade && apk add --no-cache bash git
COPY . /frontend-app/
RUN yarn install
EXPOSE 3000
CMD ["yarn", "dev"]
Building an authentication app
We’ll set up our authentication application using JWT, Hasura claims, and multiple roles. We’ll use this repository to initialize our application according to the following steps.
Step 1. Create a new directory called authentication
mkdir authentication
Step 2. Clone the repository
git clone https://github.com/hasura/graphql-engine
Step 3. Visit the passportjs-jwt-roles directory
cd graphql-engine/community/boilerplates/auth-servers/passportjs-jwt-roles
Step 4. Move this directory to the authentication directory we just created
mv * ../../../../../authentication
Step 5. Create a .env file inside the authentication directory with the following content
//authentication/.envDATABASE_URL=postgres://postgres:@db:5432/postgres
Step 6. Install the dependencies
yarn install
Step 7. Generate the RSA keys
openssl genrsa -out private.pem 2048
openssl rsa -in private.pem -pubout > public.pem
Step 8. Print the keys in an escaped format
awk -v ORS='\n' '1' public.pem
Step 9. Add the output into the HASURA_GRAPHQL_JWT_SECRET key present in the .env file of our backend application.
// backend/.env

...
HASURA_GRAPHQL_JWT_SECRET={"type": "RS256", "key": "-----BEGIN PUBLIC KEY-----\nMIIBIjANBgkqhkiG9w0BAQEFAAOCAQ8AMIIBCgKCAQEAvdJnVbZrrfYGGrnZTQwq\nlOZGonXh5h6yDqN7Np1KRmz8EyZKulKn186StNt2TZJPyYdAcAH6vnB05LUS47VF\nv9eIaAn8952BnJe0NZ9o+90k03wADORNzzeNqmJWGn2YbBiJHNLDt21Zn9dbOWOE\nKjO7eWOuiKEYEyC/OW9+p+Z05ahCZvmWVzNu9ylnHb8wqlFpwaGIEBn4Cm5/C7Zs\nj6BgggZOKp0GN6XNsc8+4zU1h2CpcCjyDJcNN1mGTMSLQHNOLAI4FY/qLwJcSomf\n8d7vTn+8EsJl+Ur+73qIYKpGoGiJw6Y2qpviRCttR8QF21QlIynz71YZTMl1SBmV\nkwIDAQAB\n-----END PUBLIC KEY-----\n"}
Our authentication application should have the following structure.
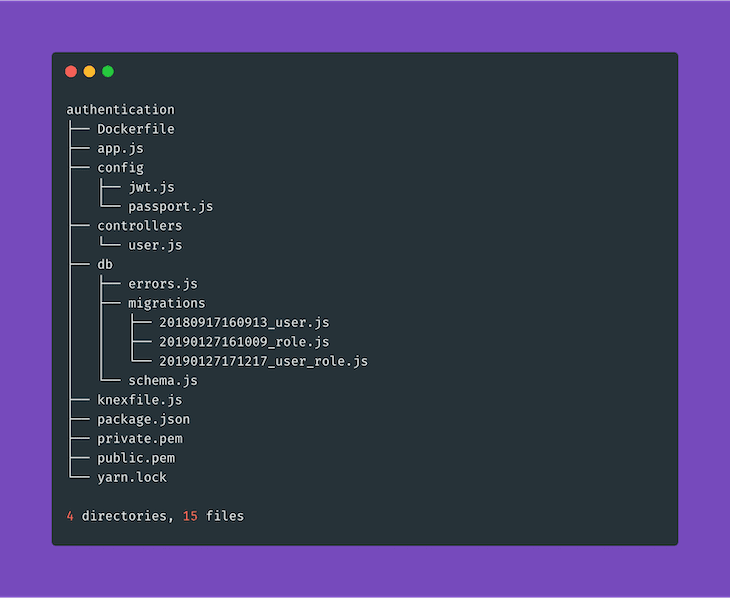
Restructuring the application tree
If we view our application structure from the root, we’ll see the following.
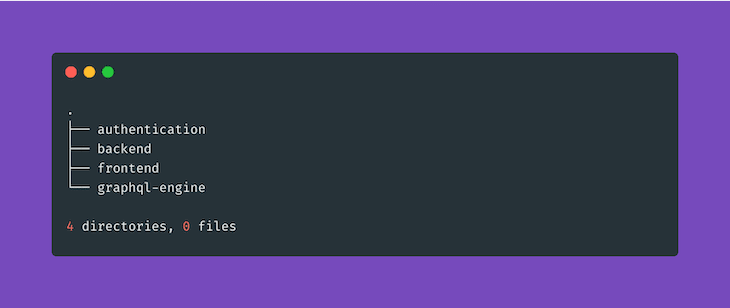
Let’s remove the graphql-engine directory from the root since we won’t need that anymore.
rm -rf graphql-engine
Next, we’ll create a new docker-compose.yml file, which will be responsible for composing our applications with the following content.
// docker-compose.yml

version: "3"
services:
  backend:
    build:
      context: ./backend
    depends_on:
      - db
    env_file: ./backend/.env
    ports:
      - 8080:8080
    volumes:
      - ./backend:/backend-app
  frontend:
    build:
      context: ./frontend
    command: yarn dev
    depends_on:
      - backend
      - authentication
    volumes:
      - ./frontend:/frontend-app
      - ./frontend/package.json:/frontend-app/package.json
      - ./frontend/yarn.lock:/frontend-app/yarn.lock
    ports:
      - "3000:3000"
  authentication:
    build:
      context: ./authentication
    command: yarn start
    env_file: ./authentication/.env
    depends_on:
      - db
    ports:
      - "3030:3030"
    volumes:
      - ./authentication:/authentication-app
      - ./authentication/package.json:/authentication-app/package.json
      - ./authentication/yarn.lock:/authentication-app/yarn.lock
  db:
    image: postgres:11.3-alpine
    volumes:
      - db_data:/var/lib/postgresql/data
volumes:
  db_data:
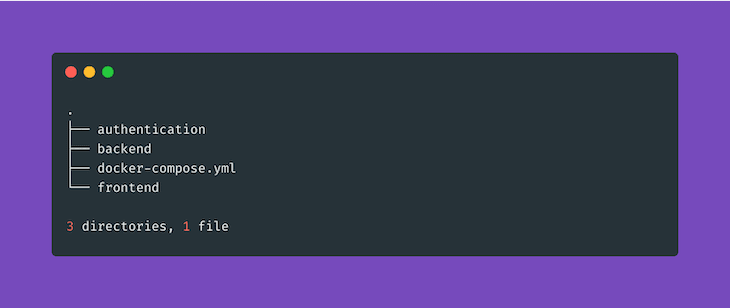
Our application tree should look like this:
Starting our applications using Docker
Once Docker is installed and running on our system, we can run the following command to start our applications.
docker-compose up
See the Docker documentation for more information about the above command.
We can check whether all the containers are up and running using the docker-compose ps command.

Note that the name of the containers can be different.
Running migrations to create user data in our database
In our authentication application, three migrations are present inside the migrations directory:

To run these migrations, we will have to SSH into our authentication container. We can find out the names of all our containers by running the following command.
docker-compose ps

To SSH into the authentication container, we need to run the following command.
docker exec -it authentication_1 /bin/bash
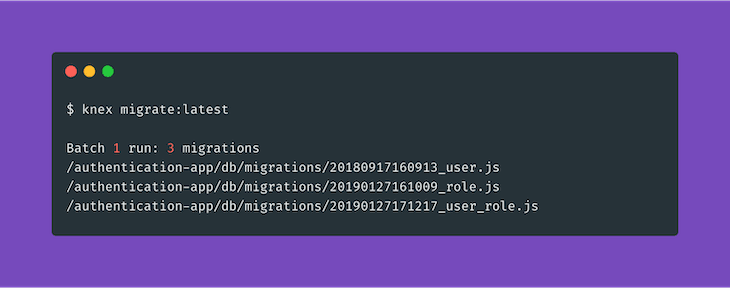
Once inside the container, we can run the migrations using the following command.
bash-4.4# knex migrate:latest
It’ll run all the migrations from the authentication application.
Now let’s look at how the above three migrations modified our database. After we exit from the container (using the command exit), we can go to our backend directory where we’ll run the following command to run the Hasura console.
hasura console
This will open the Hasura console on http://localhost:9695/. If we go to the Data tab, we’ll be able to see five untracked tables.

We need to click the Track button next to role, user, and user_role. These weren’t tracked because they weren’t exposed through the GraphQL API.
Next, we’ll click the Track All button next to Untracked foreign-key relations to track all relationships. We can view the relationships of each table from the Relationships tab inside each table.

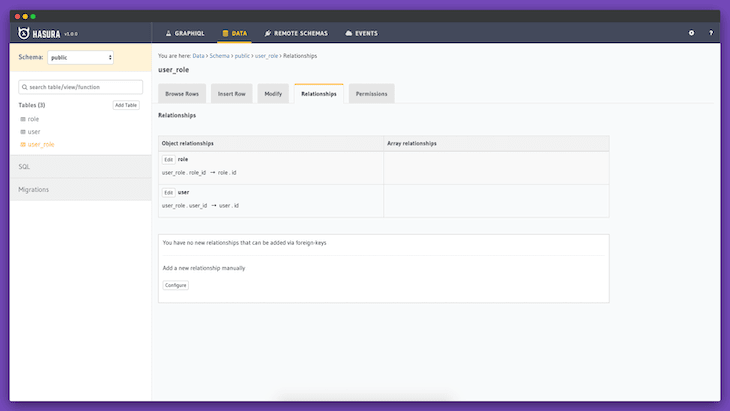
We can now view all the tables our migrations created.
The role table has two columns:
-
id(uuid, primary key, unique; default:gen_random_uuid()) -
name— (character varying, unique)
The user table has five columns:
-
id— (uuid, primary key, unique; default:gen_random_uuid()) -
username— (character varying, unique) -
password— (character varying) -
created_at— (timestamp with time zone, default:now()) -
active— (boolean, nullable, default:true)
The user_role table has three columns:
-
id— (uuid, primary key, unique, default:gen_random_uuid()) -
role_id— (uuid, nullable) -
user_id— (uuid, nullable)
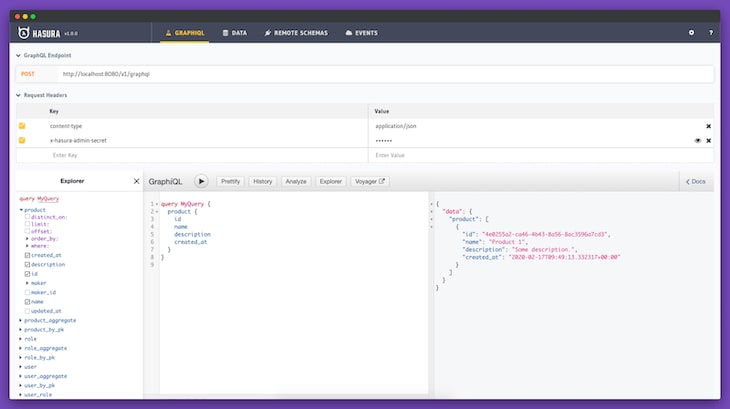
Now if we visit the Hasura GraphQL Explorer, we’ll be able to query our database using GraphiQL.

Since we don’t have any user data, the response is an empty user array. It’s interesting to note that if we don’t send the x-hasura-admin-secret key (whose value is secret) with the request header, we won’t be able to query any data.

That’s because we’ve set the value of HASURA_GRAPHQL_ADMIN_SECRET to secret in the .env file as a part of securing our GraphQL endpoint.

Also, we need to remember that any changes we make through the Hasura console will create migrations inside our migration directory, which is present in the backend application’s directory.

Authenticating users with our authentication app
If we follow our authentication repository’s documentation, we can initiate the following CURL request to create a new user.
curl -H "Content-Type: application/json" \
     -d'{"username": "admin1", "password": "pass", "confirmPassword": "pass"}'\
     http://localhost:3030/signup
We’ll get the following response.

We can also do a similar CURL request to log in an existing user.
curl -H "Content-Type: application/json" \
     -d'{"username": "admin1", "password": "pass"}' \
     http://localhost:3030/login
We’ll get the following response.

Integrating the authentication application with our frontend application
Let’s connect our Next.js application with our authentication application. The frontend application is running on http://localhost:3000/.
We’ll be using Chakra UI to build our frontend application and Nookies to handle cookies. To install them, we need to SSH into our frontend container.
docker exec -it frontend_1 /bin/bash
Once we’re inside the container, we can install the package using the following command.
bash-4.4# yarn add @chakra-ui/core @emotion/core @emotion/styled emotion-theming nookies
We’ll need to create a new file named _app.js inside the pages directory with the following content.
// frontend/pages/_app.js

import React from 'react'
import NextApp from 'next/app'
import { ThemeProvider, CSSReset, theme } from '@chakra-ui/core'

class App extends NextApp {
  render() {
    const { Component } = this.props
    return (
      <ThemeProvider theme={theme}>
        <CSSReset />
        <Component />
      </ThemeProvider>
    )
  }
}

export default App
Let’s add the the Button component in Chakra UI to our index page.
// frontend/pages/index.js

import React from 'react'
import { Box, Button } from "@chakra-ui/core";

const IndexPage = () => {
  return (
    <Box
      w="100%"
      minH="100vh"
      p={4}
      d="flex"
      alignItems="center"
      justifyContent="center"
    >
      <Button>Hello World!</Button>
    </Box>
  )
}

export default IndexPage

Now let’s create the sign-up form. We’ll have three fields: Username, Password and Confirm Password.
// frontend/components/forms/sign-up.js

import React, { useState } from "react";
import {
  Alert,
  AlertIcon,
  Box,
  Button,
  FormControl,
  FormLabel,
  FormHelperText,
  Input
} from "@chakra-ui/core";
import { setCookie } from "nookies";

const SignUpForm = () => {
  const [username, setUsername] = useState("");
  const [password, setPassword] = useState("");
  const [confirmPassword, setConfirmPassword] = useState("");
  const [error, setError] = useState(null);

  const handleSubmit = async e => {
    e.preventDefault();

  const response = await fetch("http://localhost:3030/signup", {
      method: "POST",
      body: JSON.stringify({
        username,
        password,
        confirmPassword
      }),
      headers: {
        "Content-type": "application/json; charset=UTF-8"
      }
    });

    const data = await response.json();

    if (response.status !== 200) {
      setError("Something went wrong! Please try again.");
    } else {
      setCookie({}, "X-Hasura-User-Id", data.id, {
        maxAge: 30 * 24 * 60 * 60,
        path: "/"
      });
      setCookie({}, "token", data.token, {
        maxAge: 30 * 24 * 60 * 60,
        path: "/"
      });
    }
  };

  const errorsNode = () => {
    if (!error) return false;
    return (
      <Alert status="error" mb={8} rounded="md" variant="left-accent">
        <AlertIcon />
        {error}
      </Alert>
    );
  };

  return (
    <Box
      w="100%"
      minH="100vh"
      p={4}
      d="flex"
      alignItems="center"
      justifyContent="center"
    >
      <Box w="500px" p={8} bg="gray.50" rounded="md">
        {errorsNode()}
        <FormControl mb={8}>
          <FormLabel htmlFor="username">Username</FormLabel>
          <Input
            type="text"
            id="username"
            aria-describedby="john"
            value={username}
            onChange={e => setUsername(e.target.value)}
          />
        </FormControl>
        <FormControl mb={8}>
          <FormLabel htmlFor="password">Password</FormLabel>
          <Input
            type="password"
            id="password"
            aria-describedby="*****"
            value={password}
            onChange={e => setPassword(e.target.value)}
          />
        </FormControl>
        <FormControl mb={8}>
          <FormLabel htmlFor="confirm-password">Confirm Password</FormLabel>
          <Input
            type="password"
            id="confirm-password"
            aria-describedby="*****"
            value={confirmPassword}
            onChange={e => setConfirmPassword(e.target.value)}
          />
          {!!confirmPassword && confirmPassword !== password && (
            <FormHelperText id="confirm-password">
              Passwords do not match
            </FormHelperText>
          )}
        </FormControl>
        <FormControl>
          <Button bg="#764ABC" color="white" onClick={handleSubmit}>
            Sign Up
          </Button>
        </FormControl>
      </Box>
    </Box>
  );
};

export default SignUpForm;
We need to import the form in our index page.
// frontend/pages/index.js

import React, { Component } from "react";
import SignUpForm from "../components/forms/sign-up";

export default class IndexPage extends Component {
  render() {
    return <SignUpForm />;
  }
}
The above code will generate the following form on http://localhost:3000/.
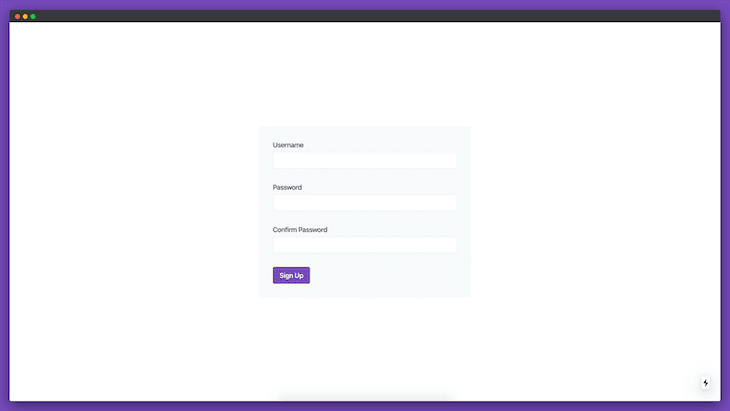
Let’s take a closer look at the handleSubmit function of our SignUpForm component.
First, we’ll initiate a POST request to http://localhost:3030/signup, which is our sign-up API endpoint. If we get a success response from our API, that means we’re storing the id and token of the user from the response in cookies. If we check our browser cookies, we’ll see that two cookies are now set in our browser.

The X-Hasura-User-Id cookie will be necessary to authorize users in Hasura. We can also store the type of user, but that’s not necessary in our application. We’ll use this cookie while building authorization in the backend application.
Let’s create a similar sign-in form with only two fields: Username and Password .
// frontend/components/forms/sign-in.js

import React, { useState } from "react";
import {
  Alert,
  AlertIcon,
  Box,
  Button,
  FormControl,
  FormLabel,
  Input
} from "@chakra-ui/core";
import { setCookie } from "nookies";

const SignInForm = () => {
  const [username, setUsername] = useState("");
  const [password, setPassword] = useState("");
  const [error, setError] = useState(null);

  const handleSubmit = async e => {
    e.preventDefault();

    const response = await fetch("http://localhost:3030/login", {
      method: "POST",
      body: JSON.stringify({
        username,
        password
      }),
      headers: {
        "Content-type": "application/json; charset=UTF-8"
      }
    });

    const data = await response.json();

    if (response.status !== 200) {
      setError("Something went wrong! Please try again.");
    } else {
      setCookie({}, "X-Hasura-User-Id", data.id, {
        maxAge: 30 * 24 * 60 * 60,
        path: "/"
      });
      setCookie({}, "token", data.token, {
        maxAge: 30 * 24 * 60 * 60,
        path: "/"
      });
    }
  };

  const errorsNode = () => {
    if (!error) return false;
    return (
      <Alert status="error" mb={8} rounded="md" variant="left-accent">
        <AlertIcon />
        {error}
      </Alert>
    );
  };

  return (
    <Box
      w="100%"
      minH="100vh"
      p={4}
      d="flex"
      alignItems="center"
      justifyContent="center"
    >
      <Box w="500px" p={8} bg="gray.50" rounded="md">
        {errorsNode()}
        <FormControl mb={8}>
          <FormLabel htmlFor="username">Username</FormLabel>
          <Input
            type="text"
            id="username"
            aria-describedby="john"
            value={username}
            onChange={e => setUsername(e.target.value)}
          />
        </FormControl>
        <FormControl mb={8}>
          <FormLabel htmlFor="password">Password</FormLabel>
          <Input
            type="password"
            id="password"
            aria-describedby="*****"
            value={password}
            onChange={e => setPassword(e.target.value)}
          />
        </FormControl>
        <FormControl>
          <Button bg="#764ABC" color="white" onClick={handleSubmit}>
            Sign In
          </Button>
        </FormControl>
      </Box>
    </Box>
  );
};

export default SignInForm;
Let’s import that form in our login page.
// frontend/pages/login.js

import React, { Component } from "react";
import SignInForm from "../components/forms/sign-in";

export default class SignInPage extends Component {
  render() {
    return <SignInForm />;
  }
}
Now if we visit http://localhost:3000/login, we should be able to see our login form.

Now, let’s create another component where we’ll show a list of products. Currently, we don’t have any products. So let’s create some.
// frontend/components/lists/products.js

import React from "react";
import { Grid, Box } from "@chakra-ui/core";

const ProductsList = () => {
  return (
    <Box
      w="100%"
      minH="100vh"
      p={4}
      d="flex"
      alignItems="center"
      justifyContent="center"
    >
      <Box w="800px" p={8} bg="gray.50" borderRadius="sm">
        <Grid
          templateColumns={[
            "repeat(1, 1fr)",
            "repeat(1, 1fr)",
            "repeat(2, 1fr)"
          ]}
          gap={8}
        >
          <Box w="100%" h={24} bg="#764ABC" rounded="md" />
          <Box w="100%" h={24} bg="#764ABC" rounded="md" />
          <Box w="100%" h={24} bg="#764ABC" rounded="md" />
          <Box w="100%" h={24} bg="#764ABC" rounded="md" />
          <Box w="100%" h={24} bg="#764ABC" rounded="md" />
          <Box w="100%" h={24} bg="#764ABC" rounded="md" />
        </Grid>
      </Box>
    </Box>
  );
};

export default ProductsList;
We’ll show these components on the products page.
// frontend/pages/products/index.js

import React, { Component } from "react";
import ProductsList from "../components/lists/products";

export default class ProductsPage extends Component {
  render() {
    return <ProductsList />;
  }
}
If we visit http://localhost:3000/products, we should now see the following screen.
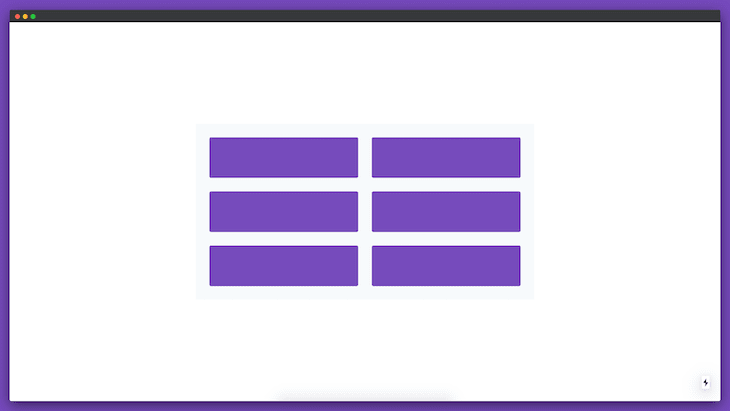
For now, we’re just showing placeholder content instead of the products themselves. The next step is to create a table to store the products in our backend application.
Creating tables for storing our products in Hasura
Let’s build the feature to store and retrieve products from our database using Hasura.
If we change the directory to our backend application and run the hasura console command, the console will be up and running at http://localhost:9695/.

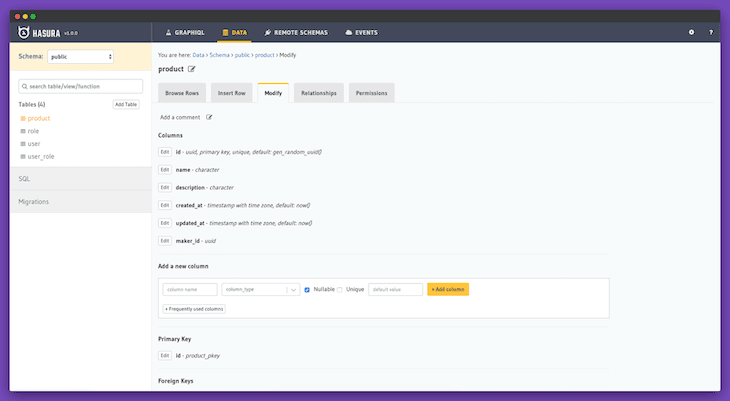
Let’s click on the Data tab and add a new table called product, which will have the following six columns.
-
-
id(uuid, primary key, unique, default:gen_random_uuid()) -
name(character) -
description(character) -
created_at(timestamp with time zone, default:now()) -
updated_at(timestamp with time zone, default:now()) -
maker_id(uuid)
-
We’ll also need to add a relationship between the product and the maker (the user who added the product). We’d use this relationship to authorize editing of that item.
To establish the relationship between the product and user model, we need to do the following:
- Click on the Relationships tab inside the product model
- Click the Configure button below Add a new relationship manually
- Select Object Relationship from the Relationship Type dropdown
- Type “maker” as the Relationship Name
- Select public from the Reference Schema dropdown
- Select user as the Reference Table
- Select maker_id from the From dropdown and id from the To dropdown
We’ve now defined a relationship between the product and user models.

You can find more information about Relationships in the Hasura documentation.
Now let’s define a new relationship between the User and Product models.
- Click on the Relationships tab inside the user model
- Click the Configure button below Add a new relationship manually
- Select Array Relationship from the Relationship Type dropdown
- Type “products” as the Relationship Name
- Select public from the Reference Schema dropdown
- Select product as the Reference Table
- Select id from the From dropdown and maker_id from the To dropdown

Now if we visit the Hasura GraphQL Explorer, we’ll be able to query our products using GraphiQL.
Configuring Next.js to fetch GraphQL data with GraphQL Hooks
It’s time to configure our Next.js application to fetch data from our backend application. We’ll use GraphQL Hooks to fetch data from the backend application.
To install the dependencies, we need to SSH into our frontend container.
docker exec -it frontend_1 /bin/bash
Once inside the container, we can install the package using the following command.
bash-4.4# yarn add graphql-hooks graphql-hooks-memcache graphql-hooks-ssr
Since we’ll be using SSR, we have to create two utility files.
// frontend/lib/with-graphql-client.js

import React from "react";
import initGraphQL from "./init-graphql";
import Head from "next/head";
import { getInitialState } from "graphql-hooks-ssr";

export default App => {
  return class GraphQLHooks extends React.Component {
    static displayName = "GraphQLHooks(App)";
    static async getInitialProps(ctx) {
      const { AppTree } = ctx;
      let appProps = {};
      if (App.getInitialProps) {
        appProps = await App.getInitialProps(ctx);
      }
      // Run all GraphQL queries in the component tree
      // and extract the resulting data
      const graphQLClient = initGraphQL();

      let graphQLState = {};

      if (typeof window === "undefined") {
        try {
          // Run all GraphQL queries
          graphQLState = await getInitialState({
            App: <AppTree {...appProps} graphQLClient={graphQLClient} />,
            client: graphQLClient
          });
        } catch (error) {
          // Prevent GraphQL hooks client errors from crashing SSR.
          // Handle them in components via the state.error prop:
          // https://github.com/nearform/graphql-hooks#usequery
          console.error("Error while running `getInitialState`", error);
        }
        // getInitialState does not call componentWillUnmount
        // head side effect therefore need to be cleared manually
        Head.rewind();
      }

      return {
        ...appProps,
        graphQLState
      };
    }

    constructor(props) {
      super(props);
      this.graphQLClient = initGraphQL(props.graphQLState);
    }

    render() {
      return <App {...this.props} graphQLClient={this.graphQLClient} />;
    }
  };
};


// frontend/lib/init-graphql.js

import { GraphQLClient } from "graphql-hooks";
import memCache from "graphql-hooks-memcache";
import unfetch from "isomorphic-unfetch";

let graphQLClient = null;

function create(initialState = {}) {
  return new GraphQLClient({
    ssrMode: typeof window === "undefined",
    url: "http://localhost:8080/v1/graphql",
    cache: memCache({ initialState }),
    fetch: typeof window !== "undefined" ? fetch.bind() : unfetch, // eslint-disable-line
    headers: {
      "x-hasura-admin-secret": "secret"
    }
  });
}

export default function initGraphQL(initialState) {
  // Make sure to create a new client for every server-side request so that data
  // isn't shared between connections (which would be bad)
  if (typeof window === "undefined") {
    return create(initialState);
  }
  // Reuse client on the client-side
  if (!graphQLClient) {
    graphQLClient = create(initialState);
  }

  return graphQLClient;
}
These two files are present in the with-graphql-hooks example of Next.js.
We now need to update our _app.js file because we need to wrap our frontend application with the withGraphQLClient higher order function.
// frontend/pages/_app.js

import React from "react";
import NextApp from "next/app";
import { ThemeProvider, CSSReset, theme } from "@chakra-ui/core";
import { ClientContext } from "graphql-hooks";

import withGraphQLClient from "../lib/with-graphql-client";

class App extends NextApp {
  render() {
    const { Component, pageProps, graphQLClient } = this.props;
    return (
      <ThemeProvider theme={theme}>
        <CSSReset />
        <ClientContext.Provider value={graphQLClient}>
          <Component {...pageProps} />
        </ClientContext.Provider>
      </ThemeProvider>
    );
  }
}
export default withGraphQLClient(App);
Showing product data in the Next.js app
Now let’s update our ProductsList component to show actual products from our database.
// frontend/components/lists/products.js

import React from "react";
import { Text, Grid, Box, Spinner, Alert, AlertIcon } from "@chakra-ui/core";
import { useQuery } from "graphql-hooks";

export const allProductsQuery = `
  query {
    product {
      id
      name
      description
    }
  }
`;

const ProductsList = () => {
  const { loading, error, data } = useQuery(allProductsQuery, {
    skipCache: true
  });

  if (loading) {
    return (
      <Box
        w="100%"
        minH="100vh"
        d="flex"
        alignItems="center"
        justifyContent="center"
      >
        <Spinner />
      </Box>
    );
  }

  if (error) {
    return (
      <Box
        w="100%"
        minH="100vh"
        d="flex"
        alignItems="center"
        justifyContent="center"
      >
        <Alert status="error" variant="left-accent">
          <AlertIcon />
          There was an error processing your request
        </Alert>
      </Box>
    );
  }

  return (
    <Box
      w="100%"
      minH="100vh"
      p={4}
      d="flex"
      alignItems="center"
      justifyContent="center"
    >
      <Box w="800px" p={8} bg="gray.50" borderRadius="sm">
        <Grid
          templateColumns={[
            "repeat(1, 1fr)",
            "repeat(1, 1fr)",
            "repeat(2, 1fr)"
          ]}
          gap={8}
        >
          {data.product.map(item => {
            return (
              <Box
                key={item.id}
                w="100%"
                p={12}
                bg="#764ABC"
                rounded="md"
                color="white"
              >
                <Text fontSize="xl" fontWeight="semibold" lineHeight="short">
                  {item.name}
                </Text>
                <Text mt={2}>{item.description}</Text>
              </Box>
            );
          })}
        </Grid>
      </Box>
    </Box>
  );
};

export default ProductsList;
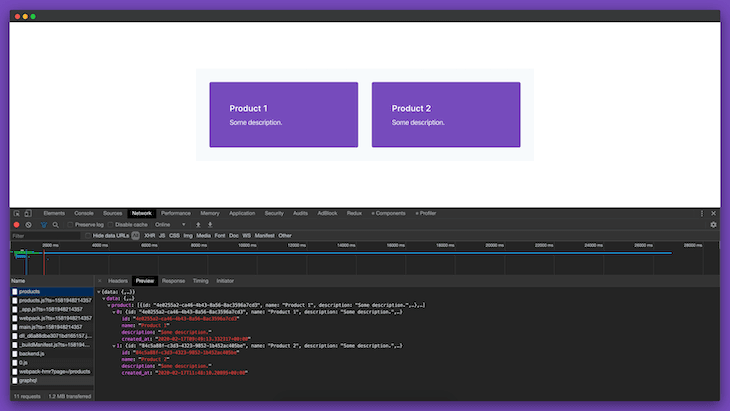
After making this change, if we visit http://localhost:3000/products, we should be able to see the actual products from our backend.
Extending the Next.js app to add new products
At this stage, we can build a form to add new products.
// frontend/components/forms/add-new-product.js

import React, { useState } from "react";
import { Box, Button, FormControl, FormLabel, Input } from "@chakra-ui/core";
import { parseCookies } from "nookies";
import { useMutation } from "graphql-hooks";
import { withRouter } from "next/router";

export const insertProductMutation = `
  mutation ($name: bpchar!, $description: bpchar!, $maker_id: uuid!) {
    insert_product(objects: {description: $description, name: $name, maker_id: $maker_id}) {
      returning {
        id
        name
      }
    }
  }
`;

const AddNewProductForm = ({ router }) => {
  const [insertProduct] = useMutation(insertProductMutation);
  const [name, setName] = useState("");
  const [description, setDescription] = useState("");
  const maker_id = parseCookies()["X-Hasura-User-Id"];

  const handleSubmit = async e => {
    e.preventDefault();

    await insertProduct({
      variables: {
        name,
        description,
        maker_id
      }
    });
    setName("");
    setDescription("");
    router.push("/products");
  };

  return (
    <Box
      w="100%"
      minH="100vh"
      p={4}
      d="flex"
      alignItems="center"
      justifyContent="center"
    >
      <Box w="500px" p={8} bg="gray.50" rounded="md">
        <FormControl mb={8}>
          <FormLabel htmlFor="name">Name</FormLabel>
          <Input
            type="text"
            id="name"
            aria-describedby="john"
            value={name}
            onChange={e => setName(e.target.value)}
          />
        </FormControl>
        <FormControl mb={8}>
          <FormLabel htmlFor="description">Description</FormLabel>
          <Input
            type="text"
            id="description"
            aria-describedby="Description"
            value={description}
            onChange={e => setDescription(e.target.value)}
          />
        </FormControl>
        <FormControl>
          <Button bg="#764ABC" color="white" onClick={handleSubmit}>
            Save
          </Button>
        </FormControl>
      </Box>
    </Box>
  );
};

export default withRouter(AddNewProductForm);
In the above form, we’re using the X-Hasura-User-Id cookie to send the id of the current user.
Now we just need to import this form in a page.
// frontend/pages/products/new.js

import React from "react";

import AddNewProductForm from "../../components/forms/add-new-product";

const CreateProductPage = () => {
  return <AddNewProductForm />;
};

export default CreateProductPage;
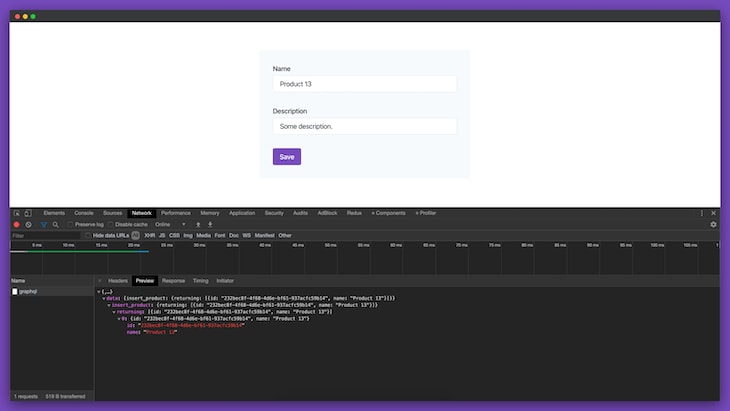
If we visit http://localhost:3000/products/new, we should now be able to see the new form.

We can also add new products.
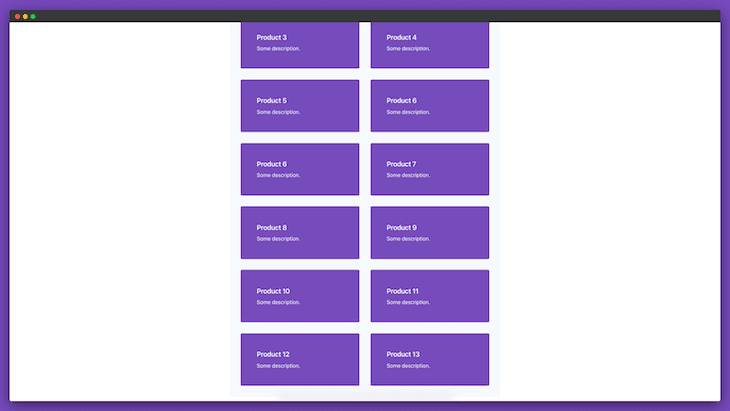
In addition, we can view the new product in the ProductsList component.
Extending the Next.js app to edit products
What if we want users to be able to edit the products? We can create a form for that too.
// frontend/components/forms/edit-product.js

import React, { useState, useEffect } from "react";
import {
  Box,
  Button,
  FormControl,
  FormLabel,
  Input,
  Spinner
} from "@chakra-ui/core";
import { useManualQuery, useMutation } from "graphql-hooks";
import { withRouter } from "next/router";

export const singleProductQuery = `
  query ($id: uuid!){
    product_by_pk (id: $id) {
      id
      name
      description
      created_at
    }
  }
`;

export const updateProductMutation = `
  mutation ($name: bpchar!, $description: bpchar!, $productId: uuid!) {
    update_product(where: {id: {_eq: $productId}}, _set: {name: $name, description: $description}) {
      returning {
        id
        name
        description
      }
    }
  }
`;

const EditProductForm = ({ router }) => {
  const [name, setName] = useState("");
  const [description, setDescription] = useState("");
  const [fetchProduct, { loading, error }] = useManualQuery(singleProductQuery);
  const [updateProduct] = useMutation(updateProductMutation);

  useEffect(() => {
    const fetchProductThenSomething = async () => {
      const product = await fetchProduct({
        skipCache: true,
        variables: {
          id: router.query.productId
        }
      });
      setName(product.data.product_by_pk.name);
      setDescription(product.data.product_by_pk.description);
    };
    fetchProductThenSomething();
  }, []);

  if (loading) {
    return (
      <Box
        w="100%"
        minH="100vh"
        d="flex"
        alignItems="center"
        justifyContent="center"
      >
        <Spinner />
      </Box>
    );
  }

  if (error) {
    return (
      <Box
        w="100%"
        minH="100vh"
        d="flex"
        alignItems="center"
        justifyContent="center"
      >
        <Alert status="error" variant="left-accent">
          <AlertIcon />
          There was an error processing your request
        </Alert>
      </Box>
    );
  }

  const handleSubmit = async e => {
    e.preventDefault();
    await updateProduct({
      variables: {
        name,
        description,
        productId: router.query.productId
      }
    });
  };

  return (
    <Box
      w="100%"
      minH="100vh"
      p={4}
      d="flex"
      alignItems="center"
      justifyContent="center"
    >
      <Box w="500px" p={8} bg="gray.50" rounded="md">
        <FormControl mb={8}>
          <FormLabel htmlFor="name">Name</FormLabel>
          <Input
            type="text"
            id="name"
            aria-describedby="john"
            value={name}
            onChange={e => setName(e.target.value)}
          />
        </FormControl>
        <FormControl mb={8}>
          <FormLabel htmlFor="description">Description</FormLabel>
          <Input
            type="text"
            id="description"
            aria-describedby="Description"
            value={description}
            onChange={e => setDescription(e.target.value)}
          />
        </FormControl>
        <FormControl>
          <Button bg="#764ABC" color="white" onClick={handleSubmit}>
            Save
          </Button>
        </FormControl>
      </Box>
    </Box>
  );
};

export default withRouter(EditProductForm);
Let’s render that form in a separate page.
// frontend/pages/products/[productId]/edit.js

import React from "react";

import EditProductForm from "../../../components/forms/edit-product";

const EditProductPage = () => {
  return <EditProductForm />;
};

export default EditProductPage;
Now, if we visit any Product page (eg: http://localhost:3000/products/:productId/edit), we should be able to see the EditProductForm.

We can now update any product through this form.
Let’s say we want to make it so that makers can update only the products they created. To do that, we need to define custom permissions for the Product model.
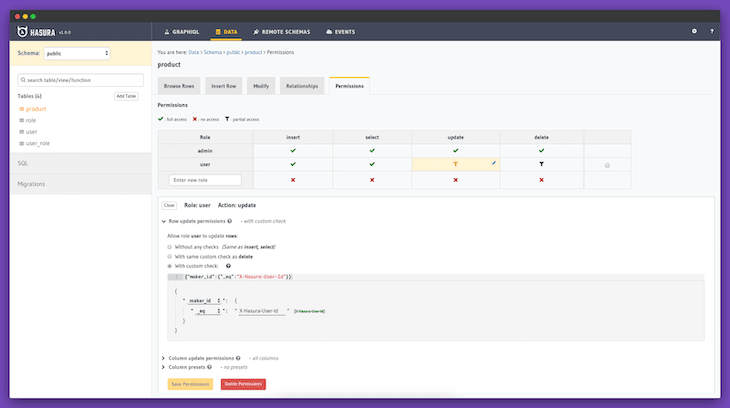
We need to define a new Role named user. When the maker_id equals X-Hasura-User-Id, then and only then will the update be allowed.
We still need to make a few changes on our Next.js application to allow makers to edit the products that they created. We just need to update the SignInForm and SignUpForm components to store the X-Hasura-User-Role cookie.
// frontend/components/forms/sign-in.js

const handleSubmit = async e => {
    e.preventDefault();

    ...

    setCookie({}, "X-Hasura-User-Id", data.id, {
        maxAge: 30 * 24 * 60 * 60,
        path: "/"
      });

      setCookie({}, "token", data.token, {
        maxAge: 30 * 24 * 60 * 60,
        path: "/"
      });

      setCookie({}, "X-Hasura-User-Role", data.roles[0], {
        maxAge: 30 * 24 * 60 * 60,
        path: "/"
      });
    }
  };
We also need to update the create function in the init-graphql.js file.
// frontend/lib/init-graphql.js

function create(initialState = {}) {
  return new GraphQLClient({
    ssrMode: typeof window === "undefined",
    url: "http://localhost:8080/v1/graphql",
    cache: memCache({ initialState }),
    fetch: typeof window !== "undefined" ? fetch.bind() : unfetch, // eslint-disable-line
    headers: {
      "x-hasura-admin-secret": "secret",
      "x-hasura-role": parseCookies()["X-Hasura-User-Role"],
      "X-Hasura-User-Id": parseCookies()["X-Hasura-User-Id"]
    }
  });
}
If we log in again, we should be able to see three cookies: X-Hasura-User-Id, X-Hasura-User-Role, and token.

If a user visits any product page, they will be able to update only the products they created.
Conclusion
It’s possible to use GraphQL Subscriptions with Hasura. You can also trigger webhooks on database events using Hasura.
You should now have a basic understanding of how to use Hasura with Next.js. The whole project is available on GitHub for your reference.
Note that the applications we built are not yet ready for production. See the Hasura documentation for more information about deploying Hasura applications. Likewise, you can read more about deploying Next.js applications in the Next.js documentation.
Plug: LogRocket, a DVR for web apps

LogRocket is a frontend logging tool that lets you replay problems as if they happened in your own browser. Instead of guessing why errors happen, or asking users for screenshots and log dumps, LogRocket lets you replay the session to quickly understand what went wrong. It works perfectly with any app, regardless of framework, and has plugins to log additional context from Redux, Vuex, and @ngrx/store.
In addition to logging Redux actions and state, LogRocket records console logs, JavaScript errors, stacktraces, network requests/responses with headers + bodies, browser metadata, and custom logs. It also instruments the DOM to record the HTML and CSS on the page, recreating pixel-perfect videos of even the most complex single-page apps.
Try it for free.
The post Building a Product Hunt clone app using Hasura and Next.js appeared first on LogRocket Blog.

Top comments (0)