
Written by Ganesh Mani✏️
This article explains how to build a Trello-like application using React Hooks and a GraphqQL server. Before jumping into the application, let me give you an explanation for why we need to build this.
Learning a concept or technology should end with a practice. Practicing what we have learned is a great way to remember the concept. It can stick with you for a very long time. That’s the main reason that we are building a Trello clone.
At the same time, Trello includes some interesting concepts such as nested drag and drop, web sockets etc.
Now, let’s see how to build this application. We will start by developing a backend for it and then we will develop the frontend.
Demo
Backend
Initially, I wanted to go with Hasura, which is an awesome tool to build GraphQL within a span of minutes.
But our application needed some functionalities that are more than just CRUD. Even though we can write our own custom resolvers in Hasura, I wanted to build it from scratch to explain it more easily.
Before jumping into the code, let’s see what kind of entities are involved in our application. Here, we have two main entities:
- Section – It contains all the cards. The user will create a section and add cards inside of it.
-
Cards – They contain all the task details. The user creates a card and stores all the task details inside of it.


Dependencies
- apollo-server-express – It helps to connect the Apollo graphQL server with ExpressJS
- express – Express is a Node.js framework to run the server
- mongoose – Mongoose connects the express server with MongoDB
- lodash – A JavaScript utility library
npm install apollo-server apollo-server-express express lodash mongoose
Once we install the required dependencies, let’s create the GraphQL server. Create a file server.js and add the following code:
const express = require("express");
const { ApolloServer, gql } = require("apollo-server-express");
const merge = require("lodash/merge");
const mongoose = require("mongoose");
const { PubSub } = require("apollo-server");
const { createServer } = require("http");
require("dotenv").config();

const typeDefs = gql``;

const resolvers = {};

const MONGO_USER = process.env.MONGO_USER || "root";
const MONGO_PASS = process.env.MONGODB_PASS;
mongoose
  .connect(
    `mongodb://${MONGO_USER}:${MONGO_PASS}@ds131902.mlab.com:31902/trello-hooks-graphql-clone`,
    { useNewUrlParser: true, useUnifiedTopology: true }
  )
  .then(() => {
    console.log("mongodb connected successfully");
    const server = new ApolloServer({
      typeDefs,
      resolvers
    });
    const app = express();
    server.applyMiddleware({ app });
    const httpServer = createServer(app);

    const PORT = process.env.PORT || 4444;
    httpServer.listen({ port: PORT }, () => {
      console.log(`Server is running in port ${PORT}`);
    });
  })
  .catch((err) => {
    console.log(err);
  });
In the above code, we import the ApolloServer and gql to run the GraphQL server and Mongoose to connect with MongoDB.
const express = require("express");
const { ApolloServer, gql } = require("apollo-server-express");
const mongoose = require("mongoose");
const { PubSub } = require("apollo-server");
const { createServer } = require("http");
require("dotenv").config();
After that, we define typeDefinitions and resolvers for Apollo GraphQL server.
const typeDefs = gql;

const resolvers = {};
Type definitions
It contains all of the GraphQL schema definition. Here, we have two entities: Section and Card. Mostly, entities should be defined as a Type.
One important thing to note here is that GraphQL has two root types:
- Query
- Mutation
Query handles all the Fetch Operations, including the GET Request and the REST API protocol. Mutation handles the data manipulation, which is the POST request in the REST API.
Resolvers
Basically, resolvers resolve the Type that we defined in the schema. For example, if you define a query type in schema, it should be resolved in the resolver.
After that, we need to connect our server with MongoDB database. We can do that using the Mongoose connect method:
const MONGO_USER = process.env.MONGO_USER || "root";
const MONGO_PASS = process.env.MONGODB_PASS;
mongoose
  .connect(
    `mongodb://${MONGO_USER}:${MONGO_PASS}@ds131902.mlab.com:31902/trello-hooks-graphql-clone`,
    { useNewUrlParser: true, useUnifiedTopology: true }
  )
  .then(() => {
    console.log("mongodb connected successfully");
  })
  .catch((err) => {
    console.log(err);
  });
Note: I am using the mlab hosting service here. You can either run this locally or use some hosting services such as mlab or mongodb atlas.
Once we connect with MongoDB successfully, let’s create our GraphQL server and run it:
const server = new ApolloServer({
      typeDefs,
      resolvers,
      context: () => ({
      }),
    });
    const app = express();
    server.applyMiddleware({ app });
    const httpServer = createServer(app);
    server.installSubscriptionHandlers(httpServer);
    const PORT = process.env.PORT || 4444;
    httpServer.listen({ port: PORT }, () => {
      console.log(`Server is running in port ${PORT}`);
    });
So far, we’ve set up a basic GraphQL server, which is connected with MongoDB database. Now, it’s time to create the business logics inside our application.
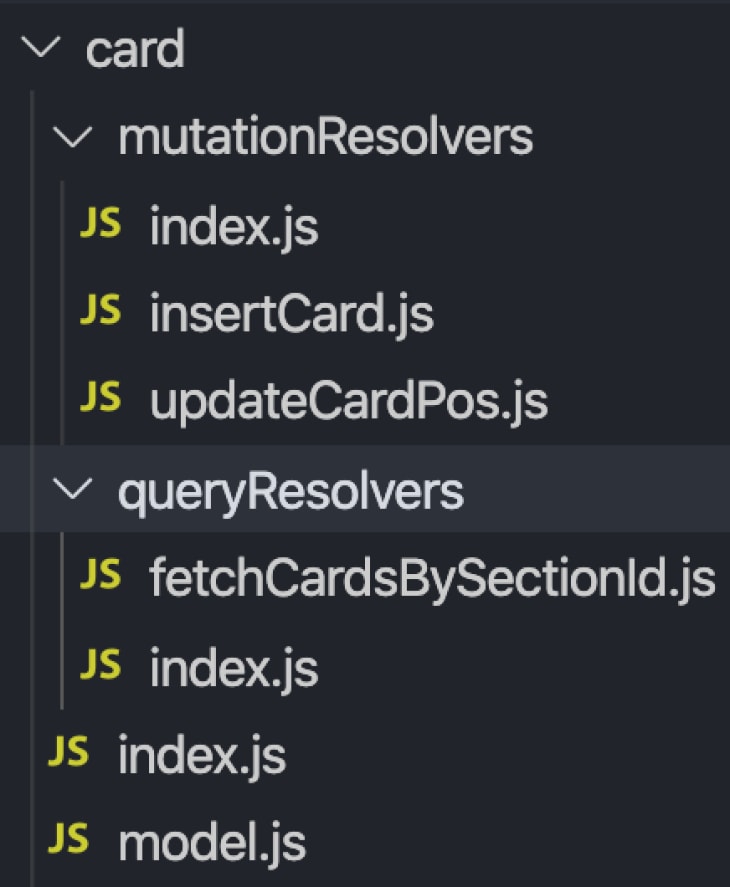
File Structure

I structured the files based on feature and entity. They’re called feature folders. Inside of every entity or feature, I have index.js, which is a root file for the specific feature.
mutationResolvers and queryResolvers folders handle the Query and Mutation resolvers and model.js file which contains the Mongoose schema model.
Section entity
Before writing Query and Mutation for the Section, we need to create the Section Type in our GraphQL SDL(Schema Definition Language). Whatever data we want to store in Section should be defined in the type:
type Section {
    id: ID!
    title: String!
    label: String!
    pos: Int!
    description: String
    cards: [Card]
 }
To understand it better, consider it like a key value pair: on the left side, it will be keyname. On the right side, it will be a value type.
Here, we have value type String and Int.
If you watch carefully, we’ll have a value type called Card. While that’s new, other value types are straightforward.
Card is the entity that we discussed in the beginning. Just like we have the type called Section. We also have the Custom Type card.
Why is it defined inside of the Type Section?
In GraphQL, we call these Relationships.
Every Section will contain many cards. That’s a 1-to-N relationship. If we convert that to the GraphQL Schema, it will be similar to the type above.
After that, we need to define the Query and Mutation types for the Section Entity:
extend type Query {
    fetchSections: [Section]
  }
  extend type Mutation {
    insertSection(request: insertSectionInput): Section
    updateSectionPos(request: updateSectionPosInput): Section
  }
Here, we defined the Query Type fetchSections, which is pretty straightforward.
If we hit the GraphQL query, it should return all the sections.
The interesting thing is, Mutation has two operation fields: insertSection and updateSectionPos, along with an argument.
Every root type (Query and Mutation) can accept arguments and return data. The data should include the type that is defined in the schema.
Important note : Argument types should be separately defined as input in the GraphQL Schema. You can use the Type keyword for inputs in GraphQL.
index.js
const mutationResolvers = require("./mutationResolvers");
const queryResolvers = require("./queryResolvers");
const { gql } = require("apollo-server-express");
const sectionTypeDefs = gql`
  input insertSectionInput {
    title: String!
    label: String!
    pos: Int!
  }
  input updateSectionPosInput {
    sectionId: String!
    pos: Int!
  }
  type Section {
    id: ID!
    title: String!
    label: String!
    pos: Int!
    description: String
    cards: [Card]
  }
  extend type Query {
    hello: String
    fetchSections: [Section]
  }
  extend type Mutation {
    insertSection(request: insertSectionInput): Section
    updateSectionPos(request: updateSectionPosInput): Section
  }
`;
const sectionResolvers = {
  Query: {
    ...queryResolvers,
  },
  Mutation: {
    ...mutationResolvers,
  },
};
module.exports = {
  sectionTypeDefs,
  sectionResolvers,
};
Model
Before writing the resolvers for Query and Mutatio, let’s create Mongoose model for Section:
const Mongoose = require("mongoose");
const sectionSchema = new Mongoose.Schema({
  title: {
    type: String,
    required: true,
  },
  label: {
    type: String,
    required: true,
  },
  description: String,
  pos: {
    type: Number,
    required: true,
  },
});


class Section {
  static getSections() {
    return this.find().sort("pos").exec();
  }
  static getSectionById(sectionId) {
    return this.findOne({
      _id: Mongoose.mongo.ObjectID(sectionId),
    }).exec();
  }
  static insertSection(sectionInfo) {
    const section = this(sectionInfo);
    return section.save();
  }
  static updatePos(sectionId, pos) {
    return this.findOneAndUpdate(
      {
        _id: Mongoose.mongo.ObjectID(sectionId),
      },
      {
        $set: {
          pos,
        },
      },
      {
        new: true,
      }
    ).exec();
  }
}
sectionSchema.loadClass(Section);
module.exports = Mongoose.model("Section", sectionSchema);
Once we create the model for the section, we can directly import it in our resolvers and use it there. However, that will create a dependency in our resolvers, so it’s always good to inject the dependencies into resolvers.
To do that, we have the GraphQL context. GraphQL context will be shared with all the resolvers in our application. So, we can pass the model in context.
Let’s do that:
const server = new ApolloServer({
      typeDefs,
      resolvers,
      context: () => ({
        card: cardModel,
        section: sectionModel
      }),
    });
Mutation
Let’s write mutation resolvers for the Section Entity. It contains two mutations. They are:
- Insert Section
- Update Section data
insertSection.js
module.exports = async (__, args, cxt) => {
  try {
    const sectionInfo = {
      title: args.request.title,
      label: args.request.label,
      pos: args.request.pos,
    };
    const section = await cxt.section.insertSection(sectionInfo);
    cxt.publisher.publish(cxt.SUBSCRIPTION_CONSTANTS.SECTION_ADDED, {
      sectionAdded: section,
    });
    return section;
  } catch (e) {
    console.log(e);
    return null;
  }
};
Here, we insert the data into Mongodb. An important thing to note here is that we don’t import anything directly into this resolver, which makes the testing process easier.
Query
Query is similar to Mutation in GraphQL, except for the fact that it doesn’t change the data in database.
Once we complete the Section Entity, let’s add it in our server.js file:
const express = require("express");
const { ApolloServer, gql } = require("apollo-server-express");
const merge = require("lodash/merge");
const mongoose = require("mongoose");
const { createServer } = require("http");
require("dotenv").config();
const { sectionResolvers, sectionTypeDefs } = require("./section");
const sectionModel = require("./section/model");
const typeDefs = gql`
  ${cardTypeDefs}
`;

const customResolvers = {
  Section: {
    cards(parent, args, cxt) {
      return cxt.card.getCardBySectionId(parent._id);
    },
  },
};
const resolvers = merge(
  sectionResolvers,
);
const MONGO_USER = process.env.MONGO_USER || "root";
const MONGO_PASS = process.env.MONGODB_PASS;
mongoose
  .connect(
    `mongodb://${MONGO_USER}:${MONGO_PASS}@ds131902.mlab.com:31902/trello-hooks-graphql-clone`,
    { useNewUrlParser: true, useUnifiedTopology: true }
  )
  .then(() => {
    console.log("mongodb connected successfully");
    const server = new ApolloServer({
      typeDefs,
      resolvers,
      context: () => ({
        section: sectionModel
      }),
    });
    const app = express();
    server.applyMiddleware({ app });
    const httpServer = createServer(app);
    server.installSubscriptionHandlers(httpServer);
    const PORT = process.env.PORT || 4444;
    httpServer.listen({ port: PORT }, () => {
      console.log(`Server is running in port ${PORT}`);
    });
  })
  .catch((err) => {
    console.log(err);
  });
Checkout the Complete Section Entity Here.
Card entity
The card feature is similar to Section.
Model
const Mongoose = require("mongoose");
const cardSchema = new Mongoose.Schema(
  {
    title: {
      type: String,
      required: true,
    },
    label: {
      type: String,
      required: true,
    },
    description: String,
    pos: {
      type: Number,
      required: true,
    },
    sectionId: {
      type: Mongoose.Schema.Types.ObjectId,
      ref: "Section",
    },
  },
  { timestamps: true }
);
class Card {
  static insertCard(cardInfo) {
    const card = this(cardInfo);
    return card.save();
  }
  static getCardBySectionId(sectionId) {
    return this.find({ sectionId }).sort("pos").exec();
  }
  static updatePos(cardId, pos, sectionId) {
    return this.findOneAndUpdate(
      {
        _id: Mongoose.mongo.ObjectID(cardId),
      },
      {
        $set: {
          pos,
          sectionId,
        },
      }
    ).exec();
  }
}
cardSchema.loadClass(Card);
module.exports = Mongoose.model("Card", cardSchema);
Other functionalities are similar to the Section Entity. You can check out the complete source code here.
Subscriptions
We came to another interesting topic in the GraphQL Server. Subscription handles the web socket connections in GraphQL.
Let’s implement web sockets for our GraphQL server using Subscriptions. Just like Query and Mutation, Subscriptions are a root type in GraphQL:
const { PubSub } = require("apollo-server");

const typeDefs = gql`
type Subscription {
    sectionAdded: Section
    cardAdded: Card
    onSectionPosChange: Section
    onCardPosChange: Card
  }
`

const SubscriptionsResolvers = {
  Subscription: {
    sectionAdded: {
      subscribe: () =>
        pubsub.asyncIterator([SUBSCRIPTION_CONSTANTS.SECTION_ADDED]),
    },
    cardAdded: {
      subscribe: () =>
        pubsub.asyncIterator([SUBSCRIPTION_CONSTANTS.CARD_ADDED]),
    },
    onSectionPosChange: {
      subscribe: () =>
        pubsub.asyncIterator([SUBSCRIPTION_CONSTANTS.ON_SECTION_POS_CHANGE]),
    },
    onCardPosChange: {
      subscribe: () =>
        pubsub.asyncIterator([SUBSCRIPTION_CONSTANTS.ON_CARD_POS_CHANGE]),
    },
  },
};

const resolvers = merge(
  cardResolvers,
  sectionResolvers,
  SubscriptionsResolvers
);
Once we define the subscription in the server.js, we need to call the pub sub in appropriate Mutations .
For example, in the insertSection.js file, we need to call the publisher to make the subscriptions work on our server.
cxt.publisher.publish(cxt.SUBSCRIPTION_CONSTANTS.CARD_ADDED, {
      cardAdded: card,
    });
Note: we inject the publisher dependency into the resolvers, just like we did in Models.
The complete Server code can be found here.
Frontend
Let’s start building the more fun and interesting part of our application.
npx create-react-app trello-clone
Dependencies
- @apollo/react-hooks – handles the GraphQL operations, such as query, mutation, and subscriptions using React Hooks.
- GraphQL – needed to run the GraphQL in client side.
- react-smooth-dnd– handles all the drag and drop happening in our React application.
- styled-components – we will be using styled components in our application.
npm install @apollo/react-hooks apollo-link apollo-link-http apollo-link-ws graphql graphql-tag react-smooth-dnd
Check out this article to learn how to set up GrapQL Hooks in a React application:
import React from "react";
import "./App.css";
import Board from "./components/Board/Board";
import { ApolloProvider } from "@apollo/react-hooks";
import { HttpLink } from "apollo-link-http";
import { split } from "apollo-link";
import { getMainDefinition } from "apollo-utilities";
import { InMemoryCache } from "apollo-cache-inmemory";
import ApolloClient from "apollo-client";
import { WebSocketLink } from "apollo-link-ws";
const httpLink = new HttpLink({
  uri: "http://localhost:4444/graphql",
});
const wsLink = new WebSocketLink({
  uri: "ws://localhost:4444/graphql",
  options: {
    reconnect: true,
  },
});
const link = split(
  ({ query }) => {
    const { kind, operation } = getMainDefinition(query);
    return kind === "OperationDefinition" && operation === "subscription";
  },
  wsLink,
  httpLink
);
const client = new ApolloClient({
  link,
  cache: new InMemoryCache(),
});
function App() {
  return (
  );
}
export default App;
Components in React
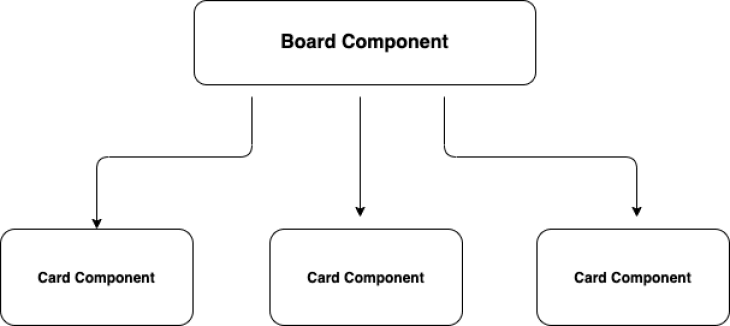
Let’s create the Board component:
import React, { useState, useEffect } from "react";
import CardContainer from "./Cards/CardsContainer";
import { IoIosAdd } from "react-icons/io";
import sortBy from "lodash/sortBy";
import {
  BoardContainer,
  CardHorizontalContainer,
  AddSectionDiv,
  AddSectionForm,
  AddSectionLink,
  AddSectionLinkSpan,
  AddSectionLinkIconSpan,
  AddSectionInput,
  ActiveAddSectionInput,
  SubmitCardButtonDiv,
  SubmitCardButton,
  SubmitCardIcon,
} from "./board.styles";
const Board = () => {
  const [isAddSectionInputActive, setAddSectionInputActive] = useState(false);
  const [addSectionInpuText, setAddSectionInputText] = useState("");
  const [boards, setBoards] = useState([]);

  const onAddSectionSubmit = () => {
    if (addSectionInpuText) {
      //Add Section Logic comes here
    }
  };
  return (
    <BoardContainer>
      //Card Container Logic Comes Here
      <AddSectionDiv onClick={() => setAddSectionInputActive(true)}>
        <AddSectionForm>
          {isAddSectionInputActive ? (
            <React.Fragment>
              <ActiveAddSectionInput
                onChange={(e) => setAddSectionInputText(e.target.value)}
              />
              <SubmitCardButtonDiv>
                <SubmitCardButton
                  type="button"
                  value="Add Card"
                  onClick={onAddSectionSubmit}
                />
                <SubmitCardIcon>
                  <IoIosAdd />
                </SubmitCardIcon>
              </SubmitCardButtonDiv>
            </React.Fragment>
          ) : (
            <React.Fragment>
              <AddSectionLink href="#">
                <AddSectionLinkSpan>
                  <IoIosAdd size={28} />
                  Add another list
                </AddSectionLinkSpan>
              </AddSectionLink>
              <AddSectionInput />
            </React.Fragment>
          )}
        </AddSectionForm>
      </AddSectionDiv>
    </BoardContainer>
  );
};
export default Board;
In the above code, the cards container functionality along with the Add Section button will trigger the mutation in GraphQL.
Once a section is added, subscription will return the data and add it to the Boards state that we defined in our component.
Let’s add the Mutation and initial fetch Query and import the React Hooks in the component:
import { useMutation, useSubscription, useQuery } from "@apollo/react-hooks";
import gql from "graphql-tag";
After that, define the Query, Mutation, and subscriptions:
const BOARD_QUERY = gql`
  query {
    fetchSections {
      id
      title
      label
      pos
      description
      cards {
        id
        title
        label
        description
        pos
      }
    }
  }
`;
const BOARD_SUBSCRIPTION = gql`
  subscription {
    sectionAdded {
      id
      title
      label
      description
      pos
      cards {
        id
        title
        label
        pos
        description
      }
    }
  }
`;
const ADD_SECTION = gql`
  mutation AddSection($title: String!, $label: String!, $pos: Int!) {
    insertSection(request: { title: $title, label: $label, pos: $pos }) {
      title
      description
      id
      label
    }
  }
`;
Once it is defined, let’s use the React Hooks for GraphQL operations.
const { loading, error, data } = useQuery(BOARD_QUERY);
useQuery returns the loading, error, and data values, which we can use to show the state.
Once we get the data, we set it in the state and render it in our component.
 useEffect(() => {
    if (data) {
      setBoards(data.fetchSections);
    }
  }, [data]);

//render
 {boards.length > 0 &&
    boards.map((item, index) => (
      <CardContainer item={item} key={index} boards={boards} />
  ))}
Now, let’s add the useMutation Hooks in our component:
  const [AddSection, { insertSection }] = useMutation(ADD_SECTION);

  //when use clicks the add Section button
const onAddSectionSubmit = () => {
    if (addSectionInpuText) {
      AddSection({
        variables: {
          title: addSectionInpuText,
          label: addSectionInpuText,
          pos:
            boards && boards.length > 0
              ? boards[boards.length - 1].pos + 16384
              : 16384,
        },
      });
    }
  };
Everything looks great. But, when we add the section, it will reflect only after the user refreshes the page. We can solve that by adding subscriptions to our application:
  const { data: { sectionAdded } = {} } = useSubscription(BOARD_SUBSCRIPTION);

//useEffect will be called whenever Subscriptions is called

useEffect(() => {
    if (sectionAdded) {
      setBoards(boards.concat(sectionAdded));
    }
  }, [sectionAdded]);
We have successfully added the API to our components. Let’s see how to integrate Drag and drop into our application.
Drag and drop
Firstly, import the required library into our component:
import { Container } from "react-smooth-dnd";
After that, wrap our component with a Dnd Container:
<Container
        orientation={"horizontal"}
        onDrop={onColumnDrop}
        onDragStart={() => {
          console.log("on drag start");
        }}
        getChildPayload={(index) => {
          return boards[index];
        }}
        dragHandleSelector=".column-drag-handle"
        dropPlaceholder={{
          animationDuration: 150,
          showOnTop: true,
          className: "cards-drop-preview",
        }}
      >
    //Our Component comes here
   </Container>
Checkout this repo to learn more about the functions and props.
Once we wrap our component, we need to bind a function to the onDrop props.
const onColumnDrop = ({ removedIndex, addedIndex, payload }) => {
    if (data) {
      let updatePOS = PosCalculation(
        removedIndex,
        addedIndex,
        data.fetchSections
      );
      let newBoards = boards.map((board) => {
        if (board.id === payload.id) {
          return { ...board, pos: updatePOS };
        } else {
          return board;
        }
      });
      let sortedBoards = sortBy(newBoards, [
        (board) => {
          return board.pos;
        },
      ]);
      setBoards([...sortedBoards]);

      //Graphql Mutation Comes Here
    }
  };
Here’s the interesting part: once we get the removedIndex, addedIndex, and payload, we calculate the updated position using a utility function. Let’s see how it works.
How Trello POS works

If it is moving from left to right, the logic would be:

Let’s write the functionality for POS calculation:
export default function (removedIndex, addedIndex, arr) {
  let pos;
  if (addedIndex === arr.length - 1) {
    pos = arr[arr.length - 1].pos + 16384;
  } else if (addedIndex === 0) {
    pos = arr[0].pos / 2;
  } else if (addedIndex < removedIndex) {
    let beforePOS = arr[addedIndex - 1].pos;
    let afterPOS = arr[addedIndex].pos;
    pos = (beforePOS + afterPOS) / 2;
  } else if (addedIndex > removedIndex) {
    let beforePOS = arr[addedIndex + 1].pos;
    let afterPOS = arr[addedIndex].pos;
    pos = (beforePOS + afterPOS) / 2;
  }
  return pos;
}
After that, we update the state with a new pos and call a GraphQL API to update our server.
Card component
Functionalities for card components and Drag and drop will be similar to what we have done in the board component. I’ll leave it up to you guys to take it as an exercise and show your progress in the comments below.
For reference though, check out this repo.
Conclusion
Like I said in the beginning of this article, cloning an application will be a good way to learn a technology/concept. Try to rebuild this on your own and let me know how it goes in the comments below.
Practicing can make you a better developer and problem solver.
Happy Coding!
Check out the complete Source code here.
Full visibility into production React apps
Debugging React applications can be difficult, especially when users experience issues that are difficult to reproduce. If you’re interested in monitoring and tracking Redux state, automatically surfacing JavaScript errors, and tracking slow network requests and component load time, try LogRocket.

LogRocket is like a DVR for web apps, recording literally everything that happens on your React app. Instead of guessing why problems happen, you can aggregate and report on what state your application was in when an issue occurred. LogRocket also monitors your app's performance, reporting with metrics like client CPU load, client memory usage, and more.
The LogRocket Redux middleware package adds an extra layer of visibility into your user sessions. LogRocket logs all actions and state from your Redux stores.
Modernize how you debug your React apps — start monitoring for free.
The post Building a Trello clone with React Hooks and GraphQL appeared first on LogRocket Blog.

Top comments (0)