
Written by Raphael Ugwu✏️
Vue’s flexible and lightweight nature makes it really awesome for developers who quickly want to scaffold small and medium scale applications.
However, Vue’s current API has certain limitations when it comes to maintaining growing applications. This is because the API organizes code by component options ( Vue’s got a lot of them) instead of logical concerns.
As more component options are added and the codebase gets larger, developers could find themselves interacting with components created by other team members, and that’s where things start to get really confusing, it then becomes an issue for teams to improve or change components.
Fortunately, Vue addressed this in its latest release by rolling out the Composition API. From what I understand, it’s a function-based API that is meant to facilitate the composition of components and their maintenance as they get larger. In this blog post, we’ll take a look at how the composition API improves the way we write code and how we can use it to build highly performant web apps.

Improving code maintainability and component reuse patterns
Vue 2 had two major drawbacks. The first was difficulty maintaining large components.
Let’s say we have a component called App.vue in an application whose job is to handle payment for a variety of products called from an API. Our initial steps would be to list the appropriate data and functions to handle our component:
// App.vue

<script >
import PayButton from "./components/PayButton.vue";

const productKey = "778899";
const API = `https://awesomeproductresources.com/?productkey=${productKey}`;  // not real ;)

export default {
    name: "app",
    components: {
        PayButton
    },
    mounted() {
          fetch(API)
            .then(response => {
                this.productResponse = response.data.listings;
            })
            .catch(error => {
                console.log(error);
            });
    },
    data: function() {
        return {
            discount: discount,
            productResponse: [],
            email: "ugwuraphael@gmail.com",
            custom: {
                title: "Retail Shop",
                logo: "We are an awesome store!"
            }
        };
    },
   computed: {
    paymentReference() {
              let text = "";
              let possible =
                "ABCDEFGHIJKLMNOPQRSTUVWXYZabcdefghijklmnopqrstuvwxyz0123456789";
              for (let i = 0; i < 10; i++)
                text += possible.charAt(Math.floor(Math.random() * possible.length));
              return text;
          }
        }
      };
</script>
All App.vue does is retrieve data from an API and pass it into the data property while handling an imported component payButton. It doesn’t seem like much and we’ve used at least three component options – component, computed and data and the mounted() lifecycle Hook.
In the future, we’ll probably want to add more features to this component. For example, some functionality that tells us if payment for a product was successful or not. To do that we’ll have to use the method component option.
Adding the method component option only makes the component get larger, more verbose, and less maintainable. Imagine that we had several components of an app written this way. It is definitely not the ideal kind of framework a developer would want to use.
Vue 3’s fix for this is a setup() method that enables us to use the composition syntax. Every piece of logic is defined as a composition function outside this method. Using the composition syntax, we would employ a separation of concerns approach and first isolate the logic that calls data from our API:
// productApi.js
<script>
import { reactive, watch } from '@vue/composition-api';

const productKey = "778899";

export const useProductApi = () => {
    const state = reactive({
        productResponse: [],
        email: "ugwuraphael@gmail.com",
        custom: {
            title: "Retail Shop",
            logo: "We are an awesome store!"
        }
    });

    watch(() => {
        const API = `https://awesomeproductresources.com/?productkey=${productKey}`;

        fetch(API)
            .then(response => response.json())
            .then(jsonResponse => {
                state.productResponse = jsonResponse.data.listings;
            })
            .catch(error => {
                console.log(error);
            });
    });

    return state;
};
</script>
Then when we need to call the API in App.vue, we’ll import useProductApi and define the rest of the component like this:
// App.vue

<script>
    import { useProductApi } from './ProductApi';
    import PayButton from "./components/PayButton.vue";

export default {
    name: 'app',
    components: {
        PayButton
    },

    setup() {
        const state = useProductApi();

        return {
            state
        }
    }
}

function paymentReference() {
    let text = "";
    let possible =
        "ABCDEFGHIJKLMNOPQRSTUVWXYZabcdefghijklmnopqrstuvwxyz0123456789";
    for (let i = 0; i < 10; i++)
        text += possible.charAt(Math.floor(Math.random() * possible.length));
    return text;
}
</script>
It’s important to note that this doesn’t mean our app will have fewer components, we’re still going to have the same number of components – just that they’ll use fewer component options and be a bit more organized.
Vue 2‘s second drawback was an inefficient component reuse pattern.
The way to reuse functionality or logic in a Vue component is to put it in a mixin or scoped slot. Let’s say we still have to feed our app certain data that would be reused, to do that let’s create a mixin and insert this data:
<script>
    const storeOwnerMixin = {
        data() {
            return {
                name: 'RC Ugwu',
                subscription: 'Premium'
            }
        }
    }

export default {
    mixins: [storeOwnerMixin]
}
</script>
This is great for small scale applications. But like the first drawback, the entire project begins to get larger and we need to create more mixins to handle other kinds of data. We could run into a couple of issues such as name conflicts and implicit property additions. The composition API aims to solve all of this by letting us define whatever function we need in a separate JavaScript file:
// storeOwner.js

export default function storeOwner(name, subscription) {
    var object = {
        name: name,
        subscription: subscription
    };
    return object;
}
and then import it wherever we need it to be used like this:
<script>
   import storeOwner from './storeOwner.js'
   export default {
     name: 'app',
     setup() {
         const storeOwnerData = storeOwner('RC Ugwu', 'Premium');

         return {
             storeOwnerData
         }
     }
 }
 </script>
Clearly, we can see the edge this has over mixins. Aside from using less code, it also lets you express yourself more in plain JavaScript and your codebase is much more flexible as functions can be reused more efficiently.
Vue Composition API compared to React Hooks
Though Vue’s Composition API and React Hooks are both sets of functions used to handle state and reuse logic in components – they work in different ways. Vue’s setup function runs only once while creating a component while React Hooks can run multiple times during render. Also for handling state, React provides just one Hook – useState:
import React, { useState } from "react";
const [name, setName] = useState("Mary");
const [subscription, setSubscription] = useState("Premium");
console.log(`Hi ${name}, you are currently on our ${subscription} plan.`);
The composition API is quite different, it provides two functions for handling state – ref and reactive . ref returns an object whose inner value can be accessed by its value property:
const name = ref('RC Ugwu');
const subscription = ref('Premium');
watch(() => {
    console.log(`Hi ${name}, you are currently on our ${subscription} plan.`);
});
reactive is a bit different, it takes an object as its input and returns a reactive proxy of it:
const state = reactive({
    name: 'RC Ugwu',
    subscription: 'Premium',
});
  watch(() => {
console.log(`Hi ${state.name}, you are currently on our ${state.subscription} plan.`);
});
Vue’s Composition API is similar to React Hooks in a lot of ways although the latter obviously has more popularity and support in the community for now, it will be interesting to see if composition functions can catch up with Hooks. You may want to check out this detailed post by Guillermo Peralta Scura to find out more about how they both compare to each other.
Building applications with the Composition API
To see how the composition API can further be used, let’s create an image gallery out of pure composition functions. For data, we’ll use Unsplash’s API. You will want to sign up and get an API key to follow along with this. Our first step is to create a project folder using Vue’s CLI:
# install Vue's CLI
npm install -g @vue/cli

# create a project folder
vue create vue-image-app

#navigate to the newly created project folder
cd vue-image-app

#install aios for the purpose of handling the API call
npm install axios

#run the app in a developement environment
npm run serve
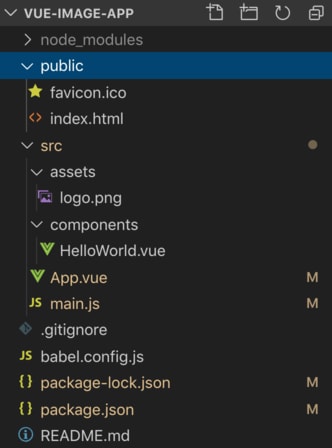
When our installation is complete, we should have a project folder similar to the one below:
Vue’s CLI still uses Vue 2, to use the composition API, we have to install it differently. In your terminal, navigate to your project folder’s directory and install Vue’s composition plugin:
npm install @vue/composition-api
After installation, we’ll import it in our main.js file:
import Vue from 'vue'
import App from './App.vue'
import VueCompositionApi from '@vue/composition-api';

Vue.use(VueCompositionApi);
Vue.config.productionTip = false
new Vue({
  render: h => h(App),
}).$mount('#app')
It’s important to note that for now, the composition API is just a different option for writing components and not an overhaul. We can still write our components using component options, mixins, and scoped slots just as we’ve always done.
Building our components
For this app, we’ll have three components:
-
App.vue: The parent component — it handles and collects data from both children components-Photo.vueandPhotoApi.js -
PhotoApi.js: A functional component created solely for handling the API call -
Photo.vue: The child component, it handles each photo retrieved from the API call
First, let’s get data from the Unsplash API. In your project’s src folder, create a folder functions and in it, create a PhotoApi.js file:
import { reactive } from "@vue/composition-api";
import axios from "axios";
export const usePhotoApi = () => {
  const state = reactive({
    info: null,
    loading: true,
    errored: false
  });
   const PHOTO_API_URL =
      "https://api.unsplash.com/photos/?client_id=d0ebc52e406b1ac89f78ab30e1f6112338d663ef349501d65fb2f380e4987e9e";
    axios
      .get(PHOTO_API_URL)
      .then(response => {
        state.info = response.data;
      })
      .catch(error => {
        console.log(error);
        state.errored = true;
      })
      .finally(() => (state.loading = false));
  return state;
};
In the code sample above, a new function was introduced from Vue’s composition API – reactive.
reactive is the long term replacement of Vue.observable() , it wraps an object and returns the directly accessible properties of that object.
Let’s go ahead and create the component that displays each photo. In your src/components folder, create a file and name it Photo.vue. In this file, input the code sample below:
<template>
  <div class="photo">
    <h2>{{ photo.user.name }}</h2>
    <div>
      <img width="200" :alt="altText" :src="photo.urls.regular" />
    </div>
    <p>{{ photo.user.bio }}</p>
  </div>
</template>
<script>
  import { computed } from '@vue/composition-api';
  export default {
    name: "Photo",
    props: ['photo'],
    setup({ photo }) {
      const altText = computed(() => `Hi, my name is ${photo.user.name}`);
      return { altText };
    }
  };
</script>
<style scoped>
p {
  color:#EDF2F4;
}
</style>
In the code sample above, the Photo component gets the photo of a user to be displayed and displays it alongside their bio. For our alt field, we use the setup() and computed functions to wrap and return the variable photo.user.name.
Finally, let’s create our App.vue component to handle both children components. In your project’s folder, navigate to App.vue and replace the code there with this:
<template>
  <div class="app">
    <div class="photos">
      <Photo v-for="photo in state.info" :photo="photo" :key="photo[0]" />
    </div>
  </div>
</template>
<script>
  import Photo from './components/Photo.vue';
  import { usePhotoApi } from './functions/photo-api';
  export default {
    name: 'app',
    components: { Photo },
    setup() {
      const state = usePhotoApi();
      return {
        state
      };
    }
  }
</script>
There, all App.vue does is use the Photo component to display each photo and set the state of the app to the state defined in PhotoApi.js.
Conclusion
It’s going to be interesting to see how the Composition API is received. One of its key advantages I’ve observed so far is its ability to separate concerns for each component – every component has just one function to carry out. This makes stuff very organized. Here are some of the functions we used in the article demo:
-
setup– this controls the logic of the component. It receivespropsand context as arguments -
ref– it returns a reactive variable and triggers the re-render of the template on change. Its value can be changed by altering thevalueproperty -
reactive– this returns a reactive object. It re-renders the template on reactive variable change. Unlikeref, its value can be changed without changing thevalueproperty
Have you found out other amazing ways to implement the Composition API? Do share them in the comments section below. You can check out the full implementation of the demo on CodeSandbox.
Editor's note: Seeing something wrong with this post? You can find the correct version here.
Plug: LogRocket, a DVR for web apps

LogRocket is a frontend logging tool that lets you replay problems as if they happened in your own browser. Instead of guessing why errors happen, or asking users for screenshots and log dumps, LogRocket lets you replay the session to quickly understand what went wrong. It works perfectly with any app, regardless of framework, and has plugins to log additional context from Redux, Vuex, and @ngrx/store.
In addition to logging Redux actions and state, LogRocket records console logs, JavaScript errors, stacktraces, network requests/responses with headers + bodies, browser metadata, and custom logs. It also instruments the DOM to record the HTML and CSS on the page, recreating pixel-perfect videos of even the most complex single-page apps.
Try it for free.
The post How to build applications with Vue’s composition API appeared first on LogRocket Blog.

Latest comments (0)