Written by Gbolahan Olagunju✏️
At some point when building an endpoint (GraphQL or REST API), you’ll want to restrict access to certain parts of your applications based on whether a user is authenticated or not.
You can do this with JSON Web Tokens (JWT) and Bcrypt. We’ll implement this on an Apollo Server that uses Prisma as the ORM of choice, but any other ORM will work.
In this article, we’ll be looking at one of the most efficient and scalable ways to perform user authentication and determine whether they are logged in or not.
There are several ways we can do this: via a cookie if you are strictly building for a web page, or by a header if you are targeting an API.
This article assumes you are familiar with the basics of performing queries and mutation in GraphQL, as well as with other concepts such as context and resolvers.
Here is a quick guide to quickly get you started Intro to GraphQL with Prisma.
Lets run the following code to quickly set up an Apollo server.
mkdir jwt-authentication
cd jwt-authentication

npm init --yes
The project directory now contains a package.json file.
npm install apollo-server graphql
touch index.js
To keep things simple and easy to follow, index.js contains just enough code to bootstrap the application.
Open the index.js in your favorite editor and paste in the following code:
const { ApolloServer, gql } = require('apollo-server');
const typeDefs = gql`
type User {
name: String!
email: String!
id: Int
}
type Query {
users: [User]
}
`;
const users = [{
name: 'Harry Potter',
email: 'harry@potter.com',
id: 23,},
{name: 'Jurassic Park',
email: 'michael@crichton.com',
id: 34 }];

const resolvers = {
Query: {
users: () => users,
 },
};

const server = new ApolloServer({ typeDefs, resolvers });

server.listen().then(({ url }) => {
console.log(`🚀  Server ready at ${url}`);
});
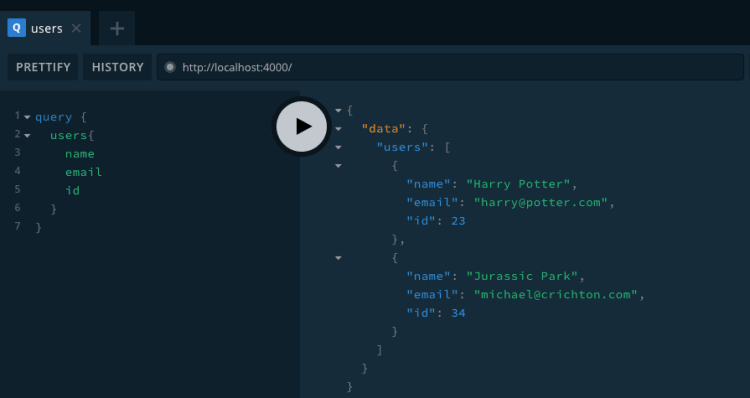
This is just to ensure that we have properly set up our application.
Next, we’ll set up our application to use Prisma as the ORM of choice.

To be successful, you will need to have Docker installed to run the next steps.
I will be using PostgreSQL as the database of choice configured on the Docker host.
Lets run the following command cd into the root of the project directory:
mkdir prisma-client
npm install -g prisma
npm install prisma-client-lib
prisma init
We will select the following options one after the other:
Create new database Set up a local database using Docker
Next, we’ll select the following:
PostgreSQL PostgreSQL database
We’ll also select:
Prisma JavaScript Client
At this point we can now run the following command to complete the set up:
docker-compose up -d && prisma deploy
After successfully running this command, we’ll have the necessary files to serve as our ORM, which is generated from the the datamodel.prisma file.
All that’s left for us to do now is import the Prisma instance into our application so that we can actually interact with an a real database rather than dummy data when we make mutations or queries.
We do this by requiring this file in our index.js:
const { prisma } = require('./prisma-client/generated/prisma-client')
Now that we are here we will have to do a little restructuring of our project.
We’ll delete our array of user objects appearing from line 12 to 18 above and create two files — schema.js and resolver.js — in our project root.
Here’s what our index.js file looks like now:
const { ApolloServer } = require('apollo-server');
const typeDefs = require('./schema.js');
const { prisma } = require('./prisma-client/generated/prisma-client')
const resolvers = require('./resolver');

const server = new ApolloServer({
  typeDefs,
  resolvers,
  context : () => ({
    prisma
  })
 });
server.listen().then(({ url }) => {
  console.log(`🚀  Server ready at ${url}`);
});
Our schema.js file now looks like this:
const { gql } = require('apollo-server');
const typeDefs = gql`
  type User {
    name: String!
    email: String!
    id: Int
  }
  type Query {
    users: [User]
  }
`;
module.exports = typeDefs;
Our resolvers.js file looks like this:
const resolvers = {
  Query: {
    users: async (root, args, { prisma }, info) => {
      try {
        return prisma.users();
      } catch (error) {
        throw error;
      }
    },
  },
};
module.exports = resolvers;
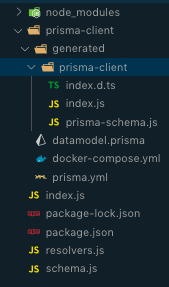
Here’s what the project structure looks like:
Now that we have setup out of the way, let’s get to the actual coding.
We need to install a few libraries to help us with this:
npm i bcrypt jsonwebtoken
npm i nodemon -D
Then we’ll open package.json and add this line to the JSON file in the scripts section:
"dev": "nodemon index.js"
This enables us to start our server by running the following:
npm run dev
It also listens and restarts the application even as we make changes to our files.
Now that we have our project set up, let’s make some changes to our datamodel.prisma file.
Here’s what it looks like now:
type User {
  id: ID! @id
  email: String! @unique
  name: String!
  password: String!
}
We’ll need to run the following command in our terminal to ensure that our prisma-schema.js stays updated:
prisma deploy
prisma generated
Now that our ORM files have been updated, we need to make some changes to our schema.js file to ensure that we’re able to perform some mutations, eg signupUser and loginUser.
Here’s what our updated schema.js looks like:
onst { gql } = require('apollo-server');
const typeDefs = gql`
  type User {
    name: String!
    email: String!
    password: String!
    id: Int
  }
type Mutation {
  signupUser(data: UserCreateInput!) : AuthPayLoad!
  loginUser(data: UserLoginInput!): AuthPayLoad!
}
input UserCreateInput {
  email: String!
  name: String!
  password: String!
}
input UserLoginInput {
  email: String!
  password: String!
}
type AuthPayLoad {
  token: String!
}
  type Query {
    users: [User]
  }
`;
module.exports = typeDefs;
The next thing for us to do is to actually implement the mutation functions in our resolvers so that we can actually sign a user up and log a user in:
const bcrypt = require('bcrypt');
const jwt = require('jsonwebtoken');

const resolvers = {
  .......,
  Mutation: {
    signupUser: async (root, args, { prisma }, info) => {
        const { data: { email, name, password } } = args;
        const newUser = await prisma.createUser({
          email,
          name,
          password: bcrypt.hashSync(password, 3)
        });
        return {token : jwt.sign(newUser, "supersecret")};
    },
    loginUser: async (root, args, { prisma }, info)  => {
      const { data: { email, password } } = args;
      const [ theUser ] = await prisma.users({
        where: {
          email
        }
      })
      if (!theUser) throw new Error('Unable to Login');
      const isMatch = bcrypt.compareSync(password, theUser.password);
      if (!isMatch) throw new Error('Unable to Login');
      return {token : jwt.sign(theUser, "supersecret")};
    }
  }
};
Below is the output from making mutations on those resolver functions:
Now that we have successfully created a token to store the identity of a user, we need to validate the identity of this user before granting the user access to certain protected resources on our database.
To do this effectively, we’ll have to modify the context function that we declared when bootstrapping our application, since we need to be able to pass the token that identifies a user from the client to the server.
We’ll do that by passing a request argument to our context function, thus making it available for use in our resolvers:
.....
context : req => ({
    prisma,
    req
  })
.....
Now let’s create a file called authenticate.js in the root of our application. This file will handle whether a user is logged in or not when accessing a protected route.
touch decodedToken.js
cd decodedToken.js
Inside decodedToken.js, we’ll simply verify the token of the user against our secret to determine their identity and log them in or respond with the appropriate message.
const jwt = require('jsonwebtoken');
const decodedToken = (req, requireAuth = true) => {
  const header =  req.req.headers.authorization;

  if (header){
    const token = header.replace('Bearer ', '');
    const decoded = jwt.verify(token, 'supersecret');
    return decoded;
  }
  if (requireAuth) {
    throw new Error('Login in to access resource');
  }
  return null
}
module.exports = { decodedToken }
For testing purposes, we’ll supply our login token via the HTTP HEADERS section in the graphQL playground at localhost 4000.
To perform a query operation that returns all users, you need to be authenticated. We’ll modify our resolvers.js file to reflect these changes.
Open resolvers.js and make the following changes:
....
const { decodedToken } = require('./decodedToken');

....
 Query: {
    users: async (root, args, { prisma, req }, info) => {
        const decoded = decodedToken(req);
        return prisma.users();
    },
  },
.....
We have successfully authenticated a user, but we need to make our decodedToken.js a little more versatile so we can use it for authorization.
Here is what our updated decodedToken.js looks like now:
const jwt = require('jsonwebtoken');
const decodedToken = (req, requireAuth = true) => {
  const header =  req.req.headers.authorization;

  if (header){
    const token = header.replace('Bearer ', '');
    const decoded = jwt.verify(token, 'supersecret');
    return decoded;
  }
  if (requireAuth) {
    throw new Error('Login in to access resource');
  }
  return null
}
module.exports = { decodedToken }
Here are the files hosted on github if you get stuck or need a reference to code along.
Conclusion
We have seen the details of authenticating a user to verify their identity.
Here’s a few things we didn’t cover:
- The access that such a user would have even after the identity has been verified — in other words, is the user an editor, a publisher, or a guest.
- Protecting the data via querying from relationships, among other things.
This article is simply an appetizer to get your feet wet with authentication using JWT on an Apollo server.
Editor's note: Seeing something wrong with this post? You can find the correct version here.
Plug: LogRocket, a DVR for web apps

LogRocket is a frontend logging tool that lets you replay problems as if they happened in your own browser. Instead of guessing why errors happen, or asking users for screenshots and log dumps, LogRocket lets you replay the session to quickly understand what went wrong. It works perfectly with any app, regardless of framework, and has plugins to log additional context from Redux, Vuex, and @ngrx/store.
In addition to logging Redux actions and state, LogRocket records console logs, JavaScript errors, stacktraces, network requests/responses with headers + bodies, browser metadata, and custom logs. It also instruments the DOM to record the HTML and CSS on the page, recreating pixel-perfect videos of even the most complex single-page apps.
Try it for free.
The post JWT authentication with Apollo Server 2: tips and tricks appeared first on LogRocket Blog.


Top comments (1)