Written by Abdulazeez Abdulazeez Adeshina✏️
Suspense isn’t exactly a new feature in the React ecosystem. However, if you don’t know what Suspense is all about or you’re just starting out with React, you should have a look here.
In a bid to make writing React components easier and with less code, Hooks were introduced to manage states in functional apps — that’s also not a new feature. Despite these improvements to React, one major functionality is still missing: caching.
In this article, we’ll look at using the react-query library alongside Suspense by building a simple recipe app that fetches recipe data from an API and renders it to the DOM.
What is useQuery?
React-query’s useQuery(query, fn) is a Hook that fetches data based on the query passed into it and then stores the data in its parent variable. A query, in this case, consists of a unique key and an asynchronous function that is acted upon. The unique key passed into the query is used for internal operations such as fetching data, caching, and refetching data linked to the query.
The Hook library can be installed via npm or Yarn:
yarn add react-query

// or

npm i -s react-query
Now, say you want to test react-query’s Hook by fetching some data from a particular source. The Hook is stored in a variable query (the default style):
const query = useQuery("demo", fetchQueries)

// fetchQueries()

async function fetchQueries() {
  return (await fetch(`http://some-url.com/endpoint`))
}
When used, the query variable is stored with information returned from the asynchronous function fetchQueries.
useQuery()’s features
If you need to fetch data from a source — an API, for example — you usually need to create a request in the useEffect() Hook, in componentDidMount, or in another function, and this request is run every time your app reloads. This is quite stressful, and this is where react-query comes into play.
Fetching data
The basic feature of useQuery() is fetching data. We’ll see from a simple demo how the data fetching aspect works.
First, you define the component and store the result from our useQuery into three destructurable variables:
function Recipes() {
   const { data, isLoading, error } = useQuery('recipes', fetchRecipes)

  return (
      <div>

      </div>
  )
}
The three variables to be destructed will contain the returned information as named:
- The
datavariable holds the data returned from thefetchRecipesfunction - The
isLoadingis a Boolean variable that holds the running status of the Hook - The
errorvariable holds whatever error is sent back from the Hook
Next, the received information is displayed by adding this block of code into the <div> body:
function Recipes() {

  ...
  <div>
    { isLoading ? (
      <b> Loading .. </b>
    ) : error ? (
      <b>There's an error: {error.message}</b>
    ) : data ? (
      <ul>
        {data.map(recipe => (
          <li key={recipe.id}>{recipe.title}</li>
        ))}
      </ul>
    ) : null }
  </div>
  ...
}
The block of code above conditionally renders data from useQuery() using the ternary operator. If you’re a seasoned React developer, this shouldn’t be new to you. But if you’re a beginner, then you should have basic knowledge of conditional rendering in JavaScript as well as React.
The ternary operator is a shorthand method to the native
if-else.
So the code above:
- Checks the loading status of the query from the Boolean variable
isLoading - Displays a loading message if the variable reads true. Otherwise, display an error if there’s an error message in the error object
- If there is no error message, displays the data if it isn’t empty (or has been created by the query)
- Otherwise, returns a default
nullobject, leaving the page blank if none of the above conditions are met
The idea of leaving the page blank isn’t ideal, but we’ll see how we can return relevant messages when there isn’t any data loaded.
Prefetching
Prefetching is one of the most interesting features in react-query. It works the same way as fetching data in that it is loaded from inception from either your useEffect() or componentDidMount() method.
In this case, data is loaded and stored in cache so your app doesn’t have to send a new request to retrieve data each time a user needs it.
Caching
Caching simply means storing data for a period of time. Caching is a superb feature from react-query and allows your app to retrieve data from memory once it’s cached without having to re-query. You can learn more about the caching feature here.
Building the app
We’ll be building a simple recipe app that fetches and render data from an API using react-query’s useQuery() Hook. I’ll assume you are familiar with React Hooks — otherwise, check here. All the code for this article can be found in this GitHub repo, as well.
Let’s get started!

Setup
The first step in building our app is to set up a working directory by installing our required dependencies and creating the required files. To set up the working directory from your terminal in your preferred root directory, run the following commands:
mkdir react-query-app && cd react-query-app
mkdir api public src src/components
cd public && touch index.html style.css
cd ../src && touch index.jsx queries.jsx
cd components && touch Button.jsx Spinner.jsx Recipe.jsx Recipes.jsx
cd ../../api && touch app.js
Next, we install the required dependencies:
npm install react react-dom react-query react-scripts
We didn’t use create-react-app to set up our app because it’s a little demo, and we don’t want unnecessary excess files.
Next thing is to add a start section to our package.json script section to run and render our app:
...

"start" : "react-scripts start"
Since we didn’t use CRA to bootstrap our app, we have to create an index.html file in the public folder:
<!DOCTYPE html>
<html>
<head>
  <link rel="stylesheet" type="text/csS" href="style.css" />
  <link href="https://fonts.googleapis.com/css?family=Sedgwick+Ave&display=swap" rel="stylesheet">
  <link href="https://fonts.googleapis.com/css?family=Arvo|Copse&display=swap" rel="stylesheet">
</head>
<body>
  <div id="root">
  </div>
</body>
</html>
Next, we’ll style our app:
body {
  background-color: #f0ebeb;
  font-family: 'Sedgwick Ave', cursive;
  font-size: 16px;
}
h1 {
  font-size: 40px;
  font-weight: lighter;
}
h2 {
  font-size: 20px;
}
button {
  background-color: #c8d2ddf3;
  border-radius: 12px;
  border: 5px 10px;
  font-family: 'Arvo', serif;
}
p {
  font-size: 18px;
  font-family: 'Copse', serif;
}
API
Let’s start our app by building the backend API where we’ll fetch data. We’ll start by installing the dependencies:
npm init -y // initialize the repo first
npm i express cors body-parser
Now we’ll write the backend code in the app.js file we created earlier.
app.js
This is the where the app’s backend code will be written. In this file, a simple route and static JSON data is filled into an array where, upon using the GET method, it returns data from the static JSON. The code contained in app.js is:
// import necessary dependencies

const express = require("express");
const bodyParser = require("body-parser");
const cors = require('cors')

// initialize express.js
const app = express();

app.use(bodyParser.json());
app.use(cors())

// hardcoded recipes

const recipes = [
  {
    id: 1,
    title: "Jollof Rice Recipe",
    content: "How to make jollof rice ..."
  },
  {
    id: 2,
    title: "Bacon and Sauced Eggs",
    content: "How to make bacon and sauced eggs"
  },
  {
    id: 3,
    title: "Pancake recipes",
    content: "how to make pancakes..."
  },
  {
    id: 4,
    title: "Fish peppersoup recipe",
    content: "how to make it..."
  },
  {
    id: 5,
    title: "Efo Riro",
    content: "how to make it..."
  },
  {
    id: 6,
    title: "Garden Egg soup",
    content: "how to make it..."
  }
];

// return all recipes
app.get("/", (req, res) => {
  res.send(recipes);
});

// return a single recipe by ID
app.get("/:id", (req, res) => {
  const recipe = recipes.filter(
    recipe => recipe.id === parseInt(req.params.id)
  );
  if (recipe.length === 0) return res.status(404).send();
  if (recipe.length > 1) return res.status(500).send();
  res.send(recipe[0]);
});

app.listen(8081, () => {
  console.log("App's running on port 8081");
});
The backend code, as stated earlier, contains a hardcoded recipes array and simple routes. The backend simply receives requests, parses them to JSON with the aid of body-parser, and returns the data in JSON format. The backend API receives only two requests:
-
"/": When a request is directed to this, the backend returns all data in the recipes array -
"/:id": When a request is directed to this with:idreplaced with an integer, it returns a recipe whose ID corresponds with it
Interestingly, that is all the backend code since we said we’ll be building a simple recipe app. Let’s move on to building the frontend part of our app, where we will get to see how react-query works with Suspense.
Components
So, we have successfully built the backend part of our app, from which data will be retrieved. Now we have to build the frontend part of our app, where data will be displayed or rendered.
index.jsx
This is the file that mounts our React app and renders our data.
import React, { lazy } from "react";
import ReactDOM from "react-dom";

const rootElement = document.getElementById("root");
ReactDOM.render(<App />, rootElement)
This is a basic render file. Next, we import react-query and the recipe components since we’ll be writing the main app component, <App />, in the index.jsx file:
import { ReactQueryConfigProvider } from "react-query";

const Recipes = lazy(() => import("./components/Recipes"));
const Recipe = lazy(() => import("./components/Recipe"));

const queryConfig = {
  suspense: true
};
We imported react-query’s configuration context provider and also created a queryConfig object that indicates that we are going to use Suspense in our app alongside react-query. Next, we’ll write our App component:
function App() {
  const [activeRecipe, setActiveRecipe] = React.useState(null);

  return (
  <React.Fragment>
    <h2>Fast Recipes</h2>
    <hr />
    <ReactQueryConfigProvider config={queryConfig}>
        <React.Suspense fallback={<h1> Loading ...</h1>}>
          {  activeRecipe ? (
              <Recipe
                activeRecipe={activeRecipe}
                setActiveRecipe={setActiveRecipe}
              />
            ) : (
              <Recipes setActiveRecipe={setActiveRecipe} />
            )}
        </React.Suspense>
    </ReactQueryConfigProvider>
  </React.Fragment>
  );
}
In our app component, we initialized a state named activeRecipe and the state handler setActiveRecipe, and then created a title for our app and grouped children tags under React.Fragment.
Next, we loaded react-query’s configuration provider component and passed the config object queryConfig that tells react-query we will be using Suspense.
Next, we wrap the conditional rendering under React.Suspense. If activeRecipe is set to true, it displays the recipe; otherwise, it displays the list of recipes.
We also added a fallback prop to React.Suspense. This is a required prop that renders the passed data whenever there isn’t any data to be rendered or if there’s a delay in fetching data.
Without the addition of Suspense, react-query renders a blank page when it is in the process of querying and rendering data. This isn’t ideal, as such situations don’t give users any indication of what the app is doing at that instance.
Next, we write the queries react-query will deal with in queries.jsx.
queries.jsx
export async function fetchRecipes() {
  return (await fetch(`http://localhost:8081`)).json();
}

export async function fetchRecipe({ id }) {
  return (await fetch(
    `http://localhost:8081/${id}`
  )).json();
}
The fetchRecipes() function returns the list of all recipes when queried, and fetchRecipe returns only a recipe.
Next, we’ll write the component that renders a single recipe.
Recipe.jsx
import React from "react";
import { useQuery } from "react-query";

import Button from "./Button";

import { fetchRecipe } from "../queries";
First, we import React and useQuery from its library to give us access to its features. We also import secondary components that handle little things, as we will see later on.
Next, we write the component after the import statements:
export default function Recipe({ activeRecipe, setActiveRecipe }) {
  const { data, isFetching } = useQuery(
    ["recipe", { id: activeRecipe }],
    fetchRecipe
  );

  return (
    <React.Fragment>
      <Button onClick={() => setActiveRecipe(null)}>Back</Button>
      <h1>
        ID: {activeRecipe} {isFetching ? "Loading Recipe" : null}
      </h1>
      {data ? (
        <div>
          <p>Title: {data.title}</p>
          <p>Content: {data.content}</p>
        </div>
      ) : null}
      <br />
      <br />
    </React.Fragment>
  );
}
The Recipe component takes two props, activeRecipe and setActiveRecipe, which will be used by the useQuery Hook to query and render data.
The useQuery Hook took two arguments: (["recipe", { id: activeRecipe }], fetchRecipe).
The first argument is an array that consists of a query name and a unique identifier, which, in this case, is the { id: activeRecipe }.
The unique identifier is used by the app when querying data through the second argument, fetchRecipe. The Hook is saved into a destructurable object:
-
data, which will contain the information returned by the second argument,fetchRecipe -
isFetching, which is a Boolean that tells us the loading state of the app
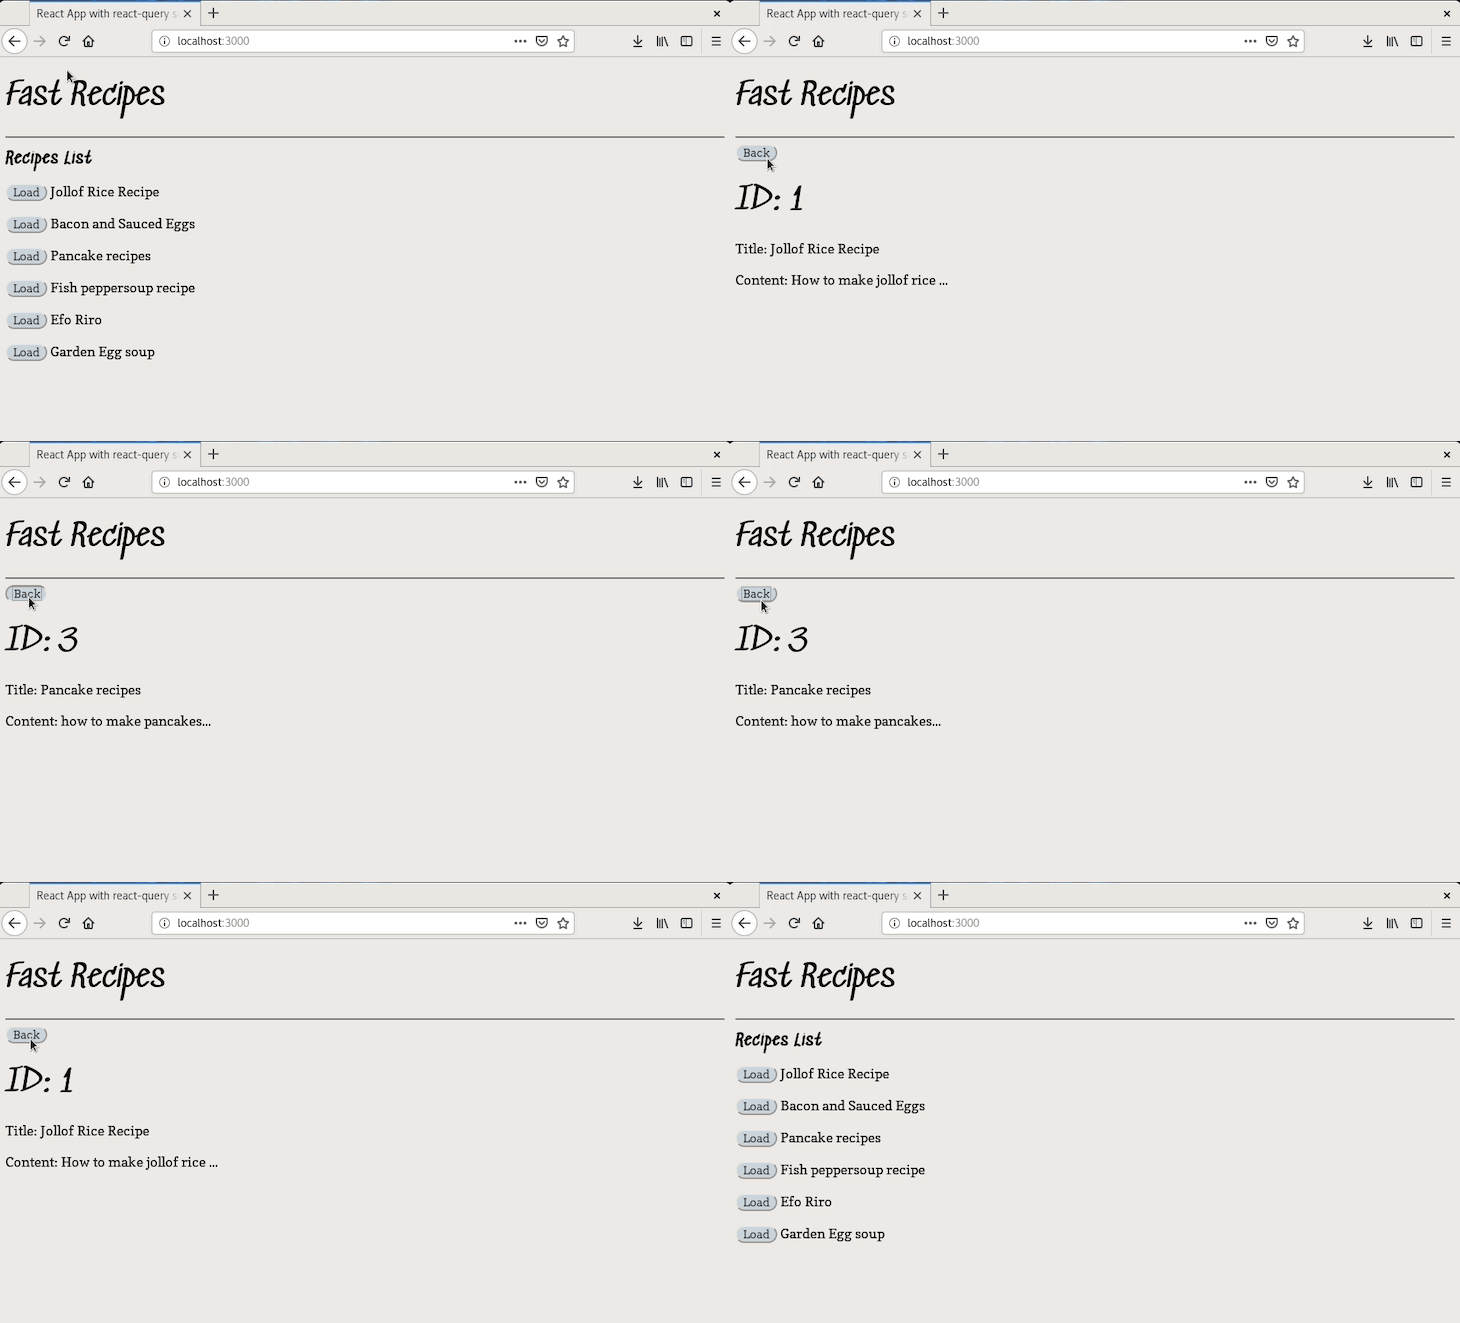
The component renders the recipe data once there’s data returned from the useQuery Hook as shown on lines 13–18; otherwise, it renders nothing. The data is in turn cached, and if the user goes back and clicks on the same recipe, a new request won’t be sent. Instead, the recipe is displayed immediately, and about twice as fast as when a request is sent.
There is also a Button component that allows the user to navigate easily within the app. Next thing we’ll do is build the Recipes component.
Recipes.jsx
The Recipes component is responsible for the rendering of the list of recipes queried from fetchRecipes using useQuery(). The code responsible for that is:
import React from "react";
import { useQuery, prefetchQuery } from "react-query";

import Button from "./Button";

import { fetchRecipes, fetchRecipe } from "../queries";

export default function Recipes({ setActiveRecipe }) {
  const { data, isFetching } = useQuery("Recipes", fetchRecipes);

  return (
    <div>
      <h1>Recipes List
      { isFetching
        ? "Loading"
        : null
      }
        </h1>
      {data.map(Recipe => (
        <p key={Recipe.title}>
          <Button
            onClick={() => {
              // Prefetch the Recipe query
              prefetchQuery(["Recipe", { id: Recipe.id }], fetchRecipe);
              setActiveRecipe(Recipe.id);
            }}
          >
            Load
          </Button>{" "}
          {Recipe.title}
        </p>
      ))}
    </div>
  );
}
In the component, we started off by importing React and react-query to enable us to use the useQuery Hook.
A loading message is displayed when the data is being fetched. The useQuery() Hook is used to retrieve the list of recipes from the backend.
Traditionally, this would have been done in the useEffect() Hook like this:
const [data, setData] = useState([])

useEffect(() => {
  fetch('https://api-url/recipes')
      .then(response => response.json())
      .then(data => {
        setData(data); // save recipes in state
      });
}, [])
Behind the scenes, this is the process carried out by react-query.
Next, the data retrieved from react-query is cached, mapped out from its array, and then rendered on the DOM.
The code for the helper component Button follows below.
Button.jsx
import React from "react";

export default function Button({ children, timeoutMs = 3000, onClick }) {

  const handleClick = e => {
      onClick(e);
  };

  return (
    <>
      <button onClick={handleClick}>
        {children}
      </button>
    </>
  );
}
Running our app
Next thing is to preview the app we’ve been building. We’ll start by running the app first without the backend to verify that a blank page will be displayed when no data is returned. From your terminal, start the React app:
npm run start
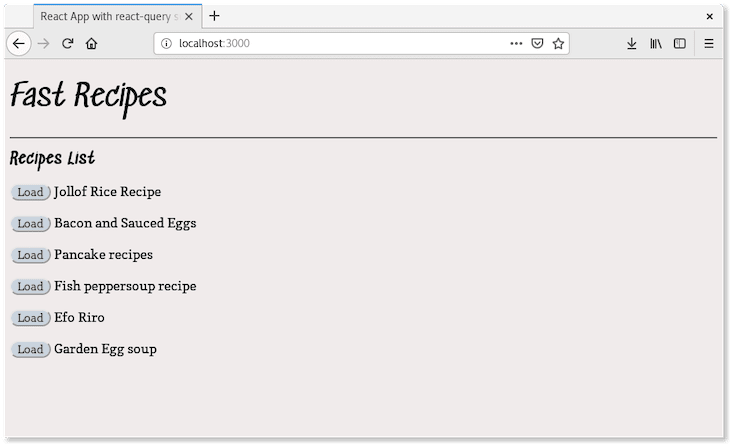
Next, open your web browser and navigate to http://localhost:3000, and you should get a page like this:
We get a blank page after the timeout (~1000ms) since the app has nothing to render to the DOM.
Next, we start our backend app by running the command below from the api folder:
npm run start

// or

node app.js
Once our backend app starts running, we get a notification from the terminal, and then we refresh the browser at localhost to render our recipes:
Suspense is said to inform the user of the app’s status when fetching or loading data from a source. In this case, react-query fetches data, and Suspense keeps us updated with the app status as instructed in the App component.
However, we haven’t seen the real effect of Suspense since the app loads fast. Setting the browser’s connection to 3G and refreshing the browser renders Loading… for a long time.
This is because the app is still awaiting data from the backend (i.e., the fetch status is pending), and therefore, Suspense displays the fallback message to avoid rendering a blank page. The page renders the recipes once the data is fetched.
We have successfully implemented Suspense in our react-query app.
Also, when a recipe is being loaded, the Suspense fallback message is displayed when there’s a delay in data fetching. The fetched recipe data is stored in cache and is immediately displayed again if the same recipe is loaded again.

Conclusion
In this article, we’ve taken a look at what Suspense and react-query are all about, plus the various features of react-query’s useQuery Hook by building a simple recipe app.
Lastly, you can find the code for the app built in this article here. Happy coding ❤.
Full visibility into production React apps
Debugging React applications can be difficult, especially when users experience issues that are difficult to reproduce. If you’re interested in monitoring and tracking Redux state, automatically surfacing JavaScript errors, and tracking slow network requests and component load time, try LogRocket.
LogRocket is like a DVR for web apps, recording literally everything that happens on your React app. Instead of guessing why problems happen, you can aggregate and report on what state your application was in when an issue occurred. LogRocket also monitors your app's performance, reporting with metrics like client CPU load, client memory usage, and more.
The LogRocket Redux middleware package adds an extra layer of visibility into your user sessions. LogRocket logs all actions and state from your Redux stores.
Modernize how you debug your React apps — start monitoring for free.
The post Using Suspense with react-query appeared first on LogRocket Blog.


Top comments (0)