As Kubernetes becomes the key target environment across many organizations, it automatically becomes an essential topic for developers.
However, Kubernetes was created for operations and, unless you spend a considerable amount of time learning and specializing yourself, it is still challenging to use. Developers should rather focus on delivering applications instead, and a developer or application-focused platform is needed to enable that.
This quick tutorial will teach you how to set up a developer-focused pipeline you can use to deploy and manage your applications on Kubernetes without dealing with the underlying infrastructure-related complexities.
For this tutorial, you will need:
A GitHub repository (you can fork this example repo)
A Shipa Cloud account (you can sign up for free here)
A Kubernetes cluster (You can see the list of supported cluster providers here)
The Components
GitHub Actions
GitHub Actions is an event-driven automation platform that allows you to run a series of commands after a specified event has occurred. For example, when a commit is made to your staging branch, you want to build, test, and deploy the changes to your staging environment. With Actions, you can automate tasks within your development lifecycle, all within GitHub.
Shipa
Shipa is an application platform that enables developers to deploy and manage cloud-native applications. It has a free tier. Developers from small to large enterprises use Shipa today to manage their cloud-native application lifecycle and is quickly becoming the application platform of choice for Kubernetes.
Kubernetes
Kubernetes is an open-source container-orchestration system for automating computer application deployment, scaling, and management. It was originally designed by Google and is now maintained by the Cloud Native Computing Foundation.
Connecting Shipa to your cluster
We will use Shipa as our application platform. You can create a free account on Shipa here.
Once you sign up, you can connect Shipa to your Kubernetes cluster. Shipa uses a policy framework to connect to different clusters.
These policies can be as detailed as we want and cover topics such as ingress, networking, container registry control, and more. For our example, we will keep it to a minimum.
Creating a Policy Framework
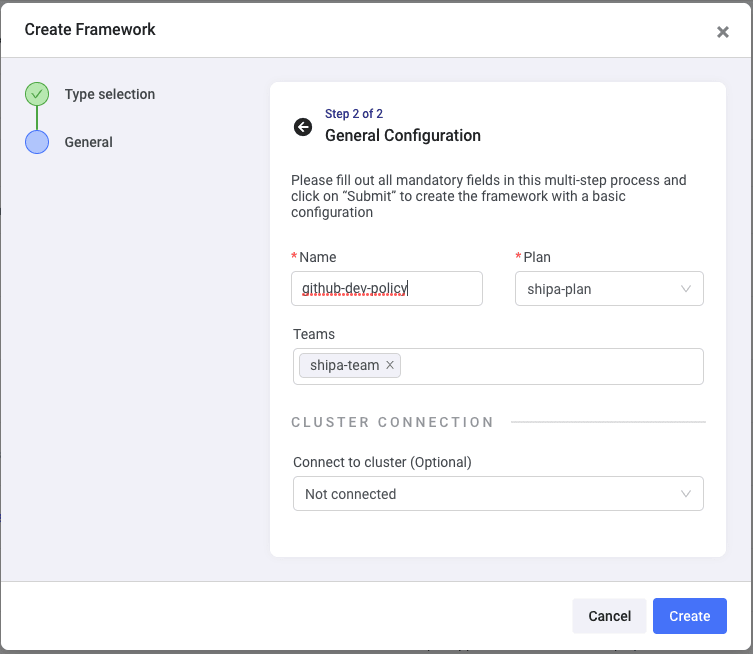
Once you log into your Shipa Cloud dashboard, go to Frameworks and click on “Create Framework”. This will open up a modal where you can create your first policy:
Keep the selection on “Basic” and click on Next.
Here, just enter the name you want to give this policy framework. For Plan, you can select the pre-created “shipa-plan” option.
You can also select the pre-created and available Team “shipa-team”. Click on Create
Connecting the policy framework to your cluster
Now, click on Clusters, and then “Add Cluster”. This will open up a new modal.
Here, you just need to enter the cluster name and select the framework you created in the previous step:
Clicking on “Next” will prompt you to enter your cluster information, so Shipa can connect to it and bind the policy to your cluster.
For Shipa to connect to your cluster, you will need to enter:
The Cluster IP
A service account token. You should use one created specifically for Shipa
The CA Certificate Shipa should use to connect to your cluster
You can get the information above by following the documentation available here.
Another (quicker) option is to copy and run this script
The script above will create the required service account and display both the token and the CA certificate you can copy and paste into the modal.
You don’t need to enter any information on step 3 of the “Add Cluster” modal. Shipa will automatically install and configure an ingress controller in your cluster for you.
Click on “Create”
The cluster connection process will take approximately 60 seconds to complete. Once complete, you will see your cluster available on the Shipa dashboard.
GitHub Actions
Configuring Secrets
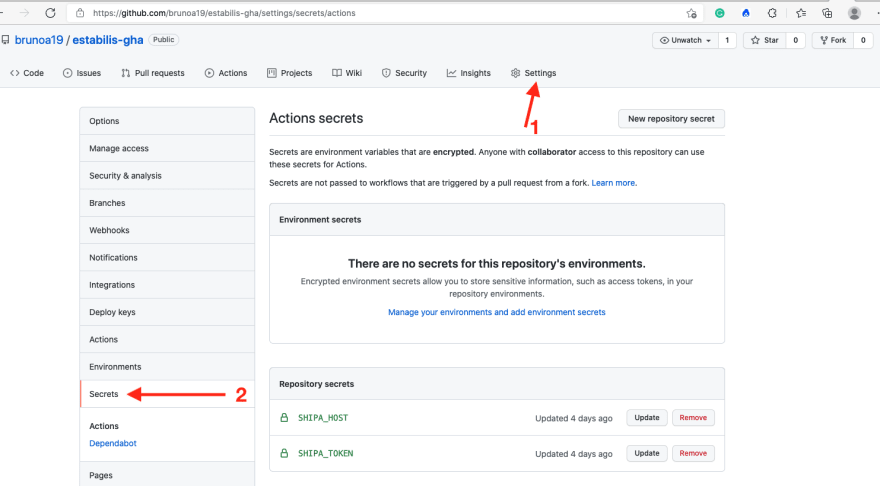
For GitHub Actions to leverage Shipa to deploy your applications to Kubernetes, you will need to enter 2 GitHub Secrets. To create a secret, just click on the “Settings” menu in your GitHub repository and then “Secrets” on the left menu.
You will need to create 2 secrets:
SHIPA_HOST
SHIPA_TOKEN
For SHIPA_HOST, you can enter: https://target.shipa.cloud:8081
For SHIPA_TOKEN, you need to use the Shipa CLI to find your token. You can install the Shipa CLI by running the following command:
curl -s https://storage.googleapis.com/shipa-client/install-cloud-cli.sh | bash
With the Shipa CLI installed, you should add your Shipa target and log in. You can do it by using the following commands:
Adding target:
shipa target add cloud-production target.shipa.cloud -s
Logging in:
shipa login
Display token:
shipa token show
Defining the Application
With your GitHub Secrets defined, we can then define a sample application to test the deployment.
If you forked the sample repository, you can see the following sample application definition.
app:
  name: app1
  teamowner: shipa-team
  framework: estabilis-dev

app-env:
  app: app1
  envs:
    - name: CR_ENV1
      value: test-1
    - name: CR_ENV3
      value: test-3
  norestart: true
  private: false

network-policy:
  app: app1
  ingress:
    policy_mode: allow-all
  egress:
    policy_mode: allow-all
  restart_app: false

app-deploy:
  app: app1
  image: ghcr.io/stefanprodan/podinfo:6.0.3
  port: 9898
The code above will:
Deploy an application named app1
Assign it to shipa-team as the owner of the application
Use the policy framework to enforce controls. Make sure you change this field to reflect the policy framework you created on the steps before. Otherwise, your deployment will fail.
Will create a couple of sample environment variables
A sample network policy will be created
A sample application called Podinfo will be deployed and exposed on port 9898
As you can see from the code above, this does not require you to deal with infrastructure deployment definitions on Kubernetes, ingress controller configuration, and more. This is, rather, a very application-level definition.
Creating the Action
Once the application definition is in your repository, you can create an Action.
Click on “Actions” then on “set up a workflow yourself”
Shipa has a published GitHub Action that you can leverage to deploy your application. You can copy the file below into your Action definition:
on: [ push ]

jobs:
  deploy_dev:
    runs-on: ubuntu-latest
    name: Deploy Dev Applications
    steps:
      - name: Checkout
        uses: actions/checkout@v2
      - name: Deploy Dev Application
        uses: shipa-corp/shipa-gh-action@0.0.1
        env:
          SHIPA_TOKEN: ${{ secrets.SHIPA_TOKEN }}
          SHIPA_HOST: ${{ secrets.SHIPA_HOST }}
        with:
          shipa-action: './dev-app/dev-app.yml'

  deploy_prod:
    runs-on: ubuntu-latest
    name: Deploy Production Apps
    steps:
      - name: Checkout
        uses: actions/checkout@v2
      - name: Deploy Prod Application
        uses: shipa-corp/shipa-gh-action@0.0.1
        env:
          SHIPA_TOKEN: ${{ secrets.SHIPA_TOKEN }}
          SHIPA_HOST: ${{ secrets.SHIPA_HOST }}
        with:
          shipa-action: './prod-app/prod-app1.yml'
This definition will:
Check out the application definition
Connect to your Shipa Cloud account using the Host and Token secrets defined before
Deploy your application
Once you save the file, GitHub will start the action and perform the deployment.
Application Dashboard
One of the common issues developers face when deploying on Kubernetes is understanding and managing their applications. Since applications on Kubernetes are a group of independent object definitions in the cluster unless you spend a considerable amount of time learning about each object and how to support it, it becomes complex to manage applications post-deployment,. and as a result, you start depending on the DevOps team to help you support your applications.
Shipa will also help you here.
Once the deployment is complete, head back to your Shipa dashboard and click on “Applications”.
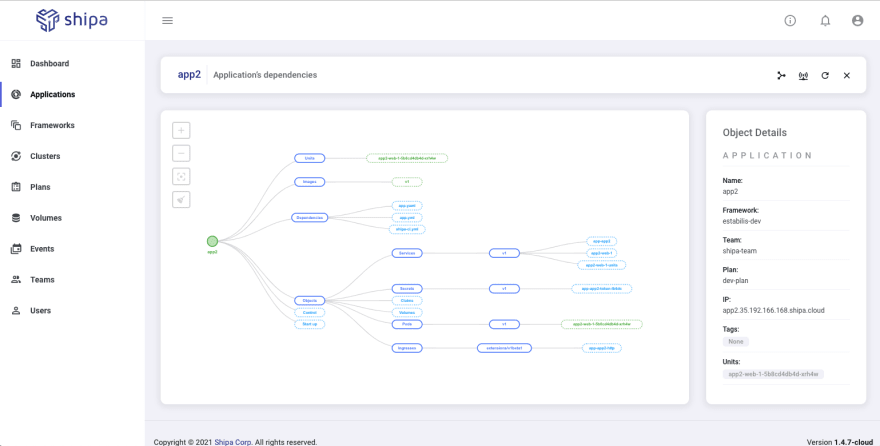
Here you will see your application listed and, if you click on it, you will see all details your need to understand and support your application, including the endpoint you can use to access your application:
Shipa will also give you a detailed view of your application dependency map and network policy. You can see both by clicking on the “Application Map” icon
Conclusion
In just a few steps, you have set up an application-focused pipeline. This will allow you and your team to quickly adopt Kubernetes without spending time dealing with the underlying infrastructure complexities.
Not only that, but you have set up a free pipeline. Who doesn’t like a developer-friendly free pipeline? :)


Top comments (0)