tldr;
By combining custom errors, named functions and Bugfender, you can create a robust error-handling process that allows you to immediately identify the defects of your JavaScript apps.
Why do we need to handle errors in JavaScript?
Unhandled JavaScript errors will stop the execution of your script, leaving the application in an undesired state – or, even worse, in an unknown state. So you need a robust error-handling process to avoid unknown errors in your apps.
But, why are errors thrown anyway? No one wants their application to end up in a broken state. Wouldn’t it be easy if JavaScript errors were just not thrown at all?
What causes unhandled exception errors?
The JavaScript Runtime environment throws errors to let the developers know that something went wrong. Common examples of errors are:
- Syntax Error when invalid source code is written.
- Type Error when an argument is not of an expected type.
- Internal Error when the JavaScript engine can’t continue with the execution (for example “too much recursion” error).
In general, you should think about thrown errors as an opportunity to fix whatever is causing them, and to improve your product.
From the developer perspective, it is even good practice to deliberately throw errors when some conditions for the correct functioning of the application do not match.
function div(x, y) {
    if (y <= 0) {
        throw "0 is not allowed";
    }

    return x / y;
}

console.log(div(2, 3));
console.log(div(3, 0));
Error handling
As said, it is good practice to throw errors as often as needed. However, these errors need to be caught and controlled before they arrive to the user. That’s why we need to have a good error handling strategy.
Handling errors allows the developer to take control of the flow after something bad has happened, and it redirects the app flow to a new stable state. This new state could consist of silently redirecting the user to another acceptable state without them even noticing, informing the user that an error has occurred, safely logging the error for further debugging… or all of those things together.
Where are JavaScript errors logged?
Errors are typically logged in the console. If the application is a website, you can visualize all the logs by opening the browser’s console within the inspection tool.
If it is a node.js environment, you can see the logs in the terminal.
Specifically for websites, this is only useful during development, because you cannot see the browser console on your user’s computer. But you can monitor errors that occur in the final users’ environment, using an external logging tool like Bugfender.
Using a try/catch block to capture errors in JavaScript. Exception handling.
As is the case with many other languages, you can enclose dangerous JavaScript code inside a try/catch/finally block. When an error is thrown, your program execution falls back to the catch block. Here, in the catch statement, is where you can take action on any runtime error that has been thrown and take corrective action if needed.
The finally block is an optional block that you can add and it will be executed regardless of whether the try block ended up in error or not.
Notice that unlike other programming languages, JavaScript does not allow for errors to be catched by error type. Instead, you should use a conditional catch block.
try {
  myroutine(); // may throw three types of exceptions
} catch (e) {
  if (e instanceof TypeError) {
    // statements to handle TypeError exceptions
  } else if (e instanceof RangeError) {
    // statements to handle RangeError exceptions
  } else if (e instanceof EvalError) {
    // statements to handle EvalError exceptions
  } else {
    // statements to handle any unspecified exceptions
    logMyErrors(e); // pass exception object to error handler
  }
}

// Source : https://developer.mozilla.org/en-US/docs/Web/JavaScript/Reference/Statements/try...catch
Throwing custom exceptions
JavaScript provides a method to generate user-defined exceptions. To generate a custom JavaScript exception you can use the throw statement. In fact it’s common practice to use this statement and include numbers or strings as an identifier or as status code.
function getRectArea(width, height) {
    if (isNaN(width) || isNaN(height)) {
        throw 'Parameter is not a number!';
    }
}
When it comes to application-specific errors, a more effective alternative is to extend the generic class and create a custom exception. With a custom error object, you can create your own error code and error message. Here you have a very basic example of how to create a custom error:
function MyError(message) {
  const error = new Error(message);
  return error;
}

MyError.prototype = Object.create(Error.prototype);

throw MyError("this is my error");
A custom exception and error object is handy for:
-
Application-specific errors: errors that have meaning only in the context of your application. For example a
ProductNotFoundErrormessage in a marketplace. The application-specific errors help you to quickly catch your app defects. -
Extending generic classes and providing detailed information: for example using custom properties. A custom
HttpNotFoundErrormight include a custom field that helps you to find the reason for this error. In this specific case, it may be useful to store the URL that wasn’t found and the date for further debugging. - Overall, better clarity. Creating custom exceptions consists of somehow identifying and classifying the errors that your app can have. It will help you gain a better understanding of your weak points and speed up the development of your software.
In the next code example, you can see a more advanced creation of custom errors:
class MyNotFoundError extends Error {
    constructor(message = '', url = '', ...params) {
    super(...params)

    this.name = 'MyNotFoundError'
    // Custom error data
    this.message = message;
    this.url = url;
    this.date = new Date()
  }
}

try {
  throw new MyNotFoundError('Page not found', 'http://mynotfoundurl.com');
} catch (e)
{
  console.log(e.name);
  console.log(e.message);
  console.log(e.url);
  console.log(e.date);
}
As you can see in the previous example, by creating a custom error object and adding a proper error handler, we can get all the information related to the error and print our own error message to the console, so we can fix it easily when it happens later. This is especially useful if your application has a log collector tool like Bugfender, so you can see all your user errors in a single place.
Understanding the Stack Trace
The stack trace is the path in the code that the JavaScript runtime has executed up to and until a specific point. That point can be an error, a breakpoint or a console.trace command.
Note: if you are not familiar with the concept of breakpoint, you can read a quick explanation in the post we wrote about breakpoints. It’s for Android and iOS but it will help you to get the basic concepts.
But before going into a stack trace, let’s try to remember the difference between named and anonymous functions.
Anonymous functions VS named functions
An anonymous function is pretty much what you might think: a function without a name.
var x = function (a, b) {return a * b};
They have a few benefits, like accessing a wider scope and inline declaration. This adds clarity to your code when, for example, you are implementing a callback in the exact place that will be called.
On the other hand, a named function looks like this:
function myFunction(a, b) {
  return a * b;
}
And the main benefit is that myFunction name can be logged and captured by the stack trace.
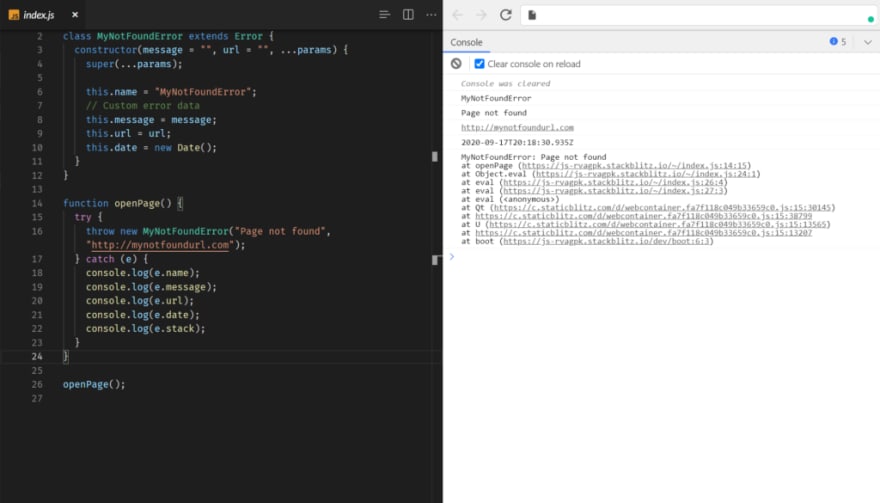
With the previous example of throwing a custom error, you can see what a stack trace in JavaScript looks like:
As you can see, if you use named functions it js very easy to follow the execution of your code until you reach an error.
Using a JavaScript Error Monitoring Tool
If you build your app using named functions and throwing custom errors you will only need one last step to maintain robust control of your app: capture and localize those errors when they happen.
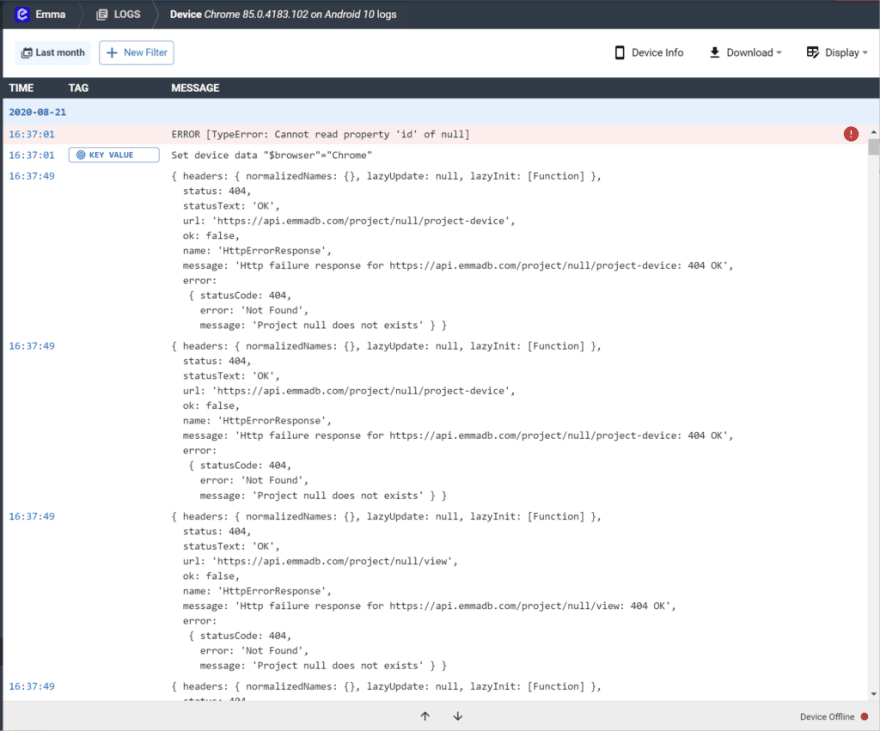
Bugfender is the tool that will help you with that. If you integrate Bugfender into your app you can log anything you might need to identify exactly what happened later. And you will also get all the information on any unhandled JavaScript errors.
Once you receive a user report, head to the Bugfender console and find exactly what happened, as well as the context of the error.
If you don’t have a Bugfender account yet, you can follow our post with thedifferent ways to use Bugfender in a web app or just get a free account right here.
In summary, use a bit of extra time during your development to combine custom errors with named functions and log that to Bugfender. You will be able to build a robust app that you can easily debug and fix.
Remember, less time looking for errors means more time to build new features.
Happy debugging!


Top comments (0)