Learn how to use Azure RBAC to connect to Cosmos DB and increase the security of your application by using Azure Managed Identities.
A few months ago, the Azure Cosmos DB team released a new feature that enables developers to use Azure principals (AAD users, service principals etc.) and Azure RBAC to connect to the database service. The feature significantly increases the security and can completely replace the use of connection strings and keys in your application – things you normally should rotate every now and then to minimize the risk of exposed credentials. Furthermore, you can apply fine-grained authorization rules to those principals at account-, database- and container-level and control what each “user” is able to do.
To completely get rid of passwords and keys in your service, Microsoft encourages developers to use “Managed Identities”. Managed identities provide an identity to applications and services to be used when connection to Azure resources that support AAD authentication. There are two kinds of managed identities:
- System-assigned identity : created automatically by Azure at the service level (e.g. Azure AppService) and tied to the lifecycle of it. Only that specific Azure resource can then use the identity to request a token and it will be automatically removed when the service is deleted
- User-assigned identity : created independently of an Azure service as a standalone resource in your subscription. The identity can be assigned to more than one resource and is not tied to the lifecycle of a particular Azure resource
When a managed identity is added, Azure also creates a dedicated certificate that is used to request a token at the token provider of Azure Active Directory. When you finally want to get access to an AAD-enabled service like Cosmos DB or Azure KeyVault, you simply call the local metadata endpoint (of the underlying service/Azure VM – http://169.254.169.254/metadata/identity/oauth2/token) to request a token which is then used to authenticate against the service – no need to use a password as the certificate of the assigned managed identity is being used for authentication. BTW, the certificate is automatically rotated for you before it expires, so you don’t need to worry about it at all. This is one big advantage of using managed identities over service principals where you would need to deal with expiring passwords for yourself.
Sample
If you want to follow along with the tutorial, clone the sample repository from my personal GitHub account: https://github.com/cdennig/cosmos-managed-identity
To see managed identities and the Cosmos DB RBAC feature in action, we’ll first create a user-assigned identity, a database and add and assign a custom Cosmos DB role to that identity.
We will use a combination of Azure Bicep and the Azure CLI. So first, let’s create a resource group and the managed identity:
$ az group create -n rg-cosmosrbac -l westeurope
{
  "id": "/subscriptions/xxxxxxxx-xxxx-xxxx-xxxx-xxxxxxxxxxxx/resourceGroups/rg-cosmosrbac",
  "location": "westeurope",
  "managedBy": null,
  "name": "rg-cosmosrbac",
  "properties": {
    "provisioningState": "Succeeded"
  },
  "tags": null,
  "type": "Microsoft.Resources/resourceGroups"
}

$ az identity create --name umid-cosmosid --resource-group rg-cosmosrbac --location westeurope
{
  "clientId": "c9e48f4e-24c7-46af-834e-96cd48c2ce27",
  [...]
  [...]
  [...]
  "id": "/subscriptions/xxxxxxxx-xxxx-xxxx-xxxx-xxxxxxxxxxxx/resourcegroups/rg-cosmosrbac/providers/Microsoft.ManagedIdentity/userAssignedIdentities/umid-cosmosid",
  "location": "westeurope",
  "name": "umid-cosmosid",
  "principalId": "63cf3af1-7ee2-4d4c-9fe6-deb936065faa",
  "resourceGroup": "rg-cosmosrbac",
  "tags": {},
  "tenantId": "xxxxxxxx-xxxx-xxxx-xxxx-xxxxxxxxxxxx",
  "type": "Microsoft.ManagedIdentity/userAssignedIdentities"
}
After that, let’s see how we create the Cosmos DB account, database and the container for the data. To create these resources, we’ll use an Azure Bicep template. Let’s have a look at the different parts of it.
var location = resourceGroup().location
var dbName = 'rbacsample'
var containerName = 'data'

// Cosmos DB Account
resource cosmosDbAccount 'Microsoft.DocumentDB/databaseAccounts@2021-06-15' = {
  name: 'cosmos-${uniqueString(resourceGroup().id)}'
  location: location
  kind: 'GlobalDocumentDB'
  properties: {
    consistencyPolicy: {
      defaultConsistencyLevel: 'Session'
    }
    locations: [
      {
        locationName: location
        failoverPriority: 0
      }
    ]
    capabilities: [
      {
        name: 'EnableServerless'
      }
    ]
    disableLocalAuth: false
    databaseAccountOfferType: 'Standard'
    enableAutomaticFailover: true
    publicNetworkAccess: 'Enabled'
  }
}

// Cosmos DB database
resource cosmosDbDatabase 'Microsoft.DocumentDB/databaseAccounts/sqlDatabases@2021-06-15' = {
  name: '${cosmosDbAccount.name}/${dbName}'
  location: location
  properties: {
    resource: {
      id: dbName
    }
  }
}

// Container
resource containerData 'Microsoft.DocumentDB/databaseAccounts/sqlDatabases/containers@2021-06-15' = {
  name: '${cosmosDbDatabase.name}/${containerName}'
  location: location
  properties: {
    resource: {
      id: containerName
      partitionKey: {
        paths: [
          '/partitionKey'
        ]
        kind: 'Hash'
      }
    }
  }
}
The template for these resources is straightforward: we create a (serverless) Cosmos DB account with a database called rbacsample and a data container. Nothing special here.
Next, the template adds a Cosmos DB role definition. Therefore, we need to inject the principal ID of the previously created managed identity to the template.
@description('Principal ID of the managed identity')
param principalId string

var roleDefId = guid('sql-role-definition-', principalId, cosmosDbAccount.id)
var roleDefName = 'Custom Read/Write role'

resource roleDefinition 'Microsoft.DocumentDB/databaseAccounts/sqlRoleDefinitions@2021-06-15' = {
  name: '${cosmosDbAccount.name}/${roleDefId}'
  properties: {
    roleName: roleDefName
    type: 'CustomRole'
    assignableScopes: [
      cosmosDbAccount.id
    ]
    permissions: [
      {
        dataActions: [
          'Microsoft.DocumentDB/databaseAccounts/readMetadata'
          'Microsoft.DocumentDB/databaseAccounts/sqlDatabases/containers/items/*'
        ]
      }
    ]
  }
}
You can see in the template, that you can scope the role definition (property assignableScopes), meaning at which level the role may be assigned. In this sample, it is scoped to the account level. But you can also choose “database” or “container” level (more information on that in the official documentation).
In terms of permissions/actions, Cosmos DB offers fine-grained options that you can use when defining your custom role. You can even make use of wildcards, which we leverage in the current sample. Let’s have a look at a few of the predefined actions:
-
Microsoft.DocumentDB/databaseAccounts/readMetadata: read account metadata -
Microsoft.DocumentDB/databaseAccounts/sqlDatabases/containers/items/create: create items -
Microsoft.DocumentDB/databaseAccounts/sqlDatabases/containers/items/read: read items -
Microsoft.DocumentDB/databaseAccounts/sqlDatabases/containers/items/delete: delete items -
Microsoft.DocumentDB/databaseAccounts/sqlDatabases/containers/readChangeFeed: read the change feed
If you want to get more information on the permission model and available actions, the documentation goes into more detail. For now, let’s move on in our sample by assigning the custom role:
var roleAssignId = guid(roleDefId, principalId, cosmosDbAccount.id)

resource roleAssignment 'Microsoft.DocumentDB/databaseAccounts/sqlRoleAssignments@2021-06-15' = {
  name: '${cosmosDbAccount.name}/${roleAssignId}'
  properties: {
    roleDefinitionId: roleDefinition.id
    principalId: principalId
    scope: cosmosDbAccount.id
  }
}
Finally, we’ll deploy the whole template (you can find the template in the root folder of the git repository):
$ MI_PRINID=$(az identity show -n umid-cosmosid -g rg-cosmosrbac --query "principalId" -o tsv)

$ az deployment group create -f deploy.bicep -g rg-cosmosrbac --parameters principalId=$MI_PRINID -o none
After the template has been successfully deployed, let’s create a sample application that uses the managed identity to access the Cosmos DB database.
Application
Let’s create a basic application that uses the managed identity to access Cosmos DB and create one document in the datacontainer for demo purposes. Fortunately, when using the Cosmos DB SDK , things couldn’t be easier for you as a developer. You simply need to use an instance of the DefaultAzureCredential class from the Azure.Identity package (API reference) and all the “heavy-lifting” like preparing and issuing the request to the local metadata endpoint and using the resulting token is done automatically for you. Let’s have a look at the relevant parts of the application:
var credential = new DefaultAzureCredential();

var cosmosClient = new CosmosClient(_configuration["Cosmos:Uri"], credential);
var container = cosmosClient.GetContainer(_configuration["Cosmos:Db"], _configuration["Cosmos:Container"]);

var newId = Guid.NewGuid().ToString();
await container.CreateItemAsync(new {id = newId, partitionKey = newId, name = "Ted Lasso"},
    new PartitionKey(newId), cancellationToken: stoppingToken);
Use the application in Azure
So far, we have everything prepared to use a managed identity to connect to Azure Cosmos DB: we created a user-assigned identity, a Cosmos DB database and a custom role tied to that identity. We also have a basic application that connects to the database via Azure RBAC and creates one document in the container. Let’s now create a service that hosts and runs the application.
Sure, we could use an Azure AppService or an Azure Function, but let’s exaggerate a little bit here and create an Azure Kubernetes Service cluster with the Pod Identity plugin enabled. This plugin lets you assign predefined managed identities to pods in your cluster and transparently use the local token endpoint of the underlying Azure VM (be aware that at the time of writing, this plugin is still in preview).
If you haven’t used the feature yet, you first must register it in your subscription and download the Azure CLI extension for AKS preview features:
$ az feature register --name EnablePodIdentityPreview --namespace Microsoft.ContainerService

$ az extension add --name aks-preview
The feature registration takes some time. You can check the status via the following command. The registration state should be “Registered” before continuing:
$ az feature show --name EnablePodIdentityPreview --namespace Microsoft.ContainerService -o table
Now, create the Kubernetes cluster. To keep things simple and cheap, let’s just add one node to the cluster:
$ az aks create -g rg-cosmosrbac -n cosmosrbac --enable-pod-identity --network-plugin azure -c 1 --generate-ssh-keys

# after the cluster has been created, download the credentials
$ az aks get-credentials -g rg-cosmosrbac -n cosmosrbac
Now, to use the managed identity and bind it to the cluster VM(s), we need to assign a special role to our managed identity called Virtual Machine Contributor.
$ MI_APPID=$(az identity show -n umid-cosmosid -g rg-cosmosrbac --query "clientId" -o tsv)
$ NODE_GROUP=$(az aks show -g rg-cosmosrbac -n cosmosrbac --query nodeResourceGroup -o tsv)
$ NODES_RESOURCE_ID=$(az group show -n $NODE_GROUP -o tsv --query "id")

# assign the role
$ az role assignment create --role "Virtual Machine Contributor" --assignee "$MI_APPID" --scope $NODES_RESOURCE_ID
Finally, we are able to create a Pod Identity and assign our managed identity to it:
$ MI_ID=$(az identity show -n umid-cosmosid -g rg-cosmosrbac --query "id" -o tsv)

$ az aks pod-identity add --resource-group rg-cosmosrbac --cluster-name cosmosrbac --namespace default --name "cosmos-pod-identity" --identity-resource-id $MI_ID
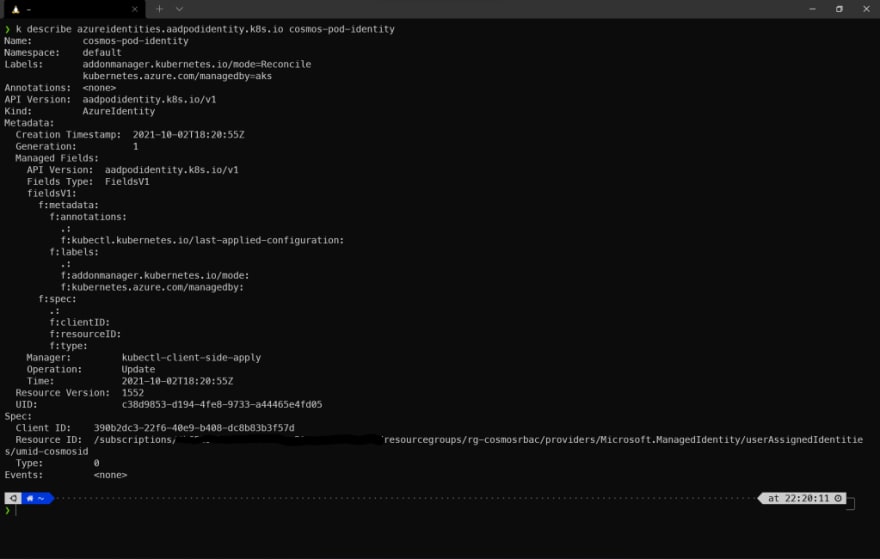
Let’s look at our cluster and see what has been created:
$ kubectl get azureidentities.aadpodidentity.k8s.io
NAME                AGE
cosmos-pod-identity 2m34s
We now have the pod identity available in the cluster and are ready to deploy the sample application. If you want to create the Docker image on your own, you can use the Dockerfile located in the CosmosDemoRbac\CosmosDemoRbac folder of the repository. For your convenience, there’s already a pre-built / pre-published image on Docker Hub. We can now create the pod manifest:
# contents of pod.yaml
apiVersion: v1
kind: Pod
metadata:
  name: demo
  labels:
    aadpodidbinding: "cosmos-pod-identity"
spec:
  containers:
  - name: demo
    image: chrisdennig/cosmos-mi:1.1
    env:
      - name: Cosmos__Uri
        value: "https://cosmos-2varraanuegcs.documents.azure.com:443/"
      - name: Cosmos__Db
        value: "rbacsample"
      - name: Cosmos__Container
        value: "data"
  nodeSelector:
    kubernetes.io/os: linux
The most important part here is line 7 (aadpodidbinding: "cosmos-pod-identity") where we bind the previously created pod identity to our pod. This will enable the application container within the pod to call the local metadata endpoint on the cluster VM to request an access token that is finally used to authenticate against Cosmos DB. Let’s deploy it (you’ll find pod.yaml file in the root folder).
$ kubectl apply -f pod.yaml
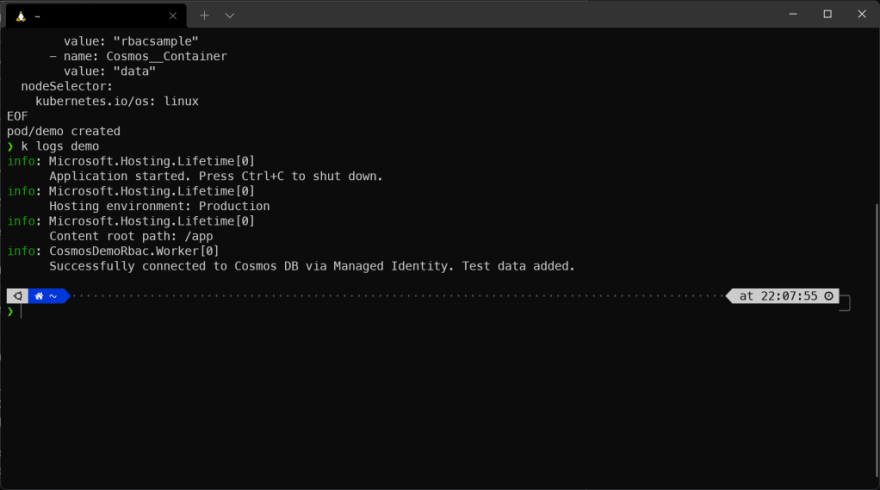
When the pod starts, the container will log some information to stdout, indicating whether the connection to Cosmos DB was successful. So, let’s query the logs:
$ kubectl logs demo
You should see an output like that:
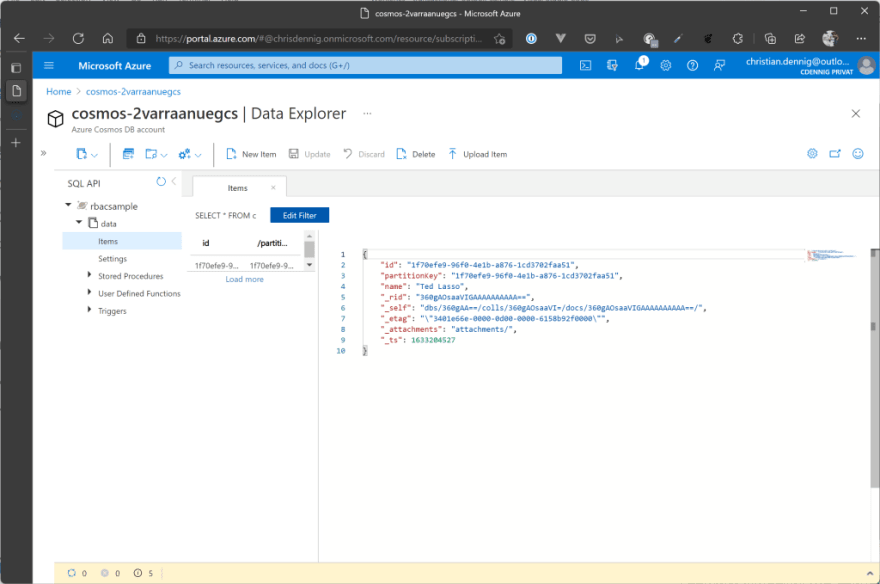
Seems like everything works as expected. Open your database in the Azure Portal and have a look at the data container. You should see one entry:
Bonus: No more Primary Keys!
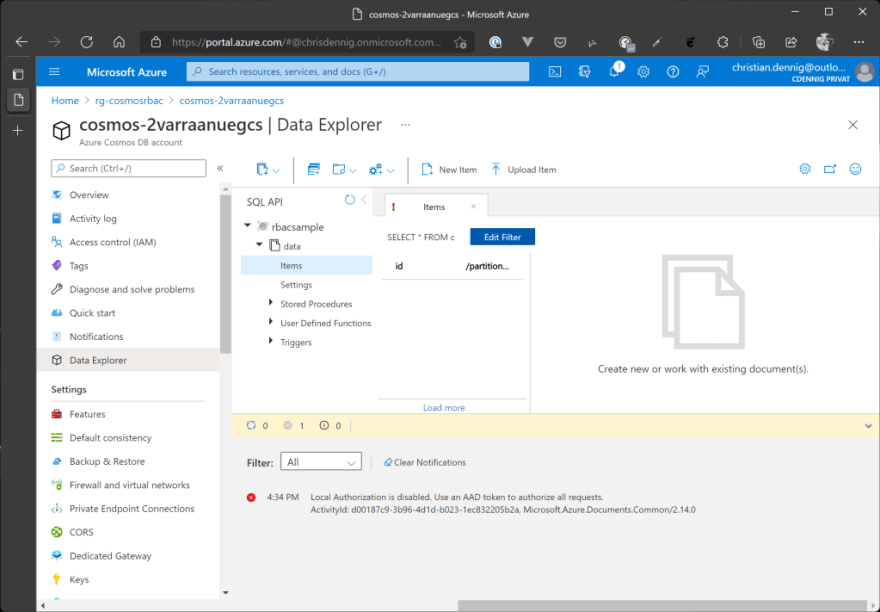
So far, we can connect to Cosmos DB via a user-assigned Azure Managed Identity. To increase the security of such a scenario even more, you can now disable the use of connection strings and Cosmos DB account keys at all – preventing anyone from using this kind of information to access your account.
To do this, open the deploy.bicep file and set the parameter disableLocalAuth on line 31 to true (we do this now, because it – of course – also disables the access to the database via the Portal). Now, reapply the template and try to open the Data Explorer in the Azure Portal again. You’ll see that you can’t access your data anymore, because the portal uses the Cosmos DB connection strings / account keys under the hood.
Summary
Getting rid of passwords (or connection string / keys) while accessing Azure services and instead making use of Managed Identities is a fantastic way to increase the security of your workloads running in Azure. This sample demonstrated how to use this approach in combination with Cosmos DB and Azure Kubernetes Service (Pod Identity feature). It is – of course – not limited to these resources. You can use this technique with other Azure services like Azure KeyVault, Azure Storage Accounts, Azure SQL DBs etc. Microsoft even encourages you to apply this approach to eliminate the probably most used attack vector in cloud computing: exposed passwords (e.g. via misconfiguration, leaked credentials in code repositories etc.).
I hope this tutorial could show you, how easy it is to apply this approach and inspire you to use it in your next project. Happy hacking, friends! 🖖
No more connection strings or primary keys! Increase security when accessing @AzureCosmosDB by using #AAD Managed Identities.
cosmosdb #aks #k8s #kubernetes #podidentity @Azure
You can find the source code on my private GitHub account: https://github.com/cdennig/cosmos-managed-identity
Header image source: https://unsplash.com/@markuswinkler


Latest comments (0)