The two most popular platforms for distributing and promoting apps are Google Play and the Apple App Store. These two platforms are critical in the app development process since they allow developers to build mobile apps and test them on actual devices.
Your applications should be created according to the specific specifications of each of these Stores to avoid any difficulties and probable rejections. A Google Developer Account is required to publish your SCADE app on the Google Play Store. The registration fee is $25, and it's a one-off payment. You must also register as an Apple Developer to create and publish your SCADE app on the App Store. Apple charges $99 a year to give out this account, and its continuous usability requires a renewal.
So you have finished developing your SCADE app and are ready to share it with the world – kudos! This tutorial is aimed at using an eReader app to show you how to release mobile apps to App Store and Google Play built with SCADE — the Swift cross-platform native development platform (www.scade.io).
Getting Started
Note: This tutorial is divided into two categories - the first guide will show you how to build and release your app to the AppStore while the second one will put you through how to achieve the same feat with PlayStore.
i. Build and Release a SCADE App on Apple App Store
Sideloading apps into iOS devices is not possible, unlike with Android. Before you can deploy your app to users and testers, you must first go through App Store Connect on the Apple Developer portal.
However, you must first create a certificate, provision profile, and AppID for your SCADE app, which has yet to be published. How do you go about creating them? The steps below will walk you through everything that needs to be done:
1. How to create an Apple Developer Certificate
You'll need a "Certificate Signing Request (CSR)" file from your Mac to manually generate a Certificate. You must first open Keychain Access using your Mac's Spotlight Search. Then, on the Keychain Access Menubar, go to Certificate Assistant and select "Request a Certificate from a Certificate Authority". Fill in your name and email address on the following pop-up box, then save the generated file to disk.
Log on to your Apple Developer Account and click on the "Certificates, Identifiers & Profiles" tab to proceed with creating a certificate for your app. Once you can confirm you are on the Certificate page, click the plus icon beside Certificates to create a new certificate file for yourself. Since you are creating the certificate for the distribution of your app to the App Store, click on "iOS Distribution (App Store and Ad Hoc)" and press the Continue button.
See the Screenshots below as a Guide:
ii. Creating an AppID
Create a new AppID by clicking the + icon button on the Identifier tab. To register your AppID, select the App IDs option and provide it with a description and a bundle ID on the following page.
Note: Ensure that this bundle ID matches with that of app id in the build.yaml file of your project.
See the Screenshots below as a Guide:
Download your certificate to your Mac, then double click the .cer file to install and get it added to Keychain Access. In Keychain Access, select the login Keychain, navigate to the Certificates tab, and right-click on the certificate you just added to the Keychain to export it as a .p12 file
iii. How to Generate a Provision Profile File
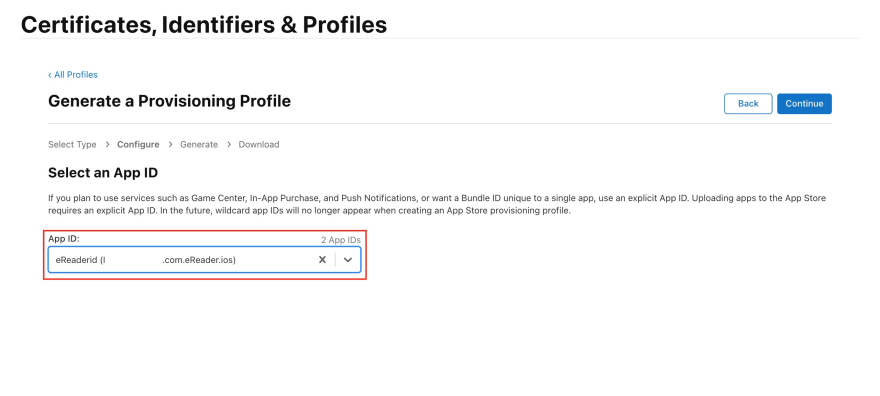
Click the plus icon button on the Provision Profiles page, then select App Store under the Distribution section to register a new Provisioning Profile. Choose the AppID you created in the previous step on the next screen.
See the Screenshots below as a Guide:
Afterward, select the certificate you want to include in this provisioning profile and give it a unique name on the next screen to generate your provision profile file.
See the Screenshots below as a Guide:

Finally, double-click on the newly generated provision profile file (in any directory on your Mac) to install it; this is required to avoid errors when creating your .ipa file. If an Xcode homescreen appears, your provision profile file has been successfully installed.
iv. Build your ipa File
Open the build.yaml file of your SCADE project and set path to the certificate (.p12 file) and provision profile (.mobileprovision file) you generated earlier. Change the export method mode from ad-hoc to app-store, as well as the versions and icons.
See the Screenshot below as a Guide:

After you've completed these steps, click the large rectangle button in the top-left corner of your IDE, go to iOS, click on Create-IPA, and press Play (or Command + R) to generate the .ipa file.
The .ipa file you just created can be found in the Product folder's ios-device subdirectory within your project folder:
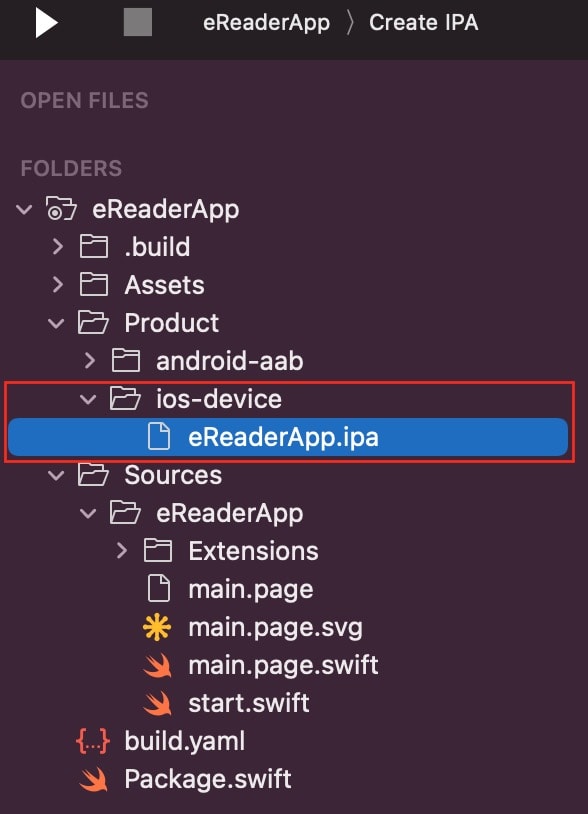
v. How to Submit your SCADE App to App Store
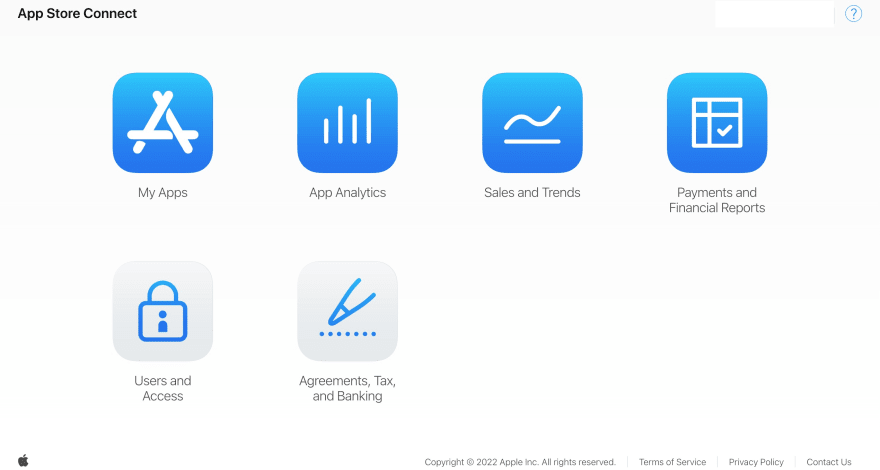
Log in to App Store Connect (https://appstoreconnect.apple.com/) with your Apple ID. Click "My Apps" and also click on the plus icon you find on the next screen and select "New App" if you are publishing a new app.
Once the above is done, you will be taken to another screen prompting you to enter information about your app. Follow the on-screen instructions and fill the form out. Once you are done hit "Create"
See the Screenshot below as a Guide:
The next step is to upload your .ipa file to the App Store and TestFlight. To do so, use the following command below:
xcrun altool --upload-app --type ios --file <path_to>/file.ipa --username <username> --password <password>
Note: Instead of using Apple Developer Account Password, visit AppleID (https://appleid.apple.com/), sign-in and generate App-Specific Password for your .ipa file to avoid errors while uploading to App Store.
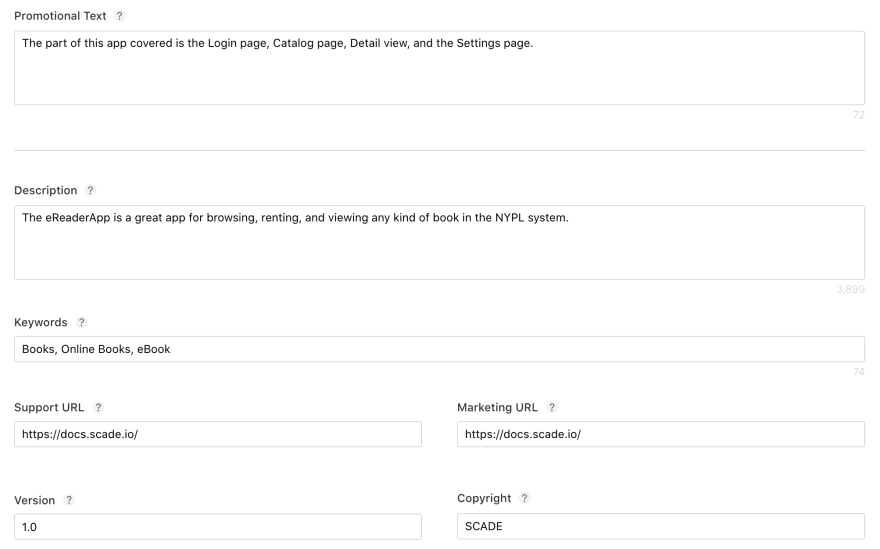
Return to the App Store Connect page and submit information about your app, such as the version number, promotional text, description, copyright, screenshots, contact information, and so on. Fill in all the fields and select the build (.ipa file) that you just uploaded. Finally, on the right-top corner of the page, click the save button before the "Add for Review" button for submission.
See the Screenshots below as a Guide:
2. Build and Release a SCADE App on Google Play Store
You must provide your app with a digital signature before publishing it on the Play Store - before they can be uploaded to the Play Store, Android requires all Android App Bundles to be digitally signed with a certificate. To sign your app, follow the steps below:
i. How to generate an Upload Keystore File
Proceed to the next step if you already have a Keystore. If you don't have one yet, you can generate one by following the Android Studio key generation steps or by using the command line on your Mac to run the following command below:
keytool -genkey -v -keystore ~/upload-keystore.jks -keyalg RSA -keysize 2048 -validity 10000 -alias upload
Note: The upload-keystore.jks file is saved in your home directory using the above command. Make a change to the argument you provide to the -keystore parameter if you wish to store it somewhere else. However, don't check the Keystore file into public source control; keep it private!
ii. Create a file named keystore.properties for Referencing your KeyStore
Make a file called keystore.properties with a reference to your upload-keystore.jks in it: Now, within key.properties, paste the following text below inside the created file:
storePassword=storePassword
keyPassword=keyPassword
keyAlias=alias
storeFile=<path_to>/upload-keystore.jks
Note: The keyAlias, storePassword and the keyPassword are the same as the ones you provided in the upload-keystore.jks file.
iii. Create Android App Bundle
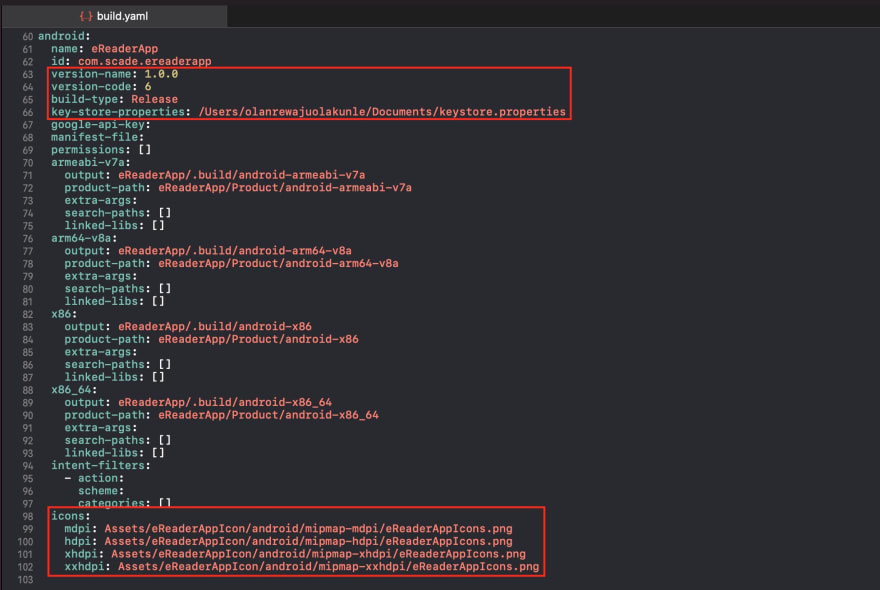
Before you could be able to generate your .aab file, open the build.yaml file of your SCADE project and set your app icons, version-name and version-code. Not only that, but you also need to change the build-type mode from Debug to Release and set the path to the key-store-properties you generated earlier.
See the Screenshot below as a Guide:
Once these are done, click on the project launch selector button at the top-left corner of your IDE, under Android, select Create-Android-App-Bundle and press the Play button ( or use Cmd + R) to generate the .aab file.
The .aab file you just created can be found in the android-aab folder of the Product folder within your project folder:
iv. How to Publish to Play Store
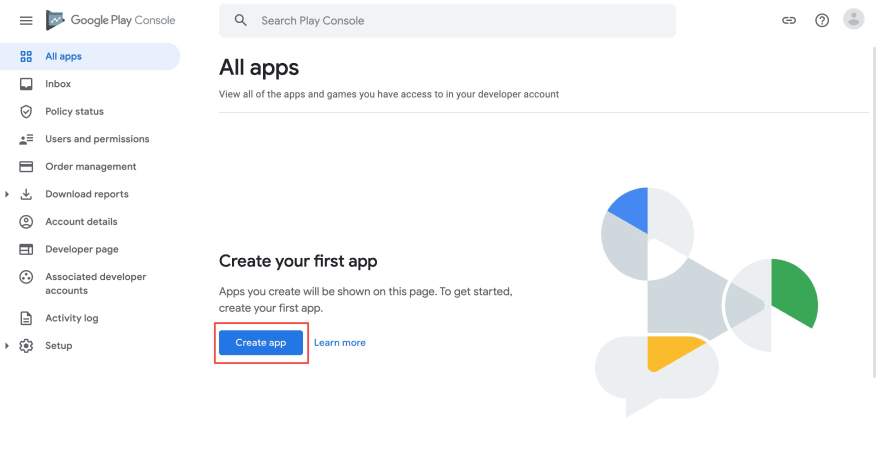
Click the Create App button on your Google Developer Account home page, then fill in the App Name, Default Language, App Type, Free or Paid, and all the checkboxes on the next screen. Then click the Create button at the far right-end of the page to open your App Dashboard.
See the Screenshots below as a Guide:
Then go to Store Presence and click on Main Store Listing, where you can fill up the Short and Full descriptions.
See the Screenshots below as a Guide:
After you've completed the preceding steps, you'll need to add an App Icon and a Feature Graphic to their respective boxes.
See the Screenshots below as a Guide:
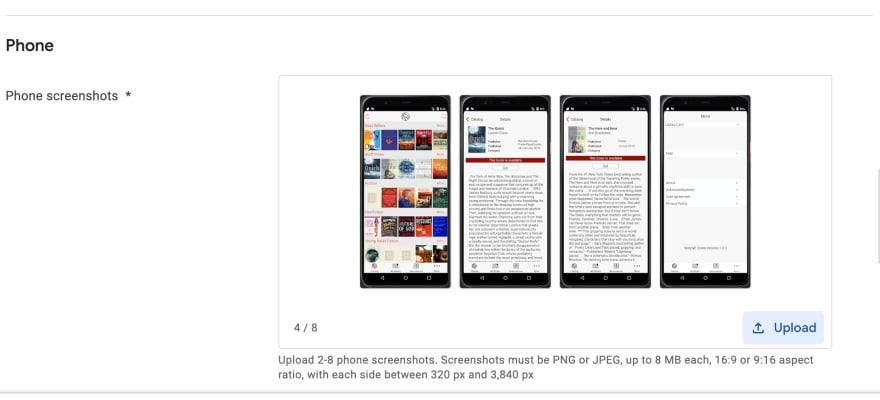
Next, under the Phone Screenshots section, provide at least two screenshots of your app. If you have screenshots of 7' and 10' tablets, you may add them to the Tablet section. Save the Main Store Listing and navigate to the Store Setting page.
See the Screenshot below as a Guide:
On the Store Settings page, select your app Category and add tags if you want to. You must also provide your email address and, if desired, your phone number and website URL before hitting the save button.
See the Screenshots below as a Guide:


To tell Google Play about the content of your app, you must also fill out the App Content page (found at the bottom of the navigation menu). They'll need this information to make sure your app complies with Google's Play policies.
The steps in the App Content page are listed below:
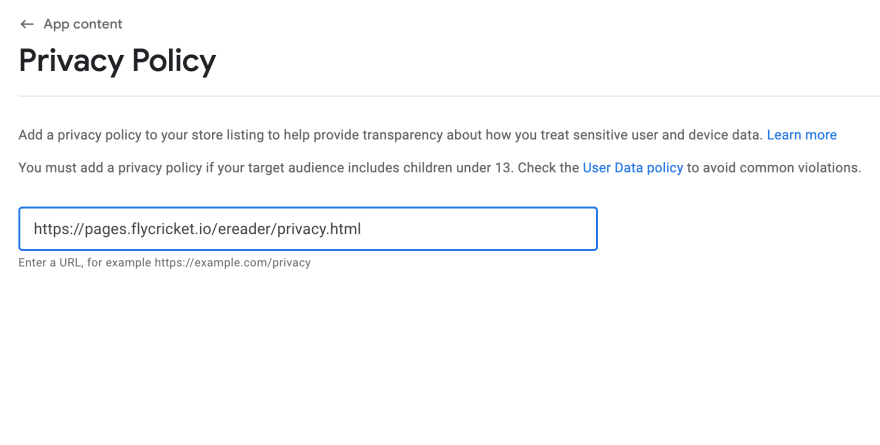
The implementation of a privacy policy can help you be more transparent about how you handle sensitive user and device data. If your intended users include children under the age of 13, you must add a Privacy policy.
See the Screenshot below as a Guide:
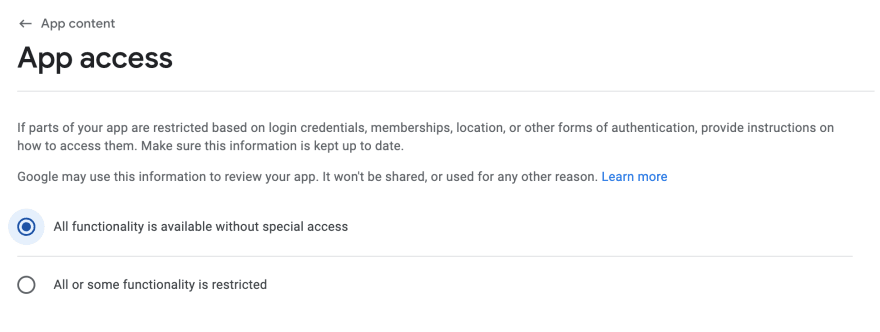
Provide instructions in the App access section if parts of your app are restricted depending on login credentials, memberships, location, or any other forms of authentication. If otherwise, select the option that states "All functionality is available without special access".
See the Screenshot below as a Guide:
Next, go to Ads and pick YES if your app has advertisements or NO if it doesn't.
See the Screenshot below as a Guide:
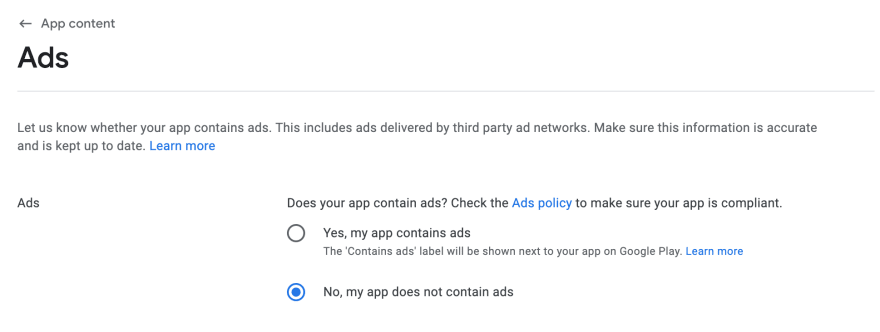
In the Content Rating part, you are to complete the content rating questionnaire to get official content ratings for your app. What is the need for this? On Google Play, users need to see these ratings to decide if your app is right for them or not.
See the Screenshot below as a Guide:

Next, go to the Target audience and content section. Select the target age groups for your app in the Target age tab. To access the Store presence tab, click the Next button twice, then select the appropriate option and click the Save button.
See the Screenshot below as a Guide:
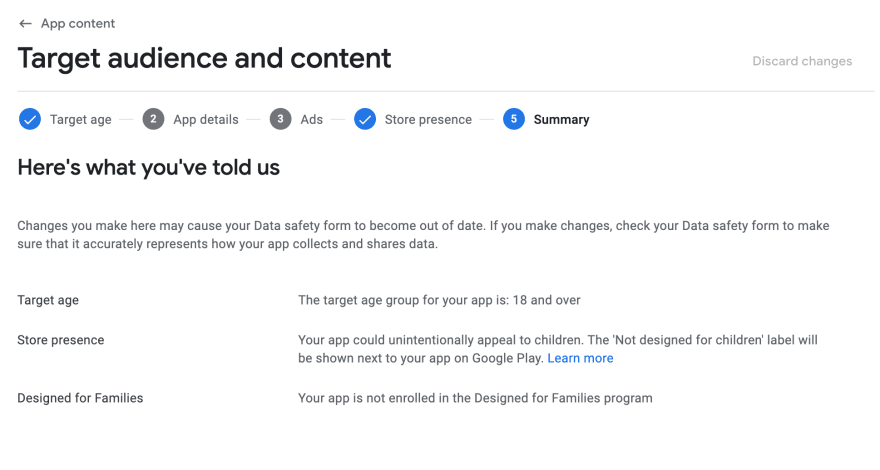
Go to News apps part and select YES if your app is a news app, otherwise select NO. Google Play requires this information to determine whether or not your app complies with their news policy.
See the Screenshot below as a Guide:

That's not all; you also need to tell Google Play whether or not your app is a "COVID-19 contact tracing and status app".
See the Screenshot below as a Guide:

Users must also know how your app collects and shares their information. In the Data Safety section, you'll need to give details regarding your app's safety. Users can learn how you collect and share their data by looking at the information you provide on your store listing.
See the Screenshot below as a Guide:

Then go to the Production page once you are done with the above steps in the App Content page and add the countries/regions where you want your app to be shown.
See the Screenshot below as a Guide:
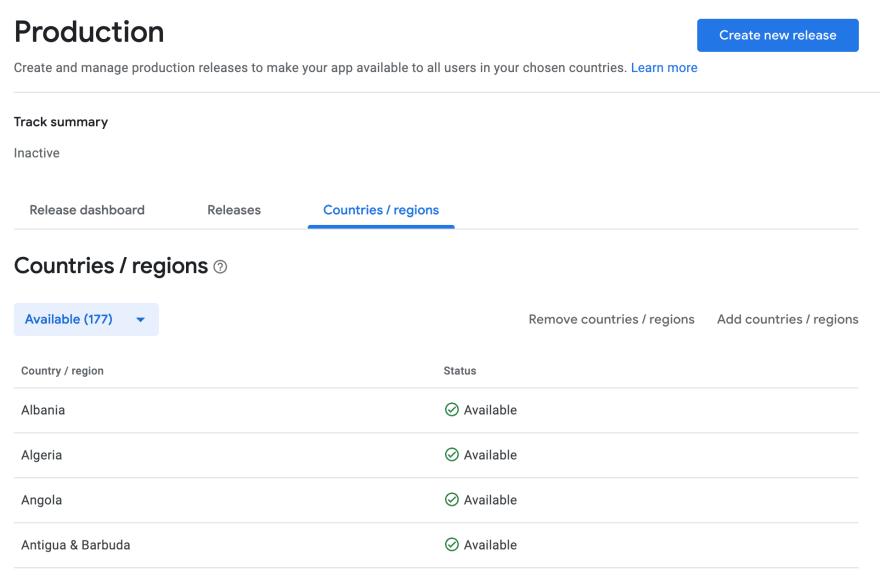
Click on Production from the sidebar, click on the Release dashboard tab, and upload the app-release.abb app bundle file in the App Bundle section and also add a Release Note that will display on your Google Play App's home page.
See the Screenshots below as a Guide:


After you've completed all of these steps, click the Save and Review Release buttons before finally hitting the "Start Rollout To Production" button. That's all there is to it - you must now wait for the Google team's response. They will manually review your app before adding it to the Google Play Store.
See the Screenshots below as a Guide:
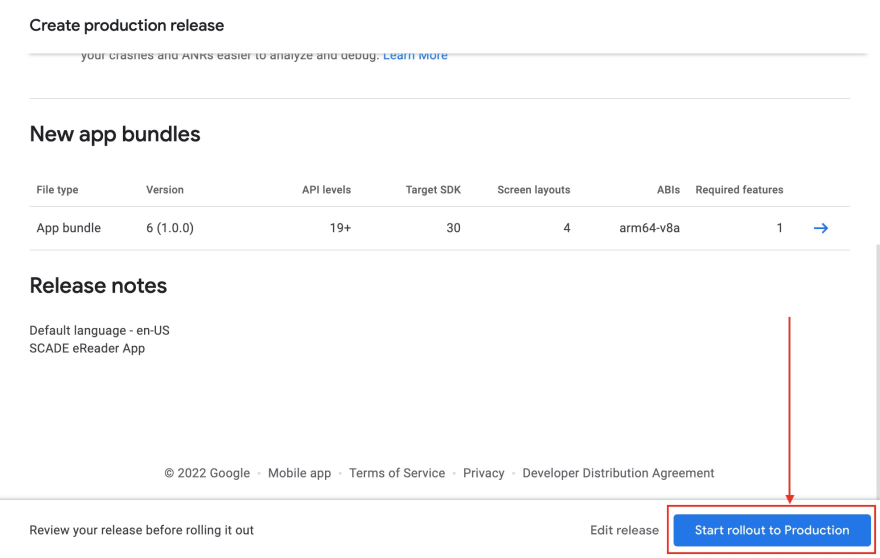
Conclusion
You can now build and deploy SCADE apps to the App Store and Google Play Store by following every guideline in this tutorial.











Latest comments (0)