
เขียนใหม่ด้วย TypeScript
ภาษา JavaScript นั้นไม่มี Type ของตัวแปรทำให้เวลาเขียนโปรแกรมมีโอกาสเกิดข้อผิลพลาดเยอะ ดังนั้นการเขียนงานโปรเจคใหญ่ๆ คนเลยนิยมเปลี่ยนไปใช้ TypeScript แทน (ถ้ายังไม่รู้จัก TypeScript อ่านต่อได้ที่นี่)
สำหรับ Vue 3.0 นี้ก็เป็นการเขียนใหม่ด้วย TypeScript แทน แต่เวลาเราเอามาใช้งาน เราสามารถเลือกได้ว่าจะใช้แบบ JavaScript ตามปกติ หรือจะใช้แบบ TypeScript ก็ได้
interface Book {
  title: string
  author: string
  year: number
}

const Component = defineComponent({
  data() {
    return {
      book: {
        title: 'Vue 3 Guide',
        author: 'Vue Team',
        year: 2020
      } as Book
    }
  }
})
อ่านเรื่อง TypeScript ต่อได้ที่นี่
JSX
เป็นฟีเจอร์ที่เอามาจาก React นั้นคือแทนที่จะใช้ Hyperscript แบบนี้
Vue.h(
  Vue.resolveComponent('anchored-heading'),
  {
    level: 1
  },
  [Vue.h('span', 'Hello'), ' world!']
)
Vue.h ย่อมาจาก Hyperscript ซึ่งหมายถึง script ที่เอาไว้สร้าง HTML structures นั่นเอง
การเขียน JSX ได้จะทำให้เราเขียน HTML ลงไปในโค้ด JavaScript ตรงๆ ได้เลย
import AnchoredHeading from './AnchoredHeading.vue'

const app = createApp({
  render() {
    return (
      <AnchoredHeading level={1}>
        <span>Hello</span> world!
      </AnchoredHeading>
    )
  }
})

app.mount('#demo')
API ที่เปลี่ยนไปใน Vue 3
ในหัวข้อนี้ขอยกตัวอย่างโค้ดข้างล่างนี่ ซึ่งรันได้ปกติใน Vue 2
<div id="app">
    <h1>{{ title }}</h1>
    <my-button @whenclick="changeTitleText"></my-button>
</div>

<script src="https://unpkg.com/vue@2.6.12"></script>
<script>
Vue.component('my-button', {
    template: `
        <button @click="handleClick">Click Me!</button>
    `,
    methods: {
        handleClick(){
            this.$emit('whenclick')
        }
    },
})

let app = new Vue({
    el: '#app',
    data: {
        title: 'นี่คือ Title แบบ Vue 2',
    },
    methods: {
        changeTitleText(){
            this.title = 'โค้ดนี้ทำงานได้ใน Vue 2'
        }
    },
})
</script>
ในตัวอย่างนี้มีการสร้าง component ชื่อ my-button ขึ้นมาหนึ่งตัว แล้วตั้งค่าไว้ว่าถ้ามีการคลิก ให้เปลี่ยนข้อความ title ซะ
ทีนี้ ถ้าเราเปลี่ยนไปใช้ Vue 3 ตัวนี้แทน https://unpkg.com/vue@3.0.0 เราจะพบว่าโค้ดของเรารันไม่ได้ไปซะแล้ว
สาเหตุก็เพราะว่า API การเรียกใช้งานมีการเปลี่ยนแปลง
วิธี createApp
จากเดิมใน Vue 2 ถ้าเราจะสร้าง Application ขึ้นมา ก็จะใช้วิธีการ new Vue ขึ้นมาตรงๆ เลย
const app = new Vue({
    el: '#app',
    //TODO
})
แต่สำหรับ Vue 3 จะเปลี่ยนไปใช้คำสั่ง createApp แทน (ไม่สามารถสร้างเองได้แล้ว ต้องสร้างผ่าน factory function ที่ Vue เตรียมไว้ให้เท่านั้น)
const app = Vue.createApp({
    //TODO
})

app.mount('#app')
หรือ
import { createApp } from 'vue'

const app = createApp({
    //TODO
})

app.mount('#app')
อีกเรื่องหนึ่งคือการ mount แอพเข้ากับ html โดยใช้ el นั้นโดนตัดออกไปแล้ว
ไปใช้วิธีการ mount ด้วยเมธอด .mount() หลังจากสร้างแอพไปแล้วแทน ซึ่งเป็นการแยกส่วนโลจิคออกจากการกำหนดส่วนแสดงผล (HTML) ออกจากกัน ทำให้ตอนนี้เราสามารถสร้างแอพเปล่าๆ โดยยังไม่ต้อง mount ได้แล้ว ถ้าอยากเอาไปทำเทสเพิ่มก็ทำได้ง่ายขึ้น
data ต้องเป็น method เท่านั้น
ปกติ data ของ Vue 2 นั้นสามารถกำหนดเป็น object หรือ function ที่รีเทิร์น object กลับมาแบบไหนก็ได้
new Vue({
    data: {
        title: 'นี่คือ Title แบบ Vue 2',
    },
})
แต่สำหรับ Vue 3 ถูกกำหนดว่า data จะต้องเป็น function เท่านั้น
Vue.createApp({
    data(){
        return {
            title: 'นี่คือ Title แบบ Vue 2',
        }
    },
})
Component ผูกกับ app
ใน Vue 2 เวลาเราสร้างคอมโพเนนท์ เราจะสั่งผ่านตัวแปร Vue ที่เป็นระดับ global แปลว่าคอมโพเนนท์นี้สามารถเรียกใช้จาก Application ของ Vue ตัวไหนก็ได้
Vue.component('my-button', {
    template: `
        <button @click="handleClick">Click Me!</button>
    `,
    methods: {
        handleClick(){
            this.$emit('whenclick')
        }
    },
})
แต่สำหรับ Vue 3 แล้วการจะสร้างคอมโพเนนท์จะต้องสร้างให้แอพตัวใดตัวหนึ่งไปเลย
const app = Vue.createApp({
    //TODO
})

app.component('my-button', {
    emits: ['whenclick'], //optional
    template: `
        <button @click="handleClick">Click Me!</button>
    `,
    methods: {
        handleClick(){
            this.$emit('whenclick')
        }
    },
})
emitsเป็น properties ที่จะกำหนด หรือไม่กำหนดก็ได้ หน้าที่ของมันคือเอาไว้เก็บชื่อเมธอดทั้งหมดที่คอมฑโพเนนท์ตัวนี้ทำได้ (มันก็คือ$emitอะไรได้บ้างนั่นแหละ) แต่การใส่ในemitsนั้นจะทำให้เวลาเรามาอ่านว่าคอมโพเนนท์ตัวนี้มีอะไรให้เรียกใช้ได้บ้างก็จะดูจากตรงนี้ได้เลย ไม่ต้องเสียเวลาไปไล่โค้ดข้างในอีกที
Vue Router ต้องสร้างด้วย createRouter()
เร้าเตอร์ก็เป็นอีกตัวที่มีการเปลี่ยนรูปแบบการเขียน
import Vue from 'vue'
import VueRouter from 'vue-router'

import App from './App.vue'
import FirstPage from './pages/FirstPage.vue'
import Page from './pages/FirstPage.vue'

Vue.use(VueRouter)

new Vue({
    render: (h) => h(App),
    router: new VueRouter({
        mode: 'history',
        routers: [
            { path: '/', component: FirstPage },
            { path: '/second', component: SecondPage },
        ],
    }),
}).$mount('#app')
โดยการสร้าง router จะต้องสร้างแยกตั้งหากด้วยคำสั่ง createRouter()
รวมถึงโหมด history ที่ตอนแรกเป็นค่าคอนฟิก, ใน Vue 3 ก็แยกออกมาเป็น createWebHistory() แล้วเหมือนกัน
import {createApp} from 'vue'
import {createRouter, createWebHistory} from 'vue-router'

import App from './App.vue'
import FirstPage from './pages/FirstPage.vue'
import Page from './pages/FirstPage.vue'

const router = createRouter({
    history: createWebHistory(),
    routers: [
        { path: '/', component: FirstPage },
        { path: '/second', component: SecondPage },
    ],
})

const app = createApp(App)
app.use(router)

router.isReady().then(() => {
    app.mount('#app')
})
Vuex ต้องสร้าง store ด้วย createStore()
คล้ายๆ กับข้อเมื่อกี้คือถ้าในโค้ดเรามีการใช้ Vuex การจะสร้าง store ขึ้นมาแทนที่จะ new Vuex.Store ตรงๆ ก็จะเปลี่ยนไปสร้างผ่าน createStore() แทน
import Vue from 'vue'
import Vuex from 'vuex'

import App from './App.vue'

const store = new Vuex.Store({
    //...
})

new Vue({
    store: store,
    render: (h) => h(App),
}).$mount('#app')
แบบนี้
import {createApp} from 'vue'
import {createStore} from 'vuex'

import App from './App.vue'

const store = createStore({
    //...
})

const app = createApp(App)
app.use(store)
app.mount('#app')
พวกค่าต่างๆ ของ store เช่น state, mutations, getters, actions ก็เซ็ตเหมือนเดิมทุกอย่าง ไม่มีอะไรเปลี่ยนแปลง
...
โดยรวมแล้ว Vue 3 มีการเปลี่ยน API ให้แยกส่วนกันมากขึ้น ทำให้โครงสร้างโค้ดถูกแบ่งเป็นโมดูลๆ จัดการและเทสง่ายขึ้น
Fragment
สำหรับใช้ที่เคยใช้ React มาก่อน Fragment ใน Vue ก็ใช้คอนเซ็ปเดียวกันนั่นแหละ
ตามปกติแล้วเวลาเราสร้าง template จำเป็นจะต้องมี root element 1 ตัวครอบทุกอย่างเอาไว้ ซึ่งหลายๆ ครั้งมันก็ไม่สะดวกเอาซะเลย
<!-- Layout.vue -->
<template>
  <div>
    <header>...</header>
    <main>...</main>
    <footer>...</footer>
  </div>
</template>
สำหรับ Vue 3 นั้นอนุญาตให้เราสร้าง root element หลายตัวใน template ได้แล้ว
<!-- Layout.vue -->
<template>
  <header>...</header>
  <main v-bind="$attrs">...</main>
  <footer>...</footer>
</template>
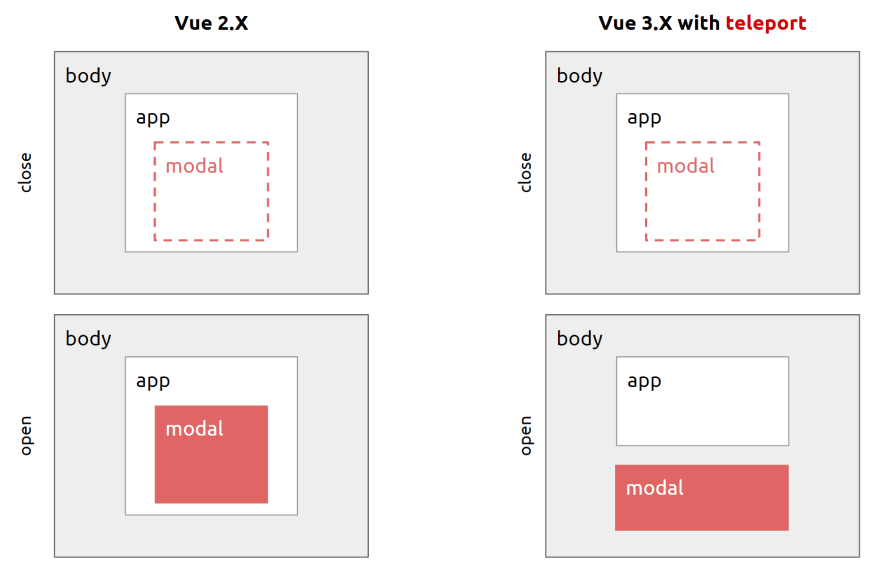
Teleport Component
teleport เป็นฟีเจอร์ที่ทำให้คอมโพเนนท์บางส่วนที่เราสร้างขึ้นมาใน Application สามารถ "เทเลฟอร์ท" หรือ "วาร์ป" ออกไปข้างนอกได้!
ตัวอย่างที่เข้าใจง่ายที่สุดน่าจะเป็น Modal หรือการที่มีกล่องเหรือเฟรมอะไรสักอย่างเด้งขึ้นมาซ้อนทับ content ของเราเป็นอีกเลเยอร์หนึ่ง
สำหรับ Vue เวอร์ชันก่อนๆ ที่ต้องเขียนทุกอย่างอยู่ในขอบเขตของ Application เท่านั้น
ถ้าเราจะสร้าง Modal ขึ้นมาก็จะต้องสร้างไว้ข้างในแอพนั้นแหละ
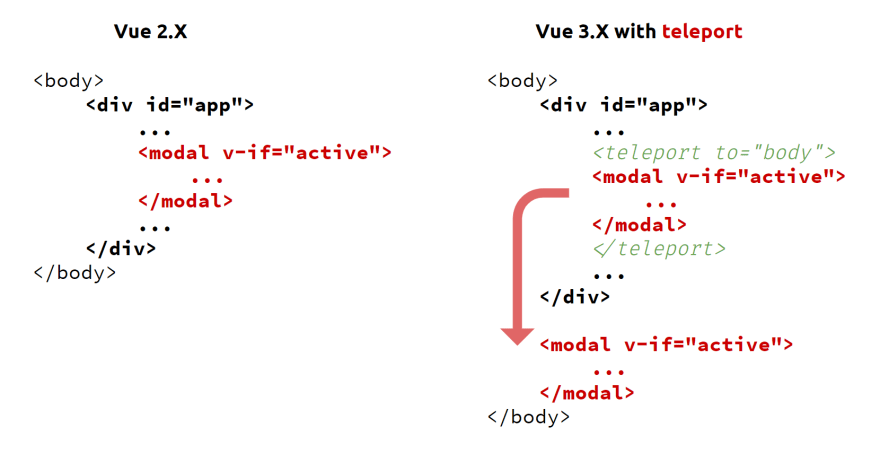
แต่สำหรับ Vue 3 เราสามารถกำหนดสิ่งที่เรียกว่า teleport เพื่อบอกว่าโค้ดตรงนี้นะ เราจะส่งมันออกไปแสดงผลข้างนอกแอพ!
จากเดิมเป็นโค้ดแบบนี้
const app = Vue.createApp({});

app.component('modal-button', {
  template: `
    <button @click="modalOpen = true">
        Open full screen modal!
    </button>

    <div v-if="modalOpen" class="modal">
      <div>
        I'm a modal!
        <button @click="modalOpen = false">
          Close
        </button>
      </div>
    </div>
  `,
  data() {
    return {
      modalOpen: false
    }
  }
})
ให้เราเพิ่ม <teleport to="body"> ลงไปครอบคอมโพเนนท์ส่วนที่ต้องการส่งออกไปข้างนอก (เช่นเคสนี้ส่งไปแสดงผลที่ชั้น body)
app.component('modal-button', {
  template: `
    <button @click="modalOpen = true">
        Open full screen modal! (With teleport!)
    </button>

    <teleport to="body">
      <div v-if="modalOpen" class="modal">
        <div>
          I'm a teleported modal!
          (My parent is "body")
          <button @click="modalOpen = false">
            Close
          </button>
        </div>
      </div>
    </teleport>
  `,
  data() {
    return {
      modalOpen: false
    }
  }
})
จริงๆ ยังมีอีกหลายฟีเจอร์ที่ Vue 3 มีการเพิ่มฝเปลี่ยนแปลง แต่อันนี้เลือกมาเฉพาะๆ ตัวที่คิดว่าสำคัญ
ป.ล. Vue 3 นั้นออกเวอร์ชัน 3.0.0 เรียบร้อยแล้ว แต่เฟรมเวิร์คหลัๆ บางตัวก็ยังไม่เสร็จดี เช่น router หรือ Vuex และสำหรับการติดตั้งจะต้องใช้ npm i vue@next หากต้องการจะใช้เวอร์ชัน 3 (ถ้าใช้ npm i vue จะได้เวอร์ชัน 2) ซึ่งการเปลี่ยนแปลงให้ vue 3 เป็นตัวหลักแทนน่าจะดำเนินการเสร็จภายในสิ้นปี 2020 นี้
อ่านเพิ่มเติมได้ที่ Release Note นะ

Top comments (0)