One handy feature of ‘not-so-native’ apps which get easily overlooked is —
to publish updates without having to go through the usual pain of submitting an update in the play store/app store.
In this tutorial, we’ll see how we can send CodePush updates using the Visual Studio App Center along with CI distribution.
Prerequisites
- GitHub account
- VS App Center account (You could sign in using github)
- react-native cli
Step 1:
Create a react native app using the react-native CLI and push the code to a GitHub repo.
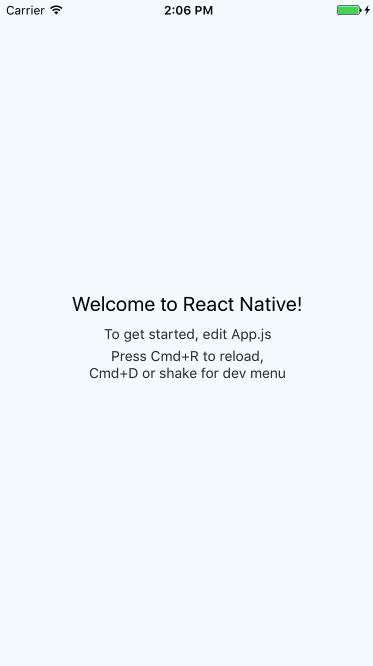
This is how your app will initially look like when you run react-native run-ios
Step 2:
2.1 Login to http://appcenter.ms/. On the Home page, click on the Add new App button.


In the model shown, fill in the details of the app you’re developing. Although we use the same codebase for both the android and iOS versions of our apps, the build process is entirely different. Hence, we’ll have to create separate apps for iOS and Android respectively.
For the sake of the tutorial, we’ll choose the OS as android. The steps will be the same for iOS except that we’ll have to choose the provisioning profile and certificates instead of the android Keystore file.
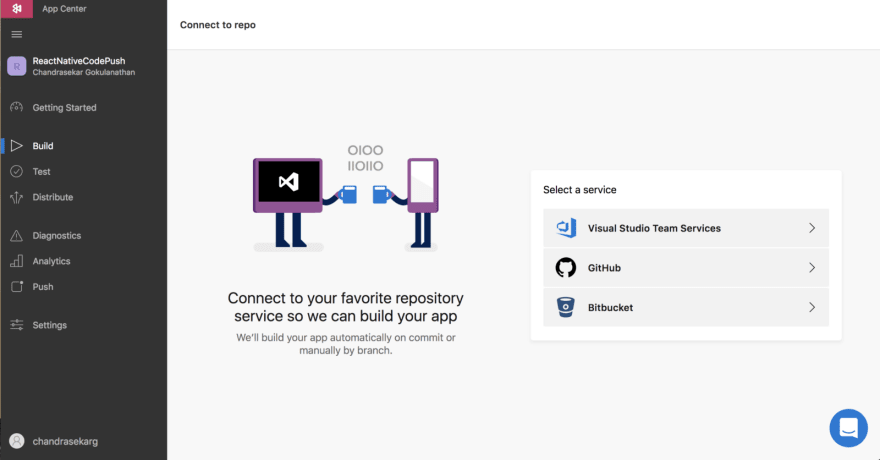
2.2 Now, link our remote repo in GitHub with this app. You’ll see the list of branches available in the repo. We just have a master branch as of now.
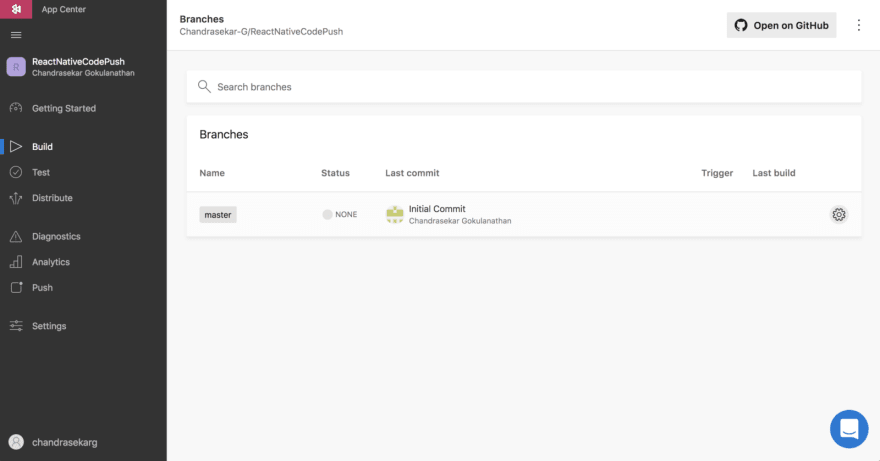
2.3 Click on the gear icon next to the desired branch. This will be the branch we’ll be using for continuous integration.
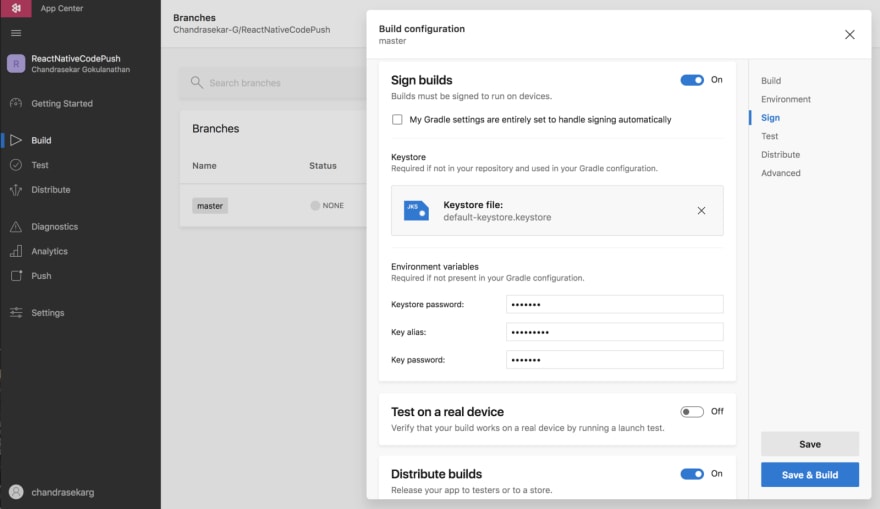
2.4 To distribute the built apk/ipa files to users we’ll have to sign our builds. For android, we’ll have to generate a** Keystore file** first to be used for signing the build. This is a sample command for generating a Keystore file.

2.5 Turn on the ‘Sign Builds’ option and **‘Distribute Builds’ **option. Upload the Keystore file we just created. Enter the password for Keystore file, key alias and the key password which we gave in the previous prompt.
For iOS, this step will be a little different. We’ll have to choose the provision profile **and the p12 certificate** and provide it with the requires passcodes for the same.
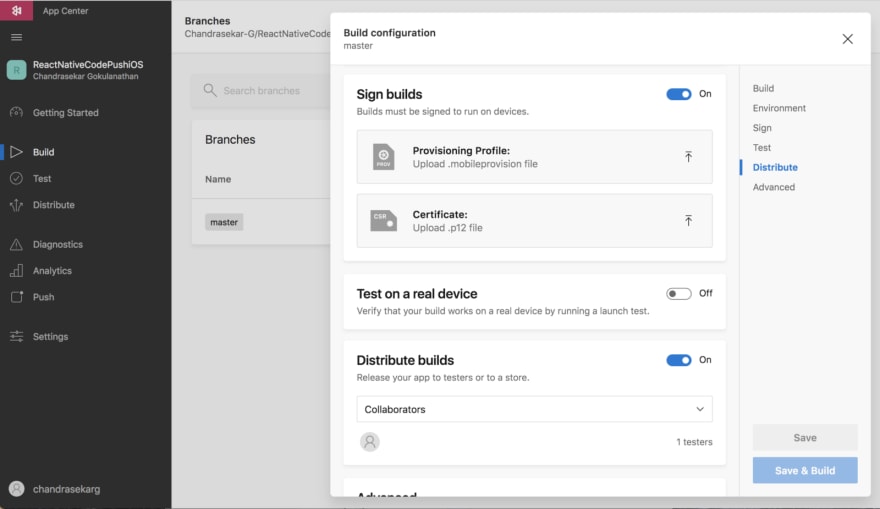
Once we click ‘Save and Build’ option, a manual build will be triggered. Any subsequent commits to the master branch will automatically trigger builds unless we’ve manually turned off that option.
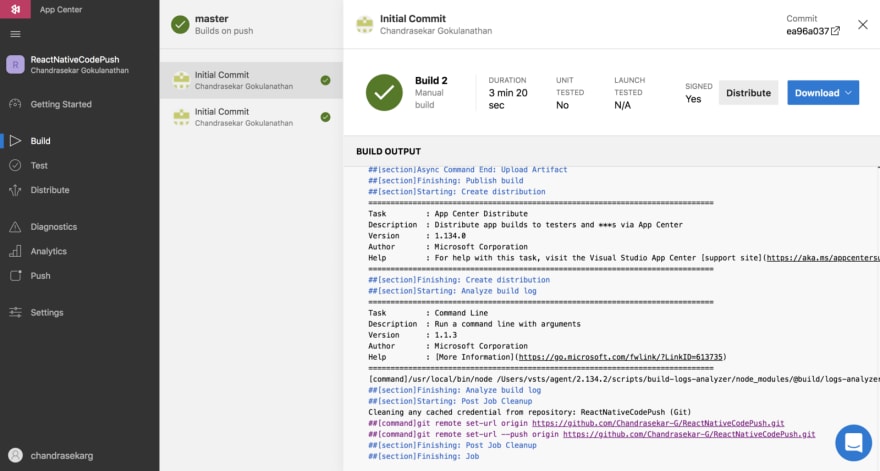
Once the build is complete, you’ll receive an email with a link to download the app. Now, our app is available for distribution and we can add collaborators to use these apps.

We have now successfully established a CI flow for our react-native android app along with app distribution
Step 3:
3.1 Install the app center command-line utility. This includes a host of other features apart from codepush like crashes, analytics…
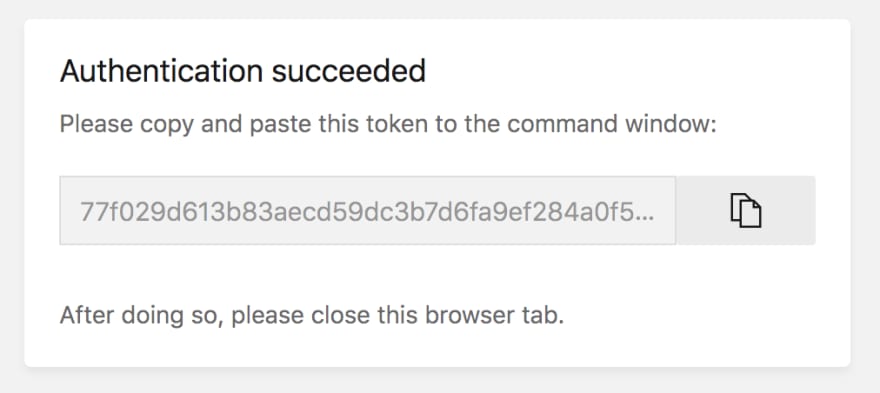
Log in to the app center. This will open up the browser and display you an authentication token. Copy and paste this token to the command window.
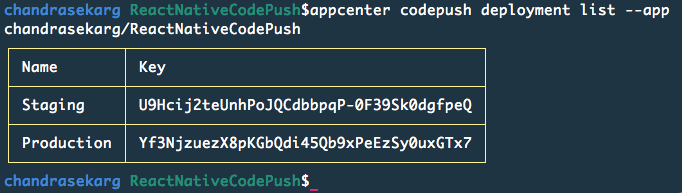
3.2 Go back to the app center. Choose our app and select **Distribute -> CodePush. **Select the Create Standard Deployments button. This will by default create two standard deployments for Production and Staging.

3.3 Now, go back to the terminal again and get the deployment lists. This will give us the list of keys available for the standard deployments available. Make a note of the staging key as we’ll be using this key in the next step.
Step 4:
4.1 We’ll now add the code push client-side SDK to our react native app so that it will be able to listen for updates from the app center and make updates accordingly. Go to the project directory and install the code-push SDK.
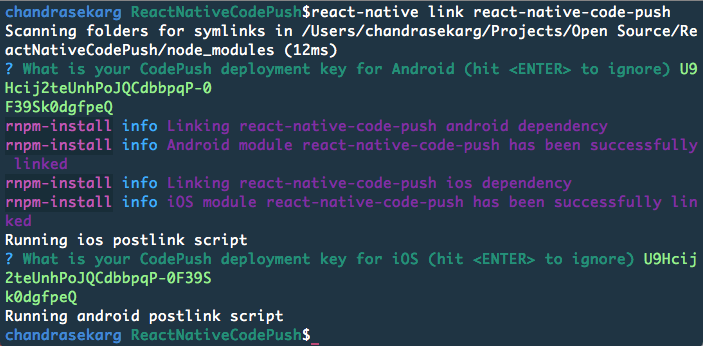
4.2 After this use the react-native link command to link this npm module with the android native build. Here you’ll be asked for the deployment keys which we got from the previous step. Use the same key for both android and iOS since we’ll be dealing with the iOS update in a totally different app.
Step 5:
Our next step will be to use this client-side SDK and make changes in our code so that our react native app is able to recognize the updates.
We’ll create a button, on press of which the app will search for updates.
5.1 Go to app.js and import the npm module.
5.2 Add a Touchable Opacity with a corresponding handler.
5.3 Make the above changes and check in the code in the remote git repo. This will trigger a build automatically in the app center and we’ll receive an mail with the new download link for the updated app. Once installed, it’ll look something like this

Step 6:
We’ll now make some text change in our app and release a build using code push.
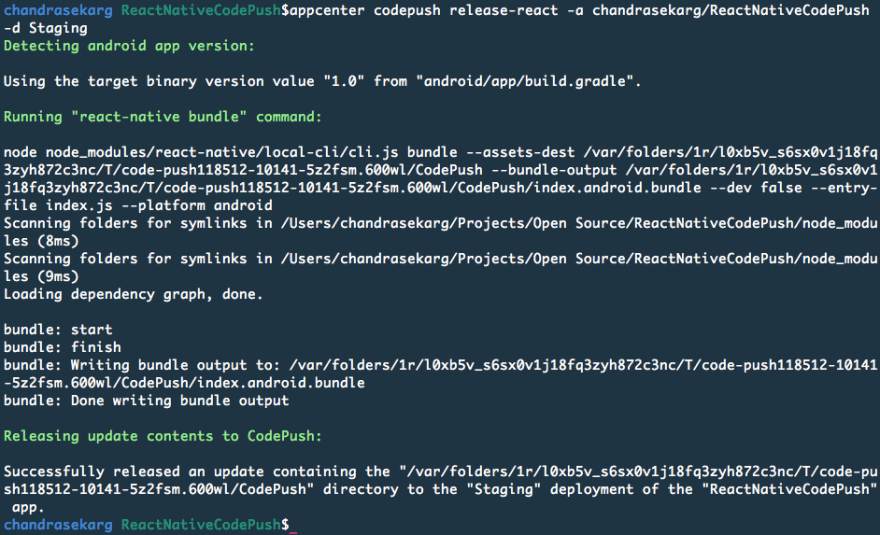
6.1 Make some text changes in the app. Now, go to the terminal and release a build using code push in staging. Now, this release will be available for apps in the version mentioned in the app.
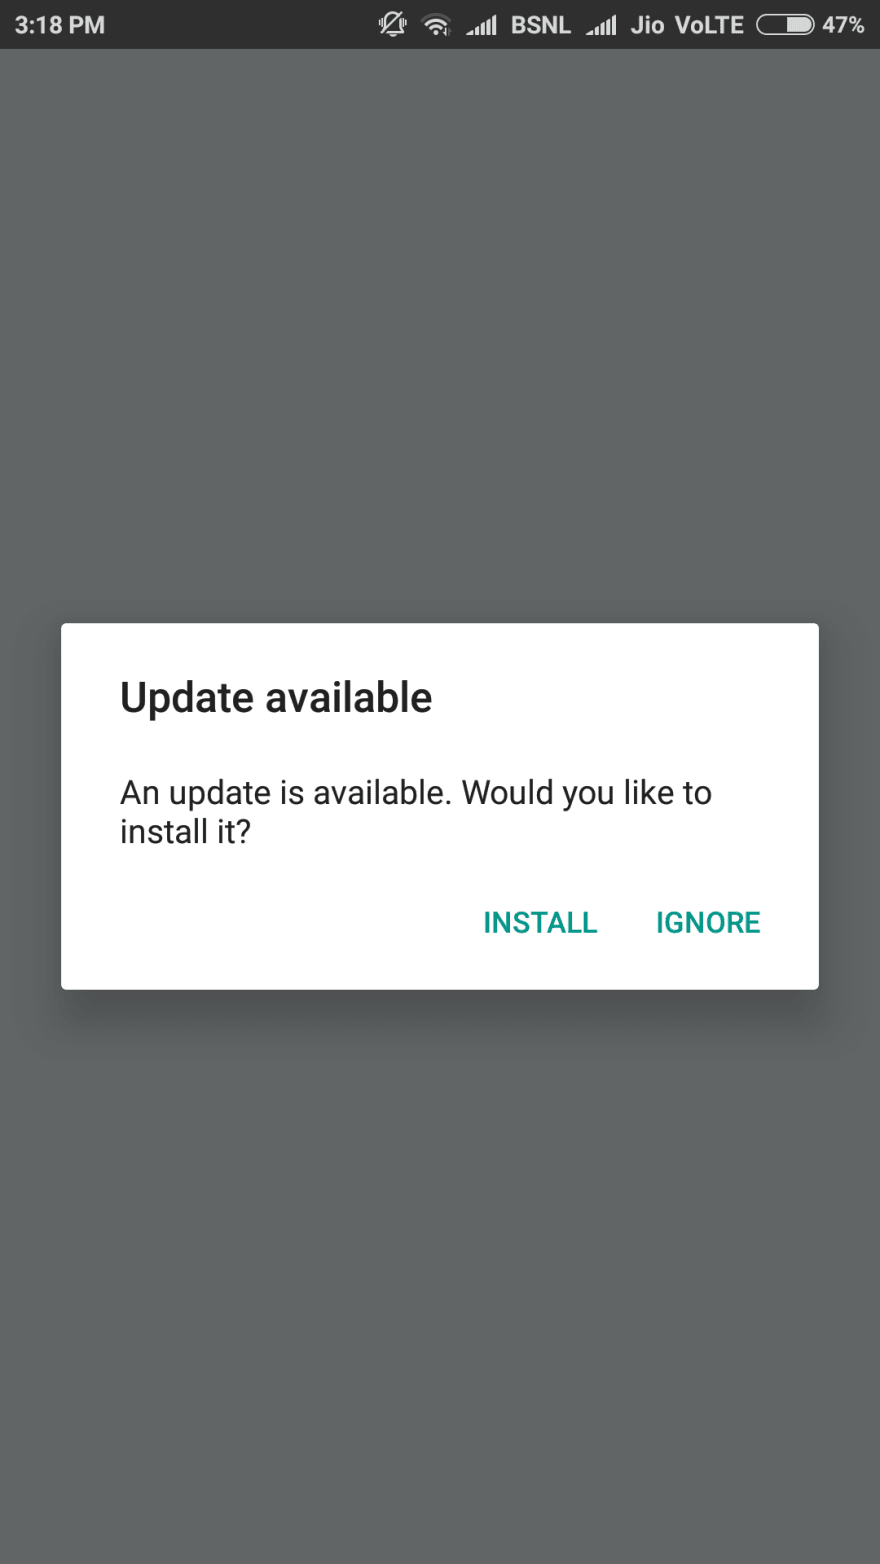
6.2 Now open the latest mobile app installed. You’ll be prompted with a dialog to update the app. When you click install, the latest update will be installed and you’ll be able to see the text changes we just made.

Here's the github repo if you need a reference,
 Chandrasekar-G
/
ReactNativeCodePush
Chandrasekar-G
/
ReactNativeCodePush
React Native + Code Push
ReactNativeCodePush
This repo has a sample react native project implemented with React Native Code Push along with CI provided by microsoft appcenter.

Top comments (0)