
It's already been a while, since the GitHub have launched CodeSpaces, it is an remote dev environment configured with lot's of preinstalled programs like Node.js, Yarn, PHP, Composer and lot's more.
In this tutorial, we're also going to create a similar type of thing.
Spoiler Alert, You can create your own codespace with a couple of commands.
And we'll get following programs installed in our codespaces.
- Latest Stable Release of Node.js with NVM.
- Yarn, PNPM
- PHP
- Composer
- Deno
- Docker
- GitHub CLI
- Heroku CLI
We'll configure it to use with VSCode.
But before all these, let's discuss about it
Introduction
I think many of you are known about GitHub CodeSpace and you guys may have applied for it's preview too. I had also done so and I have even built some programs only using GitHub CodeSpace.
GItHub CodeSpace define it as "Blazing fast cloud developer environments"
And it also provide VS Code preconfigured in the CodeSpace, so we can use VS Code on browser.
Good News, we can also make so, by using code-server. (which won't be mentioned in this article).
So, today we are also creating a similar stuff like GitHub Codespace, but on our own server.
Let's start
Create a ubuntu server/instance
In this step, you'll need to create a ubuntu instance, you can find guide for creating a ubuntu instance for your respective cloud provider with a simple search in Google. Go ahead, and create a instance.
Note: Create a instance with atleast 2 core CPU and 4 Gigs of Memory.
Once, you have create a ubuntu instance, now let's configure VS Code.
Configuring VS Code
Now, you have open VS Code (I am assuming that VS Code is already installed in your local machine), and install a extension named "Remote - SSH".
https://marketplace.visualstudio.com/items?itemName=ms-vscode-remote.remote-ssh
Once, you install install, you have to click on "Remote Explorer" in VS Code and click on '+' sign.

Now, add the ssh detail in the input.
ssh -i [PATH_TO_PRIVATE_KEY_FILE] [username]@[IP_ADDRESS]
This will not work, if you're using Ubuntu / Pop OS in your local machine, first of all you need to change the key file permission to 600 to make this work.
chmod 600 [PATH_TO_PRIVATE_KEY_FILE]

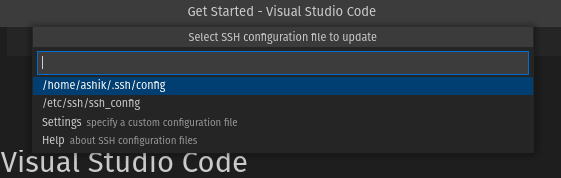
Then, VS Code will ask to Select SSH Configuration file. Select any from the given options in your VS Code.
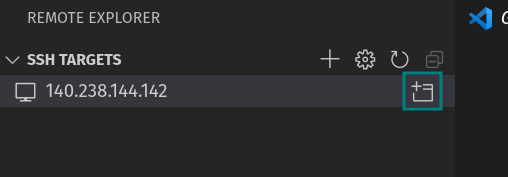
Now the host has been added to your VS Code, now you can click little plus icon on the side of the IP in SSH Targets section.

Now, the new VS Code window will open.
For first time, you'll get the dialog like below, in this you have to click Continue.

Then it, will download and install VS Code Server in your Ubuntu Instance. Now, you're ready to use your instance from VS Code. Now, let's install all the required programs mentioned in above.
Now, open the terminal in your VS Code.

Now, run the following command to download the script and run it.
wget https://raw.githubusercontent.com/projectashik/codespaces-alternative-script/main/script.py
python3 script.py
After running the above command, it will ask for your GitHub Email and Your name.

Now, press enter after every answer and then let it install all the program. But you might have to press enter once again, in between the installation when it ask for.

At last, you'll get this message.
![]()
Now, it's done.
Well done, you have created your own alternative to VS Code.
If your are a Web Developer then you will need to preview the site. For that you can forward the ports through the VS Code. Sometimes, VS Code will automatically forward the port. But if it doesn't then you can simply click on Ports at the side of Terminal and add the required PORT in which your app is served.

Once you're connected to your server, you can click on open folder and select folder and start building your project or clone the repo.

Tip: You can create a new folder using mkdir command in the terminal.
mkdir [FOLDER_NAME]
Conclusion
Please share your experience of creating custom codespace.
If you got into any problem, feel free to ask in the comment section.

Top comments (0)