

Have you ever tried to run a piece of software on a friend's computer, only for it to fail immediately? You scratch your head, look at your screen, and say those infamous words:
"But it works on my machine!"
The other person sighs. "Well, we aren't shipping your machine to production, are we?"
For decades, this was the ultimate headache of software engineering. An application would work perfectly on a developer's laptop, but break on the test server, and blow up in production.
To solve this, the tech world created Docker. Let's use the Richard Feynman Technique—translating complex technical concepts into simple, everyday analogies—to understand exactly how Docker works, why it is so powerful, and how to use it.
1. The Packaging Problem: The Shipping Container Analogy
To understand Docker, we first need to look at the history of global shipping.
Before the 1950s, cargo was a mess. If you wanted to ship whiskey, piano keys, bags of coffee, and bags of flour from New York to London, workers (stevedores) had to manually load every single crate, barrel, and sack onto the ship.

Standardized shipping containers revolutionized transport by making the carrier indifferent to the cargo.
This was slow, expensive, and risky. The whiskey barrels could leak onto the sacks of flour, or the piano keys could be crushed by heavy crates.
Then came the standardized shipping container.
Instead of worrying about how to pack piano keys vs. whiskey barrels, we put everything into identical metal boxes of the exact same size. The crane at the dock doesn't care what's inside the container; it only cares that the container has standard corner locks and fits on the ship, train, or truck.
Docker does the exact same thing for software.
Instead of shipping your raw code and hoping the server has the right version of Node.js, Python, or database libraries, you pack your code, runtime, system libraries, and settings into a standardized Docker Container.
The server running Docker doesn't care if your container holds a complex Java app or a simple HTML site. It just runs the container.
2. Virtual Machines vs. Containers: The Hotel vs. The Apartment Complex
Before Docker, we isolated applications using Virtual Machines (VMs). Let's compare them using a housing analogy:

The architecture difference: Virtual Machines bundle a complete Guest OS, while Docker Containers share the Host OS kernel.
Virtual Machines: The Hotel
A VM is like a hotel. Every guest (application) gets their own fully isolated room. But that room also comes with its own private bathroom, kitchen, plumbing, and structural walls.
In tech terms, a VM bundles your app with a complete Guest Operating System (OS).
- The Problem: Guest OSs are huge. They take gigabytes of space, consume lots of memory just to idle, and take minutes to start up.
Docker Containers: The Co-Living Apartment Complex
A Docker Container is like a room in a co-living apartment complex. Every resident (application) has their own private, locked bedroom (isolated user space), but they share the central heating, water pipes, foundation, and main door.
In tech terms, containers share the Host OS Kernel (the core engine of the operating system).
- The Benefit: Because containers don't need their own heavy Guest OS, they start up in milliseconds, take up megabytes instead of gigabytes, and allow you to run dozens of apps on a single machine.
3. Under the Hood: Namespaces and Cgroups (The Blinders and the Resource Warden)
Since containers share the Host OS kernel, what stops one container from reading another container's database files, killing its processes, or hogging all the host's memory?
Under the hood, Linux uses two core technologies to keep containers isolated and well-behaved:
Namespaces: The Horse Blinders
A Namespace determines what a container is allowed to see.
- Analogy: Think of putting horse blinders on a container. It can only look straight ahead at its own private lane.
- Linux has different types of namespaces. For instance, the Process ID (PID) namespace makes a container believe it is running alone as Process #1, completely blind to the fact that there are thousands of other processes running on the host machine. The Mount (mnt) namespace ensures it only sees its own filesystem.
Control Groups (Cgroups): The Resource Warden
A Cgroup determines what a container is allowed to use.
- Analogy: Think of a strict dormitory warden who manages electricity and water allowance. If you use too much, they shut off your supply.
- Without Cgroups, one runaway container could consume 100% of the host CPU and memory, crashing every other application on the server. Cgroups enforce strict limits, saying: "Container A, you only get a maximum of 512MB of RAM and 1 CPU core."
4. Images vs. Containers: The Blueprint vs. The House
Two terms you will hear constantly are Image and Container. The easiest way to separate them is to think of them as a Blueprint and a House.
- Docker Image (The Blueprint): This is a read-only template containing the instructions to build your environment. It describes exactly what operating system to start with, what packages to install, and where your code lives. You cannot change an image once it is built.
- Docker Container (The House): This is the active, running instance of the image. Just like you can build five identical houses from a single blueprint, you can run five identical containers from a single Docker image.
5. Layer Caching: The Stack of Transparent Sheets
How are Docker images actually constructed? They are built using Layers.
Think of a Docker image as a stack of transparent acetate sheets laid on top of one another.
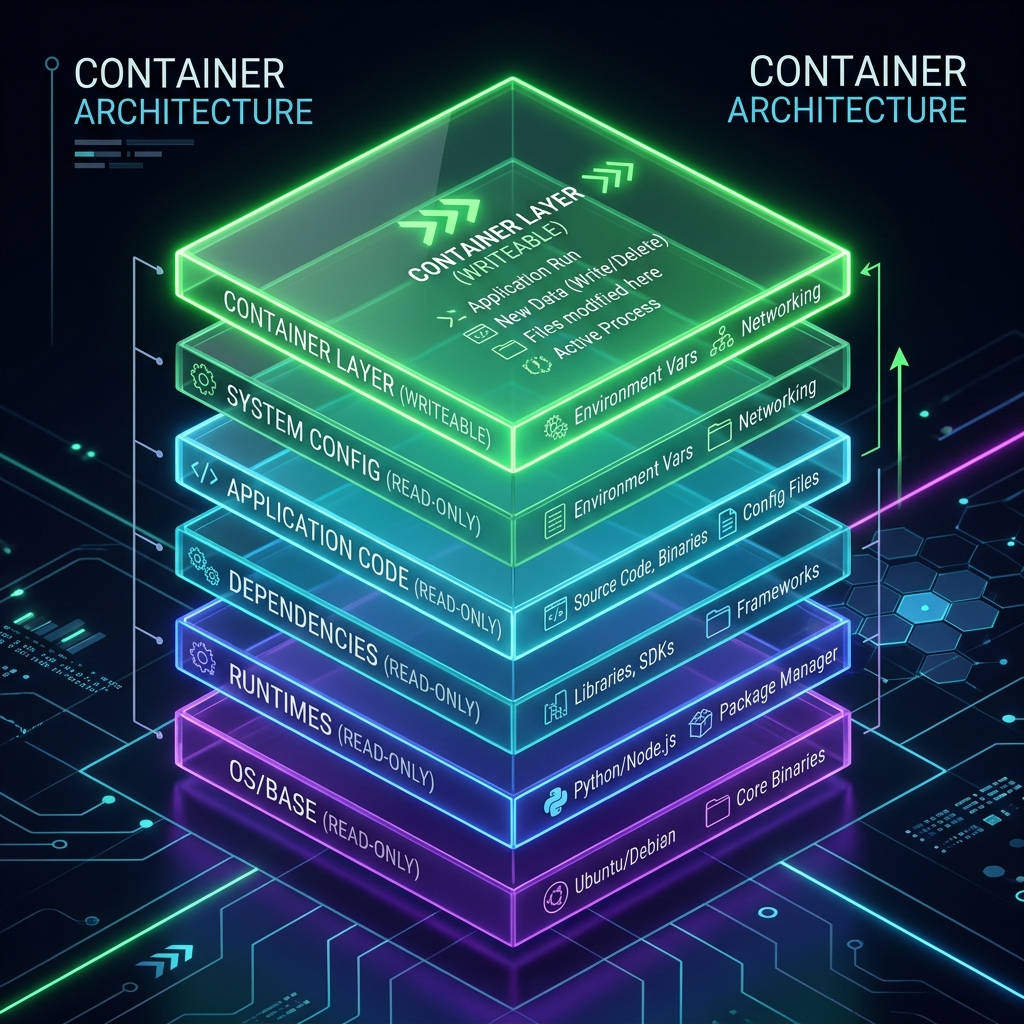 *Each instruction in a Dockerfile adds a read-only layer. When running, Docker adds a thin read-write layer on top.*- Layer 1 (Bottom): You lay down a sheet that says "Start with Ubuntu Linux."
- Layer 2: You lay down a sheet on top that says "Install Node.js."
- Layer 3: You lay down a sheet that says "Copy our application code."
- Layer 4 (Top): You lay down a sheet that says "Run the start script."
When you look down from the top, you see the combined picture: a running Node.js app on Ubuntu.
The Power of Layer Caching
Because these layers are read-only and stacked, Docker is smart. If you change a line of code in your app and rebuild the image, Docker looks at the layers:
- "Did Ubuntu change?" No. Reuse Layer 1 cache.
- "Did Node.js version change?" No. Reuse Layer 2 cache.
- "Did the app code change?" Yes! Rebuild Layer 3 and 4.
This makes builds incredibly fast, but only if you write your Dockerfile correctly.
The Golden Rule of Dockerfile Optimization
Always copy files that change rarely (like dependency files) before copying files that change frequently (like source code).
# GOOD Dockerfile practice
FROM node:18-alpine

WORKDIR /app

# Copy dependency configs first
COPY package.json package-lock.json ./
RUN npm install  # This heavy step is now cached!

# Copy the rest of the application
COPY . .

CMD ["npm", "start"]
If you copied your entire codebase before running npm install, any minor comment change in your code would invalidate the cache, forcing Docker to download all your Node modules from scratch every time!
6. Multi-Stage Builds: The Sculptor's Studio
When building an image, you often need heavy compilers, package managers, and software development kits (SDKs) to compile your code. But once the application is compiled into a single executable, you don't need those heavy tools anymore.
- Analogy: Imagine a sculptor's studio. To carve a marble statue, you need heavy chisels, hammers, scaffolding, and safety goggles. But when the statue is finished, you don't ship the hammers, scaffolding, and marble dust to the museum. You only ship the finished statue!
- Prior to Multi-Stage Builds, developers had to ship all the build tools in their Docker images, resulting in bloated, gigabyte-sized production images.
- With Multi-Stage builds, you use multiple
FROMinstructions in a singleDockerfile. You compile your code in a temporary "build stage" containing all the compilers, and then copy only the compiled artifact into a final, clean, lightweight "production stage."
Here is what a multi-stage Dockerfile looks like:
# Stage 1: The Builder (The Sculptor's Studio)
FROM node:18-alpine AS builder
WORKDIR /app
COPY package.json package-lock.json ./
RUN npm install
COPY . .
RUN npm run build # Compiles TS or bundles JS

# Stage 2: The Production Image (The Museum Exhibit)
FROM node:18-alpine AS runner
WORKDIR /app
# Copy only the built assets from the previous stage
COPY --from=builder /app/dist ./dist
COPY --from=builder /app/package.json ./package.json
RUN npm install --only=production
EXPOSE 3000
CMD ["npm", "start"]
7. ENTRYPOINT vs CMD: The Tool vs The Subcommand
Many beginners get confused by the ENTRYPOINT and CMD instructions in a Dockerfile since both seem to run commands.
Here is the difference:
- ENTRYPOINT (The Tool): This is the executable that is always run when the container starts. It defines the identity of the container.
CMD (The Default Arguments): This defines the default arguments passed to the ENTRYPOINT.
-
Analogy: Imagine you have a custom container that wraps the
gitcommand.- You set the
ENTRYPOINTto["git"]. - You set the
CMDto["status"]. - If you run the container normally, it runs
git status. - But if you run it with an argument (e.g.,
docker run my-git-app log), Docker overrides theCMD(arguments) withlog, runninggit log. The tool (ENTRYPOINT) remainsgit, but the subcommand (CMD) was easily changed!
- You set the
8. Data Persistence: Volumes (The External Hard Drive)
By default, Docker containers are ephemeral—meaning they are temporary.
Think of a container like a hotel room. While you are there, you can move the chairs, put clothes in the closet, and write notes on the desk pad. But when you check out (stop the container), the maids clean the room, discarding anything you left behind. The next guest gets a completely fresh room.
If your application is a database, you cannot afford to lose your data every time a container restarts.
To solve this, Docker uses Volumes.

Volumes map a folder inside the container to a folder on the host machine, bypassing the ephemeral container layer.
A Volume is like an external USB hard drive. You plug it into the container and tell the database app to write its files directly to that external drive.
Even if the container is deleted, crashed, or upgraded, the external drive (volume) remains plugged into the host machine, keeping your data perfectly safe.
In practice, you mount a volume using the -v flag. Here is how you might run a Postgres database with a persistent volume:
docker run -v my-db-volume:/var/lib/postgresql/data postgres:15
9. Container Security: The Guest Bedroom Rule (Running as Non-Root)
By default, Docker runs the processes inside a container as the root user. This is a massive security hazard. If an attacker finds a vulnerability in your web application and exploits it, they gain root access inside the container, which increases the risk of a "container escape"—breaking out of the container to take control of the host operating system.
- Analogy: When you rent a guest room in your house to a tenant, you don't hand them the master keys to the front door, the garage, and your personal safe. You only give them the key to their bedroom.
- To secure your container, always create and switch to a non-root user in your
Dockerfileafter executing commands that require admin permissions (like installing system packages).
FROM alpine:3.19
RUN apk add --no-cache curl

# Create a non-privileged group and user
RUN addgroup -S appgroup && adduser -S appuser -G appgroup

# Switch to the non-root user
USER appuser

# Subsequent commands run under limited permissions
CMD ["curl", "https://chemacabeza.dev"]
10. Container Networking: The Apartment Intercom
By default, containers live in absolute isolation. They are locked rooms. If you run a web app inside container A on port 80, your computer (the host) cannot reach it, and container B (a database) cannot talk to it either.
To connect them, Docker uses Bridged Networks and Port Mapping.
Port Mapping (-p 8080:80)
Think of port mapping like a doorman or mail redirect service.
When you run:
docker run -p 8080:80 my-web-app
You are telling your computer: "Whenever anyone calls door number 8080 on my main building (the host computer), route that call straight to apartment room 80 inside the container."
Bridge Networks
When you run multiple containers (e.g., a frontend app, a backend API, and a database) and want them to talk to each other, you place them on the same Docker Network. Docker automatically assigns them internal DNS names, letting Container A call http://database:5432 without needing to know the host's actual IP address.
11. Tying It All Together: Docker Compose (The Building Manager)
Running individual containers with docker run commands can get messy. If you have a web application, a database, and a cache, remembering all the long commands with port mappings and volumes is exhausting.
Enter Docker Compose. Think of it as the Building Manager. Instead of giving individual instructions to the plumber, the electrician, and the doorman every single day, you write a single master manifest (a docker-compose.yml file). You hand it to the Building Manager, and they make sure the entire apartment complex is set up perfectly.
Quickstart: Build and Run a Complete Web App
To try this yourself, create a new directory and save the following four files. You'll be able to run a complete, visits-counting Node.js web server connected to a PostgreSQL database with a single command!
1. package.json (Project Dependencies)
{
  "name": "docker-feynman-demo",
  "version": "1.0.0",
  "main": "server.js",
  "dependencies": {
    "express": "^4.19.2",
    "pg": "^8.11.5"
  },
  "scripts": {
    "start": "node server.js"
  }
}
2. server.js (Web Server & Database Connector)
const { Client } = require('pg');
const express = require('express');
const app = express();

const client = new Client({
  connectionString: process.env.DATABASE_URL || 'postgres://admin:secretpassword@database:5432/visitors'
});

async function connectWithRetry() {
  let attempts = 5;
  while (attempts > 0) {
    try {
      await client.connect();
      console.log('Connected to PostgreSQL successfully!');
      // Create table if it doesn't exist
      await client.query(`
        CREATE TABLE IF NOT EXISTS page_views (
          id SERIAL PRIMARY KEY,
          views_count INT DEFAULT 1
        );
      `);
      // Seed table
      const res = await client.query('SELECT * FROM page_views LIMIT 1');
      if (res.rows.length === 0) {
        await client.query('INSERT INTO page_views (views_count) VALUES (0)');
      }
      break;
    } catch (err) {
      console.error('Failed to connect to database, retrying in 2 seconds...', err);
      attempts--;
      await new Promise(res => setTimeout(res, 2000));
    }
  }
}

connectWithRetry();

app.get('/', async (req, res) => {
  try {
    await client.query('UPDATE page_views SET views_count = views_count + 1 WHERE id = 1');
    const dbRes = await client.query('SELECT views_count FROM page_views WHERE id = 1');
    const count = dbRes.rows[0].views_count;
    res.send(`
      <!DOCTYPE html>
      <html>
      <head>
        <title>Feynman Docker Demo</title>
        <style>
          body {
            font-family: system-ui, sans-serif;
            background: #0f172a;
            color: #f8fafc;
            text-align: center;
            padding-top: 100px;
          }
          h1 { color: #38bdf8; }
          .counter { font-size: 4rem; font-weight: bold; margin: 20px 0; color: #f43f5e; }
        </style>
      </head>
      <body>
        <h1>Hello from Docker!</h1>
        <p>This website is running inside a Docker container, connected to a PostgreSQL database.</p>
        <p>Total visits logged in the database:</p>
        <div class="counter">${count}</div>
      </body>
      </html>
    `);
  } catch (err) {
    res.status(500).send('Error communicating with database: ' + err.message);
  }
});

app.listen(3000, () => console.log('Server running on port 3000'));
3. Dockerfile (Container Blueprint)
FROM node:18-alpine
WORKDIR /app
COPY package.json ./
RUN npm install
COPY . .
EXPOSE 3000
CMD ["npm", "start"]
4. docker-compose.yml (The Orchestrator)
version: '3.8'

services:
  # The Web Application
  web:
    build: .                           # Use the local Dockerfile
    ports:
      - "8080:3000"                    # Map host port 8080 to container port 3000
    environment:
      - DATABASE_URL=postgres://admin:secretpassword@database:5432/visitors
    depends_on:
      - database                       # Wait for the database container to start
    networks:
      - app-network                    # Connect to the private network

  # The Database
  database:
    image: postgres:15                 # Pull the official Postgres blueprint
    environment:
      POSTGRES_DB: visitors
      POSTGRES_USER: admin
      POSTGRES_PASSWORD: secretpassword
    volumes:
      - db-data:/var/lib/postgresql/data # Mount volume for persistent data storage
    networks:
      - app-network                    # Connect to the private network

# Define the Volumes and Networks explicitly
volumes:
  db-data:                             # Declare the external database volume

networks:
  app-network:                         # Declare the custom bridge network
With these files in the same directory, run:
docker compose up -d
Then navigate to http://localhost:8080 in your web browser. You can stop or restart your containers, and you'll see the page view count persists perfectly!
Summary: The Docker Cheat Sheet
To wrap it up, here is how the physical world maps to the virtual world of Docker:
- Container (Standardized Shipping Box): Ensures code runs identically on any machine.
- Virtual Machine (Private Hotel Room): High isolation but heavy resource footprint.
- Docker Image (Blueprints / Recipe): Read-only static template for containers.
- Layer Caching (Stack of Acetate Sheets): Reuses unchanged layers to speed up builds.
- Volume (External USB Hard Drive): Keeps database files safe when containers die.
- Port Mapping (Main building buzzer routing): Connects host traffic to container interior.
Mastering Docker is the first step to building modern, cloud-native systems. Next time you encounter a deployment error, don't ship your machine—ship the container.
References & Further Reading
This guide is inspired by the foundational lessons and workflows of leading DevOps educators:
- Docker Crash Course by TechWorld with Nana (Videos: Docker Crash Course for Beginners & Docker Tutorial for Beginners).
- Complete Docker Course - From BEGINNER to PRO! by DevOps Directive (Video: DevOps Directive Course).
Originally published at https://chemacabeza.dev/writing/the-feynman-guide-to-docker.


Top comments (0)