
In this long descriptive blog post, where we would understand what is Infrastructure a code. Understanding the what, why, and how behind **terraform **and how to a provision simple RBAC enabled Azure Kubernetes Service (AKS) Cluster using Terraform.

What is Terraform, anyways?
Terraform is an open-source, cross-platform Infrastructure as a code,(Iaac) software tool that is provided by Hashicorp which is available on Windows, Linux, Mac, and other OS. Terraform provides a better way to provision Infrastructure on various platforms and cloud providers with the help of a configuration file (main.tf). Terraform uses a high-level configuration language called HCL(Hashicorp Configuration Language) which is more human-readable, and easy to understand.
So in simple words, instead of manually configuring the Infrastructure which involves point and click through User Interface to provision Virtual Machines, Storage, Networking, and other resources on various cloud providers such as (AWS, Azure, Google Cloud). We can automate, version control the same task for provisioning infrastructure with the help of Terraform. Along with all the goodness which Terraform has to offer, it also abstracts the underlying complexity while provisioning the infrastructure.

Imagine, a Life without Infrastructure as a code
Suppose, if you have been given a task to provision a Virtual Machine on Azure it involves.
Open your favorite browser (Chrome for me!)
Head over to portal.azure.com
Navigate to the Virtual Machine Page.
Provide the name, and then select the type, and then click and click **and **click as you configure it and wait till it gets created. Sound’s simple isn’t it?
Now imagine getting the same task, but spinning up to 100 Virtual Machine’s well that involves me doing the same task all over and over again, *click click click… **Sound’s simple isn’t it? but isn’t that too much. *(Frustrating)

So, Why Infrastructure as a Code, then?

Below are a couple of reasons to choose infrastructure as code against the traditional point and click.
Integrate best practices and standards as the Infrastructure is stored as code.
**Version Control **helps to incrementally, implement, and provision infrastructure, also with the ability to rollback to a specific version if needed.
Helps the task of creation, scaling, and deletion to be easily Automated.
**Tracking **the changes as the infrastructure is version controlled.
**Reusability, **as the code as well as the configuration files, can be later be reused and shared among teams.
Now since we have understood the goodness that Infrastructure as code has to offer, lets quickly get an overview of how would we create an AKS Cluster using Terraform.
Just an Overview.

Let’s discuss the overall flow, of provision AKS using Terraform.
- Terraform Authentication to Azure:
Initially, we would be creating a Service Principal in Azure and provide its credential to Terraform for Authentication to Azure.
- Communication with Azure API:
After successfully authenticating to Azure using the credentials provided, Terraform would then communicate with Azure Resource Manager and send requests for provisioning the resource on Azure.
- Azure Provisioning the Resource:
Azure or any cloud-based provider for that matter, based upon the resource requested checks the availability of the resource a then provisions the requested resource. Azure in the background does most of the heavy lifting and hides the underlying complexity.
Prerequisites.
Terraform CLI
Azure Account
Text Editor(Optional)
Azure CLI (Optional)
– you can skip this section if you already have terraform, text-editor, azure-cli installed on your machine.
Installing Terraform.
Terraform is a very simple command-line executable, which is available on all major platforms like Windows, Linux, and macOS as well as OpenBSD and Solaris.
We would now quickly setup Terraform on the Windows environment in 3 easy steps.
Download the executable of Terraform from the official website and extract the executable.
Create a folder under the C:/ Drive or any drive for that matter and name the folder as terraform, and move the terraform.exe into that folder.
Add the full path of the folder which now contains terraform in my case it’s C:/terraform/ in the environment variables. This can be done by typing sysdm.cpl *in the run and then navigating to the *Advanced tab and then clicking on Environment Variables.
In order to verify if the terraform has successfully installed, we can open up the command prompt and type in terraform –version, if everything went well you should have Terraform’s version displayed.
Choosing a text-editor (Optional)
Downloading a third-party text-editor is completely optional for that matter, as you can also use notepad, vim which would be completely fine, but for ease and a bunch of other features, I prefer to use visual studio code.you can download and install visual studio code from this official link.
After downloading and installing visual studio code you can install the terraform extension which helps in a lot of ways such as syntax highlighting, linting, formatting, validation, and auto-completion.
All the files presented in this demo is hosted on Github Repository. https://github.com/chrisedrego/aks_terraform
Installing Azure CLI
Azure CLI is available on all the major operating systems including Windows, macOS, and Linux. Please refer to the official download link.
Authentication to Azure using terraform.

In order to provision Infrastructure on any given cloud provider for that matter, we first need to authenticate as well as make sure that we have the required permissions needed for the requested resources.
As we are focusing on Azure as a cloud provider, let’s understand the various ways in which we can authenticate to Azure using Terraform.
Authentication using Azure-CLI
Authentication using Managed Service Identity
Authentication using Service Principal
For now, we would be Authenticating to Azure using Service Principal, before that let’s have an understanding of what is a Service Principal.
What is a service principal?

Service Principal is a security identity that has certain roles, permission assigned to it to access specific Azure resources.
Why do we need a service principal?
When a Service Principal is created it generates credentials that are used by applications to authenticate to Azure and access cloud-based resources on Azure. In this example, the Service principal will be used by Terraform to authenticate to Azure.
Two ways to create a Service Principal
Azure Portal
Azure CLI
Creating a Service Principal using Azure (Portal)
Before creating a Service Principal, we need to make sure we provide, just the adequate amount of permission needed. Providing the Service Principal a much higher amount of resources then what’s expected, exposes the system to vulnerability and thereby decreases the overall safety & security.
Step 1: Log in to your Azure Portal, and in the search bar type in *“App registrations” *and then head over to the App registrations page.
Step 2: **Click on **New Registrations, After which you’ll have a page which requests for the name of the application, supported Account types as well as redirect URL.
Provide a unique application name followed by which you can provide a Redirect URL (optional) . A Redirect URL can also be set to *http://localhost* or any valid domain name which has https-enabled.

After creating the Service Principal there is more it as we need to configure the required permissions needed as well as also grab the credentials needed for authentication.

In this case, we need to take note of the Application (client_id), Directory (tenant_id) and then head over to the Certificate & secrets tab to get access to secrets.

After grabbing hold of the client_id, client_secret & tenant_id head over to your Azure Subscription page and get the **Subscription Id **which would also be needed.
Adding roles/permission to SERVICE PRINCIPAL
After successfully creating the Service Principal for Terraform we need to make sure that we assign the Service Principal specific Roles that are needed, which will allow Terraform to provision the requested resources.
We can provision roles to the Service Principal for an entire Subscription or just to specific Resource group as well, below I have attached the Screenshot in order to go with both the approaches.
- Adding Contributor access to the Service Principal at the subscription level.
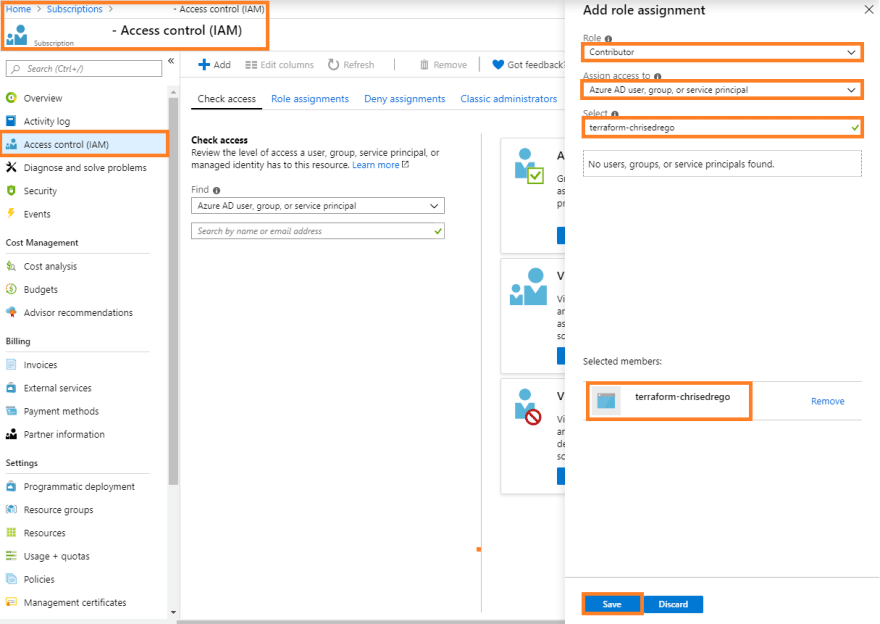
- Adding Contributor access to the Service Principal at a specific Resource Group level.

Creating and Assigning roles to Service Principal (Azure CLI)
(You can skip this step if you already used the above approach by using the Azure Portal)

I have mentioned similar steps but using the Azure Portal UI below, you can skip this step if don’t have Azure CLI installed on your machine.
- Login to Azure using Azure CLI
az login
- After Authenticating to Azure, select specific Subscription id if in case you have many, you can view your subscription id with the help
az account list
Select the subscriptionId of the account and then set the account
az account set --subscription "SUBSCRIPTION_ID"
- Now after switching the Subscription account on your machine, we can create and assign the service principal Contributor access for the subscription
$ az ad sp create-for-rbac --role="Contributor" --scopes="/subscriptions/SUBSCRIPTION_ID"
After which now it outputs a JSON which contains the clientId,tenantId,password
{
"appId": "00000000-0000-0000-0000-000000000000",
"displayName": "azure-cli-XXX",
"name": "http://azure-cli-XXX",
"password": "0000-0000-0000-0000-000000000000",
"tenant": "00000000-0000-0000-0000-000000000000"
}
When we now have Service Principal created with the Role as contributor access along with its client_id, client_secret/password, tenant_id and subscription_id which we will be using in terraform so now we all set to start (terraforming)
Now, Let's start Terraforming

All the code, mentioned here is present on my Github Repository.
For the purpose of simplicity we would just create a folder named as aks-basic, which would have three files, lets have a basic understanding of all these files.
main.tf (configuration)
variables.tf (variables)
outputs.tf (output)
**main.tf: **contains the details of the cloud provider and the resource to be provisioned on the cloud provider specified.
variables.tf — contains the list of variables and the values, which are referenced inside of the main.tf file.
*outputs.tf *— contains the value which would be returned/output after successfully provisioning the infrastructure, which can be later be used by other modules.
You can consider the modules in terraform as a function, which is a combination of (main.tf + variables.tf + outputs.tf) which is where the main.tf is the body of the function which has certain operation while as variables are inputs for the main.tf which are passed to functions, as a final resultant final output the outputs.tf can be considered to be as return value that module returns.
main.tf
provider “azurerm” {

# Azure Provider version (Optional)

version = “=1.34.0″

# Credentials are specified authenticating to Azure

client_id = “${var.client_id}“

client_secret = “${var.client_secret}“

tenant_id = “${var.tenant_id}“

subscription_id = “${var.subscription_id}“

}

resource“azurerm_resource_group” “rg”{

name = “${var.resource_group_name}“

location = “${var.resource_group_location}“

}

resource“azurerm_kubernetes_cluster” “testcluster”{

name = “${var.cluster_name}“

location = “${var.resource_group_location}“

resource_group_name = “${azurerm_resource_group.rg.name}“

dns_prefix = “dns”

agent_pool_profile {

name = “agentpool”

count = 3

vm_size = “Standard_B2ms”

}

service_principal {

# Specifying a Service Principal for AKS Cluster

client_id = “${var.client_id}“

client_secret = “${var.client_secret}“

}

# Tag’s for AKS Cluster’s environment along with  nclustername

tags = {

environment = “test”

cluster_name = “${var.cluster_name}“

}

# Enable Role Based Access Control

role_based_access_control {

enabled = true

}

}
Breaking down, the main.tf
In this case, let's understand main.tf to have a better understanding of what’s going on in the background.
Provider Block
provider “azurerm” {

version = “1.28.0”

client_id = “${var.client_id}“

client_secret = “${var.client_secret}“

tenant_id = “${var.tenant_id}“

subscription_id = “${var.subscription_id}“

}
As we already know, that terraform can be used to provision cloud resources on multiple cloud providers such as AWS, Azure, GCP, Heroku. a provider is responsible for understanding API interactions and exposing resources. The provider comes into the picture at the very initial phase while interacting with the Cloud Provider (Azure), as you can call it as an entry point to decide which cloud provider would we be provisioning the resources. To understand more about the various cloud providers that terraform has to offer to refer to the official link
In this block, we watch carefully we are specifying the Azure (arurerm) Azure Resource Manager provider along with the credentials from the Service Principal to authenticate to Azure.
AZURE_RM_KUBERNETES_CLUSTER
resource“azurerm_resource_group” “rg”{

# Name/Location of the Resource Group in which the

AKS cluster will be created.

name = “${var.resource_group_name}“

location = “${var.resource_group_location}“

}

resource“azurerm_kubernetes_cluster” “testcluster”{

name = “${var.cluster_name}“

location = “${var.resource_group_location}“

resource_group_name = “${azurerm_resource_group.rg.name}“

dns_prefix = “-dns”

agent_pool_profile {

name = “agentpool”

count = 3

vm_size = “Standard_B2ms”

os_type = “Linux”

os_disk_size_gb = 100

}

service_principal {

client_id = “${var.client_id}“

client_secret = “${var.client_secret}“

}

tags = {

environment = “test”

cluster_name = “${var.cluster_name}“

}

role_based_access_control {

enabled = true

}

}
*azurerm_kubernetes_cluster *block is used to define the overall configuration needed to spin a Kubernetes cluster, in this case, we wouldn’t be configuring a highly advanced Kubernetes cluster with all the subnet and other networking details specified, to know more about how to highly configure a Kubernetes cluster refer to the official link
name & location as we know specifies the name and the location where the AKS cluster will be created.
resource_group_name refers to the above block of the resource group name specified.
dns_prefix is the DNS prefix which will be used for the API Server of the AKS Cluster. in our case, we have specified it as DNS which will further contain a unique domain name. which will together form a unique endpoint which presents the API server for the AKS Cluster.
Example: dns-3xMXa.hcp.eastus.azmk8s.io
**Agent_pool_prefix **contains a lot of details about the nitty-gritty details about the type & count of Virtual machines that would be used along with the disk size and OS installed on them.
**tags **are an optional entity but prove useful to tag or label resource on Azure which performs a certain operation.
**role_based_access_control **a is set enabled which makes sure that the Kubernetes Cluster will be RBAC enabled.
Resource group
resource “azurerm_resource_group” “rg” {

name = “${var.resource_group_name}“

location = “${var.resource_group_location}“

}
A resource group in Azure is used to logical group the resources in Azure. As we are provisioning an AKS Cluster in Azure we are providing a resource group in which the cluster will be created.
variables.tf
variable “client_id” {

description = “contains the Client Id for service principal”

client_id = “XXXXX-XXXX-XXXXX-XXXXX”

}

variable “client_secret” {

description = “contains the Client Secret for service principal”

client_id = “XXXXX-XXXX-XXXXX-XXXXX“

}


variable “tenant_id” {

description = “contains the Tenant Id for service principal”

client_id = “XXXXX-XXXX-XXXXX-XXXXX”

}


variable “subscription_id” {

description = “contains the Subscription Id for service principal”

client_id = “XXXXX-XXXX-XXXXX-XXXXX“

}


variable “resource_group_name” {

description = “contains the name of the Resource Group”

default = “test_rg”

}


variable “resource_group_location” {

description = “contains the location Resource Group of cluster”

default = “XXXXX”

}

variable “cluster_name” {

description = “contains AKS Cluster Name”

default = “XXXXX”

}
we had a look close to the main.tf we haven't specified the much of the values hardcoded, rather all of them refer to var followed by the name of the variables all of these variables are specified in these variables.tf.
Please make note that its not recommended approach to store secrets/credentials in plain text **variables.tf **file, you could store these variables in environment variables if in case of CI/CD environment as the secret to avoid exposure and thereby hampering the security.
Now after understanding the nitty-gritty details of what main.tf and variables.tf is, let's learn how to plan and apply the configuration present in the main.tf on Azure.

TERRAFORM: STAGES

Let’s quickly understand what does each phase has to offer, as we would be implementing the same while we provision an AKS cluster.
terraform init is used to initialize the current module or folder that we are currently in which contains the main.tf and if there is any cloud provider block defined inside of the main.tf in the current directory where terraform init command is run, it goes ahead and downloads the binary need in order to communicate with APIs of the specific cloud provider.
terraform plan does a great job as it authenticates to the cloud provider, and then provides a summary of what will be the changes that will be applied after applying configuration present in the main.tf
terraform apply After running a terraform plan once we have understood that the proposed changes are needed to be applied, we can now run terraform apply which goes ahead and start provisioning the infrastructure with our approval.
terraform destroy, After successfully provisioning the resource on cloud providers, if we want to destroy the changes, we can run terraform destroy which goes ahead and destroys the resources.
Let’s understand each stage in a bit of detail here.
TERRAFORM: INIT
We need to navigate to the module/directory which contains the code (main.tf) after which you need to run the terraform init.
What magic does Terraform init do?

When we run terraform init it goes ahead and initializes if there is any external module specified in the main.tf as well if the provider block is declared it goes ahead and downloads the binaries needed in order for future communication with the specific cloud provider. In this case, if we run terraform init, it goes ahead and downloads the azure binaries inside .terraform directory, this binary is useful for communication with the Azure API.
Output after running: terraform init
Initializing the backend...
Initializing provider plugins...
Terraform has been successfully initialized!
You may now begin working with Terraform. Try running "terraform plan" to see any changes that are required for your infrastructure. All Terraform commands should now work.
If you ever set or change modules or backend configuration for Terraform, rerun this command to reinitialize your working directory. If you forget, other commands will detect it and remind you to do so if necessary.
TERRAFORM: PLAN

When you run the command terraform plan it goes ahead and gives us an overview, about how the infrastructure would look like after applying the configuration that needs to be provisioned. The resultant output from the terraform plan often lists the resources that would either be created (+) , removed (-), or modified (+/-).
terraform plan can be compared to the Linux command diff (+) (-) (~)
An execution plan has been generated and is shown below.
Resource actions are indicated with the following symbols:
+ create

Terraform will perform the following actions:

# azurerm_kubernetes_cluster.testcluster will be created

+ resource “azurerm_kubernetes_cluster” “testcluster” {

+ dns_prefix = “dns”

+ resource_group_name = “TEST”

+ “environment” = “test”

}

+ addon_profile {

+ aci_connector_linux {

+ enabled = (known after apply)

}

+ http_application_routing {

+ enabled =

(known after apply)

}

........

........

+ service_principal {

+ client_id = “92409b6a-00eb-40f7–9af6–16faef7206c8″

+ client_secret = (sensitive value)

}

}
# azurerm_resource_group.rg will be created

+ resource “azurerm_resource_group” “rg” {id = (known after apply)}
Plan: 2 to add, 0 to change, 0 to destroy.
— — — — — — — — — — — — — — — — — — — — — — — —
If we have to look carefully terraform gives us a complete overview of how changes will be applied (+) sign means the specific resources will be added, this immensely helps us when don’t want to directly apply the changes but rather would like to see what changes will occur and based upon the output if it seems suitable we then go ahead and apply the plan.
TERRAFORM APPLY

Fingers crossed, after having a rough idea of how the state of our infrastructure would look after running terraform plan, we can now go ahead and run terraform apply
What does terraform really do?
*terraform apply *command does the actual heavy lifting, it goes ahead and ensures that the expected configuration that is mentioned in the configuration file is provisioned on the cloud provider.
Running terraform apply **commands re-runs **terraform plan and output’s the overview of the proposed state of the infrastructure along with confirmation to apply the changes, with a Yes or No and also generates local state files which contain the current state of infrastructure on the cloud in context to the resources mentioned

(YES == wait)
After entering yes on the terraform apply prompt, just sit back and wait as it might take some time,

azurerm_resource_group.rg: Creating…

azurerm_resource_group.rg: Creation complete after 5s [id=/subscriptions/f7e20517–6ec1–460d-9712-aa3ee55ccc6a/resourceGroups/TEST]

.testcluster: Creating…

.testcluster: Still creating… [10s elapsed]

…..

.testcluster: Creation complete after 13m27s

[id=/subscriptions/XXXXXX/resourcegroups/TEST/providers

/Microsoft.ContainerService/managedClusters/testcluster]

Apply complete! Resources: 2 added, 0 changed, 0 destroyed.
Boom! finally, we have an AKS Cluster launched.
 on [Unsplash](https://unsplash.com?utm_source=medium&utm_medium=referral)](https://res.cloudinary.com/practicaldev/image/fetch/s--_aDBr5Ry--/c_limit%2Cf_auto%2Cfl_progressive%2Cq_auto%2Cw_880/https://cdn-images-1.medium.com/max/6000/0%2A1BLCPKwEEoSpFha0)

We were successfully able to provision an AKS Cluster with terraform.
If you do face any issues, please do let me know, All the code mentioned in this blogpost is available on my GitHub repository (aks_terraform)
Till then happy Terraforming… :)
if you found this article useful, feel free to click ❤️ Heart many times or share it with your friends.

Top comments (0)