
Documentation is far from being the sexiest thing about software development, but it is certainly necessary. Think back to all the libraries and tools you use every day; they all must have some pretty good documentation, otherwise, you would have never learned how to use them.
So if you're building a library, and you want people to use it, it should also have good documentation. And if that library happens to be written in Kotlin, you're in luck because creating a great documentation website is actually much easier than you might think with the help of a new tool called Orchid.
This tutorial will walk you through how to create a basic documentation site for your Kotlin project with Orchid, including Dokka code docs, a wiki, and changelogs, and get it deployed Github Pages. If you want to jump right into a working project, you can find everything described here in the OrchidTutorials example project.
Table of Contents
Getting Started
We'll be using Gradle for this project, but the process will be nearly identical if you prefer Maven.
To start, we'll need a Kotlin project to work with. Ideally, it will be in its own Gradle subproject, such as :app, while the documentation will be in another subproject like :docs. For illustration purposes I am going to quickly set up an example application, but you are free to just follow along using your own library and skip directly to the Orchid Setup section.
App Setup
Starting with a basic Gradle project, we'll need to create our two subprojects. This involves telling Gradle about our projects in settings.gradle, and setting up the Kotlin plugin in the :app project's build.gradle
// settings.gradle
rootProject.name = 'Kotlin Project'

include ':app'
// app/build.gradle
plugins {
    id 'org.jetbrains.kotlin.jvm' version '1.3.21'
    id 'application'
}
repositories {
    jcenter()
}
dependencies {
    compile 'org.jetbrains.kotlin:kotlin-stdlib-jdk8:1.3.21'
}
application {
    mainClassName = 'com.example.MainKt'
}
Now we're ready to start adding and running Kotlin files. For simplicity, we're using the application plugin so we can run a main method in our Kotlin project. We'll set up the application as an Application interface, an ExampleApplication class that implements that interface, and have the main method run that app. Though it is quite simplistic, it will work well enough as an example of the kind of documentation Orchid will generate for it.
So let's get these all set up!
// app/src/main/kotlin/main.kt
package com.example

/**
 * Run the ExampleApplication
 */
fun main() {
    ExampleApplication().run {
        println("Running $name version $version...")
        start("3")
        println("Finished!")
    }
}

/**
 * An Application that can be run with arbitrary arguments.
 */
interface Application {

    /**
     * The name of the application
     */
    val name: String

    /**
     * The current application version
     */
    val version: String

    /**
     * Run this application with the arguments provided
     *
     * @param args the args to configure the application
     */
    fun start(vararg args: String)
}

class ExampleApplication : Application {
    override val version: String = "1.0.0"
    override val name: String = "Example Application"

    override fun start(vararg args: String) {
        for(i in 1..args.first().toInt()) {
            println("$i...")
            Thread.sleep(1000)
        }
    }
}
Now we can run ./gradlew :app:run and Gradle will compile the Kotlin sources and run its main method. You should see the following output:
./gradlew :app:run

> Task :app:run
Running Example Application version 1.0.0...
1...
2...
3...
Finished!

BUILD SUCCESSFUL in 4s
2 actionable tasks: 2 executed
Orchid Setup
Now let's get our project ready to use Orchid. Orchid is a new static site generator, written in Kotlin, which specializes in generating code documentation. It supports Kotlin sources but also has plugins for Java, Groovy, and Swift, which all work very similar to this tutorial.
Orchid runs as a Gradle plugin and is best if it is given its own Gradle subproject. So let's get our settings.gradle setup with a new :docs project, and we'll also set up the docs/build.gradle:
// settings.gradle
rootProject.name = 'Kotlin Project'

include ':app'
include ':docs'
// docs/build.gradle
// 1. Apply Orchid plugin
plugins {
    id "com.eden.orchidPlugin" version "0.16.0"
}

// 2. Include Orchid dependencies
dependencies {
    orchidRuntime "io.github.javaeden.orchid:OrchidDocs:0.16.0"
    orchidRuntime "io.github.javaeden.orchid:OrchidKotlindoc:0.16.0"
    orchidRuntime "io.github.javaeden.orchid:OrchidPluginDocs:0.16.0"
}

// 3. Get dependencies from JCenter and Kotlinx Bintray repo
repositories {
    jcenter()
    maven { url = "https://kotlin.bintray.com/kotlinx/" }
}

// 4. Use the 'Editorial' theme, and set the URL it will have on Github Pages
orchid {
    theme = "Editorial"
    baseUrl = "http://username.github.io/project"
    version = "1.0.0"
}
This is all that's required to run your Orchid site! There are still a few things we need to do to set up the wiki and tell it where to find our Kotlin code, but you can run Orchid right now with ./gradlew :docs:orchidServe and view the site on http://localhost:8080. It should give you an output like the following:
./gradlew :docs:orchidServe

> Task :docs:orchidServe
Using the following modules:
-------------------------
 * com.eden.orchid.StandardModule

Auto-loaded modules:
-------------------------
 * com.eden.orchid.editorial.EditorialModule
 * com.eden.orchid.impl.compilers.markdown.FlexmarkModule
 * com.eden.orchid.impl.compilers.pebble.PebbleModule
 * com.eden.orchid.kotlindoc.KotlindocModule
 * com.eden.orchid.pages.PagesModule
 * com.eden.orchid.search.SearchModule
 * com.eden.orchid.wiki.WikiModule

Flag values:
-------------------------
-adminTheme: Default
-baseUrl: http://username.github.io/project
-defaultTemplateExtension: peb
-dest: ...
-dryDeploy: false
-environment: debug
-logLevel: VERBOSE
-port: 8080
-src: ...
-task: serve
-theme: Editorial
-version: 1.0.0

[INFO] Orchid: Running Orchid version 0.16.0, site version unspecified in debug environment
[INFO] OrchidWebserver: Webserver Running at http://localhost:8080
[INFO] OrchidWebsocket: Websocket running at http://localhost:8081/
[INFO] TaskServiceImpl: Build Starting...
[INFO] GeneratorServiceImpl: Indexing [10000: assets]
[INFO] GeneratorServiceImpl: Indexing [1000: home]
[INFO] GeneratorServiceImpl: Indexing [1000: kotlindoc]
[INFO] GeneratorServiceImpl: Indexing [1000: pages]
[INFO] GeneratorServiceImpl: Indexing [1000: wiki]
[INFO] GeneratorServiceImpl: Indexing [11: sitemap]
[INFO] GeneratorServiceImpl: Indexing [10: indices]
[INFO] GeneratorServiceImpl: Generating [10000: assets]
[INFO] GeneratorServiceImpl: Generating [1000: home]
[INFO] GeneratorServiceImpl: Generating [1000: kotlindoc]
[INFO] GeneratorServiceImpl: Generating [1000: pages]
[INFO] GeneratorServiceImpl: Generating [1000: wiki]
[INFO] GeneratorServiceImpl: Generating [11: sitemap]
[INFO] GeneratorServiceImpl: Generating [10: indices]

Build Metrics:
┌───────┬────────────┬───────────────┬─────────────────┬───────────────────────────┬─────────────────────────────┐
│       │ Page Count │ Indexing Time │ Generation Time │ Mean Page Generation Time │ Median Page Generation Time │
├───────┼────────────┼───────────────┼─────────────────┼───────────────────────────┼─────────────────────────────┤
│  home │     1      │     54ms      │      481ms      │           472ms           │            472ms            │
├───────┼────────────┼───────────────┼─────────────────┼───────────────────────────┼─────────────────────────────┤
│ TOTAL │          1 │      3s 496ms │           520ms │                     472ms │                       472ms │
└───────┴────────────┴───────────────┴─────────────────┴───────────────────────────┴─────────────────────────────┘

Build Complete
Generated 1 page in 4s 18ms

[WARN] Warnings:
[WARN] WikiGenerator:
[WARN]     - Could not find wiki summary page in 'wiki/'


Webserver Running at http://localhost:8080
Hit [CTRL-C] to stop the server and quit Orchid
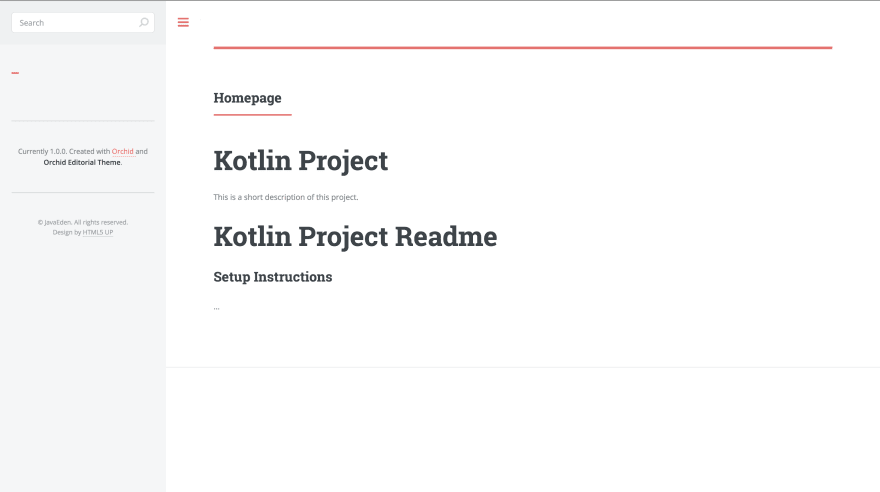
You will also see the basic site served on localhost:8080, which looks like:

But let's move on to the next step: adding content to the site!
Adding Content
Homepage
The first thing anyone will see when landing on your site is your Homepage. Orchid creates this page based on a homepage.md file in the root of your site's resources, which are located by default in src/orchid/resources. Let's start by creating this file and adding a short description of our project to it.
// docs/src/orchid/resources/homepage.md
# Kotlin Project

This is a short description of this project.

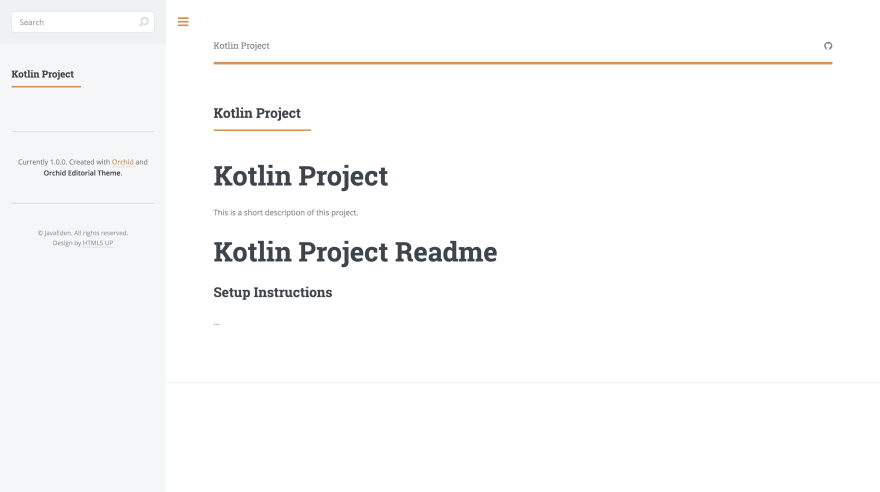
A common thing to add to the homepage is your project's README, which has things like badges, basic setup instructions, etc. We don't want to have to copy everything from the README to our Homepage file, so let's just tell Orchid to include the README on the homepage for us!
To do this, we will add a Front Matter section to the top of the homepage file, and add the "Readme" Component to the homepage in that Front Matter. If you've previously used Jekyll or another static site generator, Orchid handles Front Matter in the exact same way: YAML between a pair of triple-dashes lines.
// docs/src/orchid/resources/homepage.md
--------
components:
  - type: 'pageContent'
  - type: 'readme'
--------
# Kotlin Project

This is a short description of this project.
Orchid's Components are just a list of "blocks" which are rendered to the page in order. There are many different types of components, and different plugins can add their own. Here, we've added the readme component, which searches for the README in your project and adds it to the page. We also added the pageContent component, which adds the Markdown content of the homepage.md. If you don't define any components this one is added automatically, but if you use components you'll have to add it yourself.
That's about it for the Homepage. But our site is looking a bit boring, and there's some information that the theme would like us to provide. So let's go ahead and configure the theme.
Site Info/Theme Configuration
Orchid handles configuration with a config.yml in the root of your resources. In it, we will add some basic info about our site, and we can also configure our theme, such as changing its colors.
This config file includes some configurations under site, which is common info typically used by any theme you choose, and some theme-specific configuration under Editorial. If you remember, this key is the same value we set as our theme in docs/build.gradle. For the theme, we're changing the site's accent color, and also putting in the Github project for a social link.
# docs/src/orchid/resources/config.yml
site:
  about:
    siteName: Kotlin Project
    siteDescription: This is a short description of this project.
Editorial:
  primaryColor: '#DE9149'
  social:
    github: 'username/project'
But these configuration values didn't just come out of nowhere. If you visit http://localhost:8080/admin while your site is serving locally, you can view Orchid's admin panel. In here you can find all the options available for customization for your theme, for components, and for just about anything else.

Wiki
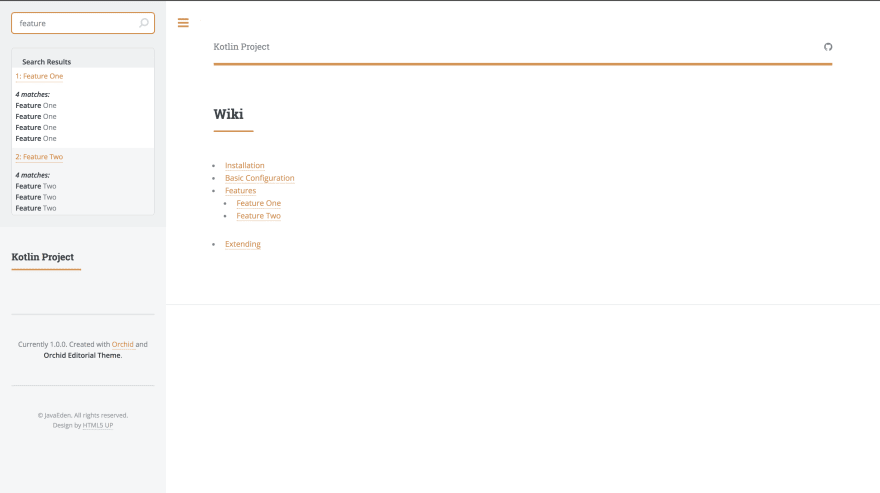
Now that our site is looking a bit more unique, we can start adding some additional content to help our users learn how to use the project. Orchid's Wiki plugin will help us here, allowing us to create an easily-navigable knowledge base, walking users through everything they need to get going with the project.
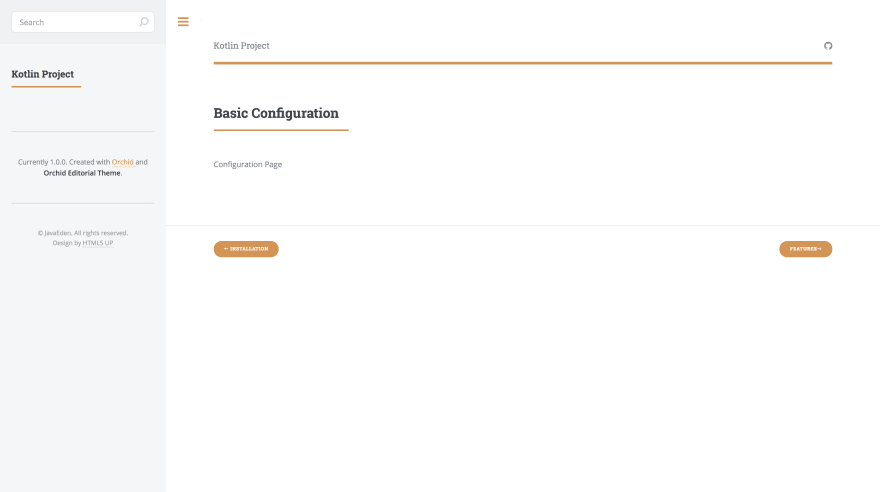
This plugin starts with a wiki/summary.md file. In here, we'll add relative links to the subpages in the wiki. Orchid will then create a new page in your site for each entry, and join them all together so that they link from one to the next, in the order declared in the summary.
// docs/src/orchid/resources/wiki/summary.md
- [Installation](installation.md)
- [Basic Configuration](configuration.md)
- [Features](features.md)
  - [Feature One](features/one.md)
  - [Feature Two](features/two.md)
- [Extending](extending.md)
I'll leave the creation of these wiki entries to you. They each work in exactly the same way as the Homepage file and can contain Markdown content and a Front Matter section with any components you wish.
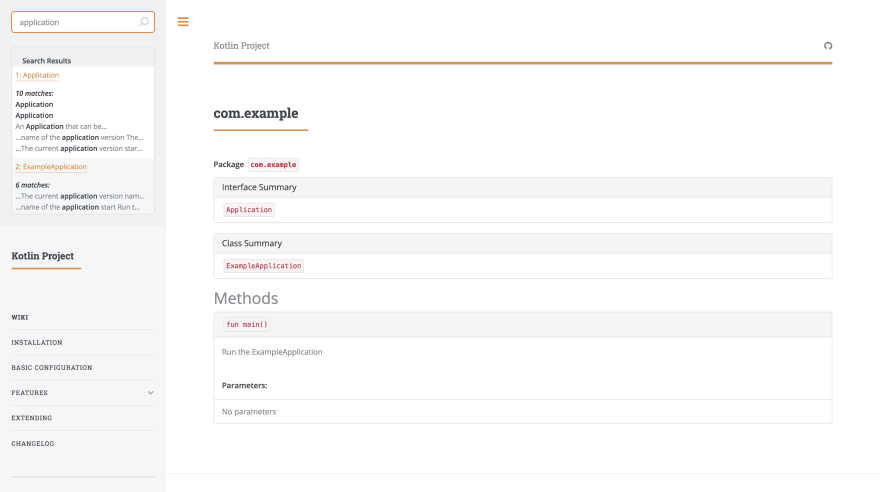
Now, if you visit http://localhost:8080/wiki you'll be able to start navigating your wiki. One of the really nice features of Orchid is the built-in static search. All of your wiki pages support full-text search, to make it easy to look up anything in your site. All the individual pages of the wiki are also linked together with forward and backward links.
The last thing we need to do is start setting up our site menus, and include a link to this wiki. You can do this in config.yml. Change it to look like the following:
# docs/src/orchid/resources/config.yml
site:
  about:
    siteName: Kotlin Project
    siteDescription: This is a short description of this project.

Editorial:
  primaryColor: '#DE9149'
  social:
    github: 'username/project'
  menu:
    - type: 'separator'
      title: 'Wiki'
    - type: 'wiki'
I've added a menu property to the Editorial theme config. Similar to components, a menu contains a list of menu item types which are rendered in order. A single menu item configuration may produce more than one entry in the actual menu as in the wiki item, which adds a link to the sidebar for each page in your wiki.

Changelog
That last piece of content we want to add to our site is a changelog. This way, users can track the changes you've been making to the project, and Orchid can also use this same information to create Releases on Github.
Changelog entries are each set up as a file in your resources changelog directory. Each entry should have a Front Matter section with a version property with the version name (as semantic versioning). So let's go ahead and create some changelog entries, such as changelog/1.0.0.md, and maybe a few others if you want:
// docs/src/orchid/resources/changelog/1.0.0.md
--------
version: '1.0.0'
--------
- Project is now ready for production!
The Changelog plugin does not create a page for the list of changelog entries by default, but we can create a Static Page to display the list of changelog entries. Static pages are markdown files, just like the wiki and homepage files, in the pages directory. We will create a changelog.md file and give it the changelog component to render our versions in order on the page http://localhost:8080/changelog:
// docs/src/orchid/resources/pages/changelog.md
--------
components:
  - type: changelog
--------

Let's also add this to our site menu, so users can easily find the recent changes:
# docs/src/orchid/resources/config.yml
site:
  about:
    siteName: Kotlin Project
    siteDescription: This is a short description of this project.

Editorial:
  primaryColor: '#DE9149'
  social:
    github: 'username/project'
  menu:
    - type: 'separator'
      title: 'Wiki'
    - type: 'wiki'
    - type: 'page'
      itemId: 'Changelog'

Kotlin Code Docs
Setting Up The Plugin
Now we're at a point where we could start documenting our Kotlin sources. First, we need to set up the plugin and point it at our other project with Kotlin source files. The Orchid plugin is already installed as the OrchidKotlindoc dependency in docs/build.gradle, so we just need to update our config.yml.
If we pop back to our admin panel, we can find the config values we need to get going. Specifically, we need to find the "Kotlindoc" Generator menu item in the sidebar. Clicking that shows us the available configuration values that we need to add to config.yml:
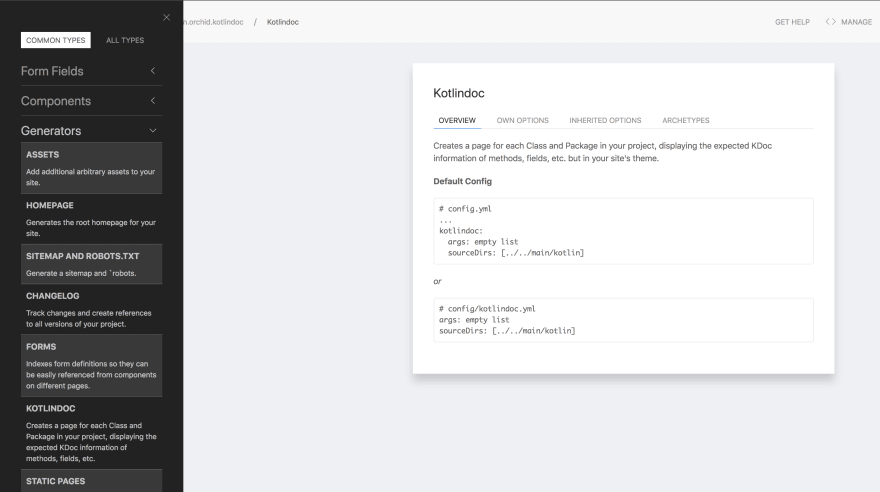
This tells us that we can add the following snippet to config.yml, and that's all we need! We'll set sourceDirs to the relative file path from the docs site resources to the app project's Kotlin sources.
# docs/src/orchid/resources/config.yml
kotlindoc:
  sourceDirs:
    - './../../../../app/src/main/kotlin'
Now, Orchid will hook into Dokka to get the info it needs, and then generate pages for each class and package it finds in your source directories (both Java and Kotlin). The fully-qualified name creates nested directories with that same path, so com.example.ExampleApplication will create http://localhost:8080/com/example/ExampleApplication in your site.

Currently, this page doesn't look that great. The default markup is based on Bootstrap, but the theme is not. No worries, however, we can just tell Orchid to add a trimmed-down Bootstrap stylesheet to our Kotlin doc pages!
Let's download this gist to a file named assets/css/orchidKotlindoc.scss. This is a SCSS file, and Orchid will automatically compile it to CSS for us and add it to our Kotlin doc pages with the following snippet in config.yml:
# docs/src/orchid/resources/config.yml
kotlindoc:
  sourceDirs:
    - './../../../../app/src/main/kotlin'
  pages:
    extraCss:
      - 'assets/css/orchidKotlindoc.scss'
There we go, now the pages are looking much better!
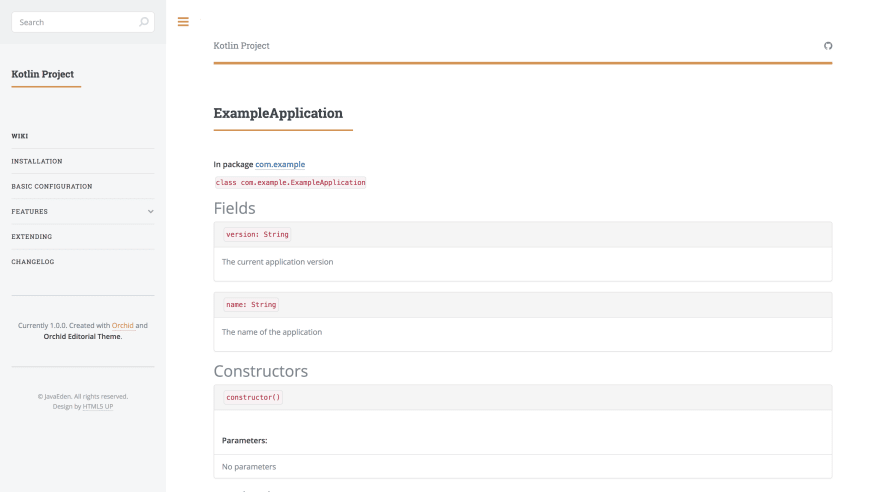
We can navigate from this Class page to its package page as well, which looks very similar. And just as the full-text search worked on our wiki pages, it also will find matches within our code comments on these pages as well!
Creating The Menus
We're nearly done setting up our site, there's just one more piece to the puzzle we need: menu links to our Kotlin doc pages! We'll start by adding links to all the classes and packages in our project to the sidebar. This gets added to the same menu list we used earlier for wiki pages in config.yml.
# docs/src/orchid/resources/config.yml
site:
  about:
    siteName: Kotlin Project
    siteDescription: This is a short description of this project.

Editorial:
  primaryColor: '#DE9149'
  social:
    github: 'username/project'
  menu:
    - type: 'separator'
      title: 'Wiki'
    - type: 'wiki'
    - type: 'page'
      itemId: 'Changelog'
    - type: 'separator'
      title: 'API Docs'
    - type: 'kotlindocPackages'
    - type: 'kotlindocClasses'

There's one more menu that is nice to include here as well. Just as the theme has a menu, each page in Orchid can also have its own menu, so that menus may change slightly on different parts of the site, highlighting relevant content. So let's add a menu to all our Kotlin doc pages with links to each method, constructor, etc. on each page. Clicking one of these menu items will link you to the appropriate anchor on the page rather than taking you to a new page.
kotlindoc:
  sourceDirs:
    - './../../../../app/src/main/kotlin'
  pages:
    extraCss:
      - 'assets/css/orchidKotlindoc.scss'
    menu:
      - type: "kotlindocClassLinks"
        includeItems: true

Deploy On Github Pages
Our site is now ready to be deployed! For most projects, Github Pages is a great place to host your docs. All you have to do is push static files to the gh-pages branch of a repository and Github will host it for you.
While many static site generators expect you to commit and push your site to this branch manually, Orchid actually makes it incredibly simple for you by providing you with a simple deployment pipeline. So let's get the Github Pages publication set up. Add the following snippet to config.yml.
# docs/src/orchid/resources/config.yml
services:
  publications:
    stages:
      ghPages:
        branch: gh-pages
        repo: 'project'
        username: 'username'
In addition, we will need to authenticate with Github in order to actually succeed in pushing to that branch. To do that, you need to create a Github Personal Access Token and set it to the githubToken environment variable.
export githubToken=...
Now, instead of running ./gradlew :docs:orchidServe simply run ./gradlew :docs:orchidDeploy -Penv=prod, and Orchid will build your site using your production base URL, and after a successful build push the built site to the gh-pages branch of your repo.
But let's take this just one step further. We always want to make sure that our doc site is up-to-date with the Releases on Github, so no one ever gets misleading or conflicting information. Fortunately, Orchid has another publisher that will create a Github Release based on the latest changelog version! It's just as simple to set up and uses the same githubToken environment variable as the ghPages publisher.
# docs/src/orchid/resources/config.yml
services:
  publications:
    stages:
      ghPages:
        branch: gh-pages
        repo: 'project'
        username: 'username'
      githubReleases:
        repo: 'username/project'
Conclusion
And with all that, our Kotlin project's doc site is finished! Now it may have seemed like a ton of work getting all that setup, but let's recall all the features included in this site:
- A homepage that automatically pulls in the README
- Wiki that links forward and backward between its entries
- A changelog that gets ordered by semantic versioning
- Source-code documentation for all your Kotlin and Java sources
- Full-text search of your wiki and your KDoc comments
- Automatically-generated menu items linking to each page in your wiki and each class and package in your source code.
- Easy links to specific methods, properties, etc. on your class and package pages
- Deploy the rendered site to Github Pages
- Create a Release on Github with the latest changelog version
That's a lot of stuff! And specifically, that's a lot that would normally need a separate tool/build process/3rd-party service for each. In fact, for basic projects Orchid combines all the following tools into its one, unique, integrated platform:
- Jekyll
- Gitbook
- Algolia
- Dokka
- Custom deployment scripts to publish to Github Pages
- Manual Release creation on Github on every release
And everything outlined in this tutorial is really just a sampling of the full functionality available in Orchid! Orchid has other plugins for different source code documentation, presentations, blogs, and much more. Check out the full list of plugins here, or you can even make your own!
Thanks for following along, happy documenting!
Cover photo by Mike Tinnion on Unsplash with modifications by Casey Brooks.

Top comments (5)
Hi
really nice and clean approach
I'm trying to use your plugin to document my code in Android Studio IDE
my project contains 3 modules
module1
module2
module3
I created new module "docs" to add orchid sources
I followed your instruction but it's not generating any dokka docs
Hi Mahdi, thanks for trying Orchid out! There are a few things you could check:
sourceDirspaths set up correctly? On the command-line, in the folder containing yourconfig.ymlfile, try runninglson each path you set up inkotlindoc.sourceDirsand make sure it lists files and folders in the root of your Kotlin code being documented. Note that the path given in this tutorial assumes the module being documented is namedapp, so be sure to change that tomodule1,module2, etc. to match your modules.If none of those work, please reach out on the Gitter Chat and I can work with you a bit more quickly to help you get this problem resolved.
I'm using version 0.16.10 on a Windows machine running Android Studio 3.4

This is my directory tree
and this is my config.yml
All of the other parts like wiki and pages are working but dokka is not generating any docs
there isn't any error and ALL PACKAGES or ALL CLASSES are linked to localhost:8080
i've tried these sourceDirs to see if i'm not pointing to an empty dir or maybe this is not how we get to a directory on Windows
"./../../../../module1/src/main/java/com/example/app"
"../../../../module1/src/main/java/com/example/app"
"../../../../module1/src/main/java"
".\\..\\..\\..\\..\\module1\\src\\main\\java\\com\\example\\app"
".\\..\\..\\..\\..\\module1\\src\\main\\java"
"..\\..\\..\\..\\module1\\src\\main\\java\\com\\example\\app"
"..\\..\\..\\..\\module1\\src\\main\\java"
is there anything else required to be added in gradle dependencies?
i mean do i need to add dokka library to module1 separately? or it is included as dokka-commandLine in orchid?
I've joined Gitter chat, i hope we'll figure it out soon
thanks for the instruction
It seems like you've got it set up correctly. Since you have the
kotlindocPackagesandkotlindocClassesbeing created and there are no errors, the plugin should be installed correctly. And the file paths also look correct, it should be able to use either forward or back-slashes for the path.Try running
./gradlew clean :docs:orchidServeinstead of./gradlew :docs:orchidServeas listed in the tutorial. Thecleantask will get rid of cached outputs which may be causing this issue.kotlindoc component was mistakenly placed under "menu" component
thank you for your guide
i really appreciate your efforts on this library
it's a clean and robust way to have all of the documents in one place